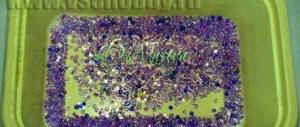
DIY postcard with tulips: a step-by-step master class on quilling with children.
You can make this card with tulips with your own hands and give it to a girl or woman for any holiday - Birthday, Teacher's Day, March 8th.
International Women's Day is coming soon - a holiday of spring and universal and absolute attention to women, which has been celebrated for more than a hundred years. On this day, children congratulate mothers and grandmothers, men congratulate women, and boys congratulate girls. On this day, women are given spring flowers. And for the holiday, we will make a paper postcard with spring flowers - tulips.
How to make paper tulips easily and quickly? Step-by-step instructions for beginners
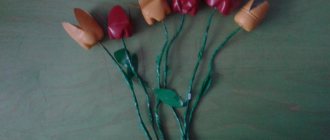
There are quite a lot of master classes on how to make a tulip out of paper yourself; I want to introduce you to the simplest one at the beginning of this post. This work is suitable for kindergarten or schoolchildren. Although the craft is not difficult, it turns out colorful and charming.
Accordingly, in order to create a future masterpiece, you need to cut out buds from colored double-sided paper or thin cardboard. This must be done carefully, and in four copies, as shown in the photo.
Then take a stick or rod and wrap it with green floral ribbon. And then start gluing the flower blanks together, as shown below, and insert the stick between them.
FLOWERS ON A STALK
To make a tulip stem, insert a plug into a purchased plastic pipe with a diameter of 50 cm and a length of 1 m and screw in a long screw at a distance of 10 cm from the bottom - so that it sticks out on both sides 2-3 cm from the surface of the pipe. Covered with green spray paint.
I prepared a liquid cement mortar and carefully poured it into this pipe, not reaching the edge 5-7 cm. Immediately inserted the tulip heads with tubes and screws. The screws here are used to hold the tulips in the plastic pipe.
Master class on making tulips from corrugated paper with candies
I think that the most common way to fold a tulip is to take crepe or corrugated paper and make a flower with a candy out of it. There are also many manufacturing options; we will consider several in this article. By the way, I have another post on my blog, in which there are also many similar works, for example, how to wrap roses out of paper, and not only poppies, mimosas, etc.
Well, to work on creating tulips, you need to cut strips of corrugated paper of the same size. Moreover, in height they should be higher than your candy; in this case, Raffaello is used. So, each strip should be 2.5 times higher than the candy, because then it needs to be twisted in half and attached to the core, that is, to the sweet.
The raphaelle itself must be fixed on a stick or wooden kebabs skewer and only then decorated with paper.
Tie petal strips made of corrugated paper to the base of the future bud, use tape for the work. Or use green tape straight away. Make a gift in such a way that the petals look voluminous; to do this, carefully consider all the assembly steps:
Also decorate the stem with a green ribbon. Arrange the craft in a bouquet and give it to the person you have in mind.
Now let's look at another option, which is also absolutely easy, but has its own characteristics. And in this case, let’s kill two birds with one stone, take a lollipop for the craft:
1. So, cut out strips of corrugated paper measuring 2.5 cm by 10 cm in the amount of 6 pieces.
2. Then round each piece to form a petal.
3. This is what will come out, it's okay if they are slightly different from each other.
4. Then twist each petal at the base, stretch the middle, corrugated paper is soft and very docile, it won’t be too difficult to twist.
5. Next, take the first petal and twist it into a lollipop using threads.
6. Then, by analogy, clockwise, tie the others.
7. The chupik will be hidden and will be instead of the core.
8. Then hide the threads under the floral paper, and also twist the stick itself with green adhesive tape.
9. Finally, all that remains is to glue the leaves.
10. And your wonderful pink-red tulip is ready.
Source
Easy tulips using origami technique for children (step-by-step diagrams)
And for those who like to fold paper and make airplanes and boats out of it, or other funny things, these diagrams will definitely come in handy. After all, tulips can also be folded easily and quickly using the origami technique. Step by step and the souvenir is ready. And in order for the flower to open, you will need to blow into it).
I hope the whole sequence of actions is clear to you, but here’s how it looks more clearly if you look at it live from colored double-sided paper.
All that remains is to attach the stem and leaf to the bud.
And then collect a whole composition of multi-colored flowers.
There is a slightly simpler way of folding, I also show it:
Or use this instruction, here the stem is also folded using origami.
And then the bud and stem are glued together with glue.
As a result, these wonderful tulips come out that can stand on their own on the desktop; use only thick paper.
There is a folding method in which the tulip turns out to be opening, you can even hide something in it, for example a wish.
Origami “Inflatable tulip”
One of the most interesting sections of origami is movable models. Having folded the sheet correctly, it is enough to blow so that it turns into a three-dimensional model. This is how this tulip is made from origami paper.
Required:
- square of thick paper.
Long-term plan for working with parents in the preparatory group for the school year
09.09.2020
Report on summer recreational work in the first junior group
09.09.2020
Photo report “Winter window decoration
09.09.2020
The simplest and easiest ways to make paper tulips
For those who love surprises, I suggest making an unusual craft. The petals will be tied with satin ribbons. Well, it’s just a gift option, however, respect to the author.
We will need:
- colored cardboard
- ribbons
- glue
- pencil and scissors
Place a white sheet of paper on the monitor screen and trace over this stencil. Cut out and use this blank as a template.
Transfer it to red cardstock and trace it.
Moreover, where the fold lines are, after tracing, fold the template and trace the flower itself on the cardboard. Or make two templates at once and cut the paper along the dotted lines.
There should be two such blanks.
So, cut out the blanks and glue a flower in the middle. And where the fold lines are, bend.
Glue a green cardboard stem and leaf to the base of the tulip.
Then carefully use a hole punch or other device to make two holes on each side of the petal.
Tie it nicely in a bow and your masterpiece is ready. Place a treat or note inside.
The next work is similar to the previous one, but it will be a little different, since the sketch is not the same, more significant, that it will be possible to hide a candy inside.
How to cut three-dimensional tulips from colored paper
Well, in conclusion, I would like to share some more ideas about what I found on the Internet. For example, take a look at this photo, the craft is made in the style of an accordion.
You will find everything you need for this work here, download, right-click and Save As.
And for those who love cutouts, or as this type is also called in modern times, kirigami or vytytanki, then take advantage of this idea.
Cutting tulips according to a template is not difficult if you have a sharp stationery knife or a special tool for this - a breadboard knife for scrapbooking or a scalpel.
In addition, if you like quilling, then do something like this, for example, tulips in a mug.
Or use the instructions if you are a beginner:
Use tissue paper, it is softer, and juice straws for your future masterpiece.
There is also this type of work, it is somewhat reminiscent of a type of origami plus gluing.
See these pictures for the entire assembly and folding process:
In addition, I have selected a couple of videos that may be useful to you.
But in this video, the author uses not colored paper, but landscape paper and watercolors.
Friends, that's all, create tulips and charm everyone. I always wish you only spring mood and positive mood. Until we meet again.
If you liked the note, share it on social networks. Goodbye.
There is no way to give your mother a beautiful bouquet? No problem! Make this wonderful card with tulips and no bouquets will be needed.
To create colorful tulips you will need a thick sheet of cardboard for the base, double-sided paper in green (for leaves and stems) and a variety of colors (for buds), a glue pencil, scissors and a flower template. Print the template and cut out all the pieces.
If it is not possible to print, then attach a landscape sheet to the monitor and redraw the contours with a soft pencil. In the future, use this stencil as a pattern, transferring the image onto colored paper.
To create one bud, you will need to cut out 6 parts from the stencil, bend them in half, apply glue to the fold and glue the parts together.
Glue the buds to the top of the card and cut and glue the tulip stem and leaves. Bend the tips of the leaves a little to give the flowers a natural look.
Don't forget to sign the card with tulips and wish your mother long and happy years of love, peace and comfort.
VIDEO NOTE:
Useful homemade products. DIY flowerpots made of concrete
TOOLS FOR CRAFTSMAN AND CRAFTSMAN, AND HOUSEHOLD GOODS VERY CHEAP. FREE SHIPPING. THERE ARE REVIEWS.
Below are other entries on the topic “How to do it yourself - for a homeowner!”
- DIY New Year's wreath made of fir branches - master class How to make a coniferous wreath on...
- Stable folding trestles for the workshop with your own hands - photo and drawing Folding trestles for the workshop with your own...
- Patterns under frost on the window with your own hands “Frosty” patterns with your own hands Previously, ours ...
- Do-it-yourself lye from ash at home Do-it-yourself soap from ash...
- Do-it-yourself tiled table - decor Decor of an old table Many people have somewhere...
- DIY flower pot for the garden + flowerpot and other ideas for the garden on video I WANT TO SHARE ANOTHER CRAFT FOR...
- Do-it-yourself wicker box - master class How to weave a box in the shape of...
Subscribe to updates in our groups and share.
Let's be friends!
With your own hands > Simple and complex crafts > DIY decorative homemade tulips for garden decoration