In this article we will talk about what water supply is in a dacha and what the principles of its design are. The topic of the article is of considerable interest, since most country houses, due to their distance from the main line, can be equipped with autonomous water supply systems.
The optimal option for installing such systems is their development at the design stage of a construction project. But it often turns out that systems designed for water intake are built while the country house is in use. That is why organizing water supply at a dacha requires a professional approach.
Selecting a simulator
The diameter of the wheel for different breeds of hamsters will be different: for Djungarian it will be 16-18cm, and for adult Syrian the diameter will be 20-22cm. The circle should be large and spacious so that the animal can move comfortably. If the wheel is small in diameter and narrow, the hamster will bend over and stumble too much, which can lead to a dislocation or fracture.
When choosing a simulator, pay attention to the surface of the track: on a grated surface, the animal can fall through and make a wound on its paw. It is advisable to buy or make a wheel yourself from a solid sheet of iron or plastic with small notches for grip. If you wish, you can even build a lighted wheel for your pet.
The safest will be exercise machines made of iron with a small distance between the rods or solid wheels made of wood. If the structure is made of wood, you don’t have to worry about the safety of your hamster even if he chews through the material of the simulator.
It wouldn’t hurt to take one more precaution if the animal has an exercise machine on a stand. It should be placed approximately in the middle of the cage, a few centimeters above the bottom. Such actions will help avoid injury.
Tank selection
When calculating the required volume, I took into account the need for irrigation (~350 l) and 30–50 l for technical needs: car washing, adding water to the children's pool, water for cleaning premises, etc.
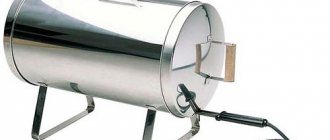
After analyzing the characteristics and prices of products offered by domestic manufacturers, I settled on a black tank made of medium-hard polyethylene ATV-750 with a volume of 750 liters from Aquatech. It is equipped with two 3/4" threaded fittings and one 1" threaded fitting. Additionally, in the upper part there is a technological hole Ø 34 mm.
Types of simulator and mounts
There are several types of running wheel trainer for hamsters: wooden, cardboard and silent. In addition to the materials from which they will be made, it is important to pay attention to the mounting of the simulator.
- Fastening to the cage wall: this is done using special fasteners or strong wire. The advantage of the method is that it saves space in the pet’s home, and the disadvantage is the noise from the exercise machine.
- A running toy with fastenings at the bottom of the cage.
- Another type is a running disc, which is best in terms of its stability; it is an analogue of an ordinary exercise machine.
Silent
How to make a hamster wheel with your own hands? A silent wheel for your hamster is an excellent option not only for the fidgety furry, but also for owners if they want to minimize noise from their pet. To make a silent hamster wheel with your own hands, you will need:
- bearing;
- can;
- insulating tape;
- fabric for covering;
- glue;
- wire.
So, let's start assembling our simulator. We take metal scissors and cut a sheet from a tin can, the height from the edge should be 8-10cm. We glue the bearing to the bottom of the resulting wheel and wait for the glue to dry. We line the entire surface with polystyrene foam - it will make your animal’s treadmill silent. We make the width of the sheet of fabric according to the volume of the edge of the can and bend it, hiding the sharp edges. Seal the fabric on top of the tin with electrical tape. We attach the resulting metal base to the cage using wire. As you can see, making a hamster wheel with your own hands is very simple; even children can do such a fun activity.
Tower from the template
An Eiffel Tower made of paper, the template of which you can draw yourself or copy from a picture, can also be assembled using scissors and glue. You need to cut out four identical sides, leaving allowances for the glue, carefully glue everything together, and wait until the glue dries. That's all, the tower is ready.
Hello, dear friends!
Meet the next contestant! Oksana Pasko prepared a master class on creating a model of the Eiffel Tower from paper using cutting techniques.
Master class by Oksana Pasko:
Eiffel Tower using paper cutting technique
The name of the competition “Gifts for loved ones with your own hands” gave me the idea to cut out the Eiffel Tower, since it is a symbol of Paris, and it is the city of lovers. I found a stencil on the Internet, and that’s how my work was born.
Cardboard
If you find out how much it costs to buy a trainer and decide that it’s not affordable for you, you need to make the toy yourself at home. The best wheels are made from cardboard; they are convenient for training your hamster. This design is safe and does not creak.
So let's start assembling. To build the toy, we will need to make two circles from cardboard, the size of which corresponds to the parameters of your pet. On one of the circles we cut out a passage for the hamster. Next, in a circle, we make small notches in the form of triangles along the edges. We will also cut out the wall and base to which the circle will be attached. The path should be cut in accordance with the rectangular cut-outs on the circles.
Assembling the cardboard structure:
- we insert the track so that the protrusions on it intertwine with the holes made;
- secure the base to the wall;
- insert the metal sleeve;
- We take the bushing and put one wheel on it, and then the second.
The main disadvantage of this method is that cardboard is short-lived and can be eaten by animals. Advantages: low cost and ease of preparation at home.
Ok, I bought it. Now what to do with the “water pump”?
Kurbatov admitted that at first it was difficult for him to accept the fact that “all this” was now his responsibility.
From now on, he needs to decide what the building will look like and what will be in it. Surprisingly, thirty years ago, while the tower was at the disposal of JSC Kirov Utility Systems, it performed its main function. Later it was no longer used for its intended purpose and it changed hands many times. Once upon a time there was a “Hunter and Fisherman” store here, and in the early 2000s there was a representative office of a regional television company. There is no question of using the water pumping station for its intended purpose - there is no need for this, and it is technically difficult to do. This means that we need to look for new options for using the structure.
Kurbatov plans to divide the building into two parts. Open a museum on the lower floors, and use the upper, fourth floor, which offers stunning views of the city, as a hotel with rooms for lovers of romance.
As for the theme of the museum exhibition, there is no certainty yet. On the one hand, the museum may be dedicated to Ivan Charushin, the main architect of the Vyatka province. On the other hand, you can create a modern museum of water structures with interactive 3D presentations illustrating the architecture of water towers in different places on the planet.
The final decision regarding the future of the building will be made when the façade is restored and the interior begins to be restored. Still, the choice of option is secondary, and the main thing is to save the building, stop the destruction and return it to its former charm. Unfortunately, there are many examples where, after careless repairs and “restoration” of historically valuable buildings transferred by the authorities into private ownership, not a trace remained of their original appearance. But Anatoly decided that he would make every effort to save the tower.
A technical inspection has already been carried out, an estimate has been drawn up and the scope of work has been determined. According to preliminary estimates, the restoration of the building will require about 1.8 million rubles.
Volunteers took on some of the tasks.
First of all, it was necessary to remove the growth, including that covering the top floor of the building. Such accidentally sprouted plants are very dangerous: their root system slowly but steadily destroys the building. Another big concern is to clear the house of the mountains of garbage that have accumulated there for many years and remove it. All problems and questions: “how best to organize work”, “what pitfalls you might encounter” and others - have to be solved independently, because there is simply no one to ask. If you look at the whole of Russia, it turns out that we do not have much experience in restoring objects of this kind. You can only rely on your own strength. However, there is hope for a grant - both presidential and private or state-owned companies, which will significantly reduce their own costs.
Anatoly Kurbatov on one of the floors of the tower.
As you can see, the stove heating is still in operation. To restore the outer facade of the water tower, Anatoly decided to use the potential of the movement to restore the urban historical environment Tom Sawyer Fest. The persistence of the members of this group eventually began to bear fruit: today the team of volunteers has more or less permanent sponsors, including companies such as MTS, Stanley, Black & Decker, Leroy Merlin.
Another slightly forgotten, but very correct tradition is subbotniks. At the moment, the new owner has already held several such events, thanks to which the matter has moved forward. By the way, a positive example is always contagious. Even the chief architect of Slobodsky and the head of the city improvement department offered their help; many people came from Kirov.
Wood
If you have the talent of a carpenter, then you can make a wooden product with your own hands. A circle made of such material has a greater range of uses. The deal of a wooden attraction is very clear, it is similar in every way to a cardboard assembly. If desired, you can decorate the product: beautifully intertwine with vine or willow.
Reading time: 9 min
A hamster wheel is not just a toy. It helps keep him healthy in captivity. Domestic hamsters eat a lot and hardly move in the cage. Firstly, they don’t have enough space, and secondly, they don’t need to get food. This leads to obesity and threatens the rodent's death.
Why does a hamster love running on a wheel?
Hamsters have an instinct for survival, that is, searching for food and protecting themselves from predatory animals and birds. You've probably noticed that as soon as you let him walk around the house, the first thing he does is examine the corners and places behind the furniture.
Therefore, nature rewarded rodents with increased activity. A wheel in a cage will help to expend the energy generated in the body as soon as it becomes necessary. The speed of movement of hamsters is approximately 5 km/h, which is the same as when a person walks on foot.
The hamster's endurance is also surprising. He can run 12 km in 10-12 hours.
What materials are best to make it from?
You can make a wheel from many available materials:
- Tree. Wooden wheels are made from small boards. Ice cream sticks are perfect for this purpose. You will also need a rectangular wooden beam and metal wire. Such a wheel turns out to be durable and requires virtually no financial costs.
But if it is not weighted down from below, then it can turn over while running, since it weighs very little. - Tin can or disk. To make it you will need a tin can of the required size, a screwdriver, a knife for cutting metal, a glue gun, and wire. The design is also quite durable. But if the edges of the jar are not treated, the hamster may cut himself on them. In addition, this design does not look very aesthetically pleasing.
- Cardboard.
This wheel is suitable for small rodents, as it is not durable. The design is very simple to make; even a child can do it under the supervision of an adult. Be sure to choose a thick cardboard so that it does not sag under the weight of the hamster.
Have you decided to make a wheel from natural materials?
Poll Options are limited because JavaScript is disabled in your browser.
What you need to do it yourself
To make a homemade wheel you will need:
- wooden board as a base;
- stick as an axis;
- compass;
- sandpaper;
- ruler;
- hacksaw;
- stationery knife;
- pencil;
- scissors;
- perforator;
- materials for the wheel body (wooden sticks, cardboard, metal or plastic container, wire).
Important!
Small children cannot use cutting objects on their own, so you need to call your parents for help.
Step-by-step instructions: how to make a hamster wheel with your own hands at home
Before starting the manufacturing process, you need to study the structural features of a hamster wheel, decide on the size and other characteristics. This will help you make the perfect wheel that your rodent will definitely love.
Running wheel diameter
The most important thing is to choose the right wheel size so that your hamster can run comfortably in it:
- a diameter of 12 cm is suitable for a young hamster;
- for an adult rodent 16-18 cm;
- jungarika – 10 cm.
Important!
As your pet grows up, he will need to change the wheel to a larger version.
Surface of the running wheel
The hamster should be comfortable running in the simulator. Therefore, the inner surface must be made ribbed.
The rodent will be able to grab onto it with its paws and rotate the cylinder. Corrugated cardboard works well for these purposes. If you are making a wheel from plastic or metal, you will need to cover the inner surface with fabric.
Made of wood
You can make a wooden wheel according to the following instructions:
- Take a thin board and draw 2 circles with the selected diameter.
- Cut out one of them whole, and inside the second, draw a circle with a diameter less than 1 cm and cut it out too.
- On a solid circle, make a hole in the center and several more small holes around it.
- Take the popsicle sticks and cut them so that they are 5-6 cm long.
- Connect both parts using sticks and a hot gun, creating a wall for the rodent to run along.
- Using a nut and screw, screw the wheel to the wall of the cage.
From a hard drive and a jar
You can make a hamster wheel from a can in half an hour using improvised means:
- Select a container of the required diameter.
- Measure 5-6 cm from the bottom along the wall and cut off the excess.
- Sand the edges and interior surface with sandpaper.
- Take a cocktail tube and connect 2 points of the circle with it so that it runs through the center.
- Glue the edges with tape or a glue gun.
- Make holes in the center of the bottom of the jar and in the middle of the straw.
- Stick a wooden skewer into them.
- Check that the wheel rotates freely along the axle.
From cardboard
It’s as easy as shelling pears to make a wheel out of cardboard paper:
- Draw on cardboard and cut out blanks for the future wheel with a stationery knife: two circles of the same size with holes for the rodent, 2 parts in the shape of the letter “P” for attaching the wheel, a strip 5-6 cm wide and equal to the length of the circle.
- Bend the strip, connecting its edges, and glue it between the circles.
- Take a knitting needle and thread it through the centers of the circles.
- Attach the sides.
- Bend the ends of the knitting needles so that the circle does not fly off.
Nuances in making a running wheel
When working on the simulator, the following points must be taken into account:
- the wheel must rotate freely around its axis;
- it must be stable and not lose balance when a hamster gets into it;
- Don't forget to trim the edges so your pet doesn't get hurt.
Important!
Remains of glue must be removed from the surface so that the rodent does not accidentally swallow it.
Installation of a water tower on the site
The plumbing fittings diagram is shown in Fig. 2, 3. To fill the tank, the pump hose or external water supply is connected to fitting 4 and water is supplied through metal-plastic pipe 19 (Ø 20 mm) through fitting A into the tank. To control the filling, a transparent tube 5 made of polyvinyl chloride is used. When overflowing, water is drained through fitting 1 and tee 3.
Water intake - in two lines through fittings B and C through metal-plastic pipes 13 (Ø 16 mm) through ball valves 15. I connected a car wash to one outlet, I use the second outlet for watering the garden.
I installed the fittings in three stages. First, I assembled individual components on a workbench in a vice using flax and a special sealant, and then placed them on the tank. Threaded fittings A, B and C, installed on the tank, are only baited. There are four protrusions on the inner surface of the fittings to prevent the fitting from turning during tightening.
How advisable is it to install an individual storage tank? How to build a water tower on your own property? What formulas should be used to calculate pipe diameter and water flow? Which foundation to choose? Our article will tell you about all this.
In the previous article, we talked about the designs, types and functions of water towers (WTOs). When it comes to water supply to an entire region or village, the installation of such a serious structure is certainly justified. But will it be useful to a private owner?
Types of simulator and mounts
Running wheels differ in their inner surface. It can be solid, lattice or mesh. It is safest to choose wheels without holes so that the hamster's paw cannot fall into it.
Wheels also differ in the type of fastening:
- to the cell wall. Saves space in the hamster's home, but when used it knocks on the rods or board.
- To the bottom of the cage. Such exercise machines are unstable and can tip over if the rodent starts to run.
- On a stand.
The best option for hamsters if space in the cage is not limited. Very stable and causes minimal noise.
Cardboard
This type of simulator is very inexpensive, but not durable.
. In addition, the hamster can chew on it significantly during a break between runs. Anyone can make such a wheel, even without special skills.
This is a great option for hamsters who are just starting to run or as a temporary trainer until you get a more durable one.
Silent
Many people choose this type of exercise machine because hamsters love to run at night. The noise from the rotation of the wheel can be heard all night and interfere with sleep.
Thanks to the special design, the parts do not touch each other and do not create extraneous sounds. But it is worth noting that such wheels are much more expensive than regular ones.
Wood
A wooden treadmill keeps the environment around the rodent environmentally friendly.
This is a big plus for his health. These wheels are a little more expensive than regular ones, but you can make them yourself.
Features of the structure of the running wheel
Any running wheel consists of a cylinder, which is mounted on an axle. When choosing a simulator, it is important to ensure that it rotates evenly and does not deviate to the sides. The wheel stand must be stable. Otherwise it will turn over.
Important!
The design of the wheel should not contain foreign objects, for example, to decorate the simulator. They will interfere with the hamster's running and may cause injury.
Welded Eiffel Towers
Welded Eiffel Towers
It's no secret what the Eiffel Tower is. In 1889, this high-rise metal frame was conceived as a temporary structure, but became the most famous architectural monument. The peculiarity of this design is that it consists of 99% metal or rivets.
The Eiffel Tower is an architectural metal structure that vaguely resembles a power line mast. The height of this structure is 300 meters. It would not be difficult to create such a grandiose building in the modern world, but is there any point in it? It is definitely not practical to make a large tower, but creating a small France on the territory of a shopping center or on a landscaped dacha area is easy.
A welded Eiffel Tower, even of small size, always arouses the interest of passers-by. It's like looking at a layout of the original, accessible and interesting.
Disadvantages of purchased hamster wheels
The main disadvantage of purchased wheels is their cost. A medium-sized exercise machine will cost no less than 700-1000 rubles.
Plastic wheels may contain harmful impurities that will worsen the hamster's health.
Often, purchased hamster wheels are coated with paint that a rodent can tear off with its teeth. If it gets into the animal's stomach, it can cause intoxication. Therefore, things made with your own hands are sometimes safer for your beloved pets.
How to train a rodent to run
Some hamsters don't understand why they need a wheel until they try to run in it. Others become lazy over time and don't want to move much. Experts recommend using the following tricks:
- Lure with a treat. You won't give your hamster a choice if you put food directly into the drum. You need to do this for several days in a row until the rodent itself begins to come and climb into the wheel.
- Blocking the exit. Take a piece of cardboard or a piece of wood and cover the entrance to the wheel with it when the hamster gets into it. He will only have to move in one direction, causing the wheel to rotate.
Possible problems
Even using such a simple design can cause difficulties. Most often, hamsters refuse to run in a wheel. It also happens that over time the wheel begins to squeak.
The wheel squeaks
The structure may creak as a result of prolonged use. The parts deform over time and come into contact with each other during rotation.
The solution is to lubricate the surfaces with oil. If a new wheel squeaks a lot, it may be defective.
Hamster doesn't run on a wheel
This problem can occur for several reasons:
- The rodent doesn't like the wheel. Try replacing it with a machine made of a different material or with a different design.
- The hamster has a hard time turning the wheel. This may happen due to the age of the animal. Rodents older than 2-3 years are considered old and they lose the desire to move a lot.
- The hamster has an injury. It may also happen that the rodent injured its paw or hit itself. Find out by watching him. If he used to be cheerful and active, but suddenly suddenly stopped running and playing, you should take him to the vet.
Instead of results
Modern pumping systems have practically replaced water pressure structures. Electronics and other equipment that adapts the operation of the pump to the conditions are becoming “smarter” and constantly becoming cheaper. Probably, over time, people will completely abandon the idea of using water-pressure structures and another problem will arise: where to put the structure. Perhaps exotic hostels with panoramic views from the top floor and new museum exhibitions will appear. There is another trend: such buildings are being purchased and converted into residential buildings. You can google a sea of original stories on the Internet, but they probably deserve a separate story.
In what cases is it advisable to install your own water tower?
- When connected to the city water supply. The private sector with gardens and vegetable gardens is a stable and powerful consumer of water, so during the peak season there is often a drop in pressure in the pipes.
- If there are large areas to be irrigated. The water supply will ensure timely watering and maintain plant growing technology.
- When engaged in livestock farming. This type of activity requires constant consumption of clean water. In the tank, the water will settle and be heated naturally.
- In case of unstable water and electricity supply. You will be able to fill your own tower during the best pressure (tension), for example, at night. Installing simple automation will ensure that the water supply system operates autonomously.
- When using your own well. VB will allow you to save energy and the resource of the pumping station thanks to the optimal operating mode.
A simple analysis shows that having your own water tower is not a strange whim, but in many cases it is an urgent necessity. Reduced by tens of times, it will be the key to reliable operation of pumps and constant uninterrupted water supply to a single farm or home.
Drip irrigation system
There are many drip irrigation systems on the market now. The simplest and, in my opinion, successful ones are a system of hoses with drip dispensers, fittings for connecting to a pressure tank and taps for switching the water supply to one or another bed.
It is recommended to use a container raised above the ground to a height of at least 1 m as a pressure tank. The volume of the container should be sufficient to water the entire garden. The use of running water is undesirable due to the low water temperature, which is harmful to plants. In a pressure tank, the water heats up to an acceptable temperature in one or two days and does not create a stressful situation for the plantings. Thus, we can formulate the minimum requirements for a mini-water tower:
- the volume should be sufficient for one-time watering of the entire garden;
- the material must be resistant to ultraviolet radiation;
- the color should be dark for faster heating;
- the material should not be transparent, otherwise the water will quickly bloom and a cap of green algae will grow in the tank;
- According to the location, the installation height should be at least 1 m above ground level, or even more.
How to calculate a water tower
We will talk less about a full-fledged water tower, and more about a gravitational hydraulic system based on it. The rule we know - “the bottom of the tank should be located above the highest point of consumption” - says that it is enough to install the tank at a certain level, which is not difficult to calculate.
Note.
The initial condition is the presence of a source - your own well with an installed pumping station or a connection to the city water supply.
Let's say there are two consumers - a vegetable garden and a cowshed. The first is located 35 and the second 25 m from the source. At the same time, the drinking bowls in the barn are installed at a level of 1 meter. Watering the garden is carried out from ground level. The pipeline branches have a minimum common pipeline section (i.e., they diverge close to the reservoir).
Finding out water consumption
The volume of the tank directly depends on this indicator. What takes place here is not calculations, but observations. It is necessary to install a water meter at the pumping station (source) and experimentally determine the daily flow rate. Let's say the average consumption was 5 cubic meters. m/day. The volume of the tank should be 20% larger, take 6 cubic meters. m.
Calculate the installation height of the tank
To withstand pressure, not only the difference in height is important, but also the distance of the consumer from the source. 1 m of water movement vertically is equal to 15 m horizontally. That is, in order to effectively move water “by gravity” 15 m horizontally, a difference of 1 m is required. In this case, not the length, but the cross-section of the pipe is calculated from the aggregate. The maximum length of one pipeline branch is taken as the calculated length.
Estimated height of the column for the first branch ( H st 1
) will be equal to:
- N st 1 = 35/15 = 2.3 m
The second branch (cow barn) has a level difference as it increases (drinkers) and this must be taken into account.
Estimated height of the column for the second branch ( N st 2
) will be equal to:
- N st 2 = 25/15 + 1 = 2.66 m
Despite the fact that the second consumer is located closer, it requires a higher column due to the difference in levels. The total calculated value is the largest indicator, i.e. 2.66 m. Add 15% of the reserve and take N st = 3 m
.
The calculation shows that under these conditions the bottom of the tank should be at a level of 3 m, while the initial pressure in the system (at the bottom of the tank) will be equal to:
- P = рхghхh
, where - p
- density of water (1000 kg/cubic m) - g
- acceleration (9.8 m/s 2) - h
- height of the water column - P = 1000 x 9.8 x 3 = 29400 Pa = 0.294 MPa = 0.3 bar
Calculate the pipe diameter
This is where things get a little more complicated. The required diameter is calculated using the flow rate and water consumption. According to Toricelli's law:
- V 2 = 2gh
, where
V
is the flow speed, and
h
is the height of the column, we get: - V 2 = 2 x 9.8 x 3 = 58.8
- V = square root of 58.8 = 7.66 m/sec
We calculate the cross-section of a 50 mm pipe using the formula S = Pr 2
:
- S = 3.14 x 0.0252 = 0.0019625 sq. m
We calculate water consumption ( R
) according to the formula
R = SV
:
- R = 0.0019625 x 7.66 = 0.015 cu. m/s = 15 l/s = 900 l/min
If the water flow per hour is known in advance, then the pipe diameter can be calculated using the formula:
- D = 2 square root of S/P, where S = R/square root of 2gh
In our case, the water flow rate of 900 l/min is quite acceptable - the entire supply can be discharged in 6-10 minutes. In this case, the diameter of the 50 mm pipe should not decrease.
Attention! Each 90° elbow gives a pressure loss of 5-7%. Design a system with a minimum number of corners.
Selecting a pump for tanks
As a rule, pumping stations are installed in a well caisson. It makes sense to build a water tower directly above the caisson. This will allow you to combine all the components in one place, which in turn will simplify repair and maintenance. We talked about how to choose a well pump in one of the previous articles. The water supply volume of an average pumping station ranges from 4 to 9 cubic meters. m/min, which fully satisfies the needs of a conventional economy. The cost of equipment (pump, filters, fittings) will be approximately 15,000 rubles.
Selecting tanks
Water containers can be of any kind, but must meet the requirements of tightness and be suitable for drinking water:
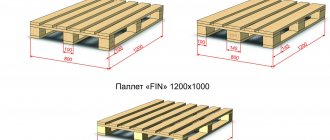
- The best solution is cubic tanks with a volume of 1 cubic meter. m in a metal frame. They are called "Eurocube". They usually have overflow, bottom and side openings for combining several tanks into one system. Thanks to their cubic shape, they are stable and take up minimal space. The frame allows you to install them on top of each other, which will increase the size of the column. The cost of one new Eurocube is 8,000 rubles, used - 4,500 rubles. You will need 6 such cubes. — 48,000 and 27,000 rubles. respectively.
- Solid homemade tank. It can be made on site from sheets of metal with stiffeners. This option may be unacceptable due to the deterioration of the properties of water during metal oxidation. Or you need to use higher grade steel.
- Conjugated barrels. Ordinary metal barrels of 200-240 liters can be the solution on a modest budget. They also allow a multi-story layout and are inexpensive - 500 rubles / piece. (new). For 6 tons you will need 12 pcs. total cost 6000 rubles.
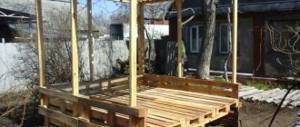
Selecting a support system for tanks
In any of the above-described cases of selecting a tank, we will need a platform of 2x2 m at a height of 3 m. The estimated mass of water at maximum load is 6 tons. To hold such a mass, a foundation structure is required and there are two acceptable options.
Steel frame
Made from metal pipes. It consists of a foundation, racks, diagonal rods, platform plane material and, if possible, a canopy. Racks made of pipes with a diameter of at least 75 mm are concreted in increments of 500 mm along the entire plane of the site. Diagonal rods (1-inch pipe, strip, fittings, etc.) create spatial rigidity. The platform must be welded from a metal corner 45x45 mm or more. From the edge of the platform to the wall of the tank, leave a margin of 250-400 mm for possible insulation.
Walls (box)
A strip foundation of approximately 2.5 x 2.5 m is installed around the caisson, into which 75 mm pipes are concreted at the corners. Then the walls are laid out from cinder block or brick (1 brick thick). Stone pillars are laid out at the corners. For floor beams, use an 85-100 mm channel with a pitch of 500-600 mm. Subsequently, the structure can be equipped for auxiliary needs.
Device Features
Structurally, an autonomous water supply for a dacha is a system that includes a source (well or borehole) and equipment responsible for supplying water to the consumer.
Due to the use of modern technologies, dacha water supply, based on artesian wells, is not inferior to the use of city water supply in terms of comfort and ease of operation, and is an order of magnitude superior to it in terms of environmental friendliness.
Important: The water supply system at the dacha is technologically connected with. That is why it is necessary to correctly calculate the productivity of well pumping equipment in accordance with the performance parameters of the other two systems.
The efficiency of organizing a water supply system is determined by a number of the following factors:
- estimated consumption volumes;
- type of well used;
- aquifer location;
- type of sewer used;
- type of wastewater disposal system used.
Taking into account these parameters, you can select the appropriate type of well pumping equipment and related devices. The location of the liquid medium supply system can be above ground, for example, in a special technical room, or underground - located in a caisson.
After we have listed the main criteria that determine the efficiency of autonomous water supply systems, we will consider specific examples of the design of such systems. We will arrange a list of examples from simple to complex and, perhaps, we will start with the most primitive, but most common option - using a well.
Features of well operation
If you are interested in having your own water supply scheme for your dacha developed and implemented at minimal cost, then a well is exactly what you need.
The organization of such a system is characterized by the following advantages:
- ease of construction with your own hands with minimal use of special equipment;
- ease of operation and maintenance of the well;
- reasonable price of the finished system, in comparison with more technically complex well analogues;
- a wide range of pumping equipment suitable for these purposes.
The use of a well can satisfy the water needs typical for small and medium-sized dacha farms.
To lift the liquid medium from the well and subsequently feed it into the pipeline, low-power surface or submersible pumps are used. The best option is to use submersible vibration pumps “Malysh” or similar devices.
To ensure effective surface water intake, a water supply pumping station is used. Taking into account the manufacturability and considerable cost of the equipment, a water supply station for a dacha is installed in an enclosed space, where optimal protection of the installation is ensured from the negative effects of environmental factors.
On the one hand, an internal pipeline is connected to the station, and on the other hand, a hose is connected that goes into the well.
Important: The use of surface pumping equipment can ensure effective lifting of water from a depth of no more than 10 meters.
Water raised from a well is suitable for irrigation and meeting technical needs without special treatment. Additional cleaning involves the use of special multi-level filtering equipment. The need for this is explained by the fact that well water is drawn from the upper horizon, which is not protected from the penetration of contaminated ground and surface water.
Other disadvantages of using wells include low flow rate and unstable water levels and, as a consequence, a high probability of drying out.
Shallow wells (Abyssinian well)
If the installation of water supply in a dacha must be completed quickly and with minimal waste, you can build a shallow well - the so-called Abyssinian well.
The technology for drilling such wells has been tested for many centuries and during this time has proven its worth. However, there is one significant drawback, since the water rises from a relatively shallow depth (no more than 10 meters), an effective filtration system will be required for its coarse and fine purification.
The technology for constructing such sources consists of driving narrow pipes (no thicker than 2 inches) into the ground until an aquifer is discovered. A significant advantage of this solution is the affordable price and the ability to supply water to a country house with your own hands without the involvement of qualified specialists.
Features of the design of underground pumping complexes (UPC)
A modern water supply system for a summer residence, built on the basis of a well and a single-level underground pumping complex, is becoming increasingly widespread.
The popularity of the solution is explained by:
- effectiveness of everyday use;
- saving space in the room due to the external location of equipment;
- possibility of all-season installation of the station;
- possibility of all-season operation of the station, despite the external location of the equipment.
The installation of the FPU, as well as the commissioning work, must be carried out by qualified specialists. It will be possible to reduce the cost of the finished result by independently digging, in accordance with the project, a hole for laying equipment and preparing a trench for running network cables and a hose.
The operating instructions for such pumping systems are as follows:
- the well pump turns on and pumps water from the well into a membrane tank located in the caisson;
- as water fills the tank, it puts pressure on the rubber membrane, which, in turn, puts pressure on the air in the adjacent chamber (up to 4 atmospheres);
- when the pressure reaches the maximum permissible limit, the pump automatically turns off;
- As water from the storage tank is used, the pressure reaches the level when the pump turns on again and again pumps the required amount of water.
Important: This water supply for a dacha works with pumping equipment capable of providing water consumption in the range of 1-16 m³/hour. For example, we note that within an hour up to 0.4 m³ flows through one open tap.
A more complex development of this technology is a two-level underground pumping complex, equipped with a storage tank, the volume of which can reach 10-20 m³. The storage tanks used are made using stainless steel.
The principle of operation of such a system is in many ways similar to the use of a water tower. The difference lies in the absence of a height difference, due to which water flows from the tower with pressure.
In a two-level PNK, water pressure is created through the operation of special pumping equipment. As a result, one pump works to supply water to the storage tank, while the second pump pumps liquid into the consumer pipeline. Systems of this type provide water consumption in the range of 10-40 m³/hour.
Features of operating a water tower
Today, when country houses are being built from block containers and other available materials, small holiday villages are springing up everywhere, which are in dire need of connecting to various utilities. And if, in the absence of a stable supply of electricity, the solution to the problem is to buy or rent a diesel generator for the dacha, then a completely different approach will be required to install water supply systems.
In many holiday villages located at a great distance from the garden, centralized systems are used, built on the basis of artesian wells and a water tower with a capacious storage tank.
The construction of such systems is an expensive and time-consuming process. However, ready-made systems are reliable and easy to use in everyday use.
The presence of a storage tank allows you to accumulate a certain amount of water. As a result, several consumers can simultaneously receive the required volume of water, which will be supplied through the pipeline with an acceptable pressure.
Important: Due to the use of a storage tank, the number of starts and stops of pumping equipment is significantly reduced, which has a positive effect on the service life.
Among the advantages of using systems with a water tower, we note the following:
- constant pressure in the pipeline;
- economical consumption of electricity required to operate the pump;
- no interruptions in water supply;
- the possibility of simultaneously supplying water to several consumers at once;
- acceptable cost of water.
However, along with the advantages, there are several significant disadvantages, among which it should be noted:
- the ability to operate the system exclusively in the warm season;
- it is inappropriate to use the system as an autonomous solution per country house.
- there is a high probability of oxidation of the internal walls of the storage tank, since these containers are mainly made of ordinary sheet steel.
- To ensure the required pressure parameters in the pipeline, it is necessary to build a pressure tower with a high storage tank height.
How advisable is it to install an individual storage tank? How to build a water tower on your own property? What formulas should be used to calculate pipe diameter and water flow? Which foundation to choose? Our article will tell you about all this.
In the previous article, we talked about the designs, types and functions of water towers (WTOs). When it comes to water supply to an entire region or village, the installation of such a serious structure is certainly justified. But will it be useful to a private owner?