In a similar way, you can arrange a corner bench or a separate small chair. It’s easy to create a cozy seating area in the garden using made benches, armchairs and a table. It is easy to create from pallets and sofas of absolutely any size and configuration - straight, corner, U-shaped.
To do this, you will need to sequentially fasten a number of pallets together to obtain a workpiece of the required length and shape.
A second row of trays is mounted on top to achieve a comfortable seating height. The backrest is attached to the finished structure.
Pallet furniture: pros and cons
It cannot be said that everything is so rosy in the use of recyclable materials, which, in essence, are pallets. There are pros and cons to such an environment. The former must be actively used, and the latter must be fought.
| pros | Minuses |
| The furniture is assembled literally in a matter of hours. | Such furniture will not fit well into any interior. Loft or country are best suited. |
| There are many design ideas from this material. | |
| The cost of the finished product is literally pennies. | It is not easy to care for structures made from pallets - dust accumulates under them, which is not easy to remove. |
| The pallets are made of high quality natural wood. | |
| The resulting products will be original and practical. | If you don't spend enough time processing the wood, you risk making an unpleasant impression on your guests. |
| Almost any technique can be used to decorate wooden furniture. |
What pallets are suitable for building a gazebo?
There are several types that differ in material quality and dimensions. Thick curved boards, on which bricks and cement are usually transported, are only suitable for firewood, and varieties with thinner boards are just what is needed. Europallets are especially popular for disassembling into material . It is of very good quality, but it has its drawbacks: it concerns its disassembly. Often, rough nails are used here, which are not so easy to pull out. A nail puller won't help here, but pulling out the brushes with a hammer and a small hatchet won't be too difficult.
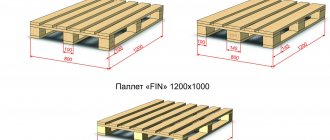
What types and sizes of pallets exist:
- standard – 1200x1000x140 mm;
- Euro pallets – 800x600x140 mm;
- Euro pallets – 800x600x140 mm;
- enlarged euro – 1200x1200x140 mm;
- thickness may vary in amplitude from 120 to 144 mm.
Ideas for making furniture from pallets
There are a lot of designs made from pallets. The Internet is replete with original ideas and examples of creativity by folk craftsmen. Moreover, ready-made furniture from pallets can be bought in designer showrooms or ordered to be made from craftsmen. Let us give you several examples of the varied uses of this material for different purposes.
The installation itself will be complicated only by installing the logs at a distance of no more than 120 centimeters. There is no need to disassemble the pallets to install the flooring. Just place them all over the site, leveling them in height using bricks, and fasten them together. To obtain a continuous surface, fill the gaps between the boards with slats. All that remains is to clean and paint the finished flooring.
Look at the photo to see what similar hand-made pallet products look like:
Using the same principle, you can line up or to. You will certainly appreciate them when the rains become more frequent and the ground on the site turns to mud. For the winter, such a path can be disassembled and stored in a storage shed. Pallet flooring can also be installed in. To prevent the bird from falling through, you need to throw a fine mesh net on top. And cleaning the chicken coop will be very simple - you just need to lift the pallets. Pallets are also useful for construction.
If you need a high fence, arrange the pallets in two rows. For racks, use a metal frame made of pipes. Color the fence according to your taste and decorate it. To complete the idea, you can make a corresponding gate.
The gazebo is an important building on the site. What would it be like without her? Once again, pallets will come in handy. With their help, you can design any rectangular room.
The only thing you have to purchase separately is and or. To make it, you can use pallets only for flooring and roof sheathing; for a semi-closed roof, install pallets at half the height of the walls. You can bring the idea to completion and sew up the walls of a closed gazebo from the inside. In this case, late guests can stay in the summer house.
Using the same principle, you can build a doghouse, a playhouse for children, a shed or woodshed, a country shower, or. And these are not all examples of using pallets for a summer cottage. From them you can assemble shelves for flowers, a sandbox, original garden lamps, a ladder, a bicycle stand, and much more.
Photo examples of DIY garden furniture made from pallets
The theater begins with a hanger, and the dacha certainly begins with. Whether there are small children in the family or not is not so important. Adults can also enjoy this attraction. A very solid structure can be made from a pallet, capable of supporting a lot of weight. can be not only with a seat, but even with a bed. Such hanging beds in the shade of trees will become a favorite resting place. The basis is two pallets, securely fastened together.
To secure a hanging bed, it is better to use chains or strong ropes. On a hot summer day, you will need a sun lounger for sunbathing. For it you need to prepare 3 pallets: two of them for the lounger, the third for the backrest. All that remains is to assemble the simplest structure, paint it and cover it with comfortable pillows.
A family holiday at the dacha means outdoor games, lunches and dinners, and evening viewing of good films using a projector. To set up a country cinema for family and friends, you can make a multi-story couch on which all your guests can comfortably sit.
Furniture made from pallets for a summer house can be supplemented with gazebos and benches for the garden. All this is done quite simply and does not require the use of special tools. The photo below shows examples of garden furniture made from pallets.
Related article:
Creating a roof
Pallets in their usual form are not suitable for roofing, so they need to be disassembled into boards and a lath created.
The following materials can be used to create a roof:
- Polycarbonate. This material transmits light well and is resistant to temperature changes. When choosing a material, you can choose the shade you like best.
- Ondulin. This material is quite popular because it has an affordable price and is simply mounted on the sheathing. It also has a long service life. By choosing brown or green material, you can make a gazebo that will fit harmoniously into the landscape.
- Soft tiles. This material is more expensive. It is worth noting that soft tiles go well with wood. If desired, you can choose material with different patterns and shades. It is worth noting that it is necessary to create a continuous flooring under this material.
The shape of the roof of a gazebo made from pallets can be different. When creating a gazebo from pallets for a summer house, it is important to choose the right shade of roofing material to make the gazebo look more attractive.
Practical recommendations on how to make furniture from pallets with your own hands
You are convinced that a lot can be done from wooden pallets. We advise you to start with small designs that require the use of 2-3 packing grids. When you get the hang of it, you can begin more serious projects: gazebos, chicken coops, cinemas, and so on. We bring to your attention information on the preparatory work and step-by-step instructions for making several simple pieces of furniture.
Tools for work
To work with pallets, you will need carpentry tools and wood fasteners. Check if everything from the presented list is in your arsenal:
- electric drill, screwdriver, nail puller, hammer, saw;
- wood screws or nails, bolts for collapsible structures;
- sandpaper, PVA wood glue, wood primer, paint, stain or varnish.
If all this is available, you are ready to work.
How to choose the right pallets
The pallets, of course, must be intact, without damage, cracks, or rotten boards. But these are not all the requirements. Pay attention to the labeling of pallets. If there is an IPPC mark, this means that the wood of the pallet was processed in compliance with international safety requirements.
This is a safe method for humans. Do not use pallets marked MB or EUR for the manufacture of home structures. Such wood was treated for preservation with chemicals hazardous to health.
Advice!
Find out what was transported on pallets. If it was fertilizers or other chemicals, refuse such a purchase.
Before purchasing, inspect the material for mold, rot and other damage. Pay attention to the nails in the pallet. If you plan to disassemble it into parts, it is important that the nails are driven evenly, not at an angle.
Pallet processing
No matter what you decide to do with the pallet, you need to carefully prepare it. Initially, the packaging is made from unplaned boards, there are a lot of burrs on it. Therefore, after cleaning the dirt, the wood must be thoroughly sanded. If you have one, the task will become much easier.
Important!
When sanding wood, do not forget about your own safety: use gloves and a respirator.
If you disassemble the pallet into boards, sort the parts by width, this will make it easier to select them in the future. Even before assembly, you can treat the wood with a moisture-proofing compound or even paint it, because painting the finished structure will be more difficult.
Related article:
: for the garden, children's room, kitchen, bathhouse, garden, gazebo; How to restore pieces of furniture, useful tips and recommendations from experts - read our publication.
Step-by-step instructions with photos of making furniture from pallets with your own hands
And now let’s begin the actual production of the most popular items in everyday life: a table, an armchair, a sofa, a bench, etc.
How to make a table with your own hands from pallets
A table made of pallets is the simplest design of all possible; you can build a full-fledged dining table and a small one - the dimensions depend only on the number of parts of the designer.
| Illustration | Description of actions |
| Carefully, so as not to split the boards, disassemble the pallets. Use a nail puller for this purpose. | |
| Sand each board on both sides using sandpaper. | |
| Saw off 8 boards of 45 centimeters each. | |
| Fasten each pair as shown in the photo, at a right angle. | |
| The resulting parts are the legs of a coffee table. | |
| Measure 4 bars of 74 centimeters each. | |
| You need to prepare 4 more bars, equal in length to six folded boards from the pallet. | |
| Assemble the supporting parts. | |
| The supporting parts should look like this. | |
| 4 transverse bars of 75 centimeters each will connect the supporting parts. | |
| Cut 12 80cm boards for the countertop and bottom shelf. | |
| Secure the table top and the bottom of the table. | |
| Measure and cut boards to cover the sides of the tabletop. | |
| Nail them on top, bottom and ends. | |
| The coffee table is ready. If you need a different table size, simply increase or decrease the length of the pieces. |
Hello. Today you will learn how you can make a floor at home yourself, or with the whole family. Old pallets were used as boards for the parquet flooring.
It all started when one family suddenly decided to do some renovations. Redo the floor. Moreover, they wanted to do this on their own. Luckily, they found someone who agreed to give them a bunch of old pallets. By the way, pallets were previously used to transport coconut oil. Probably no one could have predicted that they would eventually become parquet boards. Even Vanga and Nostradamus.
First, when a huge pile of pallets was delivered to this family. The question “Where to put them?” has become very relevant. Therefore, to take up less space, the pallets were disassembled into boards. And sober-minded people will not lay down pallets on the floor of their kitchen. At least I wouldn't do that.
Done, the pallets are disassembled.
Now they have a garage full of boards. But here’s the problem: a huge number of rusty nails stick out from all the future parquet. And rusty nails, as we all know, can be the initiators of such a bad thing as tetanus. And it’s unpleasant to step on them.
It was decided that all the nails need to be removed.
Everything works, without the slightest exception.
And now nine thousand nails were removed from the pallets. And this is one of the batches that will go for processing. The fact is that you can’t put all the boards in the trunk, but you need to transport them somehow
This is proof that it's good to have connections. In this case, connections with workers in a woodworking shop. No, of course, I don’t argue, you can do some work yourself with a knife and a plane. In principle, nothing bad will happen to you, and it’s good for your health. But this family decided that it was faster. And remember who dismantled the pallets, who took out 9,000 nails?
The boards are finished and ready for installation. This is what the floor looked like before parquet. I don't think it's impressive, but what do you think? The process has begun, laying the boards on top of the OSB board has begun.
Basically, the living room floor is ready, all that remains is polishing and varnishing. Isn't it beauty? But this beauty, only under varnish.
Now the kitchen is ready, what else is needed for happiness?
A garage made of pallets allows you to quickly assemble a frame of any shape and size. As a rule, pallets and pallets left over from the construction of a house or other country houses are used. And if earlier pallets were simply dismantled for firewood and boards, now you can assemble a small garage box and workshop for household needs.
Decoration of the gazebo
In order for all the elements of the gazebo to be combined with each other, it is worth using the described products to decorate the structure from the inside. From them, for example, you can create a fairly comfortable and wide sofa and a beautiful table, placing it in the center of the building.
Using pallets as furniture can make your gazebo more beautiful and original. In order for the structure and furniture to be combined in it, it is worth choosing the right colors in which the pallets will be painted.
It is worth remembering that covering the gazebo with paint and varnish is necessary not only to decorate it, but also to protect the material from the negative effects of the environment.
If desired, electricity can be installed into the gazebo. It is important to reliably insulate the wiring to prevent the wooden structure from catching fire during operation. Also, for convenience, it is worth making a path leading to the gazebo. To create it, you can use leftover pallets. But it is worth remembering that before you start creating a path, you need to level the soil.
It is also important to monitor the condition of the floor in the gazebo. If necessary, it is worth applying a new coat of paint and varnish.
To determine which design is best suited for your site, it is worth looking at photos of do-it-yourself gazebos made from pallets. By following the step-by-step instructions, you can do this in just a few days.
Wooden pallets for transporting pallets with all kinds of cargo have long been of great interest to summer residents and people living in the private sector. And this is not surprising - after all, in skillful hands, these products turn into full-fledged building materials. The cost of such used pallets is simply ridiculous, and it happens that they are generally given away for free. They build a lot of them: garden houses, fences, and gazebos of all kinds. Everything is limited only by flights of fancy and the desire to sculpt something on your own country plot.
Almost every summer cottage has a gazebo, and the variety of such buildings is simply enormous. There are both small and large, of different shapes and design options. Some people order ready-made structures, while others build them themselves from available materials.
But here it all depends on the budget, and if there is no money to build a gazebo from classic building materials, then it is quite possible to use alternative and very inexpensive materials, for example, wooden pallets.
Stages of building a garage from pallets with your own hands
Arrangement of the concrete base and lower trim
Since the overall weight of the structure will be insignificant, you can get by with a compacted sand cushion and wooden sleepers along the entire perimeter of the future structure. But if you want to make a garage box that will last forever, then you can use standard cement blocks. They must first be poured in the corners and in increments of 600 mm according to the size of the garage. Be sure to check the height of the head with a level. The step size of 600 mm is taken according to the width of the pallet - its edges should meet neatly in the middle of the block.
After laying the foundation, we lay out the subfloor. It can be placed in 1 layer, using a bolted connection for connection. The length of the bolts is determined by the thickness of the set of cross boards on the pallet. In this way, you line the entire garage floor from pallets, additionally securing them in the corners with a metal corner.
Building a garage frame from pallets with your own hands
The frame will be made up of 2 tiers of pallets. The first one is attached directly to the subfloor using a 30x30 mm corner. Attach the second tier to the first with bolts. The most important thing is to immediately think through and make a platform for placing the rafters. Be sure to check the slope of the structure - the drain should be directed towards the rear wall of the garage. Thus, the front wall of the frame needs to be made 20-30 cm higher than the back.
To cover garage walls made of pallets, you can use OSB or chipboard, which will have a structure similar to the lining. Such sheets are inexpensive and can be easily mounted to pallets using self-tapping screws. Don't forget to cover the walls with oil paint. This way you can ensure the coating is protected from swelling under constant exposure to high humidity and precipitation.
Construction of sheathing and roofing
The next step in how to make a garage out of pallets is to build the sheathing and roof. After installing the rafters on the roof, you purchase planed boards measuring 25x100 mm. You can also make a roof using pallets, but it will take much longer. The sheathing is attached to the rafters using self-tapping screws or bolted connections. The result should be a flat surface with a slope towards the back wall of the box.
For the roof in the form of roofing material, it is best to use 1-2 mm galvanized iron. This will ensure a reduction in the load on the load-bearing elements of the frame in combination with good roof strength. Galvanization reflects light well, so a garage made of pallets will always be dry, and the indoor temperature in summer is 3-5 degrees lower than outside. You can see a photo of a garage made from pallets with your own hands below.
Installation of wooden gates and finishing of walls
The final stage is the installation of gates pre-knocked together from 20 mm boards. Do not forget to cut the height of the gate by 5-10 cm from the soil layer. With subsequent shrinkage, the frame will shrink slightly, as a result of which the gate will actually not be able to open. For the finishing coat, you can use any wood paint or drying oil.
Detailed instructions on how to make a garage out of pallets with your own hands can be seen in this video:
Every owner of a garden plot strives to decorate and transform it for the better, to make it more convenient and comfortable for relaxation.
Preparatory work
First of all, you need to draw up a plan and drawing of what kind of gazebo it will be, what size and shape. Where will the garden furniture be located and what dimensions will it be? Calculate how much and what material will be needed, purchase everything you need.
There are a lot of self-tapping screws, so it’s better to buy them with a reserve, so they won’t be superfluous in the household.
Pallets purchased for construction need to be prepared:
- Inspect for damage, check for strength, then select the best ones. The rest can be disassembled into boards.
- Clean from dirt and wane.
- Pallets and individual planks from disassembly must be processed with a grinding machine.
- Wood needs protection from moisture, fungus and pests. To do this, it must be treated with a special antiseptic solution. If this is not done, the wood will darken and take on a not very beautiful gray color, and will also rot.
- It is better to paint the wood immediately, and not after the gazebo is ready. Waterproof wood paint is suitable, and if you want to leave the natural wood color, you can use stain. After painting, it is advisable to coat it with waterproof varnish.
The better the wood is processed, the longer the structure will retain its beautiful appearance. Prepare the necessary tool. Clear the area where you plan to build the gazebo from debris, bushes and tall grass.
What tools will you need:
- saw;
- hammer;
- axe;
- grinder;
- jigsaw;
- screwdriver;
- drill and drill bits;
- brushes;
- roulette;
- level;
- pencil.
It is better to use a power tool; it will save energy and make the work much easier and faster.
How to build a terrace from pallets with your own hands?
But not everyone can attract expensive designers for this, so you have to do a lot yourself. To do this, it is enough to have taste, imagination and some available materials. For example, for every dacha owner a private terrace made from pallets can become quite accessible.
Before starting work, it is necessary to develop a sketch of the future building. Several free pallets will have to be divided into separate boards, which will later be required to create fastenings and decorate the terrace. First, you should sand the pallets - they should be perfectly smooth. Then you need to paint the pallets, for example, white.
As a result, the pallets will be reliably protected from rotting. In addition, the primer layer will act as a base for painting. In this case, the paint will lie smoothly and beautifully, and will also adhere to the surface for a long time. The pallets must be dried well naturally in the fresh air and sun. They should not be connected to each other during drying. When making a terrace from pallets at your dacha, you can use geotextiles as a base. Thus, the pallets will be protected from rotting and will not come into contact with the ground. If there are uneven areas, you should carefully level the area for the future terrace and, if necessary, add soil to the holes. In elevated areas, on the contrary, the soil will have to be cut off.
Pallet selection
The following types of pallets can be hazardous to health:
- Painted with bright colors. Not pallets, but paint can be life-threatening due to toxic formaldehyde.
- Pallets from spontaneous bazaars and trade markets - they absorbed the smell and moisture from food and industrial cargo. During operation of the finished building, the pallets will dry out, releasing moisture and odors, sometimes very unpleasant ones.
- With IPPC marking. It is usually applied to pallets that have been treated with chemicals that can cause serious illness. Building a house from pallets with such markings is harmful both for the builder himself and for the future inhabitants of the building, since both direct contact and inhalation of fumes are equally harmful.
If nothing of the kind is observed, the pallets are clean, without defects and not broken, then they can be safely used for any purpose.
Installation of a terrace floor from pallets
When installing the floor on the terrace, pallets must be stacked as closely as possible to each other. When constructing the back wall, the finished parts are connected using screws. Next they are attached to the floor. You can also make a sofa for relaxation with your own hands from pallets. It is made of several elements that are laid in 2 rows. The table is also made from pallets that are placed on top of each other.
Soft and comfortable chairs can be a good option. To protect from the sun, you can install an awning.
At the last stage, a street veranda is made from ordinary pallets. You can make a small fence near the site. A quick-removable seat base, for example, soft foam rubber, is placed on a pallet sofa. You can also put pillows in multi-colored pillowcases on the sofa. Each owner of a summer house or garden plot can choose all the nuances of the design according to his taste.
A similar open terrace made of pallets can be located next to the house, near an open pond or a country fountain. As a result, it will become the family's favorite outdoor recreation spot. Any man can cope with the construction of such a gazebo if desired. The installation of an open terrace can be completed in just one day, which is also its great advantage.
The flooring in a dacha has its own characteristics relative to the installation of flooring in an ordinary private house, not to mention an apartment. You can learn how to make the floor of a country house better, how to level the subfloor, how to replace the old floor and much more.
The floor for a summer house, as well as in a summer unheated wooden house, of a wooden house should be:
- durable, quite rigid;
- easy to install, with the ability to quickly replace damaged areas (this is especially important for a shower stall);
- waterproof;
- resistant to abrasion and various loads on it;
- environmentally friendly;
- thermal and sound insulating;
- aesthetic.
Let's look at how to properly lay wooden flooring in a house, on the first and second floors; what kind of floor to install in a summer house or shower room in a summer cottage.
Types and features of toilets for summer cottages
First, I want to tell you a huge secret. Country wooden toilets are available on almost every plot of land. Even if the house already has plumbing facilities.
An outdoor toilet in the country is needed even if you have a restroom in the house.
Typically, indoor latrines are used at night, in winter, or during bad weather outside. In other cases, an outdoor toilet is perfect. After all, summer residents spend most of their time outdoors, enjoying a well-deserved vacation outside the city or tending to their garden.
Before you start looking at the drawings of a wooden toilet for your summer cottage with your own hands, I recommend deciding on the design of this structure. In more detail, I have summarized all the features and disadvantages of various designs in a small table, which I bring to your attention.
| Toilet type | Peculiarities |
| With cesspool | It is a wooden house with a hole dug underneath to collect sewage. There, human waste is fermented independently under the influence of microorganisms. In some cases, it is possible to clean the storage tank by calling a sewer service. |
A toilet with a leaky cesspool can be installed in areas where the depth of groundwater exceeds 2.5 meters. Otherwise, there is a danger of contamination of drinking water and even the soil at the dacha.
To prevent the smell in the toilet house from causing fainting, the sewage in the container after visiting the toilet is sprinkled with peat, ash, sawdust or other similar material. That is why the toilet got its name.
Pit toilet.
As I already said, at my dacha I have my own warm and cozy toilet in a wooden house - I finished it with my own hands, installed sewerage and ventilation. However, this did not stop me from making a separate structure on the street.
Both at my dacha and on my son’s property I chose the option with a cesspool. I also recommend it to you, if the groundwater is deep. Otherwise, you'll have to settle for powder-closet or something similar.
Lags
Wooden floors mounted on joists meet these requirements. They provide support for laying floor boards (they can be laid directly on wooden beams).
Logs are usually made of timber. They are fixed with a certain step, which depends on the thickness of the boards being laid. The logs can be laid on wooden beams, a concrete base or be recessed into the ground. This design allows for quick replacement of boards that have rotted. This is especially important in shower construction.
Single plank floor
In light summer houses and outbuildings (shower room, shed, etc.) simple single plank flooring is used. In this case, the flooring is a single layer of boards, which is laid on joists or directly on beams. The boards are laid without gaps. The exception is shower flooring. You can even make such a floor from used wooden pallets (the material of such pallets is sufficiently durable).
To protect the floor from rot and mold, they use antiseptics, varnishes, and enamels. Let's consider the existing types of such single floors.
Cold plank floor on the ground
This is the simplest type of flooring in the country.
This is the simplest type of flooring in the country. In this case, the logs are recessed into a layer of calcined sand flush with the upper level of the layer.
In another option, they are buried in a layer of compacted clay and slag. This better protects the wood from moisture. This layer is laid on a sand cushion. Its thickness should be 2.5-3 times the thickness of the logs used. The distance between them should be no more than 60 cm.
Another way to construct this type of floor is from wooden blocks coated with bitumen. The base for them is made of compacted sand, clay or concrete. The checkers are installed close to each other, and at the final stage of the floor installation they are all connected to each other. This type of flooring cannot be used in a shower stall.
What can you build from pallets?
Residential include:
- Seasonal or permanent campsites.
- Country houses.
- Outbuildings.
Non-residential - gazebos, sheds, sheds, garages, workshops, flower beds, front gardens, furniture and many other temporary and permanent structures. If you protect the material from moisture, it will last a long time and perfectly withstand weather troubles.
Insulated single plank floor on the ground
Unlike a cold floor, here there are insulating layers under the sand cushion. To do this, after removing the fertile layer, the site under the future building is compacted. Then the first thermal insulation layer is laid. The material for it can be packaging bags left over from the cement mixture. They need to be laid in 2 layers and covered with a layer of crushed stone 8-10 cm thick. The crushed stone is compacted and filled with lime milk.
Then the remaining layers are laid: roofing felt, fiberboard and expanded clay (thickness 8-10 cm). They are filled with “lean” concrete (with a high content of filler (gravel and crushed stone)).
Cold single floor with subfloor.
The logs or beams of this flooring are installed on supporting pillars made of brick or foam concrete blocks. This type of floor should be made if the beams are not built into the frame of the house. This type of floor is also called “floating”.
The pillars are mounted on foundations, various bedding or compacted soil. The cross-section of the columns depends on their height. Such supports can be made along the entire floor grid or only along the perimeter of the building.
On top of them you need to lay layers of waterproofing (roofing felt or its modern replacements) and 2-5 mm wedge gaskets. Then logs or beams are attached to them. To prevent wooden floors from rotting quickly, they must be treated with an antiseptic and varnishes used to cover the surface.
Tip: it is better to use two-component water-based polyurethane varnishes. Such varnishes are expensive, but this flooring will be wear-resistant. It requires less maintenance. Acrylic and epoxy varnishes are very popular.
A “floating” floor is not recommended for light summer houses. Due to the lack of heating, in winter, due to freezing of the soil, uneven “walking” of the pillars occurs, and, therefore, the floor covering. To prevent this, the bottom of the underground is insulated with a layer of expanded clay, crushed stone or gravel.
Then the floor boards are attached to the beams, or the logs laid on them, using nails. Tip: Correctly drive nails into floorboards at an angle of 45 degrees to their surface.
Construction works
The construction of a gazebo is divided into several stages:
- foundation;
- frame installation;
- wall cladding;
- roof;
- painting and decoration;
- decor
Foundation
In order for the gazebo to serve for many years, it is necessary to make a foundation of the required size. If the soil is not very swampy and the building area is small, then you can simply place concrete blocks of 200x200x400 mm.
When constructing a more permanent structure on problematic soil, it is better to fill in a shallow-depth tape.
One of the popular foundation laying technologies is piles, which are divided into two types. There may be three options for bases for the gazebo.
Concrete piles
It is not very difficult to make such supports for a future structure, but it will take some time for the cement mortar to set.
First, holes are dug 20x20 cm and 50 cm deep. Then formwork is placed in them from roofing felt, scrap boards or suitable material that is not a pity. Reinforcement is driven into the bottom of each hole, approximately 50 cm. Then the formwork is filled with concrete. Such piles should have a height of about 30 cm from the zero level . After pouring the solution, you need to wait a while until the mixture completely hardens.
Screw piles
A fairly new method of constructing foundations, which has proven itself well on clay and marshy soils. Everything is simple here. You buy piles of the required size, all you have to do is screw them into the ground and screw or weld the heads to them.
Shallow tape
For loose soils and large area gazebos, it is necessary to fill the tape. To construct this type of foundation, you need to dig a trench 50 centimeters deep around the perimeter and install formwork from boards along its edges. Next, a structure is made from reinforcement in the trench and concrete mixed with small stones is poured.
The concrete screed must be watered from time to time throughout the week . The time for complete hardening of such a tape is about a month.
When constructing any type of foundation, it is necessary to use a level, and the perimeter must be marked with a thread attached to pegs. This will prevent the structure from becoming uneven.
Frame
First, a timber frame base is installed along the perimeter of the foundation and secured to the foundation with anchors. It should be made from the highest quality materials, since the floor bears the highest load. Next you need to fasten the beams with strapping.
Then vertical supports are mounted, which are secured on top with a transverse tie with boards and beams. You should not use nails to install the frame , as over time the structure will become loose. Self-tapping screws are considered more reliable fasteners , and you will also need other hardware, such as anchors and angles of various types.
Wall cladding
Wall cladding can be done in several variations:
- The simplest option is completely open walls. The structure only has a roof and floor, but no walls. But such a structure will not protect from the wind, so it is not particularly popular.
- The pallets are mounted in two rows in such a way that the second row does not allow light to pass through the cracks of the first layer. With this method of constructing walls, three sides are blank, and only the front part of the building remains open. This option is suitable for those who love shadow and darkness.
- Only the back wall is sewn up, and on the sides there are railings with a height of 800-1200 mm, depending on the position of the pallets. So, if installed horizontally, the height will be 800 mm, and if installed vertically - 120 mm. When installing such railings, the pallets are first attached to the base, then evenly pulled together.
Double plank floor with subfloor
It differs from single ones in that at the bottom of the laid logs or beams, with the help of slats, a lower, rough layer is attached. Insulation boards and vapor barrier material are laid on the rough boards. Boards with wane, unhewn boards, parts of wooden pallets, etc. can be used as rough materials.
To prevent the floor boards from rotting, you need to create an air gap between the finishing layer of boards and the insulation for ventilation. Sometimes a simplified, budget version of such a double floor is made - without laying insulation boards.
Insulation of a country house
If you have insulation material and more pallets, work can continue. To do this, you need to create a frame for insulation from the inside of the house. Mineral wool is most often used, so we will talk about it, although the installation of any other similar material is not much different.
- Nail the slats so that insulation can fit between the wall and the edge of the future frame.
- Attach the plastic film so that it completely covers the entire inner surface of the walls - this is necessary to protect the mineral wool from moisture.
- Additionally, cover the inside of the house with boards from pallets, placing a layer of mineral wool in the formed niches. To prevent moisture from penetrating the house to the insulation, you can lay a layer of film between the inner wall and the mineral wool.
- Insulate the floor and ceiling in the same way.
Pallet floor
One of the most inexpensive options for flooring a small summer house or shower room is the use of wooden pallet boards. Pallet boards are carefully separated from the pallets without damaging the wood, impregnated with an antiseptic and laid on the logs. Then they can be cleaned and used to refine the varnish, or they can be leveled with plywood and covered with linoleum.
Advice: you can make flooring only from boards of only those pallets. The origin and conditions of use of which are known to you.
The flooring on the second floor does not require insulation. This overlap is performed single. The floor boards are attached to the floor beams, and from below (like the ceiling of the first floor) they are covered with plywood, fiberboard sheets or panels.