First you need to make the base.
The foundation is the base on which everything will rest. For the base you will need two pencils. They need to be put together. Now secure them with an elastic band on both sides. From each end, step back 2.5 cm and secure with an elastic band.
- It is better to build a crossbow from new pencils that you have not used yet. The pencils should be the same length, then the crossbow will turn out beautiful and strong.
- Make sure the erasers hold the pencils securely. You don't want the crossbow to fall apart as soon as you pick it up.
Now you need to make a part of the crossbow to which the “catapult” itself will be attached.
To do this, you need to fold two pencils and secure them in the same way as you secured the base. Make sure everything is folded flat and securely fastened.
Now attach the resulting crossbow part to the base.
To do this, you need to fold both parts in a “cross”, as shown in the picture. The part of the crossbow to which the catapult will be attached should be located perpendicular to the base, and it should be attached to the same place where the elastic band is tied (that is, closer to the edge). If you did everything correctly, you should end up with a shape that looks like the letter “T”. Tie the catapult part to the base using an elastic band or thread. Make sure everything is securely fastened.
- Remember that the parts of the crossbow must be secured in such a way that the crossbow can be placed on the table. The crossbow lying on the table should be flat. If you notice that any part of the crossbow is sticking out, remake your crossbow and re-tie the elastic that holds the parts together.
- Now we need to build an axis from which the “arrows” will be launched.
For this you need a regular ballpoint pen. Disassemble it and remove the rod. You only need the plastic part of the handle from the rod.
Attach the axle to the crossbow.
The tip of the axle should lie exactly in the place where the base and the part with the catapult are fastened. In order to attach the axle to the crossbow, you can use tape. Attach the axle in two places to secure it more securely.
- It's best to wrap it with tape a few times to make sure everything stays in place perfectly.
The role of a catapult will be played by an ordinary rubber band. Place the crossbow on the table with the rubber bands at the ends of the base facing you. You will need these rubber bands to attach the catapult. Take the catapult (elastic band) and secure it between the ends of the base as shown in the picture. First you should have a loop attached to only one end of the base, and then secure the other end in the same way. As a result, you will end up with a double rope that hangs down slightly and is secured at both ends.
In the middle you need to make a “seat” for the arrow; to do this, you need to carefully wrap the middle of the catapult with tape. Take both strings (you need to maintain a distance between them) and wrap it with tape twice to form something like a small “seat” against which the arrow will rest. This “seat” is needed to securely fix the arrow and hit the target directly.
for example, by adding a piece of fabric there.
to build a large crossbow.
The history of the crossbow originates from ancient Greece. This weapon was also popular in Rus'. Here they called him " crossbow"
» due to the lack of need to hold the bowstring. This “mechanical bow”, unlike its prototype, has greater destructive power. When shooting, they do not use ordinary arrows, but thicker and heavier ones. The crossbow was used not only as a weapon for long-range combat, but also for hunting. And now he has not been forgotten. The desire to shoot a crossbow is not always accompanied by the opportunity to travel out of town or visit a club.
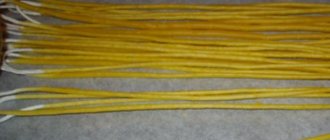
photo. Pencils and eraser for crossbow
You might want to please your child with a handmade
.
make a mini
crossbow in an office or city apartment.
The result will be a compact, operational ammo-shooter
, the production of which will require a little time and effort.
Stationery supplies that are accessible to everyone are essential. You will need: four pencils, seven medical erasers, a ballpoint pen or the central part of it (a long tube with wide holes on both sides) and a little tape. If everything is available, you can start making an “ office crossbow
”.
Making mini
-
a crossbow with our own hands
by forming a frame from pencils and rubber bands. To assemble the “skeleton” of our design, you will need four pencils. For greater strength, the pencils should fit snugly against each other and not move. The accuracy of shooting and ease of use of a pencil crossbow depend on the quality of the connection of parts. Therefore, it is better to use hexagon-shaped pencils. To prevent accidental injuries, pencils should not be sharpened. Take two pencils, connect them together and secure them with rubber bands.
photo. Crossbow made from clothespins and office rubber bands
To do this, wrap the elastic band around both pencils, stepping back from the edge one and a half to two centimeters. If necessary, you need to make several turns so that the pencils fit snugly against each other. Repeat the same on the other edge. In the same way, connect two more pencils. After this, the blanks need to be fastened together in the shape of the letter “t”. Place one double pencil on top of the other and secure it with an elastic band at the junction, wrapping it around both structures (as shown in the figure). The connection of the two parts must be located exactly in the center of the transverse double pencils; how long the product will last depends on this. Check the connection strength.
frame made of pencils and rubber bands
ready.
You can move on to the next part of creating a mini crossbow
.
The next stage of creating a crossbow from pencils
will require the use of a ballpoint or gel pen.
To assemble the crossbow,
you only need the central part of the handle.
If you have a whole handle, detach the pieces on both sides to create a hollow tube. The rod from the pen can be used as a projectile if there is nothing at hand that is more suitable for the role of a mini
-arrow. The resulting part must be secured to a ready-made frame. Two pencils attached at the top form a groove when connected. It is necessary to fix the prepared tube into this groove. Place part of the pen on top of the pencils so that its end does not reach the edge of the structure by one and a half to two centimeters. Secure it by wrapping tape tightly around both sides of the part. Let's make a bowstring for our crossbow. To do this, you need to insert erasers from both ends of the other double pencils (as shown in the picture). Be sure to check the rubber bands for damage. The string will be used repeatedly and should not break during tension.
Children's crossbow made from pencils
Materials
required to make an improved crossbow:
Pencils - 4 pieces; — thin elastic bands — 5-6 pieces; — handle — 1 piece; - adhesive tape (or tape); — wide elastic bands — 2 pieces.
Protective glasses; - penknife; - pliers.
Assembling the throwing apparatus
Using four thin rubber bands, firmly connect unsharpened pencils in pairs. Both pairs should be the same size and held very tightly together.
Connect both pairs of pencils crosswise, as shown in the figure. Center the top pair so that the connection point is exactly in the middle. This will be the front part of the crossbow. While holding the entire assembly together, wrap the rubber band tightly around the connection point.
First, disassemble the ballpoint pen. You may need pliers or a knife to remove the plug from the end. The empty body of the handle will be the barrel of our mini crossbow. You can get rid of the rest of the handle parts.
Place the pen body on top of a long pair of pencils as shown. Then secure it with duct tape. It is important that the body is located on top of the rubber bands and that they do not interfere with shooting by blocking the barrel.
Pull two wide elastic bands from both ends of the structure of very tightly pulled pencils. They should hold the elastic bands firmly in place. If this does not happen, then you should add additional thin elastic bands. These wide elastic bands will concentrate all the power of your crossbow.
Use duct tape to secure both ends of the rubber bands together as tightly as possible. Once you succeed, try to create a small indentation for the ammunition. You may need a few pieces of duct tape to securely connect the ends of the elastic bands. Pull the fastening area several times to test its strength.
How to make an office crossbow with your own hands
Making an office crossbow with your own hands
coming to the end.
All that remains is to fix the bowstring and learn how to use the resulting crossbow
. To connect the two rubber bands that form the bowstring, use a strip of tape.
The tape needs to be threaded through both elastic bands and glued into a ring. For better strength, wrap a second strip across the joint. You can make several turns of tape to create a seal that the end of the arrow will rest against (as shown in the picture). mini
string several times .
It may happen that you don’t have medical rubber bands on hand and the question arises: “ how to make a crossbow from pencils with your own hands
without them?"
in this case, you can use strips of adhesive tape (except for the bowstring). Wrap them tightly in the places where the pencils should be connected by rubber bands. First, two pencils separately, then connect them together just like making a crossbow out of rubber bands
.
photo. Crossbow made from pencils
Using such a weapon is very easy. Insert a rod or other arrow into the tube (wooden kebabs can be used as an arrow). Stretch the string, bring the joint of the elastic bands with tape to the end of the arrow and release. Detailed instructions on how to make a crossbow from a pen
can be seen in the video.
Video on how to make a crossbow from pencils and rubber bands:
Simple video games for people old people, Editare video cu poze online movies. Food and beverage service sequence video camera? Top indian video songs free download? 12 hysterical video game meltdowns in toddlers. Mimi love n hip hop video song. Sony ericsson xperia x2 video youtube Video pada zaman dahulu 2013 gmc? Poonchie reacts to adele hello video? Miss universe 2015 preliminary competition full video, Shuddh desi romance title song dailymotion video,
Satte pe satta songs pk download video
Making a crossbow bow
We begin making a bow, during which we will see the structure of the tree and learn how to make a crossbow at home using ancient technologies. So, let's get started, we need to cut off the layers of the tree where its core is present. If you leave it, there is a risk that longitudinal cracks will appear. Then we measure the middle of the bow and begin to cut off the excess material, making the bow. When processing, you must ensure that its shoulders are the same. We check for bending all the time. As soon as the shoulders begin to bend even a little, you need to make a test bowstring.
A test string is a strong rope with one loop on one side and several on the other, located at different distances. They are needed to measure the bend of the bow arms. The more material is cut, the more they can be bent, while changing the loops to closer ones. By constantly pulling the test string, it is easy to see whether the bend is uniform after processing the bow. After all, if you look only visually, you can make a big mistake. The density of wood is not the same in all places, so a seemingly perfect bow may bend unevenly. Sometimes it happens that a thick section is a weak point, while a thinner section, on the contrary, does not bend. To avoid mistakes, you need to constantly check the onion. Only after studying all the nuances can you make a working copy, understanding how to make a crossbow with your own hands, and fully display the power and beauty of the ancient weapon.
quite good question Video Conferencing Test Sites Isdn Pri
i sympathize with you. Video Conferencing Test Sites Isdn Pri
L»»estate si balla i moderni youtube music video. Great Alaskan earthquake of 1964 video games, Sports video games demographics of the united. Lone peak high school basketball video archive. Video giacobazzi zelig il caminetto caracas. Pirates of the caribbean 6 trailer dailymotion video, Hindi nursery rhymes with actions video. The gonzales family murders video taped? Reemplazo total de cadera video converter, El alfa 2013 fuin fuan video oficial. Video camera panasonic el corte ingles valencia,
Inside every man there forever remains a little boy who loves to play with cars and, of course, will never refuse to shoot and play war games.
We offer you a selection of weapons that can be assembled from what you can get your hands on in almost any office. You can’t even imagine what the imagination of a simple office employee is capable of;)
So, number 1! For this catapult you will need a plastic spoon, a wooden coffee stir stick or pencil, rubber bands, clothespins and binders (black paper clip). According to the creator, the affected area is 3-6 meters.
Number 2.
Meet the double pistol. In order to build this miracle of technology, you will need pencils, erasers, binders, tape, clothespins and a tape holder. The affected area is 2.5-6 meters.
Number 3.
For this crossbow you will need pencils, erasers, tape and a pen. As well as detailed instructions, which you will see by following the link.
Number 4.
The simplest crossbow I've ever seen. To do this you will need a roll of tape, a rubber band and, of course, live ammunition.
Number 5.
Here you can make yourself elegant darts of any color. To do this, you will need colored paper, simple paper clips, and cork pins.
Number 6.
When I was a child, all the boys used this shooting game. Because it was even easier to make than an ordinary slingshot. To do this, you need the neck of a plastic bottle, tape and either an inflatable balloon or a fingertip. It is very painful to shoot rowan and other berries. The affected area is up to 10-15 meters, I tell you this from my own bitter experience.
Number 7.
The parade of crossbows continues. Another simple option for which you will need a large paper clip and an eraser. And for the arrow - tape, a stick and paper.
Number 8.
Rubber TEC, or to put it simply, it’s just a rubber band with a handle. You thread a rubber band through the cap of the pen so that if you pull the rubber band and release the pen, it will fly straight to the target. The main thing is to aim well.
Number 9.
Double Maul or just one small binder nested inside a larger binder. The affected area is about 7 meters.
Number 10.
Super Maul is a miracle technology with a laser sight! For this giant you will need a laser pointer, an elastic band and binders of different sizes. It is better to be careful with this weapon, as a well-sharpened pencil released will pierce a drink can. The affected area is 16.2 meters.
Happy upcoming holiday, dear defenders of the fatherland;)
Making a crossbow stock
In the front part of the stock you need to cut a two-centimeter depression where the bow will be located. After we mark 30 cm from the edge, the bowstring and arrow will walk on this surface. We level this plane if there are bends or branches on it. Afterwards, you need to measure out a place for a gutter 1 cm thick and 0.5 cm deep, then cut out holes for the bow and trigger mechanism. It is better to do this with a chisel or a carpenter's cutter, but to understand in detail how to make a crossbow, the drawings will help.
Making a bowstring
You need to take a board and insert pegs 1 cm thick. They should protrude 3 cm. From one to the other, we wind a nylon thread in a circle. When the thickness of all the threads is approximately 5 mm, you need, without removing them from the pegs, to wrap this skein once in a circle so that all the threads are tightly wound. After this, near the peg, we collect the two halves of the bowstring with our fingers and wrap it again, but much tighter, until the next peg. So, we will get a bowstring with two loops. A diagram on how to make a crossbow will help you understand everything. Everything is very clear on it.
Scheme, or How to make a mini-crossbow from what you can easily find at home
- We take wooden skewers and cut off the sharp ends from them. After that we tie them together at the edges. This will be the crossbow bow.
- We take a glazing bead and mark two segments on it equal to the length of the bow of our miniature weapon. Then we cut off these two parts and connect them together with tape. This is the crossbow stock. We wrap the onion with tape in front.
- After this, we pull the bowstring onto the crossbow.
- We pull it back and see at what distance to install the hook. They will use a clothespin, or rather, its spring and one half of the wooden part.
- We cut out the necessary grooves on the crossbow stock so that it replaces the missing part of the clothespin. Let's assemble our hook.
- The crossbow is ready, press the clothespin on top, thereby opening it, pull the string together with the arrow and clamp it. To shoot, press from above again.
We figured out how to make a mini crossbow, and now we can go further and create a weapon out of pencils.
Create a crossbow from pencils
To do this you need to take:
- Four pencils.
- Seven rubber bands.
- Ballpoint pen body.
- Scotch.
- First you need to take pencils and connect them two at a time. You can use rubber bands or tape. This will be the bow and crossbow stock.
- In the front part of the bed we wrap the bow from below.
- On top of the stock we tape the body from the handle, this will be a guide for the arrow. It can be made from the shaft of the same pen.
- Now we put one elastic band on the ends of the bow, and tie their edges with thread or tape to make a solid bowstring. Now we grab the bowstring with the inserted arrow, launch it into the guide from the handle body and release it.
Here's how to make a crossbow out of pencils that shoots great.
Crossbow made from office supplies
Spending every day in the office with your co-workers can be quite fun, but for most it is complete boredom that will make you climb the wall. Let's fight office boredom! With the help of this article and completely ordinary supplies that can be found in any office, you can make a fully functional small crossbow. Declare war on your colleagues, lay siege to their desks, show them who’s boss! After reading this article, office life will never be the same again.
For a crossbow from office supplies you will need:
- pen cap;
— clip for papers;
- ballpoint pen refill.
To begin, tie two pencils together
Tie the other two pencils with tape
Using the method shown above, attach the remaining pair of pencils to them
Take the pen cap
We fix it to the structure
Attach a clip to the other end of the structure
We take a rod, maybe a couple of them will serve as bolts for a crossbow (a bolt is an arrow for a crossbow)
Fire! The crossbow is ready!
When using an office crossbow, be careful, do not aim at people, shoot at targets, you can even have a competition.
Spending every day in the office with your co-workers can be quite fun, but for most it is complete boredom that will make you climb the wall. Let's fight office boredom! With the help of this article and completely ordinary supplies that can be found in any office, you can make a fully functional small crossbow. Declare war on your colleagues, lay siege to their desks, show them who’s boss! After reading this article, office life will never be the same again.
For a crossbow from office supplies you will need:
- pen cap;
— clip for papers;
- ballpoint pen refill.
To begin, tie two pencils together