by Alexey | Paper Crafts Other For Friends Gifts For Loved Ones For Women Origami Workshop | Wednesday, July 15, 2015
| Click "Like" to follow Make-Self.net on Facebook |
Today we will do something original with you. Would you think that a bracelet can be made from plain paper? No? Then we will tell and show you how to do this without spending much time and money. Stop admiring the photos and get to work!
It's very easy and fun, I promise.
Making a bracelet
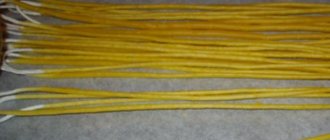
To make an origami bracelet, we will need twenty strips of paper, ten strips of two different colors. The strips should be twelve centimeters long and one and a half centimeters wide.
We fold all the strips the same way. First, fold the strip in half. Iron the paper with your finger until a fold line is formed.
Straighten the strip. Then we bend the ends of the strip inward to the fold line, iron the new folds that have formed, and fold the fragment, as shown in the photo above. We prepare such fragments from all paper strips.
These are the fragments of different colors we get.
We take one of the fragments in our right hand and press a little on the folds so that it opens a little. Then we take another fragment and insert the protruding parts into the resulting “pockets”.
Here it is - the first step of our bracelet.
Alternating colors, we form a chain according to the pattern described above: we insert one fragment into another.
When the bracelet fabric is completely ready, we insert the last fragment into the penultimate one, folding it only in half. This is done to make it more convenient for us to give the bracelet a complete, round shape.
We unfold the long strips of the last fragment. We place the initial fragment of the bracelet between them and press it a little.
We insert the tails of the last fragment, bending them inside the formed pockets. Iron the folds. The bracelet is ready.
Many people like to create their own jewelry. The motives for this are different for everyone: some want to become the owner of an exclusive item, some simply like to create, while others chase the changing trends of fashion. In this case, the most unusual materials are used. For example, this article will talk about how to make a bracelet out of paper.
Advantage of the material used
The fashion for paper jewelry came to us from the distant 60s, along with other trends that returned from the past. This is an ideal material for creating something, because it holds its shape perfectly and is very malleable; the main thing in working with it is patience and accuracy.
It would seem that paper is an extremely fragile base, but with additional fixation it can easily withstand small mechanical loads; it is enough to have glue or varnish on hand. Before making paper with your own hands, you will also need to choose one of the many manufacturing options and, of course, the material used. Indeed, today there are a huge number of types of paper, different in color, density and texture.
How to make a paper bracelet step by step
This method involves creating beads, so it is quite painstaking and complicated.
- First you need to correctly mark the sheet into triangles. To do this, measure 2 cm to the right from the bottom edge and draw a line diagonally to the top left corner. Then retreat 3 cm from the new mark and connect it with a straight line to the old one so as to form a triangle. Using the same principle, you need to draw the entire sheet.
- Cut out the resulting shapes.
- Using a pencil, you need to twist the triangles into a roll, starting to wind the strips onto the wooden base from the wide edge. Since making a paper bracelet in this way is a little difficult for a beginner, it is better to practice making it on unnecessary material, for example, an old newspaper.
- The thin tip will need to be coated with glue before wrapping it around the pencil.
- Having moved the bead to the very edge, it must be completely dipped in PVA and allowed to dry. If a bracelet requires a lot of elements, it is better to put the bead on a toothpick so as not to tear off the paper when trying to peel it off the pencil.
- When all the beads are ready, the question is how to make a paper bracelet with your own hands? will disappear by itself, because here you can give free rein to your imagination.
Then it all depends on how the creator himself wants to see the decoration. For example, paper beads can be alternated with those prepared in advance - then the bracelet will turn out thin but long, or thick if you use a slightly different technology:
- The fishing line needs to be threaded into the bead at one end, the other should be passed from the opposite side and pulled together so that they tightly clasp the paper element.
- Place a bead on each edge.
- With the next bead you need to do similar manipulations, passing a fishing line through it on both sides. In fact, the same technology is used in beadwork, so for those who are familiar with this type of needlework, there should be no problems. The ends of the fishing line are secured with a simple knot when the required length of the decoration is reached.
Origami technique: how to make a bracelet out of paper
For beginners, this method is best suited. All you need is paper and scissors. not important, the main thing is bright colors. Therefore, to create decorations, it is better to take special origami paper, as it can be very beautiful and pleasant to the touch. The only disadvantage of this bracelet is its relative fragility.
- The paper must be divided into strips along the width of the sheet in order to then cut them out. It is advisable that they are not very thin, otherwise it will be difficult to fold the elements later.
- Then the cut strip needs to be folded lengthwise 4 times, bending the edges inside the workpiece, and then in half 3 times: in the middle and along the edges (the ends should be folded towards the central fold, so that you get two pockets).
- Several such details need to be made.
- The blanks should be connected in a zigzag fashion, placing one inside the other (this is what “pockets” are for).
- When the bracelet reaches the desired length, the ends are simply connected to each other in the same way as the rest of the elements.
Of course, there are many ways to make a paper bracelet, but the ones given here are the most common. Master classes on the Internet are devoted to them, which will help you understand the tricks of creating jewelry.
Paper is an ideal material for creativity. You can draw on it, make appliqués, and use it to create all kinds of crafts.
How to find buyers, advertising bracelets
Immediately after purchasing the components, you need to start creating bracelets. A couple of pieces need to be made special, unlike other products. And this will help you attract new customers.
Tips for promoting jewelry:
- Practice taking macro photographs of objects;
- It's worth finding a professional camera;
- For shooting, place the jewelry on the fabric so that the color sets off the product and is also clearly visible;
- Take photos of all unique items.
In order to increase your chances of success, order the services of a professional photographer, so the photos will turn out to be of high quality and expensive.
Different ways
There are many ways to make a paper bracelet.
Idea number 1.
Prepare the following materials:
- thick multi-colored A4 paper;
- fishing line;
- glue;
- Ruler and pencil;
- a thin plastic or wooden stick (as for sushi).
You can start working.
Ready. A simple way to make a paper bracelet with your own hands.
Idea number 2.
Using this method, even a five-year-old child can make a bracelet for himself. Although for the first time it is better to do it with him.
You will need:
- three multi-colored thick sheets of paper;
- scissors;
- glue.
It is necessary to cut three multi-colored strips of the same length. Now carefully braid them into a braid. In this case, it is advisable to glue the strips with each bend. But use a little glue so that the paper doesn't get wet.
This was the second way to make a paper bracelet. As you can see, it turns out to be a very simple but beautiful bracelet.
Idea number 3.
Ways to sell bracelets
There is no need to spend money on opening your own retail outlet, since this will definitely not recoup the costs. Alternatively, you can sell your products to other specialized stores for further sale. A very good option is to sell jewelry online. For these purposes, it is best to create your own online store. A very relevant way of Internet sales is promotion on social networks. You can advertise your bracelets in separate groups, offer them to your acquaintances and friends. This is how you can express yourself. And very soon your home business will begin to bring you profit.
Egyptus Bracelet
You can also make an Egyptian bracelet from the cartoon of the same name.
To do this, you will need thick but flexible golden paper, glue, 3 large blue beads, 1 blue bead, and a blue felt-tip pen.
- Cut a sheet of paper crosswise, attach it to your wrist and glue the ends together, cut off the unnecessary part.
- Using a felt-tip pen, draw the eye of Horus.
- Glue a blue bead in the center of the eye, blue ones on the bottom and sides.
The fabulous decoration is ready. Now you know how to make an Egyptus bracelet out of paper. This will be very relevant for little fans of the cartoon or for those interested in Egyptian themes.
Positive aspects of creativity
These are the easiest ways to make paper decorations. Show them to your child and he will be delighted. Girls will especially enjoy this process. After all, in the same way they can make additions to the bracelet - beads or a necklace.
As for boys, the same Egyptian bracelet will suit them perfectly and will give them the opportunity to imagine themselves as the last pharaoh of Egypt.
This will perfectly develop their spatial thinking and creative skills. Weaving bracelets will help little children develop fine motor skills and finger dexterity.
You can also experiment with design and translate all your ideas into creativity. The main thing is not to be afraid to fantasize.
Due to the fact that IzobretayK mainly publishes materials devoted to, so to speak, boyish crafts
, we decided to add variety and tell the girls
how to make an origami bracelet
.
For folding an origami bracelet
you will need a square piece of paper. It will be ideal if you can choose paper like in the pictures. The product made from it looks very beautiful and impressive.
Stage three – forming an assortment, preparing photographs of products
This is a very important step. You need to make one sample of each type of bracelet that you intend to offer to customers. Later you can safely sell all these samples. But for now they are needed for a photo shoot.
So, you will need the following:
- Samples of finished bracelets;
- SLR camera with a good fast lens for subject photography;
- A beautiful background - a piece of white or black fabric, large sheets of paper or a colorful wooden board;
- At least basic knowledge of subject photography can be studied on the Internet.
Well, or just invite a photographer, pay him and wait for cool shots.
Making a paper bracelet
When folding crafts
the sheet of paper should be arranged in a diamond shape.
- Fold a sheet of paper in half (top to bottom and right to left). After this, we unfold it to its original position.
- Fold the top and bottom corners to the center bend line.
- Then we unfold the bottom corner and bend it to the new bend line.
- Unfold the bottom corner again and bend it to the top edge of the sheet.
- We unfold the sheet and perform steps 3-4 with the other half of the sheet.
- Now you need to turn the sheet over and bend the bottom corner until it intersects with the first bend.
- Unbend the previous fold and bend it again, but to the second bend.
We perform similar actions so that your sheet is divided into sixteen equal parts. - We unfold the sheet so that the folds are vertical and begin folding the folds.
- It should look like in the picture.
- We do the same actions with the other side of the sheet.
- Now turn the workpiece over and smooth it with your fingers.
- We bend the workpiece into a ring and insert one edge into the pocket of the other until they form a rhombus.
- All that remains is to smooth out the origami bracelet and give it a round shape.
- The origami bracelet is READY!
Continuing the theme of summer crafts, let's talk about how to make jewelry with your own hands. Bright bracelets, fashionable beads, unusual rings and other decorations for summer outfits will be interesting for girls to make with their own hands. Of course, mothers will help them in this exciting creative activity.
It's very easy to make bracelets from wooden ice cream sticks.
or
medical spatulas
. To do this, you must first soak them in water for 24 hours so that they become flexible. To speed up this process, it is sometimes advised to “cook” them for 15 minutes, but after this the sticks may darken.
Now you need to take them out of the water and very carefully place them in a glass or cup of a suitable diameter so that the sticks take their shape. Leave them in this position to dry. Make sure the sticks are completely dry before removing them from the cups.
These are the blanks for bracelets you should get.
All that remains is to paint the bracelets with your own paints, decorate them with fabric, paper appliqué using the decoupage technique, beads, buttons, etc.
Important!
It’s better to make a bracelet with a slightly smaller diameter than you need, because... When decorating a bracelet, in particular, when treating it with paint and glue, it may straighten a little and become larger.
It’s easy to make a bracelet with your own hands using the origami technique from candy wrappers. Detailed master class on making an origami bracelet. If you don’t have the opportunity to collect so many candy wrappers, you can make an origami bracelet from colored paper.
We will talk about how you can make fashionable bracelets from plastic bottles. Let us remind you about this craft again.
To make these bright bracelets from floss threads, you will need:
- leather cord
- floss threads of different colors
- beautiful button
- scissors
The easiest way to make an elegant bead bracelet is to buy an inexpensive bracelet and some cute beads from the jewelry department, and then “tie” the beads to the bracelet with colored yarn or thread.
Making such jewelry with your own hands is quick, simple and inexpensive, so you can afford to have bracelets of different colors to suit different outfits. This is what the finished product looks like on hand.
You can use a homemade bracelet instead of a store-bought bracelet.
Or you can “tie” store-bought beads to a leather cord. This bracelet made of beads looks very stylish. It can be wrapped around your wrist several times.
We looked at easy-to-make DIY bracelets that parents can make even with preschool-aged children. Now let's move on to more complex master classes on how to make a bracelet.
Now we will teach you how to weave bracelets from beads and beads in the simplest way, accessible even to those just starting to master the science of beading.
Do you know how to braid a regular braid? If the answer is yes, then you can completely cope with the task of making such a bracelet from small beads (seed beads) and waxed cord. You will just need to sequentially weave the beads into the braid, which is woven from the cord.
In the same way, you can weave a bracelet from thick rope and hexagonal nuts.
One of the most beautiful and stylish, in our opinion, bead bracelets, which even beginners in beadwork can make.
To make such a bracelet with your own hands, we need:
- any
small beads The number of beads depends on how long the bracelet you want. Decide in advance whether it will wrap around your wrist once or several times. - leather cord
- strong threads
of a suitable color. The threads do not have to match the leather cord; they can be of a contrasting color. A prerequisite: the thread must be of such thickness that, folded in half twice, it can pass through the hole in the bead. - beautiful button
for fastening - needle, scissors, clip for attaching the bracelet during weaving
Business profitability
The average price of a beaded bracelet, its cost is 90 rubles. It is possible to sell such jewelry on the market for 250-350 rubles. However, due to our economic situation, buying expensive jewelry is not relevant for all girls now. Therefore, it is worth considering more budget options.
For example, a bracelet woven from paracord will cost 120 rubles. Despite the fact that you can weave it in 15 minutes. And the market price of the product is 750 rubles.
For such jewelry, a comprehensive sale of components is provided. In order for all costs to be recouped, you need to sell 10 of these bracelets. Since the kit comes with 50 sets designed for weaving a bracelet. It turns out that thanks to 40 bracelets, a net profit will be received.
In order not to go into the red, you should initially buy small batches of blanks.