Materials
Dear readers of the online magazine “Handmade and Creative”, we apologize for the lack of updates on the site for several days, but today we will try to please you with exciting ideas. So, we decided to translate for you a voluminous instruction on how to create a mask from plaster or a cast of a face, they are all called differently. This is a very fun idea, since the person whose face will be subjected to plaster will be very vulnerable and can be mocked a little. The most important thing is not to forget to make holes so that the “test subject” can breathe while the frame of the face cast is drying. The master class contains more than 50 photos and several videos, but don’t be scared, everything is very simple and clear!
Required materials and tools:
- alginate impression mass - this material is widely used in dentistry; dentists use it to make impressions of the oral cavity, etc. This material is inexpensive, so it is perfect for us. As they say: “Cheap and cheerful”;
- three measuring containers - necessary for measuring alnitic mass, gypsum powder and water;
- buckets and containers for mixing alginate and gypsum, as well as other measured volumes for adding water;
- plates - for conveniently applying plaster to the face and wetting gauze in the plaster solution;
- mixer for mixing building materials.
Step 1 01
Model. Her position
In fact, the model will need to sit in one position for 45 minutes to an hour, depending on the speed of drying of the alginate mass. We advise you to sit your model more comfortably so that it is comfortable during the drying period. Also important is the fact that when removing the alginate mass from the model, there will be extremely unpleasant sensations in the area of the eyebrows, facial hair (if any), as well as hair around the face. Some craftsmen advise applying Vaseline to these areas so that the hair does not adhere so strongly to the hardening substance. But according to our practice, we can say that this does not help as much as it spoils the appearance of the final result with greasy Vaseline stains. We did not resort to using it, and our model withstood the pain test with dignity despite the fact that she wears a beard.
Step 2 02
Mix the alginate mass
Read the instructions for use carefully; in our case, we added a little less water than required. Mix everything thoroughly with your hands and sort through any possible pieces that formed when mixing the mass. It is better to err on the side of a thicker substance; if you make a very liquid mass, it will be extremely difficult to apply it to the model’s face. You need to mix the alginate quickly enough, be very careful to ensure that you quickly get 350-400 ml of a homogeneous mass without pieces and you will have about 10 minutes left to apply it to the model’s face, after which the hardening process will begin, which cannot be delayed. In order to quickly and efficiently apply the mixture to the model’s face, apply the mixture with four hands of two assistants who will stand on both sides of the model’s face. This will allow you to quickly apply the mixture to your face before it starts to harden.
Step 3 03
Plaster bandage (gauze)
It is necessary to apply the plaster bandage quickly, before the alginate hardens, and we also give advice that it is best to apply the plaster in small strips, 10 cm or less, this will allow you to correctly go around all the contours of the model’s face. The most important thing when applying plaster to the surface of the alginate is to monitor the openings of the nostrils; in no case should they be sealed, otherwise... Press the plaster strips with both hands so that there are no air cavities between the face and the alginate mass, which can ultimately ruin the entire cast faces. Your task is to get the highest quality face mask made of plaster and alginate; only in this case can you count on a good plaster cast!
Step 4 04
Time to create a plaster face mask
The main thing to remember is that you have a limited time when applying plaster bandages to your face. It’s better to do it not as smoothly as you would like, than for the plaster to start drying out. This will add large irregularities to the structure of the plaster. It's usually best to do this job with two people, armed with one bowl each of water and strips of plaster, wet the strip, squeeze out excess water and apply to the model. Three layers of plaster are a necessary layer to create a quality mask. In the nose area, it is advisable to use a smaller layer to support the alginate mass.
Step 5 05
Removing the plaster-alginate mask
When removing the mask, you need to take into account that the hair could be mixed with the alginate mass; this is inevitable, provided that you did everything correctly and the model is not completely shaved bald. Thus, gently remove the hair, try not to tear, this can cause real pain to the model and everything can go down the drain.
Step 6 06
Seal up unnecessary holes in the mask
Since we will fill the finished plaster mask with a solution from which we will ultimately obtain a high-quality cast of the face, it is necessary to fill up all the irregularities that could remain during the manufacturing process of the plaster mask. First of all, these are the openings of the nostrils; you need to carefully seal them and pay attention to possible air bubbles that were allowed when applying the alginate mass. Mix some water and alginate to create a very small amount of mass. Before doing this, apply a strip or two strips of plaster to the nose area from the outside. After this, using alginate, seal the openings of the nose.
Step 7 07
Preparation of gypsum mortar
We are close to finishing the cast. Read the description of creating the gypsum mass on the packaging and start mixing. It’s very good if you have an electric construction mixer that will thoroughly mix the solution; if you don’t have such equipment, take the trouble to do it yourself. Please note that the quality of the plaster face cast will depend on the quality of the mixture; if the solution is more rigid, then there is a possibility that there will be air bubbles inside it, which can greatly spoil the appearance. If the solution is more liquid, this will reduce the possibility of cavities appearing inside, but such a solution will take much longer to dry.
Step 8 08
Ready
To install the mask, you should choose a strong place that will at the same time hold the mask on all sides. A mask filled with solution will weigh several kilograms, so you need to approach this very carefully. We came up with an installation option in the form of a box filled with a lot of cardboard, which made it possible to evenly distribute the load over the entire area of the mask. When the layout (mask) is set, you can start filling. You don't need to fill it quickly, but evenly. After the mask is completely filled, you can make several dozen light blows on the box; this will help release possible air bubbles from the solution and more tightly fill all the unevenness of the model’s mask.
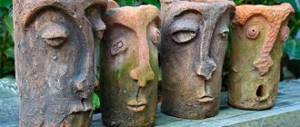
Every ordinary citizen of his country can now immortalize his face for posterity by making a plaster mask or a cast of it at home. It’s not at all difficult to make a plaster mask thanks to the simple technology presented. And how interesting it is to then surprise your friends with a sculptural portrait of the Great Man!
First you need to prepare the faces, on its basis a cast will be made.
The mask is made like this (shown in the video):
What do you need for a mask?
We will need paper towels or newspaper, it is better to use paper towels as they are soft. You also need cream or Vaseline to prevent the mask from sticking to your face. Of course, we need a model - this is one more person, since it will be very problematic to do it yourself. The model should be in a lying position on the sofa or on the floor.
Actions step by step.
First you need to apply cream or, preferably more, on your face, especially in the area of eyelashes and eyebrows and the hair contour so that the mask does not stick and can be easily removed. Pour a little PVA glue into any clean dish, tear the paper towels into small pieces and soak them thoroughly. Apply these pieces gradually and evenly to the face.
Be extremely careful in the eye and nose area. Do not press on the eyelids so that the glue does not get into the eyes, and when you paste over the nose, do not forget to leave the nostrils open.
At the end, when everything is almost ready, you can apply a little more glue on top with a brush to make the mask more secure. Well, don’t forget to dry it all thoroughly with a hairdryer. Be sure to hold the volunteer’s hand at this time so that he can give at least some sign if he gets too hot.
The most interesting moment! Using both hands, carefully remove the mask and dry it in the sun or with a hairdryer until it completely hardens.
Now you can see what the mask looks like after complete drying. By knocking, it is already dry and quite durable, like plastic. Now it can be used. For example, carefully cut out the eyes, drill holes so that you can thread an elastic band. You can also put a wig on top and the face will look quite realistic. By the way, the mask can be made up at your discretion, for example for Halloween.
Once you have made this mask, you can begin creating a plaster cast.
To create a plaster cast you will need:
tap water,
alabaster (plaster),
two containers - for sand and for plaster with water,
Previously, we published material on the site in which we made a mask. Continuing this topic, we present to your attention a new material in which we will look at how you can fill a paper mask we made with plaster, and we will also show you what kind of cast we will get as a result.
According to tradition, we suggest first of all devoting a few minutes to watching the video
Now let's start collecting materials. We will need: - tap water; - plaster; - sand; - two containers; - paper tape; - cream; - a mask made by us; - mixer.
Let us immediately clarify that we will need one container for diluting the gypsum with water, and the second for sand. If you don’t have a mixer at home, you can freely replace it with a fork, spoon, or even an ordinary wooden stick. A mixer is needed to mix the plaster with water; when using alternative tools, it is important to do everything quickly, since the gypsum begins to harden very quickly.
First of all, we need to make something like a side on the top of the mask using paper tape. This is necessary so that when pouring gypsum, it does not leak out.
Now we take the cream, with which we must thoroughly coat the inside of the mask so that the plaster does not stick to it. You can already pour plaster, but in order to protect yourself from possible deformations of the mask, take a container the size of the mask and pour sand onto its bottom.
You can move on to plaster. Pour water into a container and pour plaster into the container.
Mix thoroughly and quickly, making sure that no lumps form.
When the gypsum is mixed with water, you can pour it into the mask.
Now we need to wait until the plaster hardens thoroughly. This will happen approximately 15 minutes after pouring.
When the plaster has hardened well, we need to remove the mask from the sand and clean it of sand with a brush.
Light irregularities can be corrected with a spatula. There may be some unevenness on the mask, but this is due to the PVA glue we used to make the paper towel mask. Later we will make a mask out of thermal adhesive using the plaster appearance we received.
From ancient centuries, methods and methods of using natural minerals to maintain female attractiveness have come down to us. The use of aromatic oils, natural clay and, of course, gypsum is becoming increasingly popular. Plaster mask has found application in cosmetology due to its thermodynamic and chemical properties.
Base for plaster mask
To make a plaster cast, you first need to make a papier-mâché base.
What you will need:
- paper towels;
- Vaseline or any fatty cream;
- brush;
- PVA;
- clean container.
For the master class, it is advisable to have one more person present, since making a cast of your own face may not seem very convenient to someone. In addition, before taking an impression you need to take small precautions:
- cover the eye and eyebrow area with tissue paper;
- It is best to hide the hair under a rubber cap or bag;
- insert cardboard or paper tubes into the nostrils to facilitate breathing.
What do we have to do:
- Apply Vaseline or cream to your face. It is better to make the layer thick, especially in the eye area and along the contour of the hair, so that the impression can be easily removed.
- Pour some glue into the container. Tear the towels into pieces and soak them well with glue.
- Cover the entire face evenly with paper.
- It is important to be careful in the eye and nose area. Do not press on the eyelids so that the glue does not penetrate into the eyes. The same goes for the nose.
- To make the papier-mâché base more reliable, you can apply a small layer of glue with a brush.
- Now you can dry the mask with a hairdryer. It is important to agree in advance with your assistant on the symbols in case the air from the hair dryer is too hot.
- When it hardens a little, you can carefully remove the mask and leave it to dry until it becomes plastic.
This completes the making of the base cast.
What do we use? A little chemistry
Gypsum (Ca *2H2O) is a widespread sedimentary mineral. Appeared as a result of the evaporation of oceanic masses millions of years ago. Calcium sulfate has unique properties:
- during heating, gypsum is able to release water from the crystal lattice, transforming into a semi-aqueous form;
- with a further increase in temperature, it completely dehydrates and becomes a dense substance;
- in contact with water, dry or hardened gypsum restores its structure;
- chemical reactions occur with a large release of heat.
What do we use it for? Physical processes
In addition to the main ingredient - gypsum powder - thermoactive masks may contain seaweed, salt, mud, and silt. A plaster mask applied to the face is initially cool, but gradually warms up to 42 C, creating a “sauna effect”. The components used for this mask are fat-soluble. And they need heat to penetrate the skin. The effect of such a facial procedure can be adjusted by changing the base (cream, gel or other mask). Thermal effects improve metabolic processes, increase blood flow, and tighten sagging skin.
As the mask hardens, it cools and takes on a hardened shape, which improves drainage and provides a lifting effect.
A plaster face mask helps:
- improvement of metabolic processes;
- preventing facial skin aging;
- refreshing tired skin;
- smoothing and tightening of the skin;
- facial oval modeling;
- expanding pores for deeper nutrition.
DIY casts of arms and legs. Two production methods available to everyone
Babies in their first year of life grow so quickly that parents don’t even have time to look back.
But you really want to capture in your memory the moments when the baby is very small. The way out of the situation is casts of arms and legs. Buying a ready-made kit for making them is now not particularly difficult. However, the price of such kits often raises eyebrows, and the included creative components seriously limit your imagination. How realistic is it to make casts of arms and legs with your own hands, using improvised means? It turns out that the procedure is quite simple, and you only need a few materials! Plaster casts
How to make casts of arms and legs with your own hands using plaster? You need to take plasticine, you can even use old one, heat it in the microwave and form a cake so that your foot or palm print fits on it. Then we make an imprint on the cake. If it doesn’t work out the first time, then you just have to reheat the mass. To make the impression clearer and deeper, when pressing, you should fix the edges of the cake so that they do not diverge to the sides.
It is convenient to use some form with sides for this. After obtaining an acceptable result, the impression is placed in the freezer to harden. We dilute plaster for sculpture work (can be purchased at an art store) in accordance with the instructions and additionally add a little PVA glue, pour the resulting mass into cakes with impressions, and leave for some time to harden. When the plaster hardens, carefully clean the resulting casts from plasticine and leave for about a day for final drying. Then you should lightly walk over them with sandpaper, removing roughness and unevenness. This should be done especially carefully so as not to crumble the finished product. It is necessary to apply paint on top in several layers. The most popular options are bronze or metallic silver, but the choice of color is up to you. After drying, the casts of the arms and legs (made with your own hands, by the way) are ready! They can be placed in a deep frame, mounted on a stand, or fit into the interior in any other way.
Alabaster casts
The second, no less budget-friendly way to make casts of arms and legs with your own hands is to use alabaster as a base. You need to mix five glasses of flour, two and a half glasses of fine salt, a tube of baby cream, mix. Gradually add water, achieving the consistency of plasticine. We make cakes of the required shape and make prints of feet and palms. Place the casts in the oven and dry at low temperature until hardened. Lubricate the prints with Vaseline and fill them with diluted alabaster and leave to dry. After complete drying, carefully remove the casts from the mold using a nail file, file, or other improvised means, and give them a neat shape. After this, we cover the casts with paint of the desired color and let it dry.
We looked at the two simplest ways to make casts of arms and legs with your own hands. As you can see, this is quite simple and accessible to parents. And the possibilities for further decoration are limited only by the range of products in the art store! This could be a beautiful frame in a marine style for a boy, decorated with pebbles and shells, or a floral design for a girl. Or you can even make a cast of the hand every month and, by the end of the year, create an unusual panel on which you can clearly see how quickly the baby grew during this period.
How do we use it? Getting to know the technology
Properly prepared gypsum-based compositions have positive reviews. The course of treatment is best carried out by an experienced cosmetologist. The specialist will select the required plaster and compositions for it (creams, serums) individually. But with some experience, you can try to do this procedure yourself. A plaster mask requires certain rules to be followed:
- Before application, the skin is cleansed and light peeling can be performed.
- Do not massage your face, do not provoke an increase in blood flow.
- Fat-soluble nutritional preparations are applied under the mask.
- The area around the eyes is protected with a cloth, pre-lubricated with cream.
- The gypsum mixture is applied from bottom to top using a cosmetic spatula. Better in a horizontal position.
- Stays on the face for no longer than 20 minutes.
Which ones do we use? Cosmetic kitchen
The use of plaster casts is a cosmetic procedure; cosmetology today knows many recipes for this miracle remedy.
Janssen Thermo Face Mask
Made in Germany, it is used as a rejuvenating procedure to moisturize the skin, prevent aging, and improve tone. It is recommended to use it 2 times a week for a month.
- the powder from the bag is mixed with water to the desired composition, stirred well;
- apply with quick movements, avoiding the eye and lip area;
- wait for the mask to harden for up to 20 minutes;
- an impression of the chin is taken;
- residues are removed with tonic.
The composition from France tightens the skin, relieves fatigue, and improves complexion. It is recommended to purchase special ampoules with serum for the plaster procedure.
- a gauze base for plaster is pre-prepared;
- gypsum powder is mixed with water;
- Serum is applied to the skin;
- gauze and plaster are applied on top;
- hold for 30 minutes.
Plaster mask
Now you can begin creating the plaster mask.
For this you will need:
- paper adhesive tape;
- water;
- gypsum;
- cream;
- papier-mâché mask;
- mixer;
- a pair of deep containers;
- sand.
Sequencing:
- Along the edge of the mask, you need to make a border out of paper tape. This is done to ensure that the gypsum mixture does not leave the cast.
- Now, coat the inside of the mask well with the same cream or Vaseline that was used earlier. This is necessary so that when the plaster dries, it does not stick to it.
- Next, it is important to protect the mask from deformation. To do this, you need to take a small deep container of suitable size and cover the bottom with a thick layer of sand.
- Place the mask in the sand and pour more sand in a circle to make a kind of pillow for the cast. This is a great way to restore the stiffness lost to the mask due to the greasy cream.
- Now you can make the gypsum mixture. To do this, mix dry plaster with water in a second container. Carefully move with a mixer, trying to avoid lumps.
If using a mixer is not possible, you can use a fork or spoon as an alternative. However, in this case you will have to work very quickly with your hands until the plaster has completely hardened.
- When the mixture is brought to a state of homogeneity, you can pour it into a papier-mâché cast.
- It remains to wait about a quarter of an hour until the plaster hardens. If time allows, you can wait about half an hour for greater reliability.
- When the plaster has hardened, you need to remove the mask and carefully remove the sand with a soft brush. After this, papier-mâché can be removed from the plaster.
The mask is ready and now you can use it.