When preparing for holidays or children's parties, difficulties always arise in choosing and creating a suitable costume. It is especially difficult to choose an image for a girl. Young fashionistas want to look beautiful and magical. Therefore, you need to thoroughly think through all the details of the costume and make a real masterpiece.
Recently, stores have been pleasing with their assortment, but the prices for suits are too high. And the quality sometimes leaves much to be desired.
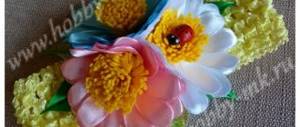
Therefore, we suggest you make your own costumes. For girls, an excellent option would be the image of a strawberry, similar to the one used in the well-known orchard advertisement.
What substances does a cotton-gauze bandage or mask protect against?
A cotton-gauze bandage or mask is a special device for protecting the respiratory system. Let's look at the main situations when a bandage can be useful.
VMP can perform several functions:
- Protects against viruses that are transmitted by airborne droplets, such as influenza, whooping cough.
- Protects against dust, smog or smoke.
- It is an excellent protection during a fire, when toxic combustion products are released and there is a lot of smoke in the room for a long time.
Instructions for making a cotton-gauze bandage, face mask
- Used during a bacteriological attack if poisonous gases are sprayed around.
- Useful during an accident at nuclear power plants. VMP perfectly filters dust that contains radioactive substances.
- Protects if the air is contaminated with ammonia or chlorine. In this case, the bandage must be additionally soaked in a solution that contains citric acid in the first case and a soda solution in the second.
- It is important to know how to make a mask with your own hands and to be able to do it quickly. Let's say there is a fire in your building, but you cannot quickly leave the house.
- Of course, you can buy it at the pharmacy, but making it is very simple. Yes, and it costs much less. For a cotton-gauze bandage, it is important to purchase high-quality material. It will be described a little below.
https://youtu.be/https://www.youtube.com/watch?v=p6mZK1Gl6ac
_
Denim headband
An integral attribute of everyday street style is denim clothing. It is even worn at business meetings, ceremonial or public events. The denim headband can be combined with jackets, shirts, dresses, overalls, shorts or shoes made of similar fabric.
Any color from white, light blue to classic blue. Stylish chic - decor with embroidery, fringe, massive metal elements or stones. Looks trendy with ripped jeans.
To sew a headband, you need to choose a certain type of denim. Chambry, stretch, summer are suitable. From lightweight material, you can sew a straw with an elastic band or wire for better fixation on the head. The choice depends on the hair and application.
What does a cotton-gauze bandage or face mask look like?
Cotton-gauze bandage, mask comes in various shapes: round, rectangular, square. The product is made, as the name suggests, from gauze and cotton wool.
The following requirements must be taken into account:
- For the dressing, take gauze whose density is at least 36 g per square meter. Otherwise, the product will not provide the required effective protection. You can easily determine this parameter if you weigh the gauze. For example, take gauze that is 0.9 m wide and 5 m long. The gauze should weigh more than 160 g.
- When you buy gauze, check with the seller exactly what requirements the manufacturer adheres to during production. The highest quality gauze is “Gostovskaya”. It has the same actual length as stated by the manufacturer.
- Buy cotton wool for the bandage that is made only from 100% cotton. Synthetic impurities are not allowed. As a rule, such wool is bleached without the use of chemicals. The presence of synthetics can be easily determined - just hold the cotton wool up to a UV lamp. “Pure” cotton wool will not glow under UV light.
- The cotton wool should not contain short fibers that could enter the lungs during inhalation.
Traditional look
Standard sizes of cotton-gauze bandage, face mask
- When making a cotton-gauze bandage or face mask, be sure to take into account the size of the product - it should cover a large area of the face. At the same time, the forehead and eyes always remain open.
Standard parameters:
- The standard width of the product with ties is 0.9 m.
- The standard height of the bandage is 0.2 m.
- The central part of the product is 0.2 m wide .
- The sectional parts of the mask are a minimum of 0.3 m and a maximum of 0.35 m.
Cotton-gauze bandage, DIY mask without a machine: diagram, pattern
- If you want to make a cotton-gauze bandage or mask at home, without a machine, then pay attention to the pattern diagram. It shows standard mask sizes.
- Make a bandage taking into account your physiological characteristics. As mentioned above, the mask should cover almost the entire part of the face with the exception of the eyes and forehead area.
Scheme of cotton-gauze bandage, mask
How to make, sew a cotton-gauze bandage, life safety mask from a bandage: instructions
- In the midst of epidemics, many people try to buy a mask at the pharmacy. This bandage is considered a quick and fairly inexpensive method of protection against viral diseases.
- But you must understand that such a product is considered disposable, therefore, the mask must be changed every 3 or 4 hours.
- A gauze bandage that you make yourself can last quite a long time. Because after use you can wash it and reuse it.
- Making a mask is quite easy. And the basic skill of making a mask is introduced to children in schools during a life safety lesson.
Let's consider a simple option for making a cotton-gauze bandage . For this you need:
- a needle with a spool of white thread, a 100-gram pack of cotton wool, 2 bandages, 7 m long and 0.14 m wide.
Next follow the instructions:
- Cut off the bandage. You only need 0.6 m.
- Place cotton wool on the edge of the strip you get. Make the cotton wool in the form of a square (14 cm wide and 14 cm long).
- Twist the bandage together with the cotton wool. Repeat this 3 times.
- Cut another piece of bandage of identical dimensions.
- Cut the resulting piece so that you get 2 equal parts.
- Twist both parts to make ropes. They will serve you as ties.
- You need to thread the resulting ties into the bandage itself: one tie at the top, the other at the bottom. Sew up the edges of the mask.
VMP
- In total, from the material you buy, you will make at least 12 masks.
Knitting patterns
Now let's move on to creating stylish knitted headbands that will be on trend in 2020. Let's start with the simplest schemes and gradually move on to more complex and interesting options.
Elastic band with overlap
This headband looks like a turban, which is trendy this year. Despite the simplicity of the knitting, the result is a rather spectacular bandage with an overlap in the center.
It is recommended to knit such a bandage with an elastic band - alternating the front and back loops. The proportions can be anything: 1×1, 2×2, 3×2 and others, it all depends on individual wishes. Our photos show examples connected using a 2×2 pattern. The final length of the bandage is designed for girls 6-8 years old.
Interesting: Knitting a scarf with knitting needles is very easy!
Step-by-step instruction:
- Suitable yarn for this work is half wool and half acrylic, density 116m/100g, knitting needles number 4.
- We cast on 24 loops and knit with an elastic band, according to the given diagram, a segment 22 cm long.
- Afterwards the overlap is made - we divide the work into two equal parts of twelve loops each. Next we knit each of them separately, approximately 6 cm long.
- We put the loops together again and knit another 22 cm according to the same pattern.
- After the product is ready, we sew the ends together. This is best done on open loops using a special knitted seam.
Bow
The headband turns out to be very impressive if you decorate it with a bow. Despite the originality of this product, it is very simple to make. All you need is to choose your favorite threads and comfortable knitting needles. The needlewoman needs to master the technique of casting on loops and knitting with facial loops. The diagrams with descriptions given below will help you get a stylish new thing in just a couple of hours.
- We cast on 25 loops and knit 130-140 rows with facial loops (see the figure below for how to make facial loops).
- After the strip is ready, we begin to create the bow. To do this, we cast on 20 loops and knit 25 rows in the same way. We close the edges and assemble the product.
Volumetric braid
The most common among fashionistas are knitted headbands, decorated with a voluminous braid. Creating such beauty with knitting needles is quite simple. All that is needed:
- Threads you like, for example, YarnArt merinode luxe/50, knitting needles number 4.5.
- We cast on seven loops and knit with a 1×1 elastic band: 1 edge, 1 knit, *1 purl, 1 knit* - to the end of the row, 1 edge.
- Next, we make three loops in stocking stitch at the beginning and end of the row. We knit the middle of the row, adding two loops in the front row until we get 25 loops.
- We knit a braid: 1 edge loop, 3 stocking stitch, 2 purl stitches, a braid of 13 loops, 2 purl stitches, 3 stocking stitch, 1 edge stitch.
After the bandage reaches the required length, decrease two loops in each front row; after seven loops remain, sew on a button.
A more complex version with a scythe
Needlewomen are able to come up with all kinds of headband options. We offer another interesting option with a “wide braid” pattern. This bandage should be knitted in the same way as the above option with a braid. Feel free to experiment, because the result is worth it!
Interesting: Knitted cardigans for women: patterns and description
With visor
If you want something interesting and original, you can try knitting a headband with a visor. Such a product will not only protect your ears from the wind, but also cover your face from bad weather.
- To create such a product you need 100 g of gray melange and 100 g of beige yarn, as well as a set of double needles number 15 and short circular needles number 10.
- For knitting, stockinette stitch and elastic are used (see diagram above).
- Procedure: cast on 24 stitches with gray thread on stocking needles, dividing them equally into four needles, close in a ring and knit in stockinette stitch. In the second round.r. From the cast-on edge, gradually add 4 loops to get 28 loops. After 8 laps. From the cast-on edge, close off all the loops.
- To create a visor, you need to tie the front thirteen loops using gray thread according to the pattern: 1 tbsp. Single crochet in first 4 stitches, 2 tbsp. without a crochet in the next p., 1 tbsp. without a crochet in the next 3 loops, 2 tbsp. without a crochet in the next p., 1 tbsp. without a crochet in the next 4 p. – 15 loops in total. Turn the product and continue: 1 tbsp. without a crochet in the next 5 loops, 2 tbsp. without a crochet in the next loops, 1 tbsp. without a crochet in the next 3 loops, 1 connection Art. in the last loop. Then cut the thread.
Cotton-gauze bandage, fire mask: instructions for quick production without a machine, pattern
To make a cotton-gauze bandage, you will need:
- 100 gram cotton ball
- Gauze – 2 pcs (3x0.9 m).
Next follow the instructions:
- Cut the gauze (0.6 m in total).
- Place a cotton square in the center of the gauze that you cut (its sides should be 0.14 m).
- Connect the edges so that you get a strip (the length of this strip should be 0.9 m and the width should be at least 1.5 cm.
- Cut each piece on the side lengthwise so that the scissors reach the cotton wool.
- Use the fragments that you get instead of bandages.
Making a mask
Option two
DIY bows in kanzashi style
Delight your princess with a luxurious bow made using the Japanese kanzashi technique. At first glance it may seem complicated, but it is not. You need some free time and a little inspiration. We have prepared a detailed master class that will teach you this ancient art.
Materials:
- satin ribbon (width – 2.5 cm)
- golden cord
- felt
- thick elastic band
- rhinestones
- glue gun
- lighter
- scissors
- tweezers
1. Cut 32 pieces 9 cm long.
2. Fold it in half at an angle so that the petal has a pointed tip.
3. Bend the ends to the center of the petal using tweezers. Then use a lighter to seal the edges.
4. Cut out a base with a diameter of 4.5 cm from felt and mark it into 8 sectors.
5. Using a pistol, apply a little glue to the edge of the petal and immediately apply it between the marks.
6. We have formed the first row, it took 8 petals.
7. Glue the petals of the 2nd row into the empty spaces between the petals of the 1st row. We glue subsequent rows 0.5 mm below the previous row until the entire free area is filled.
8. Cut 8 pieces of gold cord 14 cm long and glue them to the back in the form of an arc. If desired, after this you can lay a few more rows of petals and glue spiral tapes.
9. Cut out 2 circles of felt with a diameter of 3.5 cm. Cover one hole on the wrong side, make a cut on the second, insert an elastic band and stick it on the wrong side of the bow. Turn the decoration over and glue rhinestones into the center.
Watch also the video on how to make bows with your own hands - master class from narrow ribbons.
Cotton-gauze bandage, elastic mask
This bandage is also called “Petal”, as it has a round shape.
The procedure for making a cotton-gauze bandage with an elastic band with your own hands consists of several stages:
- To begin, take a piece of paper.
- Draw a circle on a piece of paper. Its diameter should be the distance from the bottom of the chin to the center of the bridge of the nose.
- Transfer the pattern to gauze.
- Place cotton wool between the gauze sheets in the form of a circle with a diameter of 20 cm.
- Sew the circle around the edge.
- You can do this with a sewing machine or with a needle by hand.
- Lastly, sew on a 1.5 cm wide elastic band to secure it.
What to wear with a headband
Who is comfortable trend princess smile look beautiful
Children's accessories can be combined with any set of clothes. But even for little girls, it is necessary to follow the stylistic alphabet so that the image looks fashionable and charming.
- Choose a headband that matches your dress or shoes.
- If the outfit is in one of the pastel shades, a contrasting option with an emphasis on the decorative element looks beautiful.
- The printed headband echoes the color scheme of the clothes.
- A fashion accessory must match the season.
- A miniature decorated headband goes well with a laconic outfit; a too voluminous version may look out of place.
- Minimal emphasis on decoration is done if the girl is wearing clothes with variegated colors. A monochromatic bandage is ideal so as not to disrupt the integrity of the image.
- When purchasing a finished product or making an accessory with your own hands, consider the girl’s age.
- The bandage should not press or be uncomfortable for the child.
Post Views: 13,292
Headbands are a fashion accessory today. But vigilant mothers do not miss the opportunity to dress up their baby not only for beauty, but also to protect her ears from the wind.
Are you interested in how to sew a headband for a girl with your own hands? This master class, prepared by our reader, details a simple way to make a children's accessory from an old T-shirt - a great opportunity to clear out your closet. If you don’t have unnecessary clothes, feel free to use knitwear. The thicker the fabric, the warmer the product will be. For summer it is better to choose thin materials.
First you need to measure the circumference of the child's head and cut out two identical rectangles from fabric. The length of each rectangle should be 10 cm longer than the measured circumference of the child's head. If you want a smaller bow, then the length of the rectangle must also be shortened. This example shows how to sew a headband for a nine-month-old girl with a head circumference of 44 cm. Therefore, the length of the cut fabric was 54 cm and the width was 10 cm.
Alternatively, you can use an old adult T-shirt if it fits correctly.
In this case, it was enough to simply cut a strip of fabric 10 cm wide.
The sides were already sewn together, the length was just right. The result is a “collar” like this.
Using a machine, it is enough to stitch the long sides of the rectangles, folding them with the wrong sides facing each other. (If the rectangles are not cut from a T-shirt, but simply from fabric, then you will have to stitch all 4 sides yourself).
Then turn it right side out through the small hole previously left. This hole can later be sewn up by hand. Now you need to straighten all the corners and iron the finished rectangle.
After this, the ironed rectangle needs to be folded in half and the semicircle of the child’s head is measured from the fold. In this case it is 22 cm (since the total circumference is 44 cm).
At this point you just need to stitch a rectangle folded in half.
To sew a headband with your own hands, you don’t even have to match the threads to the same color, since all the seams are hidden inside. As a result of this seam, a “fish with a tail” is obtained from a rectangle (this is a top view)
This “fishtail” must be laid out on different sides, and it will subsequently become a bow. All that remains is to make a jumper for it. You can choose any decorative one with rhinestones to suit your taste. Or you can simply cut out a small rectangle from the same fabric and fold it in half with the wrong sides facing each other.
In the same way as the main large rectangle, stitch and turn it right side out. Use this jumper to gather the “fish tail” at the seam and fix it in this position.
Starting from birth, today's mothers of little princesses begin to create different hairstyles for them, attach hairpins and elastic bands, and put on beautiful headbands. However, this option is not always comfortable and can interfere with the baby. In this case, an excellent DIY headband can be a replacement. Many options for various children's headbands can be worn not only by little girls, but also by adult girls and women.
Not every small child can attach a bow to their first thin hairs, but if for a photo shoot, or just “going out” you want the baby to have a beautiful bow or flower on her head, a beautiful headband will help out. Soft and comfortable can be made even for newborns.
To create children's headbands you will need the following materials:
- Main material: any ribbon or elastic band of the desired color, you can choose a ready-made bandage.
- Material for creating a decorative flower.
- Needle, thread, special glue (if you have a special machine, you can start working with it).
Having decided on the main materials of our headband, we need to measure the head circumference, and then, based on this information, cut off the required length.
Then you need to connect the ends of the base together using a machine or by hand and decorate the ribbon with a decorative flower. It can be sewn or glued with special glue for rubber.
Let's look at a master class on how to create a children's headband with your own hands - this is a headband with felt roses.
To work we will need:
- Felt with a thickness of 0.1 mm in calm shades.
- Headband.
- Wooden stick.
- Sharp scissors, glue.
Why is it recommended to moisten cotton gauze dressings with water?
- Why is it necessary to moisten cotton-gauze dressings with water? This is because in this state it more reliably protects the human respiratory system from dust, smoke, and gases.
- It is enough to wet the product in plain water.
For bacterial protection against viruses, the bandage must be dry.
The most useful articles:
How to wear a medical mask correctly, which side should you put on your face? How long can you wear a medical protective mask, how often should you change it: rules for using a medical mask