Fast and agile squirrels jump in the forest from one branch to another. It is not difficult for them. If your baby also liked such a forest beauty with a bushy tail, then you can make it together from an affordable material - bright colored paper or half-cardboard.
The body, head and legs will look like voluminous tubes, but the tail will be flat.
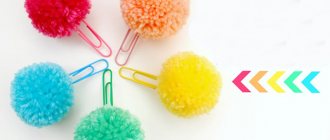
Master class on making squirrels from yarn
Necessary materials:
- cardboard for blanks;
- straight yarn orange or red;
- yarn with orange or red curls;
- beads or small black beads;
- black bead;
- black thread;
- red or orange threads;
- needles;
- scissors.
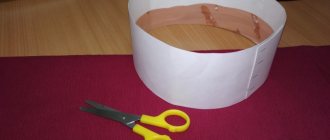
For pompoms, cut out two circles of cardboard measuring 6 and 4 cm. Inside, cut out circles with a diameter of 2 cm. Wrap threads around the cardboard. The internal space must be completely filled.
Cut the threads along the edge, thread the thread, remove the pom pom from the cardboard and tighten the thread. Spread the threads to create a fluffy ball. Make a second pom pom.
For curly yarn, make a circle of cardboard with a diameter of 10 cm, the inner circle is 2 cm. Make a pompom from curly yarn using the method described above.
To create squirrel ears, use a thread 10 cm long. Fold it in half and in half again. Tie it in a knot close to the edge. Sew the ear to the head. Repeat and sew on the second ear.
Make eyes from beads or small beads, sewing them to the “muzzle”. Under the eyes, secure the nose with a thread and a needle. Connect the head, body and tail using the threads left over from creating the pompoms.
Using the technology for creating ears (step 7), make paws. Take threads 20 cm long for them. Attach the paws to the squirrel. Use scissors to trim the threads on the pompoms. Now you can play with this craft!
3D printing models of protein molecules
So, the fashion for 3D printing has reached our modest institution, proudly called Laboratory of Molecular Biology. A couple of weeks ago, workshops bought a 3D printer, which initiated a heated discussion among biologists about how this new thing could be useful. Physiologists, for example, are already planning to print some complex parts for a new mechanism designed to test all sorts of behavioral reactions in rats. We are engaged in determining the three-dimensional structure of a protein using X-ray diffraction analysis (and, for some time now, cryo-electron microscopy) and for us the benefits of 3D printing are not so obvious. Accordingly, we scoured the Internet to understand what people were typing in terms of protein structures. The resulting overview with beautiful pictures and videos of printed models is under the cut.
Briefly about protein structures
As Comrade Friedrich Engels rightly noted more than a hundred years ago, “life is a way of existence of protein bodies.”
That is, our bodies are largely made of protein and proteins perform the most important functions in our body - structural (the shape of cells is supported by a protein cytoskeleton), motor (muscles contract thanks to the clever work of motor proteins), enzymatic (for example, food is digested thanks to enzyme proteins ), transport (oxygen from the lungs to the tissues carries the protein hemoglobin) and so on; in a word, without protein you can’t go anywhere. Accordingly, it is very interesting to learn how proteins work. From a biochemist's point of view, protein is such a black box. You can give it different substances as input and then see what comes out (at what speed, etc.). Determining the three-dimensional structure of a protein molecule in a sense opens this black box; the structure of a protein is a diagram of how the black box is arranged inside. It is not always possible to immediately understand from the structure how a protein works, but the structure certainly opens our eyes and allows us to plan further experiments.
A protein is a very large molecule (macromolecule). From a chemical point of view, it is a linear polymer, ranging in length from 70 to more than 1000 amino acid monomers. Thanks to different side groups of amino acids, a long protein molecule folds into a compact globule; each protein has its own folding. It is the structure of the folded protein that scientists determine. The leading method is X-ray diffraction analysis, which allows one to calculate the coordinates of protein atoms from X-ray diffraction on a crystal of the corresponding protein. Scientists-crystallographers have a convention - any specific protein structure must be posted in the Protein Data Bank (PDB, Protein Data Bank), in which the number of structures has already exceeded 100,000. Accordingly, all structures are in the public domain, they can be downloaded and viewed , print on a 3D printer and so on. I wrote more about protein structures on Habré earlier; You can read more about the structures here.
It should be noted that the task of mapping protein structure is not so simple. A protein consists of several thousand atoms, which, at first glance, seem like a terrible mess (“a” and “b” in the picture). Different mappings are used for different tasks. For example, if we want to understand how the main chain of a protein is laid out, then we want to display the protein in a schematic form, where only the path of the main chain ("g" in the picture) will be indicated using special symbols - helices to indicate alpha helices, arrows for designations of beta-folded sheets (“d”, “e” in the picture).
If we want to see the protein as a three-dimensional body, we can display the surface of the protein (then it becomes like a potato); the surface can be painted using different parameters. The most useful thing is to color by electrostatic potential, then the charged areas will be immediately visible.
If we want to understand how a drug molecule or chemical substrate binds to our protein, then we display only a small part of the protein - the active center of the enzyme, a small number of key amino acids that directly interact with the drug.
Printed protein structures
To start with, here are some entertaining videos.
Here is a very clear demonstration of how many actin protein molecules are assembled into so-called “actin filaments”, which form the cytoskeleton on which the entire shape of our cells rests, plus it also works in muscles. Individual actin molecules are 3D printed, and the surface is colored according to their electrostatic potential.
Here's something cooler: a molecule of hemoglobin, which carries oxygen in our body (red blood cells are filled with this protein). Hemoglobin consists of four subunits (individual protein molecules), plus a small heme molecule that carries an iron atom, which binds oxygen, binds to hemoglobin. In the manufacture of this model, a more complex technology was used. process and as a result, the transparent outer surface displays the real surface of the protein molecule, and inside, under the transparent outer layer, multi-colored alpha helices and other elements of the secondary structure are visible, clearly showing the course of the main chain of the protein. The video shows the assembly of a whole hemoglobin from four subunits, the subunits are attached to magnets. At the very end, a small heme molecule is pushed into place.
Here is another video of the same model, here it shows the secondary structure better and shows how lowering the model into water allows you to see the secondary structure with more contrast. Another difference is that in this model the outer layer of the protein is not just transparent, as in the previous version, but also slightly tinted with electrostatic potential:
These videos are taken from the channel of Japanese protein 3D printing enthusiast Kawakami Masaru, more videos with different printed protein structures can be found here: https://www.youtube.com/channel/UCsrgChR36VUMVy8GejyuD0Q/videos
Of course, savvy businessmen couldn’t help but pick up the idea, and the production of molecular beauty has already been put into production: such cognitive protein structures can already be purchased.
Again, if you want to print your protein, you don't have to buy a 3D printer to do it. There are already a sufficient number of companies that sell both ready-made kits (for example, 3D DNA models) and print any protein to order. For example, 3D Molecular Designs.
On the subject of business: in addition to 3D printing itself, there have long been companies ready to print the three-dimensional structure of your favorite protein in a transparent crystal. The idea is quite in demand among structural biologists: for example, the boss gave a similar crystal to one of my friends after she determined the structure of a protein for the first time in her life. The scientific value of such a crystal tends to zero, but it looks very beautiful and aesthetically pleasing.
If anyone thinks that this is all jokes and self-indulgence, it’s not at all. The seriousness of the situation is shown by the recently launched repository of ready-made 3D models from the American NIH - National Institutes of Health in collaboration with the National Library of Medicine (these are the most serious structures that are part of the US Department of Health). In addition to high-resolution (x-ray crystallography) and low-resolution (cryo-electron microscopy) protein structures, the repository also contains models of test tube stands and other laboratory items. The repository was created, as I understand it, to improve the internal sharing of models within the NIH. Now there are 452 models.
How to print your own protein structure
If you are inspired by the pictures above and have access to a 3D printer, then printing the protein structure yourself is quite easy.
There are many step-by-step instructions on the Internet, here are two of the most sensible and detailed: https://www.instructables.com/id/3D-Print-a-Protein-Modeling-a-Molecular-Machine/?ALLSTEPS https://www. over-engineered.com/projects/3d-printed-protein In short, you first need to install one of the programs for displaying protein structures. Then find the structure to print. All structures are in the Protein Data Bank, there is a keyword search there. In addition to searching, they have a wonderful project called “Molecule of the Month” - they select a certain protein and talk in detail about its structure and function for a wide audience of non-professionals. The main page of the project looks intimidating due to the abundance of incomprehensible names of proteins, but if you start clicking on the links, there will be beautiful pictures and clear descriptions of the work and structure of this or that protein. I hope this information will help you choose which protein to print.
After downloading the structure (the Protein Data Bank has a wonderful “Download files” button) and displaying it in the appropriate program, you need to choose in what form you want to print the molecule. The instructions above suggest displaying the protein as a surface colored by electrostatic potential, exporting the surface, converting it to a printable format, and voila! It’s really easy to print a three-dimensional model of a protein that looks like a potato.
However, it would be interesting to print, say, a schematic representation of the main chain of the protein, something like this (here, as far as I can see, the complex of protein and DNA):
The only thing is that such a skeletal structure of the protein may turn out to be fragile. For such printing, it is recommended to use the program for displaying protein structures Chimera, since it can directly export .stl files, which are understood by most 3D printers. Accordingly, any type of molecule you choose in Chimera is easily exported and can be printed, including a skeletal representation. Here's a short video presentation that explains the process a little:
Conclusion (or what for the goat button accordion)
As we have just seen, people are actively printing protein structures. The question remains open: why are they doing this? So far the only answer is for educational, demonstration, training purposes. Proteins are complex three-dimensional objects, and the ability to hold such a “molecule” in your hand certainly contributes to the understanding of how proteins are structured and work. Plus, many squirrels are simply visually beautiful. Printing the skeletal structure of a protein can be quite a technical challenge, and then an impressive demonstration of the capabilities of 3D printing. So, if you have a 3D printer, free time and enthusiasm... You know what to do!
This beauty is a ribosome.
Cardboard squirrel
Cute red animals can be made from other materials, such as toilet paper rolls, cardboard or thick paper. You will also need colored paper, paints or markers, scissors and glue.
If there are no ready-made cylinders, glue them together from scrap materials: paper or cardboard. From one edge, bend the top of the cylinder inward and make sharp squirrel ears. The photo of the squirrel shows how to do this.
Cut a strip of orange paper 1.5-2 cm wide. Roll it up and glue it to the finished body - this is the tail. Cut out 4 paws and an oval for the muzzle from an orange sheet. Glue all the parts in the appropriate places.
Draw the squirrel's eyes, nose and mouth. These parts can also be cut out of colored paper. The squirrel is ready!
Those who are lucky enough to have housing in close proximity to a forest or city park will be interested to know that often harmless forest inhabitants, such as squirrels, can come out to meet people in search of food.
If you have free time and a desire to help our little brothers, make a feeder or a house for a squirrel. The animals will be grateful, and the children will be glad to have the opportunity to get to know each other closely.
For the craft you will need:
- - one pine cone
- - pieces of orange and black plasticine
- - autumn leaves for decorating a forest clearing.
So, a squirrel is a cute rodent with a long fluffy tail and elongated pointed ears. The animal lives on all continents except Australia; it prefers to live in hollows, and sometimes in basements (attics) of large households. Squirrels are not afraid to take food from human hands. It is believed that red animals are easy to tame.
Work on the craft begins with sculpting the main parts. An abdomen resembling a chicken egg, pointed ears and an elongated nose are made from orange plasticine. The eyes of the red rodent are black balls.
The connected elements should look something like the one shown in the picture.
Next, the plasticine body parts must be transferred to a pine cone and firmly attached to the scales. The presented squirrel is very similar to a pet. It can be seen that, unlike its wild counterparts, the animal eats well.
It is impossible to calmly engage in the creative process without demonstrating the craft on the side. Is the squirrel good?
Making four squirrel limbs is a piece of cake. The front legs are like two elongated droplets with claws at the wide ends. The lower legs are two thickened ovals, vaguely reminiscent of feet. The claws are pressed into plasticine with a stack or a toothpick. It is better to carry out the work on a modeling board (so as not to stain the table).
At the next stage, the legs are attached to the pine body and given the desired position. The wider the lower limbs are attached, the more stable the squirrel will be.
All that remains is to give the beauty a fluffy tail with long fur. The picture shows one of the options. The pointed flatbread is decorated with stripes and slightly rolled in a spiral. This way the tail will keep its shape well. You can use faux fur for the tail to make it more realistic.
The red rodent in all its glory. The craft made from pine cones and plasticine “Squirrel” is ready.
This work is intended for primary school children, but older preschoolers can also perform certain stages of collective work (gluing paper strips into “droplets”, making leaves using the accordion folding technique), under the guidance of parents or educators.
Stages of work:
1.The application is made on a sheet of A3 paper.
You can take colored cardboard in A3 format or on a white sheet of A3 format
glue two sheets of blue, green or yellow photocopier paper. Choose colored paper for the background of your future work.
2. We transfer the finished drawing of the squirrel through carbon paper
and cut it along the contour without the tail.
3. Trace the cut out squirrel on an orange sheet of paper and cut it out.
You need to trace the squirrel with a pencil, putting it in reverse.
4. We cut out all the chalk details on the workpiece: muzzle,
the middle of the ear, nose, eyes, paws, breast (3 parts of different sizes).
5. We trace all the cut out parts on colored paper,
put them in reverse and cut them out.
The muzzle, paws, and ears must be cut along the edge with scissors (imitation fur).
We cut the cut squirrel from the orange sheet along the entire edge.
We glue all the details onto the squirrel,
We finish the pink cheeks, antennae, and mushroom.
6.Cut out a branch from brown paper.
Glue a tree branch, a squirrel and a pencil onto the finished background
draw the outline of the tail.
7. Take a whole sheet of orange and half a sheet of thin white paper
fold several times to separate the sheet
into 8 identical rectangles.
8.Each rectangle must be folded several times into 8 stripes.
Then each strip must be cut in half.
That is, from one rectangle you will get 16 narrow strips.
9. We glue “droplets” from narrow white stripes and glue them to the tip of the tail.
You need to glue the “droplets” in rows, gradually going down.
We make several white rows, then rows of orange “droplets”.
10.Cut out titles for autumn leaves from colored paper
according to the diagram and fold them like an accordion.
11.You can cut out a maple leaf in another way: fold the paper in half and trace along the contour of the template, unfold it and fold it like an accordion.
12. We make a composition of autumn leaves, complete the paper branches, lay everything out and glue it with PVA glue.
Using a felt-tip pen, add dots on the face.
13.The volumetric applique “Squirrel on a Branch” is ready!
Quick navigation through the article
Do you have a bunch of pine cones and don't know what to do with them? Why not use them for children's creativity? After all, they are so beautiful and easy to process. In this material you will find 11 step-by-step master classes on making children's crafts from pine cones, as well as from scrap and natural materials.
- If you want the pine cones to be absolutely clean and dry, then before you start crafting, clean them with a brush, then put them in the oven to bake at 350 degrees for about 10-15 minutes. Wait until they cool down and start making crafts.
You will need:
- Pine cones or any other cones are round and not too elongated;
- Plasticine (for sculpting the muzzle and legs, brown, beige, orange or yellow are equally suitable, and for the tip of the nose it is better to choose black plasticine);
- The hedgehog's eyes can be made from plastic doll eyes (available at craft stores), black beads or black plasticine.
Master Class:
Step 1. Roll a small ball out of plasticine, then stretch it out a little and form a muzzle.
Step 2. Roll one small ball of black plasticine and place it on the tip of the muzzle.
Step 3. If you want the hedgehog to have ears, simply roll two small balls from the same plasticine that the hedgehog's head was made from, and then stick them in the right places.
Step 4. Now roll 4 sausages approximately 1.5-2 cm long.
Step 5. Assemble the figurine like a construction set and stick eyes on the face. Woo-ala, your hedgehog is ready!
By the way, if you replace plasticine with polymer self-hardening clay, then the hedgehog will become a real souvenir that can be given as a gift or presented at a crafts exhibition in a kindergarten.
Squirrel feeder from a box
The box should be larger than those installed for birds. For example, you can use a shoebox.
Take strong threads. Make 4 holes in the base of the box almost at the very bottom. Insert the ropes into the holes, passing them under the bottom and extending them inside the box. Hang the box on your property or on a tree in the forest. Don't forget to leave a treat!
It should be noted that such a feeder is short-lived. Unfavorable weather conditions such as snow or rain can soak and ruin it.
Squirrel house
You will have to tinker a little with this product. It is unlikely that small children will be able to do it, but with the help of a parent or other caring adult, one or more squirrels will acquire comfortable housing.
Required materials and tools:
- log with a diameter of at least 40 cm;
- pencil;
- roulette;
- wood hacksaw;
- screws or nails;
- screwdriver or hammer;
- sandpaper;
- saw.
Manufacturing process:
Saw off a part of the log 5 cm thick and the main shape 40 cm long. Hollow out the inner part of the workpiece, leaving the walls and floor at least 3 cm thick.
Using sandpaper, sand the inside of the house. Make an "entrance" for the squirrels. Nail or drill into the roof with screws.
The squirrel house is ready. Take it to the forest and attach it to a tree you like. Squirrels will appreciate your efforts. If you visit your friends regularly, they will soon get used to visitors and will approach you without fear.
Wooden house for a squirrel
In this case, we are talking about both the opportunity for squirrels to have lunch and the fact that they acquire small temporary housing. Although it should be noted that the product will take a lot of time.
Necessary materials:
- A log whose diameter is at least 40 cm.
- A simple pencil.
- Roulette.
- Hacksaw for woodworking.
- Self-tapping screws.
- Screwdriver.
- Sandpaper.
- Saw.
Manufacturing stages
Stage 1. It is necessary to saw off a part 40 cm long from the log. The inner side of the workpiece should be hollowed out, leaving walls about 3 cm wide.
Stage 2. Take sandpaper and sand the inside of the future house.
Stage 3. Cut a hole for the entrance. Attach the roof in the form of a flat plank using self-tapping screws and a screwdriver.
Important! Make no mistake about the size of the hollow - it should not be too small for squirrels to crawl through, but not too large to maintain a microclimate inside the house.
The undoubted advantage of such a house is that it is reliable and durable, and also that if you visit your charges often enough with something tasty, the permanent residents will get used to it and will come out to meet you.
It is impossible to say for sure why squirrels are such popular characters in crafts made by both adults and children. Perhaps it's because they have a bushy tail, or perhaps it's because of their fascinating habits. But the fact remains that squirrels are creatures adored by everyone. This means you can always find an interesting and completely new way to make them as toys.
DIY squirrel photo
A squirrel is an animal with funny tufts on its ears and a fluffy tail. Such toys can't help but delight! The Pretty Toys workshop invites you to sew a squirrel with your own hands. Arm yourself with fur, fabric, thread, scissors and go! The pattern of a squirrel can be absolutely anything: a little fluffy one, a cunning fluffy one, a whole family of animals or a cunning couple. A very popular Ice Age squirrel toy right now. Of course, she is unique, but well recognized even by those who are not very familiar with this cartoon.
A homemade soft squirrel toy can have different sizes. Some people love big toys that are so nice and comfortable to hug. Another person likes small animals. You can take this compact toy with you on a walk or on a visit. The pattern of the “squirrel” toy involves the use of materials such as fleece, velor, faux fur, mohair, plush, and velvet. However, nothing prevents you from imagining and choosing other fabrics. If you wish, you can sew a squirrel with your own hands in a few hours. However, there is no need to rush. After all, you can make a squirrel together with your child! It’s so interesting to watch how a real toy is made from pieces of fabric and filler. And it’s even more interesting to take part in this transformation.
Our “Workshop” presents not only patterns of soft squirrel toys, but also a description of the manufacturing process itself. You can also find recommendations for those who are doing this type of work for the first time. If you are interested in some kind of squirrel, do not doubt that you can make it yourself. A little imagination, and your toy will become truly unique and original. You can make not just one animal, but a whole team of fluffy squirrels! Fun and easy!
If you have created a real masterpiece, don’t be shy! Send us photos and patterns. Your work will appear in the Pretty Toys workshop and will help many caring mothers make an interesting and funny toy.
Surely each of us already knows that in stores or supermarkets you can now see a strange vodka called “Belochka”. That vodka that the famous writer and satirist Mikhail Zadornov mentioned at one of his speeches. I will give you a photograph of that very vodka so that you can see what such a squirrel looks like. Under it the inscription reads: “I have arrived!”
Some elements on the label glow in the dark:
We took the idea for the work from her, but we just decided to make it so that it looked more harmless. I present to you a photo of the finished product:
This funny toy is designed against alcoholism and drunkenness. I provide a list of everything we needed to make the squirrel: 1. A hood from an old leather fur coat; 2. Scissors, thread, needle; 3. Tweezers, cotton wool, beads, glue; 4. Paper for the model image.
Here is the toy model:
Having drawn the model of the head on both sides on a separate sheet of paper, cut out:
We divide each model into three parts with scissors, signing the sides of each of them so that they can be assembled correctly when sewing:
Here are the models of the body and legs:
Now we take the hood and carefully cut off the fur part from it, sewn on both sides:
We take paper samples of the head and pin them to the trimmed part of the hood:
Carefully cut them out, leaving areas along the edges for stitching:
We pin samples of the other side of the head:
Having sewn the samples together, we make eyes from beads:
We will make fur tassels on the upper tips of the ears, but before sewing on the fur, we will glue it so that it does not fall apart:
We sew the models together from the outside:
Now we make the back of the head and the back of the squirrel’s head, using only one piece of material for this:
This is what the finished head will look like:
There is a lot of wool on the inside of our material taken for cutting. This wool half filled the squirrel's head, and half the amount of cotton wool was needed.
By cutting out a piece of fabric of a suitable size, we form the lower part of the squirrel’s head:
Now let's get down to making the body. Having cut the sample into two parts, we cut out the constituent segments of the body from the fabric one by one:
Here are all the tissue segments that form the torso:
Now we compare the models that match each other and sew them together:
We combine both of these sides into one, we get the torso:
We make paws:
Sew the legs to the toy:
We make a sample on a piece of paper for the underside of the body, and then pin it to the fabric and cut it out, and then sew it to the toy. We do the same for the front legs.
Sew the finished front legs to the squirrel:
Now take a small piece of fabric with fur and cut off a small part from it:
We form several fur patches from it and wrap one of them around the squirrel’s neck, and then sew its edges (i.e., without sewing it to the toy itself):
Now we cut off a piece of fur fabric that is suitable in size for our toy, and take a thick wire. These things are needed to make the tail:
We determine the required wire size by giving the wire the appropriate size for the tail. We insert the lower tip into the toy, bending it strongly down:
The previous seam in a fur piece of fabric should be ripped out and a new one should be made, and then placed on the wire, forming a tail:
We remove the excess protruding wire and sew the tail to the almost finished toy:
If desired, a thin layer of fluorescent paint (paint based on phosphorescent pigment that accumulates light energy when illuminated) can be applied on top of the squirrel’s beaded eyes. In the dark, these paints release the accumulated energy of light. After processing the eyes, the beads can be covered with transparent tape on top. Let's start making a platform for our toy. On this platform there will be an inscription: “I have arrived!” We take three to four cardboard sheets, several sheets of colored paper, glue and scissors:
We cut out rectangular shapes from colored paper that match the size of the cardboard sheets for the six sides of the future platform and glue them together:
These are the sides:
Glue colored paper to the cardboard rectangles.
Nuts and tree branches; Vegetables and fruits used for this purpose have a much shorter shelf life and quickly lose their appearance.
It is enough to have one large walnut at your disposal to create a charming character - for example, a squirrel.
We want to tell you how to make a squirrel with your own hands from a cardboard roll and.
What you will need:
- large smooth walnut;
- a cardboard tube with a narrow diameter - for example, from cling film or foil;
- napkins;
- a piece of white fur;
- eyes for toys;
- cardboard and foil or foil cardboard;
- pieces of suede or leather of brown or red color;
- polymer glue;
- scissors;
- pencil;
- black bead, piece of black leather or cardboard;
- dried tangerine skin in the form of a cap.
Let's get started.
We cut the cardboard roll to the length we need - this will be the body.
We stuff it tightly with napkins, to which we fix the walnut with glue - like a head.
Glue the eyes and nose to the head. To make them stick better, you can make a layer from a piece of napkin.
We cut out small ears from suede, glue them to the top of the head, and cover the ends with a tangerine cap. You can decorate the head with a dried flower or leaf - whatever is available.
Cut out the hind legs from cardboard. To make them look more elegant, glue a layer of foil on top. If you use foil cardboard, simply cut out the legs from it and glue them on the sides of the squirrel body.
Glue a piece of fur along the back - like a tail.
From the remaining suede we make the front legs and glue them over the back ones.
The squirrel, an incredibly beautiful jumping animal from the order of rodents, has been known to absolutely everyone since early childhood. Squirrels are the main characters of numerous Russian folk tales and children's animated films; they write poems and come up with riddles about her, learn songs and proverbs.
It is difficult to answer the question of why squirrels are so loved and adored by everyone. Perhaps because of his cute appearance and luxurious tail, or perhaps due to his active behavior and interesting habits.
In any case, it is important to introduce your child to this charming animal. And the news portal “site” in this article has prepared for you several simple photos of master classes on making children’s squirrel crafts. The following materials will be used in crafts: plasticine, cones, paper, cardboard rolls of toilet paper, etc.
Stages of making a paper squirrel:
The squirrel's body will consist of two volumetric parts in the form of rings. Therefore, we will prepare for them two strips of different lengths, but the same width. Cut out from yellow paper.
We glue each element separately to get two three-dimensional parts.
We place a large element at the bottom, and at the top we attach a smaller volumetric part to it. Glue it together.
The main part of the body lacks a chic tail. We draw its outline in the form of a fire flame with a simple pencil on a bright orange sheet of paper. Cut it out.
Glue the tail to the back wall of the squirrel's body.
Now let's work on the animal's paws. Take yellow paper and cut out four thin strips.
We twist and connect the edges with glue. We get four rings.
Glue one pair of voluminous paws to the upper part of the body, and the second to the lower part.
Then we move on to the head, where we need to add orange details - the ears and the front of the muzzle. Draw the outline and cut out all the details.
We bend the ears from the top of the triangle to the base. We create a slot at the bottom and bend the sides. Apply glue and glue the finished ears to the top of the head.
We will also glue the orange part to the front of the muzzle. Let's add small plastic eyes. Using a measuring pen, we will add lines to the finished craft, which will give the product a finished look. These are the main features of the muzzle, the contour of parts of the head, and texture.
A bright squirrel in the form of a voluminous paper craft for your kids who can’t bear to play with a new toy is ready.
However, you should be very careful, because they can easily damage and deform it.
A paper squirrel made using this method is an excellent children’s craft, almost a homemade toy. The main work is to create the base of the squirrel’s body, and the remaining details are easy to draw; alternatively, use the ready-made template presented in this review.
Materials used:
- Orange cardboard and white paper;
- Eyes stickers and pompoms;
- A button for decoration in the shape of a flower;
- Scissors, glue stick, pencil, red felt-tip pen.
Squirrel craft
To make such a funny animal, a squirrel, you will need a cardboard toilet paper roll, colored paper, scissors and glue.
The upper part of the cardboard roll must be folded to form the ears of the future squirrel.
From colored paper you need to cut a wide, long strip and twist it. Glue the finished strip to a cardboard tube - this will be the squirrel's tail.
Also cut out four legs and a muzzle from colored paper. Glue all the parts to the cardboard tube. Don't forget about the nose and eyes.
DIY squirrel craft
To make such cute paper squirrels, you will need a ready-made template (we attach it below), colored pencils, scissors and a cardboard toilet paper tube.
Print the finished squirrel template and carefully cut out all the details. Cut a cardboard toilet paper roll diagonally, making a vertical cut at the highest part.
We place the paper squirrel itself into the cut made. Glue the legs to the sides of the cardboard tube.
If necessary, decorate the craft with pencils.