Ponds are often installed on the sites of country houses. Freshwater fish in such ponds do not have sufficient food supply. It needs to be fed artificially so that the number of fish constantly increases.
On this topic:
How to feed birds correctly - we help birds...
Oct 11, 2019
Grilled fish for a picnic according to proven recipes
Oct 3, 2019
How long to grill fish - a few secrets...
Oct 1, 2019
Original recipe for stewed pollock with onions and carrots from…
Aug 21, 2019
BACK FORWARD 1 of 13
Fish farming is the most profitable type of farming. If in livestock farming to obtain 1 kg of meat it is necessary to spend 10 kg of feed, that is, the ratio is 1:10, then in fish farming this figure is 1:3.
Feed the fish in doses, otherwise the excess food that the fish did not eat will turn sour. This will lead to water pollution in the pond and oxygen starvation of its inhabitants. The immunity of the fish will decrease, so the risk of the livestock being affected by infectious diseases will increase.
The pond must have an established ecosystem. It is not advisable to scatter food on the surface of the reservoir. In order to control the fish's food consumption, you need to make feeders and introduce a feeding schedule.
Feeder for aquarium fish based on Arduino
I wanted to share my development of a feeder for aquarium fish. Summer is the holiday season. I was afraid that three weeks at sea would lead to starvation of the inhabitants of the aquarium, and since my mother-in-law went with me, there was no one to trust with the task of feeding the fish.
After thinking a little about the problem, I decided to use an Arduino UNO, which was at hand, to make an automatic feeder. Fortunately, I already had some automation experience. And since an Ethernet Shield was purchased for future use, the idea of a terrible perversion arose: controlling feeding through a computer network. The fact is that at home I have a computer that is constantly on and acts as a home server. It is connected to an uninterruptible power supply and therefore the chances are high that even with short-term switching of the power supply, the computer will greet us with the hum of its fans, and for one thing it will condescend to control this very feeder.
The fact is that in the examples from the Arduino IDE development environment for Ethernet Shield, a web server was found, some modification of which made it possible to display the status of all analog contacts in JSON format. A little experimentation with the query string in this web server allowed us to recognize URLs like:
- 192.168.1.17/eat
- 192.168.1.17/on
- 192.168.1.17/off
I adapted the last two for turning on and off the light in the aquarium, and the first for direct feeding.
Turning the light on and off is done using a relay module. I directly built this same relay into a pre-purchased socket. From all this I subsequently made a small controlled extension cord.
The most difficult thing was making the feeding installation itself. It became obvious that during the holidays the fish go on a diet from which frozen bloodworms are excluded, and only eat pellets.
I scoured the RuNet in search of an acceptable design for making it myself. I found the most acceptable to be a rotating drum with food inside. In this case, the drum has a slot through which the granules fall out, passing the lower point. The most important thing is that this same drum does not accidentally stop in the “slit down” position, then the fish may have a “belly celebration”, and after a while they feel like they are living in a sartir instead of an aquarium. In short, there were problems:
- what to make a drum from
- how to rotate it
- how to make it stop in time by making only one revolution
After rummaging through the toys my son had broken down, I found what seemed to me to be a decent gearbox with a motor. Around which I began to assemble the mechanical part of the feeder. The drum was an ordinary plastic jar of oatmeal jelly, which the wife had been playing with for some time. But when I assembled the design and tried it on a standard five-volt power supply, I realized that the gearbox had too little reduction, and the behavior of the entire system was somewhat reminiscent of a centrifuge. I was too lazy to convert it to a different gearbox, so I decided to go a different route - lowering the voltage. But the three-volt power supply also rotated the drum too quickly. I even bought a one-and-a-half-volt power supply specially. I was happy, but my joy did not last long, because... when checking operation in “semi-combat” mode, i.e. when turning the feeder on and off through the relay, it suddenly became clear that after 20-40 cycles, the Chinese power supply had died safely. I had to urgently buy a Motor Shield and use its wide capabilities to regulate the drum rotation speed.
At this point, two of the three problems went away, and I began to seriously think about solving the problem of precise stopping. A mechanical switch that would signal the passage of a revolution did not seem to me a very good solution. I was confused by the additional mechanical load on the gearbox, which occurs only in one position of the drum. Therefore, I decided to use a system: LED + black mark on the drum + photoresistor. I took a photoresistor, assembled a voltage divider with it, and using one of the analog inputs of the Arduino UNO began to measure the voltage to determine the presence or absence of a tag. The mark itself was a small piece of electrical tape, and the backlight was organized using an LED powered through a resistor (to limit the current). Then there was a boring development of statistics, with different degrees of illumination of the drum (light in the room). I determined which values are taken from the analog input, and set threshold values for the options “there is a mark” - “there is no mark”. This solved the last problem.
Then I tried the feeder with granules and a slot, but, in order not to feed the fish in advance, all the tests were carried out on a sheet of paper, where I not only determined the size of the gap (sealing it with fragments of tape) but also found out that some of the granules spilled past the intended distance between two slats. I had to unscrew the plastic packaging for some kind of cable and make something out of them that resembles brushes in an electric motor, so that when the gap is raised, the food would be “plugged” by these transparent plates rubbing against the drum.
As you already understand, the purpose of this device is not a well-fed fish life, but some kind of test of oneself. And I decided to go further. In terms of software development. In the hardware I only had the executor of three commands, but on the home server I decided to keep some statistics. Since I am a web programmer, out of habit, I took a MySQL database and created two tables in it. In one I added the URLs and dates of requests to the device, in the other I wrote the answers, as a result I received statistics on whether the fish were successfully fed and what time the lights in the aquarium turned on and off. (The fact is that the device produces a response only after the command is executed. And it does not provide a response if something went wrong.) Remembering some of my Java skills, I took the URL class and, with its help, made all three of these http requests to the Arduino. The JSON response was parsed using a library downloaded from json.org. The vacation was approaching quickly, so there wasn’t enough time for the remaining perversions, and I decided to run the control java software itself using the good old cron.
This is how the departure to the sea found both us and the fish. Three weeks later, we returned tanned and saw all our fish swimming happily around the aquarium, and they were pretty well-fed.
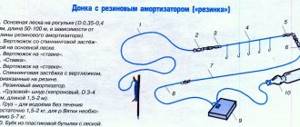
Do-it-yourself feeder for winter fishing
This type of feeder is stationary.
Its peculiarity is that such a feeder is not removed from the bottom immediately after the food is delivered, but continues to be on the bottom during the entire fishing process. The main task of such a feeder is to withstand strong currents, where conventional “dump truck” type feeders cannot be used. The author proposed an option for making a similar type of feeder with your own hands.
Materials and tools: - lead (can be taken from old batteries and melted down); - metal mesh with a mesh size of about 4 mm; - a can of canned fish (bottom diameter should be 8 cm); — steel wire (diameter 1 mm); - container for melting metal.
Manufacturing process
Step one. Mesh preparation
First, take a metal mesh and metal scissors. You need to cut a square with a side length of 30 cm. Next, a cylinder is made, and the joint is sewn together using wire. At this stage, the creation of the feeder is completed.
Step two.
Melting lead If you have lead in the form of small pieces, then you can immediately begin making a feeder.
If not, the lead must first be melted down in a larger container. After this, take a tin can, add lead and then put the can on the fire. When the metal becomes liquid, the prepared mesh cylinder is lowered into the tin. After the lead has cooled, the jar needs to be cut. As a result, there will already be a lead weight on the bottom of the mesh. Now it needs to be finalized using a file. It is necessary to grind off the excess edges and give the cargo a more acceptable appearance. Step three.
Creating a feeder lid A tin can is also used as a lid for such a feeder. You need to make holes in it and create hooks from copper wire. Subsequently, with the help of these hooks, the lid will be attached to the feeder and will not fall off when lowered to the bottom.
Also at the last stage you need to make a handle for the feeder, it will be tied to it. For these purposes, you can also use several pieces of copper wire that need to be woven together.
That's all, the tackle is ready. Now you need to pour bait into the feeder and lower it to the bottom. When fishing on a current, such a feeder is always placed upstream, and the fishing hole is drilled some distance downstream. You need to step back 1.5 meters from the feeder, and the distance between the holes should be about 0.5 m.
Typically, the amount of feed in the feeder does not exceed 75%. Mixtures of crackers, seeds, flour, oatmeal, and so on can be used.
If the current is too strong, then it is better to form balls from the bait, which will then be loaded into the feeder. In this case, the bait will erode more slowly. Depending on the strength of the current, one load will last on average 45 - 150 minutes. Source
Become the author of the site, publish your own articles, descriptions of homemade products and pay for the text. Read more here.
Fish feeder
The fish feeder is a float with food containers. It can be made from wood or a plastic canister. To do this, you need to cut a plastic container into two parts or make a box out of boards.
A wooden handle bar is attached to the container so that the feeder can be moved around the pond. It is better to make two separate sections for different types of food.
On this topic:
How to smoke fish in a hot smoker so that it...
Jun 2, 2018
Appetizing flounder baked in the oven
May 13, 2018
BACK FORWARD 1 of 21
The feeder is immersed in water. You can use a brick as a load. To dive under water to different depths, it is necessary to use weights of different weights. The feeder is tied to the shore of the pond so that it can be raised to the surface of the water and food can be added.
On this topic:
Excellent pike baked in the oven for the holiday table
Easy marinating of fish at home
Making silage: professional secrets of modern…
Smokehouse for fish: do it yourself
BACK FORWARD 1 of 12