We make the side of the basket.
Before we continue working on the basket, I want to show you the bottom of our beauty from the bottom side, which was created at the end of the 1st part of the master class.
I decided to make the side simpler. The scheme is simple: along the entire perimeter of the bottom I made half-flowers from 7 cm loops. Each element consists of 5 loops and is glued to each other closely.
It is better to start this stage from the middle of the workpiece. Since our pattern is symmetrical and starts from the center, it will not be difficult to determine the starting point. I glued the first loops as in the photo.
In this way we glue the loops around the entire perimeter of the oval. On the sides of the oval the distance for 7 cm loops was not enough, so I made them 5 cm each. This size was just right.
Here's a close-up photo. It already shows what the half-flowers will look like.
On the inside, I covered the junction of the parts with a small circle of thread.
Cord basket. MK Grishina Elena
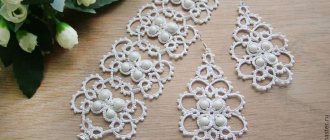
I prefer baskets made of cotton cords, they are nicer and hold their shape better. These baskets are sewn from cotton cords:
And here are these made from artificial cord:
It is better to take a thicker cord for the first basket, starting from 3-4 mm thick.
It is better to take threads in tone.
It’s clear that this is not for everyone, but this way the basket looks neater, uneven stitches and joints are not visible.
You can stop, cut the thread, look and start again, the overlapping stitches will not be visible.
We take the cord. We melt the edge of the cord (if it is synthetic), if it is cotton, we cut it evenly.
We secure the tip like this - you can use threads, you can use needles.
The longer the tail, the more oval the bottom will be. The tail should remain on the LEFT. It is important.
Using a machine, select a zigzag stitch.
The stitch width should be enough to capture both sides of the cord.
Typically the stitch width is equal to or slightly greater than the thickness of the cord.
Let's start scribbling. We make a tack, we can go over one place several times, if the threads are the same, it won’t be visible.
I specifically use threads of a different color so that you can see.
We sew and turn the workpiece. We turn it calmly, laying out the cord like this.
We continue to scribble - we are making the bottom.
When the bottom of the basket begins to rise, we begin to tighten the loose cord. Like this:
I used arrows to indicate the direction of tension. The tension force should be uniform, but different in different areas of the basket. To make it clear, look at this “basket profile”:
Explanations for the diagram:
- When we do it, we don’t pull it, but simply lay out the cord in a spiral.
- It starts - we pull weakly, the basket begins to bend, you will feel it. So we sew 2-3cm.
- The most difficult section is to pull with all your might)) push the basket itself forward, pull the cord towards you. The pressure is uniform.
- The basket is bent. We sew. We pull just a little bit. In theory, we don’t have to pull, but the machine itself will interfere with us, it hangs over the basket and pulls it a little to the side, e.g. So that the walls are even, we still tighten them a little.
In order for the basket to be level and not skewed, it is IMPORTANT to change the tension of the cord (and move from point to point) not where we like, but in a spiral. So that the full circle is sewn evenly. In the diagram, these points are marked with a dotted line, the one who knits, I think will understand me (ha ha))) I don’t knit myself))))
It’s better to stop at these same points to see what we come up with. While sewing the basket, I stop 5 times)) Then I re-tack and continue sewing.
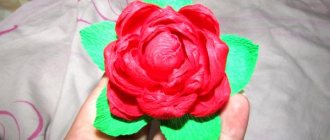
The tail of the basket can be fastened in different ways, you can make a facing, you can simply stitch it with a zigzag, you can close it with ears (like I did on the red one):
I will be glad if MK is useful to you. Come visit the blog! (Grishina Elena)
We make a handle.
You will have to tinker a little with the handle. But believe me, there is nothing complicated. It will be double. This way, in my opinion, the work looks more interesting and will be more practical.
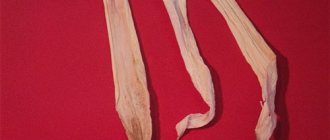
The handle is made from three-strand tape. Its length is 60 cm. It is not very convenient to do, but you will have to come to terms with this moment.
The main thing is that when you do it, lubricate the threads with glue well enough, because the rigidity of the handle will depend on this.
We attach the end of the ribbon to the top of the flower as shown in the photo.
We fasten the opposite end to the other edge of the basket.
Note! Until the tape is completely dry, it will become deformed and fall off.
It will look something like this, or even worse)))
At this stage, the main thing is not to rush! You need to give the tape time to dry completely and, as it dries, give it the desired shape. In the end, the first half of the pen will look pretty good.
As you can see, it has become even and regular in shape. Exactly what we need! We make the second handle in exactly the same way.
We tie the handles together in the center. To do this, just grease a small piece of thread with glue and wind it around the very top of the handle.
With this, the framework of what we will hold on to is ready and then we will proceed to the next stage.
Technique for weaving a decorative panel with paper twine presentation for a technology lesson on the topic
Slide 1
State comprehensive (correctional) boarding school No. 9 Technique of weaving a decorative panel with paper twine Teacher: Sosedova F.M. St. Petersburg 2013
Slide 2
From the history of weaving The art of weaving from vines goes back centuries: - back in the Stone Age, people knew how to weave the walls of their homes; — in the Neolithic era, at the dawn of human development, wicker weaving was one of the common crafts; archaeological excavations confirm the existence of wicker containers that served as molds for making pottery; - in biblical texts there are references to weaving from vines: the daughter of Pharaoh finds the baby Moses floating along the Nile in a basket of reeds; - in Ancient Rome, the army of the gladiator Spartacus descended from the top of Vesuvius along stairs woven from grapevines; — in the Middle Ages, the technique of wicker weaving was one of the most widespread; numerous wicker products are depicted on the canvases of Renaissance artists; - at all times, among all peoples, products created by craftsmen who mastered the technique of wicker weaving were popular; By the second half of the 19th century, this type of applied art had become fashionable among various strata of society. All kinds of furniture, newspaper cases, strollers, swings, travel chests, baskets, children's toys, table setting items were and are in constant demand.
Slide 3
Goals: Development of individual skills of students by means of mastering the technique of weaving with paper twine; education of aesthetic taste; adaptation of children in social life through creativity; Providing conditions for creative activity and self-realization of students’ personality.
Slide 4
Objectives: Educational: -introduce students to the history of weaving and the use of willow twigs in applied arts; -teach children to use tools and materials (paper twine) necessary for weaving; -teach weaving techniques when creating panels; - teach safety precautions when working with tools and the rules of personal hygiene. Educational: -help you believe in yourself; - to cultivate patience, hard work, the desire to complete the work started, and a kind attitude towards each other; -instill a desire for quality work; -develop correct self-esteem.
Slide 5
Developmental: - improve coordination, memory; -develop fine motor skills, eye, imaginative and logical thinking; -develop interest in creative work, artistic taste; -develop the creative potential of each student. Social: - create a favorable atmosphere for informal communication between children who are passionate about a common cause; -stimulate the creative activity of students; -teach students how to organize their leisure time in an interesting and useful way; -introduce children to creative work and promote their adaptation to living conditions in modern society.
Slide 6
Necessary tools for work: Scissors; Awl; Wire cutters; Sample; Glue brush; Ball pen; Rubber mat, at least 0.5 cm thick.
Slide 7
Main material for work: Paper twine; Corrugated cardboard; PVA glue. Products often require decorative coatings; water-based transparent varnishes are used for these purposes.
Slide 8
Weaving technique: Make a base; Thread the guide threads; Weaving with braided (main) thread; Finish the weaving with the “openwork” technique; Secure the products with PVA glue; Treat the ends of the guide thread with wire cutters.
Slide 9
Making the base: Draw an oval according to the template; Mark the holes with a ballpoint pen; Cut out an oval with scissors.
Slide 10
We trace the oval according to the template, pressing it tightly to the cardboard
Slide 11
Mark the holes on the cardboard with a ballpoint pen, the number of holes should be odd
Slide 12
Cut an oval with scissors
Slide 13
Threading the guide thread: We pierce the marked holes on the base using an awl; Measure and cut the twine into pieces; We thread pieces of twine into the holes on the base.
Slide 14
Using an awl, we pierce the marked holes on the base; We place the base on a rubber mat.
Slide 15
We measure the twine 12-15 cm long; Use scissors to cut the twine into pieces. The number of segments should be equal to ½ of the even number of holes and plus one segment. For example: a total of 37 holes. 36:2=18 18 segments+1 segment=19 segments. Total: 19 segments.
Slide 16
We thread the finished pieces into the holes on the base. One piece in two holes, in a loop. In this case, the threaded segment protrudes from each hole to the same length. Glue the odd, last segment to the base from the wrong side with PVA glue. We will call the segments guide threads
Slide 17
Weaving with braided (main) thread: We lay paper twine, which we will henceforth call braided (main) thread, row by row, passing between the guide threads, alternately from above and below.
Slide 18
Weaving pattern with main (braid) thread
Slide 19
We bend the remaining length of the guide thread into an “openwork”. We bend the first guide thread through one to the third, the second guide thread through one to the fourth, and so on.
Slide 20
To give the product shape and strength, apply PVA glue to the product.
Slide 21
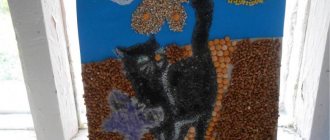
Our works
We braid braids.
A braided braid will perform two important functions: it will make the work more durable and beautiful. You can weave any version of the braid, but I decided that I would have a classic version of three strands.
A little secret of weaving. When you weave, the threads need to be slightly lubricated with glue. Firstly, the villi will be smoothed out and the braid will not be shaggy. Secondly, the glue will give it additional rigidity, which will allow the basket to keep its shape.
We braid the braid the entire length of the handle. Therefore, measure out the length of the threads so that it is enough. If my handle length was 60 cm, then for the braid I cut threads 100 cm - 120 cm long.
It’s better to weave a longer one than a shorter one and then think about how to correct this mistake.
We glue the braided braid onto the ribbons of the handles.
Our basket is now taking on its final form.
The final stage remains.