Once upon a time, topiary was the privilege of gardens and parks, because initially this was the name given to decoratively trimmed trees and shrubs of unusual, original shapes. Over time, living decorative trees turned into artificial, small tree-shaped figurines made from various materials, which became the design highlight of any interior. Modern topiaries are called trees of happiness.
We offer you a master class on making a tree from organza and dried flower buds.
Organza topiary
List of materials: - floral organza - 70 cm wide - 3 m; - artificial flowers; - base ball - 10 cm; - trunk; - plastic or ceramic pot; - plaster; - decorative elements - sisal, lace. List of tools for work: glue gun with rods; stapler; scissors. Instructions on how to make organza topiary:
First of all, you need to prepare the organza. It is necessary to make so-called “pounds” from it. They will completely cover the entire ball. This will create an organza crown. “Funtiki” can be made in different ways. I have this method, I like it the most. The organza needs to be cut into squares measuring 7 by 7 cm. Precise measurements are not necessary in this process; “counters” that are not even exactly the same size will look good on the crown. Next, take two squares. Place one square on top of another, like this. Fold in half. Fold the bottom part onto the top. Now just fold it in half. Use a stapler to fasten at the bottom. This is what the pound looks like from the front. You will need a lot of such “pounds”. This is only a small part of them. For one tree with a ball size of 10 cm, I need 3 meters of oragnza (with a width of 70 cm). “The funnels are ready,” you can start creating a crown. At the very beginning of working with the ball, it is necessary to note where the barrel will be located. If you are comfortable, you can immediately glue the barrel to the ball. Personally, I find it more convenient to do this at the end of work. I will make topiary from organza and artificial flowers. I'll take this bouquet. Now you need to take one flower and glue it to the ball. We will glue both flowers and organza using hot glue. Now paste the flower around the circle with “pounds”. Next, glue more flowers. And paste some “sticks” around the flower. We do this until the flowers run out. In total, it took me 9 flowers to make this tree. We also fill the gaps between the flowers with organza. The crown is ready. Next, we take the barrel and glue it into the hole that we previously made for it. The trunk can be painted in the color you like, or wrapped with a special tape. The topiary is almost ready, all that remains is to install the trunk with the crown in the pot. I took a regular plastic pot. The height of the pot is 10 cm. We dilute the plaster with water until it becomes thick sour cream and fill the pot with it. Where we immediately insert the barrel. We hold it for about 4-5 minutes, periodically leveling the barrel. After 5 minutes, you can lower the barrel, the plaster will begin to set. But it will take several hours for it to dry completely. When the plaster is completely dry, you can decorate the lower part of the tree. For this I use sisal and flower. Instead of sisal, you can use artificial moss, various pebbles, and sand. I hot glue some sisal and glue a flower here. I decorate the pot with lace. I also glued it on with hot glue. Here our tree is ready. I glued two branches of natural lagurus to the trunk.
You can also use various butterflies, birds, etc. as decoration; beads can be glued to the crown. Experiment and create your own unique topiary. Creative success.
I made the tree as a gift, so I wrapped it in gift wrap. Now let's hurry up.
Organza topiaries: wedding gifts
If you are going to attend a wedding, then you are clearly faced with the question of what to give the newlyweds. Of course, it is customary to give flowers as the main gift, but usually at weddings there is such an abundance of flowers that the young people don’t even pay attention to them, and a few days will pass and all the beauty will fade, not a trace will remain of your efforts.
With a little effort and effort, you can truly surprise and delight the newlyweds by giving them a handmade topiary for their wedding.
Creating organza topiary for a wedding “Lilac Happiness”
To make it you need to stock up on:
- Foam base ball;
- Pink floral organza (about 5 m);
- Trunk (35-40 cm);
- Flowerpot (preferably ceramic and elegantly decorated);
- Wedding figurine;
- Satin flowers;
- Satin ribbons;
- Alabaster;
- Acrylic pink or lilac paint;
- Glue gun;
- Stationery stapler;
- Scissors.
Let's start by painting the trunk lilac or pink, while it dries, prepare the pounds, then secure the trunk to the base (you can put it on hot glue). Having diluted the required amount of alabaster in the pot, we place the trunk with the base there. Leave it overnight to harden. Next, carefully and consistently fix the pounds on the base, forming a crown. In addition to the pounds, it is necessary to harmoniously glue flowers onto the base; there should not be many of them, their purpose is to enrich the composition without weighing it down. Finally, decorate the flowerpot with sesal and thread beads on a fishing line along the trunk. You can install a wedding figurine under the crown.
Organza topiary, master class
You can not only buy such a tree in a store, but you can also make it yourself.
For this you need: organza, artificial flowers, leaves, cherry berries and materials for the trunk and pot. Follow all the recommendations in the presented master class, and you will have a wonderful example of homemade topiary. List of materials that will be required:
Floral organza – 3 m.; (70 cm wide) newspaper or paper - to create a base ball; Knitting; barrel-stick – 1 pc.; gypsum; plastic or ceramic pot; artificial flowers; artificial cherry fruits – 15 pcs.; ribbon for decorating the pot; decor – sisal, bird, butterfly or similar; toothpicks.
List of tools for work:
Glue gun with glue; stapler; scissors.
Master class on creating a topiary with your own hands:
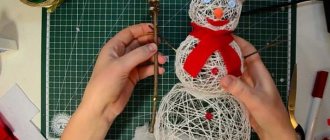
Making a topiary, or tree of happiness, begins with creating a crown. In order to make a crown, you will need a base ball, which you can use ready-made, in the form of a foam ball, or make it yourself. Today I make a ball myself from ordinary newspaper and thread. You need to take a piece of newspaper and crumple it into a ball in your hands. Carefully wrap with knitting threads in several layers. Here's what I got. The base for the crown is ready, now you can start creating the so-called “pipes” or “trimmings” from floral organza. As for organza, I always use floral organza, as it holds its shape better and is more voluminous. So, to make “trimmings” from organza, you need to first cut the organza into strips 7 cm wide, and then cut each strip into squares. The resulting blanks measure 7 by 7 cm. Take two squares. We put them on top of each other diagonally, like this. Fold in half diagonally. For clarity, I secured it with a needle. Now cut it in half, creating a triangle like this. And in half again. It turns out like this “trimming 2. We fasten the corner with a stapler and glue a toothpick to the very edge. The “trimmings” are ready, you can proceed to making the crown. In addition to organza, I use these artificial flowers. We begin to collect the crown. Here, do what is most convenient for you. I first make the entire crown, and then insert the stick-trunk, it’s more convenient for me. You can first glue the barrel to the ball, and only then cover the ball with organza and flowers. We separate the flower from the bouquet and insert it into the crown. We take ready-made “trimmings” and insert them around the flower. Then insert the second flower into the ball. And we also insert trims around the flower. And so on. Then we close the free space with “trimmings”. When there is very little free space left, I insert the barrel and cover the remaining free space with “trimmings”. This is how the crown turns out. Now we dilute the plaster according to the instructions indicated on the package. We take a pot, insert a tree and fill it with plaster. Hold for 5-7 minutes, level and leave until completely dry. The plaster sets quickly, but during this time I manage to level the tree as I need it. It should take several hours for it to dry completely. I usually fill the pot with plaster overnight, and in the morning you can start decorating the lower part of the tree. I decorate the bottom of the tree as follows. I wrap the trunk with beige sisal and glue on the cherries. I make a bow from the ribbon and glue it to the pot. Now I take the cherries. And I glue them to the crown of the tree in random order. This is how the tree with cherries turned out.
You can use various butterflies, birds, beads, etc. as decoration. This is how you can easily make topiary with your own hands.
Being a stylish piece of furniture, topiaries do not lose their popularity. Initially, topiary art was called curly cutting of plants. To complete a particular composition, sometimes it was necessary to work on topiary for several years. Impatient lovers did not want to put up with this. Then a new direction in needlework with the same name appeared. These beautiful trees of happiness are made from a variety of materials. Today at Krestik we will look at a master class on making topiary from felt and several options for topiary compositions from satin ribbons, organza and sisal!
Organza topiary master class: detailed process
In this part of the article, you will be presented with a step-by-step explanation of the process of making topiary with your own hands.
To make a tree of happiness you will need to stock up on:
- Organza (approximately 2.5 meters will be required, remember that the width of the fabric should not be less than 70cm);
- A foam ball with a diameter of at least 7 cm;
- Glue gun for working with hot glue;
- An elegant flowerpot for composition;
- A stapler (the most common office staple will do);
- Polyurethane foam;
- Sharp scissors;
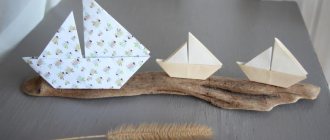
- Driftwood (remember that it is a decorative load-bearing element, so it should be aesthetically attractive);
- Wire;
- Atal or brocade ribbons;
- Decorative details to suit your taste.
Step by step instructions
It’s better to start working with the topiary trunk; if you haven’t found a beautiful and smooth driftwood yourself, buy one that’s already been processed at a decor store or hand-made studio. An original solution is to decorate the driftwood with a satin ribbon or paint it in the color you want; gold or red will look especially fresh. If you decide to decorate the driftwood with a satin ribbon, do not forget to secure its end with hot glue.
An interesting option for decorating driftwood would be white twine or lace.
When the driftwood is ready, insert it into the blank ball, be careful: it should stand evenly and firmly, you can “plant” it with hot glue. Afterwards, you can start decorating the flowerpot, for example, you can wrap it with harsh thread, put it on hot glue, or decorate it with lace or fabric. Next, fill the flowerpot with polyurethane foam, but not to the brim; remember: polyurethane foam can increase in volume. Insert a driftwood into a flowerpot with foam and leave the future tree overnight; the next day, remove excess dried foam. Then start working with organza, cutting the number of squares you need, make pounds (how to make pounds is written below), fold the blanks in a place convenient for you, for example, on a tray. Next, place each pound on hot glue in turn, thus securing them to the ball. As a result, you should have an organza crown.
Find out which topiary is suitable as a gift for a man on the next page:
All you have to do is decorate your tree; the process is not limited by anything other than your imagination and the general concept of topiary. You can see an example of a finished topiary in the photo.
Felt topiary “Pink chrysanthemum”
Materials and tools:
- felt (8 sheets measuring 30×28 cm)
- sisal (greens)
- flowerpot
- satin ribbon 1 cm wide
- postcard
- butterfly on a leg
- ladybug
- green wool thread
- foam ball (diameter 10 cm)
- sheet of green paper
- stick
- mixture of cement and sand (1:1)
- glue gun
- scissors
Crown
We cut all the felt into strips 7 cm wide.
From each felt strip we make a chrysanthemum.
Using hot glue, we “plant” the resulting flowers on a foam ball, previously pasted over with green paper.
Trunk
For the trunk we use a regular stick from a birch or other tree. We clear it of bark and use a glue gun to wrap it tightly with green woolen thread.
The topiary trunk stick should be dry, and not just broken from the tree!
Assembling a topiary
We plant the crown onto the trunk using hot glue.
Mix a thick cement-sand mortar in a flowerpot and place the topiary in it exactly in the center.
Place a butterfly next to it so it doesn’t fly away)
We fill the surface of the cement with sisal. Leave to dry.
Decoration
We pierce a small postcard with pleasant wishes with a hole punch. We string it on a satin ribbon and tie an even bow under the tree crown.
We plant a ladybug in the grass.
We put a “Handmade” sticker on the flowerpot.
Our topiary is ready! A handmade tree of happiness will serve as a wonderful gift for family and friends.
Another version of the felt tree of happiness:
The crown for topiary can be made from other equally simple materials: satin ribbons, organza, sisal.
Topiary made from satin ribbons
You can make an exquisite ribbon topiary with your own hands using satin ribbons of various widths and different techniques for working with them.
You can watch the master class in the video lesson.
Organza Topiary
Organza is perhaps the most weightless material. Topiaries with organza flowers always turn out as airy as a cloud.
How to create an aerial topiary, watch the video master class.
Surprising with a gift is not easy these days, but it is still possible. Try making a topiary for your loved one with your own hands. The materials for its creation can be different; light and elegant organza is often chosen. The “Tree of Happiness” from it looks very elegant.
Topiary with organza strings
Funtiki are small parts made of organza that can be assembled into a single composition. In the photo you can see what they are. The name is funny, and they are not difficult to make.
Funtiki are made like this:
- Cut into small squares. It is undesirable for the side to be more than 7 cm. Ordinary organza may fray at the edges, but floral organza will not cause such trouble. Therefore, almost every master class advises taking it.
- Fold the workpiece diagonally with your own hands, slightly moving the corners.
- And then the fabric needs to be folded so that it gradually becomes an accordion. To do this, mentally divide the square into four parts.
- Such a pound is fixed with a regular pin.
- You can fasten two blanks with a stapler or just thread.
These are the trimmings that can be used to decorate a topiary. You will have to make a lot of them if you want a lush tree. A video or photo master class, it happens, explains how quickly you can make many of these pound cake blanks at once.
How to make a pound from organza (video master class)
Options for making organza topiary
Organza topiaries can have different shapes and look completely different. However, they all include the following basic elements:
- stand;
- base for the crown;
- trunk.
You will get a beautiful topiary if you decorate it correctly. Organza goes well with satin ribbons and beads, which can be attached with glue. You can decorate with artificial flowers, varnish, and paints. A ball is most often used as a base. It can be made of any material, but it must be durable. Typically, balls made of papier-mâché, plastic, foam, and paper are used. For a romantic date, such as Valentine's Day, you can make a heart topiary. The base for it is cut out of foam plastic.
The following can be used as a stand:
- baskets;
- pots;
- vases;
- glasses;
- cups.
The main thing is that the diameter of the crown is approximately the same as the diameter of the stand, otherwise the structure will look heavy.
There are different options for making a trunk for a “tree of happiness.”
The most popular materials for this are branches, wire, and sushi sticks. The wire is twisted several times and then decorated with cords or ribbons. The branches are varnished after removing the bark.
Organza flowers for decorating topiary can be made in several ways.
- Templates in the shape of flowers are made from cardboard. Organza blanks are cut out from them. All that remains is to burn the edges of the resulting blanks.
- A long ribbon is taken and one edge is burned over a candle flame. Next, you should roll the ribbon in the shape of a flower, and secure its lower part with thread.
- Flowers are made using pounders. To do this, organza is cut into squares, folded diagonally, shifting the corners, and then folded into an accordion or fan. The workpiece is fastened using a stapler or thread.
Topiary made of organza and artificial roses looks romantic. Flowers made from foamiran are suitable. In this case, the pot is painted to match the color of roses, organza acts as an additional decorative element, but otherwise the technology for making the “tree of happiness” is standard. You can also make leaves from organza, and additionally decorate the ball with gold ribbons and bows, attaching them with glue. The space between the walls of the pot and the trunk is decorated with beautiful stones, which are also fixed with glue. The leaves can be sprinkled with glitter and fixed with varnish.
The most difficult thing to do is a topiary decorated with organza and silk flowers,
made using the guilloché technique - burning onto fabric. But the result will definitely exceed all expectations. To make this topiary you will need a burner with temperature control. In addition, you will need special glass, without which the work will not be possible. To avoid cutting yourself, it is recommended to seal the edges of the glass with tape. Burning is carried out using a pre-prepared stencil.
Topiary elements
Topiaries - trees of happiness, so different and unique, consist of the same elements:
Base for topiary
The basis for the crown (most often a ball).
Typically, foam balls are used for topiary. Handicraft stores sell these blanks of different diameters. You can also use plastic balls or make a base using the papier-mâché technique. You can cut a base of a different shape from a foam ball. Heart-shaped topiaries are very popular as wedding gifts. At the bottom of the base made of any material, you need to leave a hole for attaching the barrel.
Stand
The size of the topiary stand is selected so that the crown of the tree is larger than the diameter of the stand. With this ratio, the composition will be proportional and light.
The choice of container for the stand depends on the imagination and capabilities of the master. Flower pots, baskets, and old cups can also be used.
Having decided on the style of the future tree of happiness, the master can decorate the stand by choosing fabric or lace. Another option is to varnish or paint the pot. In some cases, beads, glass beads or seed beads will be appropriate.
Trunk
The main requirement for a barrel is strength. Trunk made from natural materials look very good. Slightly curved branches or driftwood will make the topiary original and unique. Before use, the bark is removed from the future trunk, then the surface is covered with varnish or paint.
Often thick wire is used for the barrel. To make the tree stable, the pieces of wire are twisted together. Of course, then you need to decorate the base. The wire harness is lubricated with glue and wrapped with fabric, ribbons or cord.
Flowers
The main element of decorating the base of the tree of happiness is flowers. Organza flowers can be made in three ways.
Cut out a ribbon of the required size from organza and fold it in such a way as to make a lush flower. The bud in the lower part is secured with thread. Blanks are cut from organza according to round templates of two or three sizes. They are stacked, stitched, and a beautiful bead is sewn into the center.
Organza is cut into squares measuring 5*5 or 7*7 cm. Each piece is folded diagonally, the corners should be slightly offset.
The workpiece is folded like an accordion, the lower corner is secured with a stapler or stitched. If you connect several of these cones, you will get a lush flower. To decorate topiary, you can also use ready-made flowers, which can be purchased in specialized stores. Textile daisies, bells or poppies will enliven the composition and give the tree of happiness a summer mood.
When choosing materials for making wood, you need to take into account the overall style of the composition. It must be solid, all components of the topiary must correspond to each other.
Instructions for making organza topiary
The master class on creating organza topiary is simple.
- First, take a base in the shape of a ball or other shape made of plastic, paper or foam.
- Pounds are made - squares with a side of 7 cm are cut. They are folded diagonally, shifting the corners.
- Next, an accordion is made from the blanks. You can secure the resulting shape using a stapler.
- You can decorate the pot as your imagination dictates. A good option is decoupage using beautiful napkins.
- The topiary trunk, which can be a stick decorated with yarn, is fixed to plaster in a pot.
- The inside of the pot is decorated with artificial grass.
- The crown is decorated. To ensure that the pounds stick well to the base ball, it is sheathed with fabric. Organza flowers can be planted with glue or sewn on. The leaves are attached in the same way.
If you don’t have the time or desire to make organza flowers yourself, you can purchase ready-made ones at a flower shop. You can attach the composition to the pot not only with plaster, but also with polyurethane foam. An original design option for the barrel would be to decorate it with colored laces.
Organza flowers look good combined with crepe paper, coffee beans and satin ribbons. Topiary can even be made from organza and pasta - it all depends on your imagination!
To create a topiary in a marine style, you can use the appropriate paraphernalia glued between the flowers - starfish, shells, anchors.
The tree of happiness looks interesting and original, combining organza and nuts - both whole and parts. You can take pistachios, walnuts, hazelnuts. In this case, organza can act as a frame, and the fruits themselves are painted in beautiful colors.
A great option is the money tree.
In this case, in addition to organza, coins and fake banknotes are used as decorative materials.
Rose brooch made of felt and organza
Rose made of felt and organza. A small master class.
My rose has two types of petals - organza with felted wool fibers and petals made of wool on a frame. Plus “twigs” and leaves. Required materials: - a little combed ribbon for the petals - delicate shades and green for the leaves and twigs. - a small piece of organza - wire for beading - clasp for a brooch - a needle for dry felting - olive soap or, failing that, Fairy
- thin fishing line
The first thing I do is create a felt sheet for the petals on the frame. Take the combed tape and lay out three very thin layers, each layer perpendicular to the previous one. We lay out the layout in a small area - 30 by 30 cm. Colors can be mixed, but very carefully. These are blanks for petals and leaves, so the colors of the selected wool are appropriate. Each felt layer is enough for 5-6 petals or leaves, so we calculate the number of blanks accordingly. For an average rose it takes me 7-8 petals on the frame.
Having spread out the wool, I moisten it quite generously with a soap solution from a spray bottle, cover it with a mesh or bubble wrap and go through it with a vibrating machine, literally several times, until the fibers initially adhere. Then I immediately put the workpiece on a towel and dry it.
While the felt layers are drying, you can make a frame for the petals and leaves. They are made very simply - pieces of thin wire are twisted in the form of loops to the size of the future petal, for green leaves in the same way - just sharpen the tip. Of course, we make several sizes - from the smallest petal to the largest.
If the layers of wool have already dried, then it’s time to start forming the petals. We cut out pieces from the layers in the shape of petals and leaves, larger in size than the corresponding elements of the wire frame (about 1 cm).
Next, we place the frame on the cut out parts, bend the edges of the felt and, using a needle, dry nail the wool, covering the frame (of course, on a foam pad or a special brush). Also very lightly, just to hold the fibers together.
We now have a set of wool petals and leaves, but they are not finished yet. Then I add it wet (wet it with soapy water and just rub it between your palms).
We do the same with the leaves.
Organza petals - cut out fairly large ovals from fabric - from 10 cm in length for small buds, to 15 - 18 for large roses. Then we place several blanks on the surface for felting and lay a very thin, simply airy layer of wool fibers on top of each oval, also crosswise. You can leave spaces unfilled with wool in the middle of the ovals. We wet it with a soap solution (spray), cover it with a net or film and go through it several times with a vibrating machine. Next, we deal with each petal individually - three between the palms, felted with a vibrating machine. Wool fibers will envelop the fabric sections and naturally secure the organza.
The branches are made very simply - I twist the wire twice (in finished form from 10 to 15 cm) and wrap it with a thin strand of combed tape, you can mix colors - start wrapping with one color, finish with another. In the middle of the branch, wrap more, going towards the tip. Moisten with soapy water and roll between palms. Advice - to avoid too much soap solution, do not dip the entire parts into soap, but rather use a spray bottle.
Next, all the blanks are dried and you can begin assembling the product.
At this stage it is difficult to give advice on the layout of the petals; we can say that it all depends on your imagination! First, fold several small felt petals, twisting the wires at the base of the petal, then wrap them in an organza petal. But the other way around is also possible! First, form the center of the organza flower. We fold organza in different ways and experiment. Having collected a certain number of petals, we sew them together with thin fishing line (I take double the fishing line, otherwise it breaks easily). Having collected a sufficient number of petals and sewn them tightly, add a leaf (or a couple) and a twig.
I fold the ends of the wires and hide them under a leaf. I sew on the lock and mask its base by sewing on a square cut from the remnants of felt fabric with fishing line.
Of course, the flower can be any, I also like to make orchids.
Good luck!
How to make organza topiary (video)
Any organza topiary is worthy of attention. It will look good in the office, on a bookshelf, and on the dining table. Caring for the product is simple - just blow off the dust with a cold stream of air using a hairdryer. It is also important not to place the topiary in direct sunlight to prevent the colors from fading, and to avoid getting it wet. If these simple conditions are met, the “tree of happiness” created by the master with love will delight the eye for many years.
Topiary, the tree of happiness, has recently become a popular gift and interior decoration. A small beautiful tree, according to popular belief, brings happiness and prosperity. In addition, as a decorative detail it can play the role of an interesting interior element.
You can make topiary with your own hands, using simple materials. A wide variety of materials are perfect for its manufacture: organza, ribbons, dried flowers and leaves, coffee beans, artificial flowers, fruits and berries.
I love making topiary from organza, and have created it more than once in different variations. I definitely use special floral organza. It can be purchased at a florist or gift wrapping store.
Take advantage of the master class presented at “Dream House” on how to create a cute topiary from organza and textile flowers with your own hands, and make sure that you can do this job.
Topiary made from wide organza ribbons (video master class)
It is impossible to single out one master class that covers several technologies for making a tree of happiness. Take creativity from everyone and create your own lucky topiary that will bring you good luck.
Topiary, the tree of happiness, has recently become a popular gift and interior decoration. A small beautiful tree, according to popular belief, brings happiness and prosperity. In addition, as a decorative detail it can play the role of an interesting interior element.
Materials for organza topiary
To create a beautiful topiary with your own hands, you will need the following:
- floral organza (I used yellow organza) – width 70cm, length 3-4m;
- textile flowers;
- foam base ball (I use a ball with a diameter of 10 cm);
- toothpicks;
- trunk;
- plastic or ceramic pot;
- gypsum;
- a piece of foam;
- sisal;
- various decor - inserts, butterflies, birds, etc.;
- stapler with staples;
- glue and heat gun.
Large organza topiary
A topiary made of light organza will transform the interior and add bright colors to an ordinary home environment. The peculiarity of this MK is that it tells how to make a fairly large tree 1 meter high. You will need a foam ball (about 20 cm in diameter), for such a ball you will need 6 meters of floral organza 0.7 m wide. Organza is taken in two colors: light brown and snow-white. To decorate the tree you will need white beads, as well as some brown beads. A satin ribbon in matching colors will come in handy. The tree trunk is made from aluminum wire. The tools you need are a stapler, scissors, and a small glue gun.
- Organza is cut into 8x8 cm squares and poundlets are formed from each - the components of the crown of the future tree.
- Bend the square diagonally, shifting the corners slightly.
- The vertices of the triangle are tucked towards the middle.
- The workpiece is folded in half in the opposite direction from the previous fold.
- Each workpiece is fastened with a stapler, the lower corner of the pound is trimmed. This will make it easier to glue the element to the base.
Instructions for making topiary with your own hands
The creation of organza topiary begins with the production of so-called “trimmings”, otherwise they are also called “counters”. To do this, you need to cut the organza into equal squares measuring 7x7cm. You can also use squares with sides measuring 6.5 cm, but personally I like the size of the square with sides equal to 7 cm.
After all the organza is cut into squares, you should take two squares.
Place one square on top of another.
Fold in half into a triangle.
DIY topiary step by step photo
And in half again. Secure at the bottom with a stapler. This is what the “trimming” looks like from above.
Now the toothpicks should be broken in half.
And apply glue to the tip of the “trimming” and glue a toothpick.
You will need a lot of such trims. It takes me more than 100 “trimmings” to make one topiary.
To make the tree, I use ready-made foam balls, but you can also use various children’s plastic balls as a base.
It is recommended to steam textile flowers before use. To do this, I use it and carefully steam each flower. For my topiary I use daisies.
The flowers must be stuck into the base of the ball.
How to make topiary with your own hands
Now take the trim pieces and stick them around each flower.
Also filling gaps between colors.
When the entire crown is ready, you need to dilute the plaster. Gypsum is diluted with water to the consistency of sour cream.
How to make organza topiary
Place the trunk with the crown in the pot and secure the trunk with a piece of foam plastic or a piece of sandwich panel. This is necessary so that during operation the trunk is securely held in the pot.
Fill the pot with gypsum mixture. Immediately insert the decor on a stick here (if there is one). I had a watering can with matching organza and flowers, it turned out very beautiful.
Interior decor – topiary in a pot
I glued two ladybugs to the pot, and one more to the watering can and to the trunk.
Organza topiary with textile daisies is ready. It turned out to be a very nice tree in my opinion.
Reading time: 4 minutes
It is difficult to find an interior without a small corner of prosperity and happiness. And its symbol is the “money tree” or topiary. For production, any available material is used, and the themes of artificial trees are very diverse. If you want to give an exquisite gift for a birthday, wedding, anniversary, airy organza topiary will solve the problem.
Tree with a heart-shaped crown
Before starting work, it is advisable to draw a sketch of the future tree. Instructions for creating an organza topiary will be given in a master class in which a heart-shaped cardboard blank is used as a base, and a suitable branch is used for a tree trunk.
To work you need to prepare:
The tools you will need are scissors, a stapler and a small glue gun.
The operating procedure is as follows.
- A heart is cut out of cardboard.
- The barrel is glued to the workpiece.
- Gives volume to the heart. To do this, coat the workpiece with glue, take a crumpled newspaper and place it in the middle of the cardboard heart.
- Wrap the heart in napkins and secure with thread.
- Dilute plaster or alabaster with water to the consistency of liquid sour cream.
- Styrofoam or pieces of polyurethane foam are placed at the bottom of the pot, the solution is poured into the prepared container and the barrel is inserted into the solution. Leave the structure to dry.
- Organza is cut into squares measuring 5*5 cm. The number of squares depends on the size of the heart.
- Fold each square diagonally, slightly moving the corners. Then fold it in half again. Bend the corners on both sides. The workpiece is fastened at the base with a stapler.
- When all the parts are ready, start gluing the organza cones to the heart using a glue gun.
- When gluing parts to the base, adhere to this order. First, organza blanks are glued along the contour of the heart, then on all sides.
- Glue the organza parts to the surface of the plaster.
- Decorated with beads and flowers.
- A satin ribbon is tied to the trunk and to the pot.
All roads lead to Rome
What do the topiary bushes in the park and the charming tree in a pot on the chest of drawers have in common? It turns out there is a common history that goes back to Ancient Rome. It was there that “topiary” slaves created figured hedges. The Italian Renaissance was also reflected in landscape fashion: gardens were decorated with original bushes in the shape of animals and political figures.
Since the 17th century, France has become a real trendsetter for beautiful parks, the basis of which is the art of curly pruning of green spaces. And over the following centuries, it became a sign of good taste to use the capabilities of topiary in shaping the landscape.
In the world of storey buildings, having your own garden or park is problematic. But anyone can afford to create a piece of man-made nature. This is how unusual trees migrated into the home interior.
We disassemble for spare parts
Any topiary consists of four main parts:
- the basis. The shape of the base reflects the theme of the product. Traditionally it is a ball, but it can be a square, a cone or an animal figure, the outline of a letter, or a heart. The choice of material for the base depends on the technique: if the decorative elements will be stuck in, a soft one will do; for stickers it is better to use a hard surface;
- crown. The main element for fantasy. To create it, any fabric, beads, sequins, beads, shells are suitable. The crown is even decorated with nuts, coffee beans, colored pasta and cereals, and candies;
- trunk. A crown-shaped base is attached to this part. The main requirement is that it must be strong and easy to decorate;
- stand. Traditionally, a regular flower pot is used for the stand. However, there is no limit to imagination. A small, miniature tree can easily be fixed in a small shell or coffee cup. For a larger topiary, any container decorated in accordance with the general idea is suitable.
Before starting work, you need to think through each element. They must be combined with each other functionally and thematically, forming a complete image.
Funtik technique
Elements for decorating with organza are formed in several ways:
- making flowers using ready-made templates;
- ribbon flowers, leaves;
- formation of pounds.
The simplest technique for working with pound organza. Main stages of working with fabric:
- the material is cut into squares with a side of 7 (5) cm. To avoid processing the edges, use hot scissors or a special organza for floristry;
- the square is bent diagonally so that the corners do not coincide, but are offset;
- the workpiece is folded like an accordion or fan;
- The corner is fixed with a sewing pin;
- a second one is made and connected to the first using a stapler, thread,
In this way, the required number of pounds is prepared for trimming the base of the organza topiary.
Idea for Valentine's Day
The symbol of Valentine's Day, the heart, will be a great idea for a topiary crown. Such a tree of happiness will be an original gift. To make it you will need the following materials:
Procedure:
- the barrel and the workpiece are glued together;
- Pounds are made from organza. Squares are cut into 5x5 cm format;
- using a gun, glue the pounds to the heart-shaped workpiece so as to completely cover the entire surface;
- the barrel is attached to the stand;
- the lower part of the tree is decorated with pounds.
Beads, satin ribbon bows, and butterflies will add completeness to the topiary. The middle of the heart can be filled with roses, peonies, lilies, made of organza. An original addition will be a frame with a joint photo
Assembly
- The pot is filled with pieces of polystyrene foam , the lower end of the barrel is inserted and filled with a solution of gypsum, alabaster or cement. If the tree is quite voluminous and the crown is heavy, polystyrene foam may not be added.
- Until the solution hardens, it is necessary to ensure that the stem remains in the specified position. The surface of the solution is decorated with colored pebbles, sand or beads.
- The upper end of the stem is inserted into the hole in the crown , where quick-drying glue is first poured.