Firstly, the contact with the body has improved, and secondly, additional cooling has appeared in the form of a cylindrical radiator. All joints were coated with thermal paste, and the structure was assembled together. I’ll immediately make a reservation about cooling. There are different versions of this flashlight. And the second version does not have a hole under the substrate, but only two holes for the wires.
If you come across such a design, then you are lucky; if not, then you definitely need to take care of cooling. The LED gets very hot. Measuring the temperature for several minutes near the LED showed more than 100 degrees. This is unacceptable for the long life of your ray of light.
Now about the second improvement: the driver. When I ordered a flashlight, I immediately decided that I would exchange it for a more convenient one. Many people are annoyed by these strobes and SOSs, and even by the inadequate activation of the flashlight after previous work. When turned on, it jumps to the next mode, and if the last time you worked with the minimum mode, now it will turn on the strobe light for you. I'm definitely not happy with this. Let's move on to the driver itself. The driver presented below is the design of a friend AVSel , for which I express my deep gratitude to him. Unlike special microcircuits, it is made on a microcontroller. All files for it.
What diodes are used in flashlights?
High-power LED lights started with 5mm sensor devices.
LED flashlights in completely different designs, from pocket to camping, became widespread in the mid-2000s. Their price has dropped noticeably, and the brightness and long service life of a single battery charge have played their role.
5mm white ultra-bright LEDs consume 20 to 50 mA of current, with a voltage drop of 3.2-3.4 volts. Luminous intensity – 800 mcd.
They perform very well in miniature keychain flashlights. The small size allows you to carry this flashlight with you. They are powered either by “mini-pen” batteries or by several round “tablets”. Often used in flashlight lighters.
These are the types of LEDs that have been installed in Chinese lanterns for many years, but their life is gradually coming to an end.
In search lights with a large reflector size, it is possible to mount dozens of such diodes, but such solutions are gradually fading into the background, and the choice of buyers falls in favor of flashlights with powerful Cree-type LEDs.
Search light with 5mm LEDs
These flashlights operate on AA, AAA batteries or rechargeable batteries. They are inexpensive and inferior both in brightness and quality to modern flashlights with more powerful crystals, but more on that below.
In the further development of flashlights, manufacturers have gone through many options, but the market for quality products is occupied by flashlights with powerful matrices or discrete LEDs.
DIY rechargeable LED portable flashlight
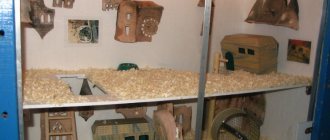
Hello, dear DIY friends. In today's article I will try to describe and show you in as much detail as possible how to make a rechargeable unfocused LED lamp in the old style. This homemade product will be especially useful for those who often have power cuts at home, and also for hikers. This lamp has fairly small dimensions and a very modest battery can easily illuminate a room of about 20 square meters. m. and do this for quite a long time. The homemade product itself will consist of the most accessible and already familiar elements, so anyone can certainly assemble it. Well, well, I think there’s no need to delay with a long preface, let’s go.
You can find links to some of the design components at the end of the article.
For this LED flashlight you will need the following, namely:
— 18650 standard batteries (2 pcs.) — Various sewer PVC fittings — LED strips — Switch — Small piece of plywood — Wires — Some large plastic can — Paint — Power connector — Small sheet of thin metal (“tin can”) — Self-tapping screws
The following tools will also be needed:
- A soldering iron with all the necessary accessories to work with it - A stationery knife - A marker - A ruler - A hacksaw or jigsaw - Superglue - Electrical tape or heat shrink - Wire cutters
Making an LED flashlight:
Assembling a homemade product should begin with the part on which we will place LED strips. As such a part, the author of the homemade product used a standard PVC sewer pipe of approximately 40 mm in diameter. From the PVC pipe you have chosen, you need to cut a section long enough so that you can easily place the LED strip you took on it. These LED strips are usually sold in car dealerships and are used as daytime running lights.
Next, for the newly cut pipe, you need to cut a couple of plugs, the plugs should be round, but they should not be flush with the pipe, but should protrude slightly. And they should protrude by about 5 mm on each side, this is necessary so that when the lamp falls, the protruding LEDs do not break. We mark such circles on a plywood sheet and cut them out, the author of the homemade product had a core drill of this size with him, if you don’t have one, you can use a jigsaw.
We glue the freshly cut plywood plugs to our pipe at the top and bottom, respectively. Be careful and center the pipe well on the plugs. You can glue these structural elements together using ordinary superglue.
It is necessary to make several small through holes on one of the plugs. These holes are needed to pass wires from the LED strips through the plug into the lower part of the structure (which we will directly assemble a little later). There should be exactly as many holes as you are going to attach the LED strips to the PVC pipe.
Then, as you might guess, we glue the LED strips to the PVC pipe. Often such strips have double-sided tape on them, which should be used to secure them to the pipe. It is advisable to thoroughly degrease the surface to be glued before gluing.
Having glued the LED strips into place, we insert the wires through the holes specially made for this purpose in the plugs. Then we connect all the LED strips to each other in parallel and solder two common wires (+/-) to them. The connection points must be insulated with heat shrink or at least electrical tape. We supply power and check that your electronic circuit is working.
The next step is to make a base on which our luminous part will be installed, and we will also place batteries in this very base. The author of the homemade product for such a base selected a large plastic jar with a lid; from such a jar it is necessary to cut off only the conical part with a lid. You can cut it using a circular knife.
The lid of the jar you took needs to be cut, it needs to be cut to lay the bundle of wires formed after connecting the LED panels to each other, the most important thing is that the cut hole is smaller than the diameter of the plug.
Next, you need to connect the light part with the base, or rather with the base cover. They should be connected to each other using superglue. At this stage, the author decided to immediately paint the base and plywood plug with spray paint, naturally, without touching the LED part. This moment is completely optional, and you can skip it or paint it later (after assembly).
After which it is necessary to integrate a switch into our design. The switch should be installed on the top as it will be more convenient. It can be embedded into a plywood plug, but making a hole for a switch in it will be more problematic than, for example, in a PVC sewer plug, which the author of the homemade product actually decided to use. We simply make a through hole in a plug of suitable diameter in its center for installing the switch.
Also, you need to make a hole in the plastic base for installing the power connector and, accordingly, install and secure it there using its own fixing nut.
Next, you need to make a plug for the base. This plug also needs to be cut from plywood or MDF panels. In order to cut out a plug that fits precisely in size, you need to attach the base to a plywood sheet and outline it with a marker, and then cut out this part using an ordinary jigsaw.
Before installing the plug in its place, you need to glue the batteries to it with superglue. A few words about batteries, batteries should be used in the 18650 format, if only because they are quite easy to get, they cost pennies in Chinese online stores, and you can also get them from old laptop batteries. To power the LED strips chosen by the author, two 18650 batteries connected in series are needed.
But we are in no hurry to install and glue the plywood base plug, since now we need to connect all the electronic components together. Here, in fact, everything is banal and primitively simple, and any comments on this electrical circuit would be unnecessary; just look at the diagram given by the author below.
After everything has been soldered, it is advisable to insulate all exposed contacts in order to protect yourself from shorting them. Well, now we finally glue the base plug and the plug with the switch into place using the same superglue. Also at this stage, the author decided to paint the upper part of the homemade product.
In principle, the homemade product is ready, but for more convenient operation, you can also make a handle. The author made the handle from a plastic tube and thin metal. Namely, he took a plastic tube and cut off a piece of it so long that it could be held comfortably in the hand, glued a couple of plastic plugs to this pipe and screwed a couple of metal plates cut from thin metal to them.
Then this same handle must be screwed to the plywood plug using self-tapping screws and a screwdriver.
All is ready! Now you have a powerful LED flashlight that you can use to illuminate the darkness around you. On my own behalf, I would like to add that in this scheme it would be worth using a battery charge and discharge controller, since thanks to such a controller your batteries will last many times longer, and, incidentally, it is much safer to operate the batteries this way.
You can purchase components that may be useful for assembling this homemade product here:
— 18650 batteries — LED strips — Switch — Wires — Power connector
Here is a video from the author of the homemade product:
Well, thank you all for your attention and good luck in future DIY projects!
Source
Become the author of the site, publish your own articles, descriptions of homemade products and pay for the text. Read more here.
What kind of LEDs are used in high-power flashlights?
Powerful flashlights mean modern flashlights of various types, ranging from those the size of a finger to huge search flashlights.
In such products, the Cree brand is relevant in 2020. This is the name of an American company. Its products are considered one of the most advanced in the field of LED technology. An alternative is LED from the manufacturer Luminus.
Such things are significantly superior to LEDs from Chinese lanterns.
What Cree LEDs are most commonly installed in flashlights?
Models are called consisting of three or four characters, separated by a hyphen. So diodes Cree XR-E, XR-G, XM-L, XP-E. Models XP-E2, G2 are most often used for small flashlights, while XM-L and L2 are very versatile.
They are used starting from the so-called. EDC flashlights (everyday carry) range from small flashlights smaller than the palm of your hand to large, serious search flashlights.
Increasing the power of the flashlight
If you are not satisfied with the brightness of your flashlight or you have figured out how to replace the LED in a flashlight and want to upgrade it, before buying heavy-duty models, study the basic principles of LED operation and the limitations in their operation.
Diode matrices do not like overheating - this is the main postulate! And replacing the LED in a flashlight with a more powerful one can lead to this situation. Pay attention to models in which more powerful diodes are installed and compare them with yours; if they are similar in size and design, change them.
If your flashlight is smaller, additional cooling will be required. We wrote more about making radiators with our own hands here.
If you try to install such a giant as the Cree MK-R into a miniature keychain flashlight, it will quickly fail from overheating and it will be a waste of money. A slight increase in power (a couple of watts) is acceptable without upgrading the flashlight itself.
Otherwise, the process of replacing the brand of LED in a flashlight with a more powerful one is described above.
How to make lanterns for the Lantern Festival. Let's hit the slush with light!
mania
Lanterns on St. Martin's Day are intended to help people survive the cold and darkness of the coming winter. While nature falls asleep and the world becomes darker, the time comes for people to bring light to the world and illuminate the world themselves. You need to look inside yourself, look at the people around you and find light in human warmth and kindness, in actions “in truth.” Just like Saint Martin in the legend, we can be welcoming and friendly towards each other, and this helps us get through the cold times. And then you can take the flashlight home and give it to someone close to you who needs help and support, or you can give it to any passerby on the street to share warmth and light. Practice: how to organize a lantern festival Light and candles are a universal symbol of all that is good. And for children, lanterns with candles seem like something magical, even without additional legends and entertainment. And a few simple solutions on how to make a flashlight. Paper lanterns: Option (1) You can paint the paper with watercolors, roll it into a lantern, and then oil it. Or you can fold it in a cunning way, resulting in an unusual faceted shape from many concave rhombuses. Instructions at this link.
option 2 You can make slits in the cardboard base (box) and glue translucent paper, such as tracing paper or silk paper, into these slits. You can make houses or castles with luminous windows. You can glue dark silhouettes and autumn leaves. You can hide silhouette pictures inside the lantern, then they will only appear when the candle inside is lit. It’s convenient to do this with small children: children cut strips of colored tissue paper into small squares. Then they smear a piece of tracing paper with glue and sprinkle chopped pieces on top, and then shake off the excess. Such a beautiful stained glass window can be inserted into a cardboard frame or rolled into a tube and glued to the bottom.
Option (3) Instead of a cardboard box, you can take a kraft paper bag. Instead of tracing paper from the store, you can use thin paper from shoe boxes; inscriptions and drawings on such paper give additional texture to the flashlight. And in a thick cardboard box you can make holes with a punch - these will be stars or falling snow - and complement the picture with a cut out silhouette of the moon or fir trees and houses.
glass lanterns Lanterns are easy to make using glass jars as a base. To make such a flashlight comfortable to hold, you need to wrap several layers of thick wire around the neck and attach a handle to it. And the jar itself can be decorated with whatever your heart desires. For example, you can: - paste over it with colored tracing paper, or corrugated paper, or thin colored tape; the pieces can be glued randomly, or you can lay out a simple pattern; - cover with a light-colored napkin with a pattern, or even lace; - paint with special stained glass paints or gouache mixed with PVA; - draw patterns using shiny colored glue and a glue gun; - glue colored glass pieces to the jar, and fill the space between them with plasticine, clay or plaster. Metal lanterns: - The most ordinary tin cans turn into magic lanterns if you drill holes in them and insert a candle inside. The holes can be randomly located, or they can be folded into a pattern, for example, into the silhouette of a maple leaf or a heart. — You can make lanterns from thick metal foil. A sheet of such foil should be placed on a sheet of corrugated cardboard and holes should be made on it with an awl or a thick needle; It’s quite simple, and therefore it’s easy to create a complex and interesting design. It can be supplemented with convex elements of the pattern: they need to be drawn and squeezed out from the inside with a blunt pencil. The sheet is then folded, fastened and a flashlight is obtained.
Lantern a la papier-mâché This is perhaps the most labor-intensive option, but it allows you to get amazing figures. You need to inflate a balloon and cover it with translucent paper (you can use colored paper). When everything is dry, the ball needs to burst, and the resulting translucent spherical shape can be painted, decorated with additional elements, and a part can be cut out so that the intended shape is obtained. It’s so great to make different animals, for example, an elephant with paper ears and a trunk, or a fantastic fish, or whatever your imagination allows you to come up with. And one last thing. The most convenient way to carry a flashlight is depicted in the pictures of Rotraut by Susanne Berner. In his hands the child holds a stick, to one end of which a flashlight is tied:
you will need: 2 days in stock, whatman paper or watercolor paper, sponge or cotton wool for wetting the paper, various jars, vegetable oil, ruler, scissors, glue, watercolor in 3 primary colors (red, yellow and blue). Watercolor should be good: in tubes or at least honey. Thick watercolor from tubes must be diluted with water to a liquid state.
On the first day, paper moistened with water is painted over with watercolors in accordance with your imagination. Watching how colors blur, flow, and mix with each other is very useful for the all-round development of a child... Let them color many sheets in different ways, try this technique.
For making lanterns, those designs are suitable in which the main color is yellow, the second most important color is red, and the design is truly watercolor, transparent, and pastel colors. To achieve smooth color transitions, you need to tilt the sheet from time to time. The resulting picture can take a whole day to dry! However, if you moistened the sheet with water using a cotton swab and were not very keen on coloring, it will dry in a few hours.
Then we make a lantern from the resulting paper. You can simply glue the cylinder together (in fact, this is not so simple - after all, you will have to attach the bottom of the round shape - a non-trivial task).
We made one of the options based on a square prism, choosing the most complex, but also the most beautiful shape.
In this work you cannot do without a ruler and pencil. Since you need to accurately observe the geometry, it is better to use a ruler with a transparent scale and a very finely sharpened pencil (automatic pencils with replaceable cores are unbeatable).
We divided the A3 sheet as follows: horizontally, 4 pieces of 10 cm each and 1.5 cm left for the fold; vertically 3 segments of 7 cm each and the rest (about 9 cm) was left for making the bottom, then along these notches the wrong side of the design was drawn into rectangles. You can choose other proportions. In this case, you need to be guided by two considerations - firstly, are there any bad places in the selected drawing that need to be hidden - hidden in the places of gluing. Secondly, immediately decide how you will strengthen your small candle. The same Lena Shapiro prefers to show the drawing in all its glory, leaving no more than 2 cm for the folds, and for the bottom, prepare squares from plywood, cover them with foil, and fix the candle on a nail hammered into the bottom. And our bottom turned out to be folded from 4 layers of paper, a small round candle stood on it in a transparent plastic cup, and this design also turned out to be quite stable and safe.
At the intersection of the strips intended for gluing, a rectangle is formed in the corner of the sheet. You can immediately cut it off, or you can immediately cut a long strip along the lines into 4 parts.
To get a “faceted” flashlight, add diagonal criss-cross folds. First, we draw all the diagonals (the future bottom is not involved in this, but the side strip is required). Along the resulting lines you will have to fold the drawing many times. To avoid the formation of unsightly cracks and creases at the folds, you should first draw them along a ruler with a pen that has stopped writing or with a dull knife. (We used a metal ruler with a rounded edge).
Then we begin to work out the folds, starting from the upper corners. This means that each one needs to be bent, ironed, straightened, bent again on the other side, ironed, straightened. You can optimize the process by placing a ruler inside the fold each time. All this must be done not only with diagonal, but also with vertical folds.
Thin lines drawn with an automatic pencil do not need to be erased - they will not show through later. Leaving thick black lines is unacceptable - it’s better not to do them right away.
After all the folds are worked out, you can glue the flashlight. As you may have guessed, the strips bent at the very beginning will be smeared with glue.
At home I used PVA glue or paste, both took quite a long time to dry, and the side seam generally came apart every now and then. But for the photo shoot for this article, we took “Winnie the Pooh” glue from the children’s assortment.
Everything that is said in the description about how neat it is to work with this glue is true. A pleasant surprise was that this glue is transparent, does not stain the paper and grips the paper tightly in a few seconds. Pay attention to how the side seam is glued together: one hand irons it from the inside of the flashlight, the other from the outside. The bottom has already been glued together by this time.
You can also use simpler folding methods. They are good because when the flashlight is glued, it is enough to press on the edges - and the prepared folds will bend pliably under your fingers, forming a bizarre faceted figure.
And in order to repeat our sample, you will have to work hard - to give the correct direction to each stiffener. All diagonal folds should look outward. Your flashlight will consist entirely of diamonds - so, if the diamond is drawn by a vertical fold line, you need to press on such a line and point it inward. Horizontal ones form by themselves.
We made a beautiful handle for the flashlight with a jagged edge, also from paper (we cut it out using children's plastic - this important task can be entrusted to the youngest members of the family - and then glued it on.
And finally, the final touch (do without it if you do without a candle). When the flashlight is well glued and dry, apply vegetable oil to it with a cotton swab and wait. Once well saturated with oil, the paper will begin to transmit light. You can also coat the flashlight from the inside, it will go faster. Look at the light: are there any dark spots left? There was no smell coming from our flashlight, but you can try adding a drop of some colorless essential oil to your oil - suddenly the flashlight will smell like an aroma lamp!
Now you need to secure the candle from below. The main fire safety requirement is that it should not move to the edge so that the paper does not catch fire. The main aesthetic requirement is that the candle must be very low so that the entire lantern glows. We, as mentioned above, held a spherical candle in a cup - so, we first lit the fire, and only then carefully lowered this cup into the flashlight.
Well, that's all, light the fire and have a little holiday of magic, light and warmth right now!
What else can you do?
You can make lanterns with patterns of autumn leaves. We place the dried leaf between two sheets of tracing paper or thin white paper, and with the resulting composition we tighten the window in any lantern - even from a milk bag painted with gouache or finger paints.
If you are calm about deviating from the canons, but are very afraid of fire, you can carry a candle in a glass jar - the top can be decorated with scallops made of paper or fabric, the sides can be painted with stained glass paints...
The autumn Waldorf holidays have already passed, and autumn itself has passed. But lanterns will be just as appropriate at the New Year’s party!
| Fold in half again, up to the 1/2″ line. Does your paper look like this? Now fold it horizontally in half. (Don't forget to crease it to the back and the front). Fold again horizontally into fourths. Do the same thing going the other way, dividing those center rectangles from corner to corner. Crease the paper along these diagonal lines, folding to both the front and back as usual. This is tricky to explain, but not difficult to do. Here is another picture of the same action. Just fold on all the diagonal pencil lines that go one direction, then fold on all the lines that go the other direction. You paper should be looking rather like this. Go up to that top row of rectangles and fold it into thirds...like you are hemming fabric; fold it over a third of the way, then fold it over again. Do you have something that looks like this? Let the glue dry before going on. When the glue is set, you should have something that opens into a rectangular tube-like shape. Here's another look from a different angle. This “hemmed” edge is the top of the lantern. The flaps at the other end fold in to form the bottom. Glue these as you fold them on top of each other. I like to cut a square of card stock to glue to the bottom. It makes it sturdier and gives it a more finished look. And here is another square of card stock glued to the inside to finish that, too. Happy Martinmas! Welcome Season of Light! paper star lantern tutorial(Feb., 2012 edit: A video tutorial of this project can now be found here. FI You can also make lanterns using the papier mache technique, but wrapping the ball with thick woolen threads - then we burst the ball and don’t forget the pwa You can also make it from vegetables - scrape out the middle of a beet or pumpkin - and you get a lantern. here in my diary how to make a cap https://www.babyblog.ru/user/id798068/698941 but you can do it in any other way, we connected them last year) I hope someone reads to the end) |
Police lights
They have proven themselves over the years and with each new model of these flashlights the demand does not subside. A new product on the domestic market is a model with a stun gun.
LED Police flashlight with shocker
Such lanterns shine brightly and can act as a means of self-defense. However, they also have problems with LEDs.
How to replace the LED in a Police flashlight
The wide range of models is very difficult to cover in one article, but general recommendations for repairs can be given.
- When repairing a flashlight with a stun gun, be careful, preferably use rubber gloves to avoid electric shock.
- Flashlights with dust and moisture protection are assembled on a large number of screws. They differ in length, so make notes from where you unscrewed this or that screw.
- The optical system of the Police flashlight allows you to adjust the diameter of the light spot. When disassembling the body, make marks on the position in which the parts were before removal, otherwise it will be difficult to put the unit with the lens back.
Replacing the LED, voltage converter unit, driver, and battery is possible using a standard soldering kit.
Master class on making glowing lanterns “Laterne”
DENISOVA M.V.
Primary school teacher
MBOU "Secondary school No. 8"
Roslavl.
MASTER – CLASS “MAKING GLOWING LANTERNS”
The importance and necessity of spiritual and moral development and education is clearly demonstrated by the fact that this issue has moved from being discussed to being approved at the state level.
“Ensuring the spiritual and moral development and personality education of a Russian citizen is a key task of modern state policy of the Russian Federation,” notes the Concept of spiritual and moral development and personality education of a Russian citizen. Based on the provisions of the Concept and the requirements of the Federal State Educational Standard, which define the model of a modern graduate, the school builds its activities.
In my work, to achieve a positive result in forming the foundations of a student’s moral self-awareness, I highlight three routes: Slide 3
- Creation of an effective personality-oriented system of educational extracurricular work that implements an activity-based approach.
- Emphasis and implementation of meta-subject connections (as well as the connection between classroom and extracurricular activities), in particular the lessons of the ORKSE and class hours.
- Active interaction with parents according to the system: teacher - parent - child.
Today's master class will concern route 3. Slide 4.
Route 3. Active interaction with parents is implemented through:
- A system of thematic parent meetings, participation in parent conferences;
- School-wide cultural activity “Parents at school”;
- Understudy Day for parents, both at the class and school level: involving parents in lessons and extracurricular activities, master classes;
- Joint projects, for example, the social project “For the benefit of yourself and others”, the social and creative project “Happy New Year” (operations “Herringbone”, “Tangerine”)
- Joint leisure: holidays, hikes, excursions, etc.;
- Individual consultations for parents;
- Personal confidential conversations with parents;
- Diagnostics and monitoring - study of students’ families with subsequent correctional work:
a) monitoring parents’ satisfaction with the work of the educational institution,
b) studying the educational capabilities of the family,
c) passportization of families;
Educational technologies that I prefer:
technology of integration of educational influences, technology of everyday affairs; technology of large and small traditions; technology of patronage, mutual assistance and mercy.
I will dwell in more detail on the technology of large and small traditions. Slide 5.
Leading targets: to bring the class closer - according to the type of relationship in it - to the family, using traditions (Knowledge Day, New Year, Mother's Day, March 8, etc.) according to the principle of children + parents. This master class on making luminous lanterns was conducted by me as part of the holiday dedicated to Mother’s Day “Bow down to the mother’s earth.” The form of work is paired (child + mother). Slide 6
When conducting such events together with parents, perhaps the most difficult thing is to create motivation, that is, to create an atmosphere that will unite everyone, make them forget everyday things and get distracted, and devote time to communicating with children. After all, we increasingly live on the run: we don’t have time to spend an extra hour with our children, to do something with them together. Instead, many parents resort to “giving gifts” of expensive things to compensate for the attention, and many simply do not know how to communicate with the child. And children expect miracles from us - after all, they are still small. This is the miracle we created for them and with them. Slide 7
— In any country, for any person, the most precious thing is their home, their parents.
So in Germany there is a holiday called St. Martin's Day. On this day, it is customary for children and their parents to make glowing “Laterne” lanterns, with which they then go to church. According to legend, this is how the fellow villagers of St. Martin looked for him at one time with lanterns and torches in order to pay tribute to him for his kindness. Today I invite you to make glowing lanterns with your children, as a symbol of the warmth of the family hearth, as a piece of a mother’s heart, which warms us with its warmth all our lives. (Making lanterns ).
I deliberately did not make a ready-made sample of a flashlight for children and parents in order to leave room for a miracle, a surprise, which, undoubtedly, turned out to be different for everyone.
- Blanks 4 sheets of cardboard (take an A4 sheet and cut it in half) and templates.
- We cut out windows in cardboard (future walls according to the template)
- On the wrong side we mark the windows with tracing paper (glue the tracing paper to the wall of the flashlight with glue)
- We connect the walls with tape to make a box
- Glue the cardboard bottom to the bottom according to the size of the flashlight blank.
- Make holes in two opposite walls of the flashlight to insert a stick holder.
- A flat candle is glued to the bottom of the lantern
- A stick is threaded through the holes and secured with wire.
(At the end of the evening it is possible to light the lanterns
At the end of the evening, when our lanterns were lit, everyone was overwhelmed with emotions: the delight of the children, the joy of communicating with each other and some kind of feeling of magic that united us all. Like this: through the simplest emotions and experiences, I think we can touch the most subtle strings of the human soul, help people become kinder.
What kind of LEDs are used in Chinese lanterns?
Many products are now purchased on Aliexpress, where you can find both original products and Chinese copies that do not correspond to the stated description. The price for such devices is comparable to the price of the original.
In a flashlight that claims a Cree LED, it may not actually be there; at best, there will be a diode of a frankly different type, at worst, one that will be difficult to distinguish from the original in appearance.
What might this entail? Cheap LEDs are made in low-tech conditions and do not produce the declared power. They have low efficiency, which is why they have increased heating of the case and crystal. As has already been said, overheating is the worst enemy for LED devices.
This happens because when heated, the current through the semiconductor increases, as a result of which the heating becomes even stronger, the power is released even more, and this avalanche-like leads to breakdown or breakage of the LED.
If you try and spend time searching for information, you can determine the originality of the product.
Compare the original and fake cree
LatticeBright is a Chinese LED manufacturer that makes products very similar to Cree, probably a coincidence of design thought (sarcasm).
Comparison of the Chinese copy and the original Cree
On the substrates these clones look like this. You can notice the variety of shapes of LED substrates produced in China.
Detecting counterfeit by LED substrate
Counterfeits are made quite skillfully; many sellers do not indicate this “brand” in the product description and where the LEDs for flashlights are made. The quality of such diodes is not the worst among Chinese junk, but it is also far from the original.
Making an electronic LED flashlight at home
There are times when a flashlight is simply necessary.
This could be an accidental car breakdown at night, or the need to get something out of the basement. Moreover, if the flashlight has an LED bulb, it will provide the best illumination in the dark and allow you to find the necessary thing or do the necessary work as easily as possible. An LED flashlight can be purchased at an electronics store, or you can make it at home, which is what we will do now. Let's watch a video of this useful homemade product:
Our flashlight will be based on an electronic converter.
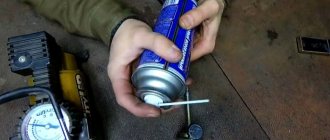
So, we will need:
— An old felt-tip pen, which we will use as the body of our flashlight; - Light; — Battery; — Wires; - The diagram is presented below.
First of all, we need to wind our own toroidal transformer, since the finished transformer may not fit into the frame of our flashlight, namely a felt-tip pen. This can be done in a very simple way. Ferrite rods can be used. Such a rod can be removed from the coil of an old radio.
The coil must be wound with a thin enameled wire with a cross section of 0.15 mm. First we wind one winding of 40 turns, and after that - a second winding of 60 turns. The windings should be immediately fixed with glue.
The most difficult part of making your own LED flashlight is winding the transistor coil. After this, we just have to connect the necessary wires to the battery, switch, resistor, transistor and of course to our LED light bulb. You can find out exactly how the connections should be made from the photo below.
We solder the wires and check our workpiece for functionality. Once you are sure that everything is working correctly, all that remains is to assemble the flashlight into the housing. For greater convenience, drill a hole on the cap of the felt-tip pen and insert an LED light bulb into it.
We fix the light bulb with hot glue, thus providing not only fixation, but also insulation.
Under the cap we make another hole to match the size of the wires.
Through this hole we insert the wires coming from the light bulb. We connect the cap to the body, that is, we insert it into place.
At the end, we insert the battery of our flashlight into the case, insulate all the wires and place the transistor-resistor components in the back cover of the felt-tip pen. There we insert the switch through the pre-drilled hole.
Become the author of the site, publish your own articles, descriptions of homemade products and pay for the text. Read more here.