Home › With your own hands › Toys and entertainment › How to make a catapult at home with a child. Master class (photo)
How to make a catapult at home with a child. Master class (photo)
Toys and entertainment Do it yourself 03.11.2016 2896
Do-it-yourself toy made from disposable plastic utensils at home: fun leisure time for mom, dad and child. Step-by-step instruction. Meet us!
If your child is between 3 and 6 years old, make this wonderful toy with him. And if he is 7 years old or older, then he can do it himself, but under your strict guidance.
**** Attention ! A hot glue gun is used to make a catapult. Be careful! Follow safety rules. Do not leave your child unattended! Use a stand for the gun; hot glue may drip from the spout.
**** Reference . A catapult (or ballista) is a throwing weapon that appeared before our era. The difference between a catapult and a ballista is that arrows were used as projectiles for the catapult, and stones for the ballista. The arrows from the catapult flew almost horizontally, flying parallel to the ground. Stones from the ballista flew out at a large angle to the ground.
Today we will make a weapon with the code name “catapult”. And we will shoot paper shells. A fun and useful activity with children.
Large catapult
Such a weapon is intended for entertainment while relaxing at the dacha or in any other country house. You should not use it at home or in an apartment. And, of course, do not forget about safety precautions. Never leave children unattended with this device!
It is best if you and your child plan how to make a catapult. He will be happy to join in the creative process. And the step-by-step instructions given will tell you how to make a catapult with your own hands.
How does a catapult fire?
Its operation is the same as that of the giant fighting machines of the Middle Ages, but this small model is designed as a means of entertainment and is designed to throw small objects, such as unshelled hazelnuts or candy, to accurately hit a box, basket or other target. To ensure your safety and to ensure that your catapult experience is as enjoyable as possible, follow these tips.
For security
- Wear safety glasses.
- Never aim at a person or animal.
- Do not use metal or sharp objects for throwing.
For firing from a catapult
- Place small weights, such as washers or coins, in the counterweight box. The amount of cargo depends on the type of object being thrown, the required trajectory of its flight and the firing distance. The optimal amount of cargo is determined experimentally. In our case, it took 14 M6 washers to throw in-shell peanuts over a distance of about 5 m.
- Place the “projectile” in the sling and put the washer tied to the free cord of the sling onto the hook rod at the upper end of lever F. Note. Slightly bend the hook rod up or down to change the moment of the throw and the flight path of the “projectile”.
- Pull the sling along platform B, raising the counterweight so that the end of the boom arm touches the platform. Point the catapult at the target and release the sling, which will fire a well-aimed shot.
Mini catapult
You can never predict with certainty when a catapult will be needed. It can be a great way to keep your child occupied if you have to wait a long time, and children, as a rule, do not like to wait. With the help of such a weapon you can arrange real competitions between friends. Children will appreciate your efforts. And if the manufacture of a large catapult requires the preparation of materials and adult male power, then the creation of a mini-version is possible even for a child.
So how to make a mini catapult? For the simplest option, popsicle sticks are perfect. You need 9 of them. Prepare five rubber bands. You can use regular hair bands or money ones. You will also need a plastic bottle cap.
- Connect 7 sticks together. Secure them firmly at both ends with rubber bands.
- Place the remaining two sticks together and secure them carefully on one side. Split the opposite ends and place them on the prepared bundle of seven sticks. Try to push the ligament as deep as possible. Secure this position with two elastic bands for strength in a criss-cross position.
- Glue a plastic bottle cap to the top of the catapult (one of the split sticks). To do this, it is best to use a fairly strong glue, for example “Moment”. Can be applied
The mini catapult is ready. Have a good time and, of course, win the competition!
How to do something yourself, with your own hands - home craftsman website
AN EXCELLENT TOOL FOR CRAFTS AND HANDCRAFTS AND EVERYTHING FOR THE GARDEN, HOME AND Cottage LITERALLY FOR FREE - SEE FOR YOURSELF. THERE ARE REVIEWS.
You can make this simple ballista model in one evening. The model is functional - it throws projectiles at a distance of up to 5 meters.
The onager is a Roman torsion-type throwing machine. The literal translation is “wild donkey.” This simplified ballista was nicknamed for the sound when triggered, which was like the blow of a wild donkey’s hoof. Onager ballista with a shoulder for throwing small stones or stone cannonballs The lever is activated by a torsion bar made of twisted animal hair Archaeological finds of metal parts of ballistas allows us to attribute its appearance to the third century.
The photo shows a modern reconstruction of the ballista.
TOOLS FOR HOME AND GARDEN, HANDCRAFTS, ETC. PRICES VERY LOW
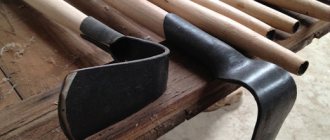
Bamboo kebab skewers are surprisingly strong. This is an ideal material for making models. The only disadvantage of bamboo is that it does not stick well.
Therefore, the bamboo parts are fastened with threads, and then the joint is coated with glue. To make the model, I needed skewers, glue, threads, a plastic bottle cap, and a rubber band.
Tools: side cutters and hot glue gun.
In order to make a mini catapult with our own hands we will need
Materials required for making an onager: Threads, spool - 15 rubles. Glue "Titan" - 96 rub. Wooden skewers - 85 rub.
Stationery eraser, thick - free of charge. Lipton tea lid - shareware.
Paper catapult
Are you surprised? And have no idea how to make a catapult out of paper? In fact, there are a lot of origami options. The simplest and most accessible is a regular airplane. Everyone loves to launch them, absolutely regardless of age and gender. The main thing during production is to take into account the rules of aerodynamics and choose high-quality paper.
And how you want your airplane to fly higher and fly longer. This is very easy to achieve if you know exactly how to make a catapult.
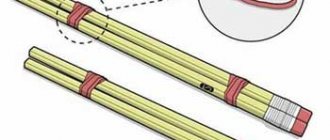
Attach a rubber band to the base of your paper flyer. It is this simple device and a pencil that will help the plane soar higher than others.
To start this miracle, hook the eraser to the end of the pencil. You pull the airplane back and let go.
Swift flight over long distances is guaranteed.
Pencil catapult
You can make a catapult from almost any item. Even from ordinary pencils that are always found in the house, you can create an excellent one. Let's look at how to make a catapult from pencils.
For such a device you will need ten pencils, fourteen erasers and one bottle cap.
- Create a square using four pencils - this will be the base of the catapult. Carefully secure the places where they intersect with rubber bands.
- Insert a pencil vertically into each intersection. Secure their position with additional elastic bands.
- Connect the vertical pencils in twos and fasten them together. The catapult stands are ready.
- Add another pencil to the top mounts of the posts, placing it horizontally. Secure the position with rubber bands.
- Place the last pencil on one side of the base (see picture) and secure it carefully. This will be the catapult lever.
- Glue a plastic cover to the free end of the lever.
- Attach the last rubber band to the top horizontal pencil by pulling it under the lever.
The catapult is ready. Best hits to you!
Lever with pads
1. Cut out the blank for lever F. Make a copy of the lever template and use spray adhesive to attach it to the workpiece. Saw out the lever and sand to the contour line. Delete the template.
Note. Drill the through hole with a diameter of 5 mm shown on the template after gluing the overlays G.
thick , cut a blank measuring 35x305 mm for the overlays G. Make two copies of the trim template and attach them to the piece using spray adhesive. Cut out the overlays and sand them along the contour.
3. Using a drill press, drill holes with a diameter of 3 and 5 mm in the edges of the overlays G in the locations indicated on the template.
Clamping the part in a wooden hand vice, mill 3 mm wide chamfers on the pads G in the places indicated on the template.
Lego catapult
Original guns are obtained from ordinary Lego construction sets. Very often, many of its parts, from which masterpieces were once built, according to instructions, gather dust unnecessarily in boxes. And the child asks for more and more construction sets. Is it worth buying them right away? After all, from numerous parts you can independently build wonderful creations that are in no way inferior to those described in store recommendations. It takes a little time and imagination.
Encourage your child to get out all the unwanted lego pieces. “How to make a catapult?” - ask him. Just don’t leave him alone, help him start the construction process. You will be surprised how quickly your baby will get involved in creativity. Children have a very developed imagination, but to stimulate it, the child needs a push. Get him interested. If you yourself have no idea how to make a catapult, where to start, look at the pictures.
The most amazing and unique masterpiece will be created before your eyes - the fruit of your child’s imagination, the best catapult in the world! Praise your child and admire his creation. Before you know it, soldiers, towers, and castles will appear near the built catapult, built by a single architect—your child!
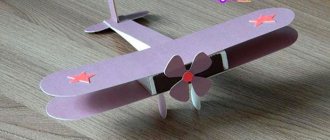
Sequence of making a catapult
- Warm up the hot glue gun by plugging it into a power outlet.
- Make the base of the catapult. To do this, take two deep plastic plates, glue them together, placing them one on top of the other.
- Cut two smaller diameter plastic tubes in half. In the photographs they are green. These are the racks of the future catapult.
- From two other tubes of the same diameter, cut two crossbars: the length of one is approximately half the length of the tube, the length of the second is slightly more than half. These are the crossbars of the future catapult. They are pink in the photo.
- From a larger diameter tube, cut out two small sleeves approximately 4 cm long. In the photo they are white.
- We begin to glue the catapult. Glue two green pieces to the catapult body as shown in the picture.
**** Reference. When gluing parts using a hot glue gun, apply glue to one of the parts, connect them and hold them with your hand for a few seconds so that the glue hardens a little.
- In the same way, glue two other green parts to the base of the catapult.
- Secure the teaspoon and the smaller pink tube together with a rubber band.
- Glue the tube with the spoon to the catapult stands. The spoon should be located under the crossbar, to which it is attached with an elastic band. If the crossbar is a little longer than necessary, no problem, then cut off the excess.
- Insert the longer pink tube into one of the cut out sleeves.
- Glue it to the catapult stands so that the handle of the spoon is located above this crossbar, and its end is approximately 1.5-2 cm below the crossbar. DO NOT glue the spoon to the bottom crossbar.
- Place the second sleeve on the handle of the spoon.
- Glue two bushings together. This way the spoon will not be rigidly attached to the crossbars.
- While the glue hardens and the structure becomes more durable, roll a projectile out of paper.
- Wait 10 minutes for the glue to dry, shorten the bars if necessary, and enjoy playing with your child.
For more interest, you can shoot at some kind of target or arrange a competition to hit some kind of container.
And next time do it with your child "
Assembling a catapult from a Fischertechnik kit and ways to increase its range
The article discusses the operating principle of a catapult and discusses ways to increase the range of a projectile fired by a catapult.
Key words: catapult, flight range.
Catapult (lat. Catapulta from ancient Greek καταπέλτης) is a Greek term that refers to any throwing machine. [5]
The first catapults in history began to be used before our era in Greece (in the 5th century), then until the 15th century they were used in all European countries. Ancient ejection devices operated either on the principle of a bow (ballistas and scorpions) or on the principle of a sling. The latter were listed as siege weapons, and they began to be used only in the Middle Ages. Cannonballs or stones were placed in the “string bag” (sling), which was attached to the long end of the lever, and a counterweight was attached to the short end of the same lever. The long arm of the lever, under the influence of the counterweight, rose upward, followed by a blow to the locking beam and the projectile, fired by the sling, flew along its trajectory. The cannonball or stone could reach its target after several hundred meters. [6]
I became interested in catapults, and I wanted to assemble a model of a catapult from a construction set. Our school has Fischertechnik Pneumatics-3 construction kits. In the assembly instructions I found a description and diagram of the catapult. In my work I put
Purpose: to study the conditions of the projectile flight range.
Tasks:
– find in the literature and study the design of the catapult;
– study the composition of the “Pneumatics-3” set;
– learn to read the device diagram in the catapult assembly instructions;
– assemble a model of a catapult from a construction set.
– achieve maximum projectile range
More than 2000 years ago, the ancient Greek inventor, mathematician and mechanic Ctesibius built the first machines powered by compressed air. One of these machines was a pneumatic catapult, which used compressed air energy to fire stones and spears [1]. From the kit I assembled a catapult model and performed experiments.
Fig.1. Diagram and catapult with one cylinder (simple catapult).
Experience 1:
Determined the range of the catapult.
Equipment: measuring tape and one black building block.
He placed the block in the catapult basket and turned the handle of the distribution valve. The catapult threw a “projectile”. I measured the range of the projectile using a measuring tape. I entered the resulting value into the table.
Table 1
Catapult projectile range
| Catapult type | Flight range, cm |
| Simple model | 25 |
How to increase the range of a projectile? What does flight range depend on?
The flight range depends on the initial speed of the projectile. To increase the flight range, you need to increase the initial speed. To do this, you need to push the projectile out of the catapult harder. [3]. Let's change the design of the model.
In a simple catapult, the compressor is connected directly to the “P” connection of the distribution valve. Let's change the model. I added two air reservoirs between the compressor and the distribution valve. In the new system, compressed air will first flow from the compressor into storage tanks and then to the “P” connection of the valve. Reservoirs for storing compressed air in pneumatics are called receivers.
Experience 2:
Use the building instructions to add receivers to the catapult model. I repeated the experiment to determine the range of the catapult.
table 2
Catapult projectile range
| Catapult type | Flight range, cm |
| Model with receiver | 75 |
Explanation:
A pneumatic compressor has limited capacity. This means that the compressor produces approximately two liters of compressed air per minute at a pressure of 70–80 kPa. To throw a projectile, a large amount of air is required in a very short period of time, so to increase the range, you can use a more powerful compressor or pre-stock the required amount of air. Since we don’t have another compressor, we used the second solution - we installed receivers for compressed air. The use of receivers provides a larger amount of air at the moment of throwing the projectile. The projectile range has increased. [1]
I read that there are other ways to increase the range of a projectile.
Everyone is familiar with the legendary phrase of the ancient Greek physicist Archimedes: “Give me a fulcrum, and I will change the world.” With these words, Archimedes described the principle of operation of the lever. This means that a longer lever allows for greater projectile throwing speed. [4]
I increased the length of the throwing arm in the catapult and checked whether the mechanism's range would change?
Table 3
Catapult projectile range
| Catapult type | Flight range, cm |
| Model with receiver and extended lever | 85 |
In the model with an extended lever, the projectile range has increased.
Having done the work, I learned how to assemble pneumatically driven catapult models from a construction set. I assembled models with a receiver and an extended lever. I studied how the design of a catapult allows you to change the range of a projectile.
Literature:
- Workbook for the Fischertechnik designer set “Profi Pneumatics-3” P.14–15
- I'm exploring the world: Children's encyclopedia "The World of the Mysterious." - M.: Astrel, 2004.
- Encyclopedia for children: T. 14 - “Technology”. - M.: Avanta+, 2000.
- V. V. Belaga, I. A. Lomachenkov, Yu. A. Panebrattsev. Academic school textbook on physics. — Enlightenment — 2013 -143 p.
- https://ru.wikipedia.org/wiki/
- https://xn—-dtbjalal8asil4g8c.xn--p1ai/oruzhie/istoriya-katapultyi.html