Quote from tanuuusa
Read in full In your quotation book or community!
Do-it-yourself sandbox - a simple children's sandbox with a lid - a bench.
It's good in the summer outside the city, especially at the dacha or in a country house. You can simply relax, enjoying the fresh air or gardening. In general, there are a lot of activities for an adult. What should children do? The easiest way to keep your child occupied is to make him a sandbox. Moreover, making a sandbox with your own hands is quite simple.
Of course, you can buy a sandbox, but good wooden sandboxes are not cheap, and plastic sandboxes are somewhat reminiscent of a basin, they are small and are unlikely to be comfortable for a child. Therefore, all that remains is to buy boards and make a sandbox with your own hands. However, before you start building a sandbox, you need to decide on the size, installation location and additional accessories such as a bench or lid.
Types of children's sandboxes
Before you start work, you need to carefully consider the dimensions of the future structure, the materials used, as well as ideas for decoration. Thanks to the Internet, you can see many interesting options for unusual design of a children's corner. Folding sandboxes, either with additional shelter: a lid or a cover, have gained the greatest popularity.
Main types of sandboxes:
- standard open sandbox;
- folding;
- with an additional “mushroom” type canopy;
- thematic structure (for boys and girls, universal and combined options);
- sandbox - boat;
- sandbox in the form of a house;
- the machine is a sandbox.
You can choose the preferred model of your structure not only based on gender (for boys or girls), but also depending on the materials used in construction.
Design stages
The work of drawing up a diagram includes several stages: designing the box, starting from its shape, the drawing is supplemented with a design for the lid and canopy. What the base of a children's sandbox will be depends on many factors:
- Is it planned to purchase new material or will remnants from previous construction be used?
- Your professional skills when working with wooden structures.
- How much time can you devote to creating a children's sandbox?
The most common version of the scheme is a standard square shape, with a side size from 1.2 to 3.0 m. The height of a children's sandbox varies between 25-30 cm, it can be equipped with a bottom. To fill a structure measuring 2x2 m you will need about 1 m 3 of sand. Having completed the drawing of the base, we move on to designing the lid.
Cap options
It is foolish to doubt the need to install a protective element for a children's sandbox. The reasons why the diagram should include a cover design are as follows:
- It is attractive for dogs and cats to set up a latrine there. To ensure that children's holiday does not end in treatment, hygiene standards should be observed at all times, and the sandbox is no exception. Purchasing expensive mixtures containing fragrances to repel animals does not always solve the problem for a long period. Firstly, the substance quickly evaporates, and secondly, the harmlessness of its effect on the child’s body is questionable.
- During periods of heavy rain, the cover will protect the sand from excessive absorption of moisture, and as soon as the weather improves, the child will be able to start playing his favorite games in the children's sandbox.
- You can save money and not include the installation of a cover in the design, but protection in the form of polyethylene pressed down with pipes or bricks is not aesthetically pleasing. In addition, a child cannot independently remove such protection from a children's sandbox.
Let's leave the variants of drawings with complex structures in the form of a lid that opens like a fan or equipped with a lifting mechanism aside. The simplest option for a children's sandbox is an ordinary removable board made of boards, shown in the drawing below:
But this is not a very good solution to the problem, due to possible child injuries if you want to remove it yourself. Recently, models of children's sandboxes equipped with a folding lid that can easily be converted into a bench have become very popular. A design option is shown in the following diagram:
For ease of opening, it is equipped with handles, as in the photo below:
For a children's sandbox, you can use a design with a sliding lid, which later plays the role of a shelf or bench without a back. Convenient lower stands provide ease of opening and contribute to the stability of the structure.
Canopy equipment
The canopy design also has many variations. Depending on the planned life of the children's sandbox, thick fabric, plywood or thin boards can be used as material. The mount is selected based on the overall dimensions of the structure:
- For small children's structures, two poles with a crossbar and a stretched awning are sufficient.
- You can stick to an option familiar from childhood and create a drawing with a fungus. But it is better to leave such sun protection as a last resort, because a pillar in the middle of a children's sandbox often brings complete inconvenience, and the shadow moves to the side.
- For volumetric structures, it is recommended to install four support pillars. The canopy can be flat or in the form of a gable roof.
The drawings and photos presented below will help you decide on the canopy shape required for your children's sandbox design.
Design and preparation for work
Making a sandbox with your own hands is not at all difficult, even for a novice master. For these purposes, wood, metal, remnants of building materials (brick, foam and gas blocks), and car tires are used. The size of the sandbox is determined individually; a lot depends on the capabilities and location, age group of children, and preferred design. It is not at all necessary to build a bulky model; most children willingly play even in a sandbox of minimal size.
The requirements for sand for a children's sandbox are extremely stringent. Be sure to use fresh river or sea sand, carefully sifted and without the slightest trace of debris and dirt.
Many parents also prefer to treat it thermally: heat it in portions in the oven or pour boiling water (potassium permanganate solution, other disinfectant) over it. Such methods will be justified if there are doubts about the quality of the sand, but will require a lot of time to implement.
Particular attention should be paid to the choice of location. If the area is large enough, this will not be difficult. The place for the sandbox should be well heated by the sun, located away from trees and main buildings, and be sufficiently protected from drafts. It is also advisable that the children's sandbox should not be exposed to direct sunlight in the afternoon. This will protect your child from possible sunburn and overheating, because even doctors recommend not sunbathing after noon.
For additional convenience, the sandbox can be equipped with a canopy made from any available materials. Traditionally, a wooden roof or awning is used for these purposes. Having decided on the location of the future construction, you can begin to develop a sketch and select materials.
Most parents do not risk leaving small children unattended, and constantly running around the corner of the house to see their beloved child will be very inconvenient. That is why it is necessary to provide a place with a suitable view for building a sandbox with your own hands.
Selecting a location
- The sandbox for children should be located in a visible area. Children must be under the supervision of their parents. Therefore, it will be better to build it closer to the house so that you can keep an eye on the baby from the kitchen window.
- Sterility is the key to the baby’s health. The sand should not become clogged with foreign objects, such as leaves, bird droppings, branches, and so on. It is advisable not to build children's sandboxes near trees and bushes. And if a dry tree is nearby, construction is completely prohibited.
- The main thing is to hide the structure from the lunchtime heat. In order not to harm the child from the sun's rays, you need to position it so that the sun hits it in the morning and in the evening. At these moments it is the safest. But if the sun does not get into the sandbox at all, then in spring and autumn it will be very damp there. This means that the baby can get sick at any time.
Construction of a simple model
To make the simplest model of a children's sandbox with your own hands, you will need a schematic drawing indicating the size of the future play area, materials suitable for construction, and also very little time. Considering the example of the construction of a wooden sandbox made of 1.5x1.5 m plywood, several key points can be highlighted.
Important nuances during construction:
- It is necessary to consider whether the future sandbox will have a bottom, or whether a pre-dug hole should be used for these purposes.
- When using wooden blocks, you need to carefully treat them from possible splinters, cover them with an antibacterial primer, and protect the outside with two to three layers of paint.
- Small benches should be provided in the corners of the sandbox. The simplest option is to stuff a triangular piece of board with secure fastening on the sides.
- To protect the child from the sun, you should use a large beach umbrella; sophisticated models of sandboxes can have an independent canopy, with support in the middle of the sandbox, or in the corners. Such a structure is often popularly called a “fungus”. In addition to providing a sunny shelter, they will reliably protect the child from rain, and the sand inside from debris.
- The sides of the sandbox should not be very high, but at the same time prevent sand from scattering outside the structure. Typically, it will be enough to use boards with a height of 20 cm.
- To join the plywood planks together and provide additional strength to the structure, a wooden beam with a section of 40×40 or 50×50 is used.
- All parts in contact with soil and moisture must be treated with antibacterial solutions.
- A do-it-yourself sandbox with a canopy goes well with other elements of the playground. Examples of successful ideas can also be found in the photo.
Build process
Cut boards or plywood sheets are installed on a previously prepared surface, and then fastened together. It is important to ensure reliable fastening, but to prevent possible injuries among children. That is why the joints are cleaned and covered with several layers of paint. Painting the sandbox should be done with oil-based paint that is resistant to atmospheric changes, but at the same time safe and non-toxic.
A do-it-yourself wooden sandbox can also be made from timber, wooden pallets, and tree trunks cleared of bark. An interesting and unconventional option is a do-it-yourself sandbox made from pallets. To do this, just disassemble the pallets. Sand them thoroughly and use them to create your own model of a children's corner. Thin boards are perfect for constructing an additional cover, as well as for creating a transformable sandbox. Its protective cover can easily be transformed into comfortable benches for children.
A sandbox made of logs is assembled as simply as possible. To do this, pre-barked and painted logs are joined together in any convenient way. All that remains is to prepare the sand, build a protective awning and a cover for the sand.
Canopy or fungus
The fungus over the sandbox is an excellent decorative element that also serves as protection from the weather. Under it you can wait out the rain or protect yourself from the sun's rays. Often a table is attached to the fungus column, which can perform various functions, including serving as a storage place for toys.
For the stem of the fungus you will need a beam with a cross section of 100x100 mm. In order for the canopy to be stable, part of the beam, at least 1 m, must go deep into the ground. The wood should be pre-treated with an antiseptic to protect against rot and insects.
In order to make a mushroom cap, you need to build triangles from boards. On the inside they should be nailed to the support, and on the outside they should be covered with thin plywood. The span of the cap is desirable about 2.5 m.
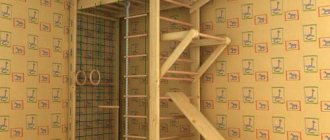
Instructions for building a sandbox in pictures
Selecting and preparing a site for installing a sandbox.
Laying the frame and bottom of the sandbox.
Making bases for benches.
Painting the finished sandbox.
Basic rules for working with paper for primary school children
Primary school children confidently work with scissors and use other stationery items. Therefore, paper crafts for 3rd grade children may be more difficult. It is important to give the child the opportunity to try to show interest. To do this, they show him simple handmade products, arousing passion for making.
For example:
Required materials and tools
Before you start making complex or light crafts from grade 3 paper, you need to prepare all the materials and tools that will be needed for the work. The following items may be required:
- colored paper and white (office);
- cardboard - you can use simple cardboard boxes of different densities, take special stationery cardboard white or colored;
- glue stick or PVA;
- scissors, for some crafts you need to take a stationery knife;
- a simple pencil, pen, colored pencils or markers, other items that will be needed in the work;
- rhinestones, beads and other little things that decorate finished crafts.
It is better to do this right away, so as not to interrupt the lesson in the future in search of the necessary material or subject for work.
DIY sandbox boat
This design differs from the previous one solely in its configuration. To do this, you need to estimate the approximate size of the boat. Consider options for additional design (helm, benches for passengers, an interesting awning - sail, additional decor). The advantage of such sandboxes is their relatively simple production, but an impressive appearance that will decorate any area. You can see the drawings and approximate dimensions of the sandbox - boat in the photo below.
Topic: “Children’s playground layout”
a) Introductory conversation.
Teacher: - Guys, before we continue working on our project, which we started doing in the last lesson, listen to an excerpt from Sergei Vladimirovich Mikhalkov’s poem “What do you have?”
Some were sitting on the bench, Some were looking at the street, Tolya was singing, Boris was silent, Nikolai was shaking his leg. It was evening, There was nothing to do.
– Why do you think the guys were bored in the yard?
(They had no place to play. They had no playground).
– That’s right, the guys didn’t have a playground - an area for children to play, which in itself is a toy.
– Why is it important that every yard has a playground? (children's answers)
- Of course, you are all right. On the playground, children play in the fresh air, run, jump, chat with friends, relax, and have fun.
– Let’s look at footage from the famous cartoon about the crocodile Gena and answer the question: what can happen when children have nowhere to play. (viewing an excerpt from the film about Crocodile Gena – 2 min.)
– So what can happen when children have nowhere to play? (children's answers)
– In order to find out where the children can safely play in our village, we organized an excursion and photographed the courtyards. Let's remember how the courtyards in our village are arranged? (Slide 2)(What do you see on these slides)
– What conclusion did we draw? (playgrounds required)
“And then we decided that we could help solve this important problem for our village - the lack of playgrounds, and contribute to the improvement of our village. Which? (we decided to make a model of a playground for our school yard).
– We started our work in the last lesson, and in today’s lesson we will complete our layout.
b) Reporting the topic of the lesson
– What problem did we pose in the last lesson? Then let's formulate the topic of the lesson together. (we formulate the topic of the lesson) (Slide 3)
– Today in class we will continue to make a model of a playground, which we will present to our deputy Kolotusha Kapitalina Ivanovna, who came to visit us today, and we will ask the Village Administration to install a playground according to our model in our schoolyard.
Code for use on the site:
Copy this code and paste it onto your website
To download, share the material on social networks
After you share the material, a download link will appear below.
Slide captions:
Fill out the table in your workbook according to the example.
4. Filling out the technological map, drawing up a plan and performing work on the project.
(using a template, drawing, etc.)
(glue, sew, intertwine)
5. Project protection and evaluation.
We will hold a joint presentation and defense of a collective project.
1. Using the template from the workbook, make the sandbox base pieces from colored paper and glue them onto a piece of cardboard as shown in the picture. Trim off any excess leaf.
Design of the future sandbox
When looking at photos of finished projects on the Internet, you should definitely consider:
- interests of your child;
- possible number of children playing in the sandbox at the same time;
- your capabilities.
A sandbox for a boy with his own hands can be made in the form of a boat, a car, or a spaceship. A young traveler will definitely like this design. Plus, they are simple and easy to make.
Make a sandbox with or without a bottom
A simple sandbox model involves digging a hole a little deeper (20-25 cm). This option also has significant disadvantages. First of all, the sand will quickly become dirty and lose its original appearance. The second significant disadvantage is the monolithic nature of the structure, which is unacceptable for dacha conditions, as well as if it is necessary to move the children's corner. An alternative would be to construct the bottom from a piece of linoleum or several layers of thick film.
Which awning would be best?
For small structures, it will be easier and cheaper to purchase a beach umbrella, but for complex structures like a boat, as well as large sandboxes, it would be more advisable to make a stationary protection. This could be a wooden cover, stretched thick fabric, or the use of traditional roofing materials. A similar element can also be used in the overall design; for example, a stylized house with tiles will look more than appropriate.
Do I need a protective case?
Such a design element is a prerequisite for maintaining hygiene in children's games. To prevent the sand from becoming contaminated by branches, leaves, debris blown in by the wind, and also from playing the role of a toilet for all the neighborhood cats, you should definitely consider protecting the sand. You can make a cover for the sandbox yourself. To do this, it is enough to take dense fabric around the perimeter of the structure, and also provide methods for its fastening.
The fabric can be replaced with dense polyethylene, a piece of linoleum, and other flexible building materials.
The popular option, when the roof of the sandbox is lowered onto the sand, serving as a protective cover, is fraught with additional difficulties. In addition to the design features, it is necessary to provide a sufficiently reliable fixation, because children while playing can accidentally tip the roof over on themselves.
How to paint a children's sandbox
The selected color scheme will fit perfectly into the design of your building and will become an additional decor of the site. It is advisable to use combinations of bright shades, and choose paint that is as fade-resistant and safe for use as possible.
A do-it-yourself sandbox for children is an opportunity to quickly and easily organize leisure time for children. If there is enough space on your site to build a play area, you should definitely please the kids.
Determining the place
In addition to studying possible schemes and preparing your own drawing, you should wisely choose a place to install a children's sandbox. There are many factors to consider when considering this issue. The priority direction for placing a children's sandbox is the sector between the northern and southeastern parts of the site. The logical explanation is due to the influence of ultraviolet rays. The first half of the day is characterized by clear air and soft UV radiation, after lunch the picture changes, the ultraviolet becomes harsher, so the formation of a shadow over the children's sandbox is mandatory. The diagram below clearly demonstrates the idea presented.
In addition to the reference point to the sun, there are several other factors that determine the location of the children's sandbox:
- Good visibility from the window of the house and the most visited points of the site. Children's unpredictability is a common phenomenon, so the sandbox should always be in the field of view of the older generation.
- Setting up a children's sandbox in the shade of trees is not recommended. At best, it will become contaminated with bird droppings and other debris; at worst, a caterpillar will fall on the child.
- It is also not recommended to draw up a drawing of a children's sandbox, focusing on the nearest location of sources of moisture; this could be an artificial pond or a regularly irrigated bed. Spiders may favor such places, and meeting them in a children's sandbox will not seem pleasant to a child.
- The northern side of housing construction will also have to be excluded - constant exposure to the shade prevents the sand from warming up properly.
Note! In addition to installing the structure itself, the design should provide for the arrangement of the area around it. To avoid mass transfer of sand into the house or onto the garden path, there should be a lawn within a radius of one and a half meters. In its absence, it is recommended to make a blind area around the sandbox.
Having decided on the location, they proceed directly to drawing up a diagram of the children's sandbox.