DIY paper mosaic on cardboard for children
Making an applique out of paper with your own hands is a very interesting activity, because you can take almost any drawing as a sketch. You can find it on the Internet and print it, or use your imagination and draw it yourself. And the materials for the work are not that expensive, they are easily accessible to everyone. Today we’ll figure out what a do-it-yourself paper mosaic is. The technique for creating this type of art is very easy and simple to learn. Even a small child can handle it, because most of the work is done without the use of a cutting tool. We invite you to consider several master classes that will help you more accurately understand how to work correctly in this technique.
First option
For work you will need the following tools and materials:
- Simple black pencil;
- Sheet of cardboard;
- Set of colored paper;
- PVA glue;
- The finished drawing template in our case is a mushroom.
How to get the job done? From the finished template, draw a mushroom onto cardboard.
Now let's move on to the preparatory process before the work itself. To do this, take 6 small containers and start tearing the paper into pieces with your hands. We will use the following colors:
- For the mushroom cap - brown;
- For under the hat place - beige color;
- For the mushroom stem - yellow;
- The sky is blue;
- For grass - green.
Each color should have its own bowl.
One by one, we begin to stick small pieces onto the necessary details of the drawing. After the main element has been completely completed, the remains must be glued and imitated earth. And as an addition, glue small brown pieces to the ground. Let them be small fallen leaves.
Now let's move on to the design of the sky.
The finished product must be placed under a small press, this is required so that when drying the finished application does not change its appearance.
In this torn mosaic style you can make a postcard for any holiday. This technique is very necessary for children. After all, it is precisely this that allows you to develop fine motor skills of your hands. Also, in addition to fine motor skills, in this lesson you can teach your child to distinguish colors and tear paper into small pieces. And see how he will independently cope with the task assigned to him.
Second lesson
For work you will need the following tools and materials:
- A sheet of white cardboard;
- Scissors for paper cutting;
- PVA glue;
- Set of felt-tip pens;
- Paints;
- Set of brushes.
Step-by-step work process.
At the very beginning, you need to prepare all the above materials. For work we will use ready-made pictures.
Using scissors, cut them out. And glue the blanks onto cardboard.
Afterwards we move on directly to the application itself. To do this, we will cut colored paper into strips half a centimeter wide, and then cut each of them into small squares. This is how it should work out for you:
We lay the finished parts one by one and glue them with glue. This can be done not quite close to each other. You can keep a short distance, as shown in the photo.
Now we move on to the design of the stalk; for this we will use green paper.
That’s it, we’ll divide the picture in a horizontal position into two parts. Let's paint the top one. After which we will begin to simulate that our vegetable will lie on the table. In this case, you can use a lighter paint.
We take a black felt-tip pen in our hands and carefully trace the outline of the vegetable.
Now we give a small shadow to the tomato; for this, again, you will need a black felt-tip pen.
We make brick markings on the painted background. That's all, the craft is completely ready.
We do other vegetables in exactly the same way.
This lesson allows you to develop children's attention and correctness when working with sharp cutting objects. Of course, before you start working, be sure to carry out safety precautions and explain to the children what scissors are needed for. Also, this type of activity allows you to reveal knowledge of colors, as well as train perseverance.
And in general, children really like work done using the paper mosaic technique; they are ready to spend a long time doing this activity. After all, it is very interesting and entertaining. For beginning needlewomen, it is better to use simple drawings, and only then after a while you can try to do large-scale work.
Video on the topic of the article
dekormyhome.ru
Mosaic applique made from colored paper
A mosaic made of colored paper is an ornament consisting of many pieces of colored paper. By doing crafts, the child develops fine motor skills, and also develops the perception of color shades.
Required material
To make an applique you will need a set of “Colored Paper”, scissors for children and glue.
Progress:
Mosaic made of colored paper is done as follows:
1. First, we prepare a template, which you can take from the coloring book, download and print the current one, or draw a sketch yourself.
2. Then cut the colored paper into small pieces. We add each color separately.
3. When working with a mosaic applique, apply glue to the background of the template or sketch and then place pieces of cut paper on top. This mosaic is much easier to perform using tweezers.
4. You can paste colored paper in any order, it is recommended:
- wheels;
- bumper;
- window;
- body.
5. When pieces of colored paper are pasted over the entire background of the picture, add a load: a book, a heavy box. The mosaic will dry in a few hours.
The Mosaic application made from colored paper is ready!
It should be borne in mind that a mosaic made without gaps requires significantly less precision from the child and is easier to complete.
If this is the first time a child has been offered a similar craft, then it is advisable to use a simpler template with a small number of details. The older the child and the more experience in performing mosaic work, the more complex the sketch can be used.
The Mosaic application made from colored paper has a simplified version, when pieces of colored paper can be torn.
This craft belongs to a decorative type of creativity. Mosaic work is labor-intensive, which helps develop neatness in a child.
The Mosaic application made from colored paper is a kind of game with the baby, and it is also an opportunity to lay the foundation for sensory development in children.
imalishka.ru
DIY paper mosaic on cardboard for children in photo
DIY paper mosaic on cardboard for children in photographs.
Making an applique out of paper with your own hands is a very interesting activity, because you can take almost any drawing as a sketch. You can find it on the Internet and print it, or use your imagination and draw it yourself. And the materials for the work are not that expensive, they are easily accessible to everyone. Today we’ll figure out what a do-it-yourself paper mosaic is. The technique for creating this type of art is very easy and simple to learn. Even a small child can handle it, because most of the work is done without the use of a cutting tool. We invite you to consider several master classes that will help you more accurately understand how to work correctly in this technique.
First option
How to get the job done? From the finished template, draw a mushroom onto cardboard.
Now let's move on to the preparatory process before the work itself. To do this, take 6 small containers and start tearing the paper into pieces with your hands. We will use the following colors:
Each color should have its own bowl.
One by one, we begin to stick small pieces onto the necessary details of the drawing. After the main element has been completely completed, the remains must be glued and imitated earth. And as an addition, glue small brown pieces to the ground. Let them be small fallen leaves.
Now let's move on to the design of the sky.
The finished product must be placed under a small press, this is required so that when drying the finished application does not change its appearance.
In this torn mosaic style you can make a postcard for any holiday. This technique is very necessary for children. After all, it is precisely this that allows you to develop fine motor skills of your hands. Also, in addition to fine motor skills, in this lesson you can teach your child to distinguish colors and tear paper into small pieces. And see how he will independently cope with the task assigned to him.
Second lesson
Step-by-step work process.
At the very beginning, you need to prepare all the above materials. For work we will use ready-made pictures.
Using scissors, cut them out. And glue the blanks onto cardboard.
Afterwards we move on directly to the application itself. To do this, we will cut colored paper into strips half a centimeter wide, and then cut each of them into small squares. This is how it should work out for you:
We lay the finished parts one by one and glue them with glue. This can be done not quite close to each other. You can keep a short distance, as shown in the photo.
Now we move on to the design of the stalk; for this we will use green paper.
That’s it, we’ll divide the picture in a horizontal position into two parts. Let's paint the top one. After which we will begin to simulate that our vegetable will lie on the table. In this case, you can use a lighter paint.
We take a black felt-tip pen in our hands and carefully trace the outline of the vegetable.
Now we give a small shadow to the tomato; for this, again, you will need a black felt-tip pen.
We make brick markings on the painted background. That's all, the craft is completely ready.
We do other vegetables in exactly the same way.
This lesson allows you to develop children's attention and correctness when working with sharp cutting objects. Of course, before you start working, be sure to carry out safety precautions and explain to the children what scissors are needed for. Also, this type of activity allows you to reveal knowledge of colors, as well as train perseverance.
And in general, children really like work done using the paper mosaic technique; they are ready to spend a long time doing this activity. After all, it is very interesting and entertaining. For beginning needlewomen, it is better to use simple drawings, and only then after a while you can try to do large-scale work.
Video on the topic of the article
Review DIY paper mosaic on cardboard for children.
stroitelstvo21.ru
how to make from colored paper on cardboard
Collecting mosaic pictures is very exciting and even useful. Surely, everyone was engaged in similar creativity back in kindergarten. Such an original and interesting lesson always brings a lot of pleasure, allowing you to reveal your creative talents without requiring large expenses. Even a small child will be very interested in sitting next to his parent and creating a beautiful paper mosaic with his own hands.
Since ancient times, different peoples have decorated their lives in different ways and used a variety of materials for appliqués. For example, northern peoples often used fur and beads in their appliqués, in addition to ordinary materials. An unusual and attractive applique made from pieces of straw ribbon.
With the advent of paper, appliqué on it received a special place in history. Black silhouette images of all kinds of subjects were very popular. And today, for example in Ukraine, this art still lives under the name cutting.
Materials and their storage
Colored paper is an excellent material for creating a simple but beautiful mosaic. Although, to create more interesting and thematic works, you can use old newspapers, magazines, napkins with various patterns and other types of waste paper that you may have already been planning to throw away.
On the reverse side, draw the sheet into small squares and triangles, and then cut them. Try cutting without preliminary drawing - the resulting polygons will become very interesting details of your mosaic and will definitely attract the attention of others. Prepare these pieces from paper of different colors. It is best to use a separate box to store each color to make it easier to work with.
Choose glue so that when it dries, it is transparent, so that it is convenient to apply, and also that it is in a convenient package with a tight lid and does not dry out after the first use.
Creating an application
The glue must be gradually applied to the entire sheet of cardboard, working and gluing one area after another. At the same time, try not to use too much glue so that the cardboard does not get wet and ripple, because this can seriously spoil the appearance of your product.
You should always start with the largest details of the picture, gradually moving to smaller ones. Also, styling begins with the contours of the picture and only then the entire figure is filled with color.
Small unfilled cracks between pieces of paper create a special charm and add amazing style.
Works created not from flat cut paper, but from torn paper, will look very original.
You can also try to create work using the cutting technique. Such paintings turn out to be voluminous and interesting.
In order to repeat similar work, you just need to glue each square of paper to the base, not completely, but only with the middle, rolling it into a tube - an end piece using a ballpoint pen.
Creating a paper mosaic is great because it does not require the use or knowledge of any special techniques. But, if you think that creating such crafts is only suitable for children, then look at what amazing paper pictures adults and experienced craftsmen use. No one would hesitate to call this a “children’s craft”:
Another amazing thing about this hobby is that you don’t have to be able to draw beautifully. It is enough to select any suitable template on the Internet and post your creation based on it.
Try to experiment - use corrugated or velvet paper, different textures will add originality to your drawing. Try replacing plain colored sheets with those that you yourself decorate in a variety of ways, adding streaks, drops and hundreds of different shades of the same color. Try to create a picture not on an ordinary sheet, but on a pre-cut shape, attach a stick or magnet to it and use it as an addition to your interior.
Works made using the mosaic technique from colored paper require patience, but are not difficult to perform. Children will enjoy making these colorful and unusual applications, which help develop perseverance and cultivate a craving for beauty. Paper mosaic is a new level of skills in the art of appliqué.
Video about how paintings are created from paper mosaics
Look at the video at the end of the article and you will learn how simply and beautifully you can design your work using a simple paper mosaic, even without experience in drawing and design. Even a child can cope with this task!
sdelala-sama.ru
New master classes in the “Mosaic” technique
Wooden mosaic or 3D wallpaper with your own...
Video, Interior, Master class
4
| Headphone organizer in the form of a smiley face Video, Master class, Craft, product 3 | Decor with wooden mosaic tiles… Video, Decor of objects, Master class 20 | Linoleum mosaic Painting, panel, drawing, Master class 53 | |
| Mosaic panel Video, Painting, panel, drawing, Master class 6 | Painting a jar. Mosaic Video, Decor of objects, Master class 21 | Kitchen apron in Provence style... Video, Interior, Master class 70 | Plate made of thermomosaic beads. Video, Master class, Craft, product 19 |
| DIY vase made from a glass. Roses from… Video, Decor of objects, Master class 22 | Hot stand Master class, Craft, product 20 | Bottle decor with mirror mosaics and… Item decoration, Master class, Materials and tools 255 | Decor of wine glasses. MK Decor of objects, Master class 161 |
| Photo frame, pendant and keychain made of... Video, Master class, Craft, product 7 | coffee table on the balcony. Master class, Craft, product 61 | House by the stream (stained glass and beaded panel) Painting, panel, drawing, Master class 49 | Sea glass mosaic Decor of objects, Interior, Master class 30 |
| Eggshell painting “Symbol... Painting, panel, drawing, Master class 49 | Winter flowers Master Class 16 | "Stone" rug for the bathroom Master class, Craft, product 55 | Decor of old MK stools like I did... Decor of objects, Master class 98 |
| DIY pebble rug Video, Interior, Master class 62 | watch base Master class, Craft, product 26 | MK Flask made of thermomosaic)) Master class, Craft, product 8 | Organizer made from disposable containers. Master class, Craft, product 16 |
stranamasterov.ru
Paper mosaic
Some call this technique appliqué, others call it paper mosaic. She has the right to both names. This is an ideal creative simulator for fine motor skills of children under three years old, who cannot yet independently cut out colored parts for “adult appliqué”.
What will you need? To create a work using the paper mosaic technique, you need a sheet of white cardboard or any other color that matches the artistic intent of the work.
You will also need colored paper. It should be noted that it is for this composition that you can use all the scraps of paper left over from previous works.
Glue is needed to secure all the details of the composition. You can use either PVA glue with a brush or a glue stick.
We select the base and apply the “mosaic”Creating a picture using the “paper mosaic” technique is available to children over two years old.
The main difficulty in creating works using this technique is to choose an effective base image with sufficiently large details and pronounced texture. Children's coloring books for little ones are quite suitable for this purpose. It is during their creation that artists select images that meet the requirements of paper mosaics.
After the basis for the future masterpiece has been chosen, you should sort out the colors, determining which parts of the drawing will be painted in which color.
Next, the colored paper is torn into small pieces. It is best to work with only one color, preparing mosaic pieces for all parts that have the same color. After the required number of pieces of paper of one color or another have been made, glue is applied to the base parts, and all small colored elements are glued to it within the outlined contours. In this case, it is possible to place colored pieces either at a short distance from each other or overlapping. This depends on the child’s decision and can be determined by the theme of the image (for example, for a tiled roof of a house, an overlapping arrangement of torn pieces of paper would be ideal).
Pieces of paper of a different color are prepared and attached in the same way. This is how a color composition is gradually created, although monochromatic images can also be quite interesting, especially against a bright background, including black and white options.
In the future, the paper mosaic technique can be complicated by achieving pieces of paper that are identical in size and shape.
The undeniable advantages of this technology are its simplicity, effectiveness, accessibility and cost-effectiveness. A child who independently prepared the material for such an application and glued it on will be able to proudly show off his work and claim that he did the work himself.
You can look at the comments or write your own.
kotikit.ru
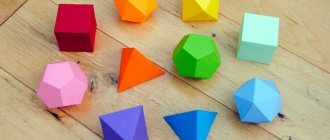
DIY pictures, how to draw a template, geometric diagram for children, stencils
Using mosaic designs, you can beautifully and stylishly decorate your interior. Today, using small pieces of glass, stone, smalt, metal, ceramics or wood, you can create a mosaic cladding that is suitable for almost any surface. Mosaics are common in room decoration and are used for any purpose. Any mosaic is a specific pattern that is made up of a large number of small parts. Despite the fact that modern manufacturers offer a wide range of ready-made products, moreover, they even make them to order, many prefer to succumb to the impulse of creativity and create a masterpiece with their own hands.
Mosaic pictures: where to start
Do you really like mosaic, but don't know how to get started and think it's expensive? We hasten to convince you that everything is as simple as shelling pears, and besides, creating such splendor as a mosaic with your own hands will also save your budget.
There are 2 layout methods for beginners:
- Straight. In this case, the fragments are laid out directly on the surface.
- Back. All parts are laid out and glued with glue with the front side to paper or adhesive film.
There are several ways to lay mosaics, which you can choose at your discretion.
You decide for yourself which method suits you best. Working with a mosaic is no different from putting together puzzles. You simply assemble your chosen pattern from fragments of different or the same shape.
If you are just starting to work with mosaics, then experts advise starting with simple small patterns that do not have many colors. It is better to start more complex schemes when you gain more experience.
Please note that the more details, the larger the drawing will be. It is better to lay large parts at a large distance from each other, so the end result will look more successful.
Also, to begin with, it is better not to purchase complex elements; just use glass and a mirror.
Mosaic pattern: main aesthetic properties
It cannot be said that the aesthetic properties of mosaics are limited by the purpose of the room. For example, a mosaic for a nursery, paintings for children will become a special decoration, a living room or bedroom can be chosen based on the preferences of the owner of this room. Mosaics of different colors on furniture will look extraordinary and impressive. It is also not uncommon to see mosaics on mirrors or on the fireplace portal.
A beautiful mosaic can perfectly decorate the interior of a kitchen space
You may be convinced that mosaic is just a set of awkward squares in the kitchen, but those who have an apron in the form of juicy fruits or lush bouquets will be able to argue with you.
Magnificent mosaic decorations can decorate any dining room or kitchen interior.
Mosaic pattern is simply irreplaceable in the bathroom. It will create a unique coziness and comfortable atmosphere. The aesthetic and performance properties of mosaics are not inferior to those of tiles, and in addition they have an excellent decorative effect.
If you are a supporter of indoor mosaics, but do not yet know how to get started, then it is best for you to rely on ready-made diagrams. And skills will come with time.
Do-it-yourself mosaic: drawings and diagrams
Before you start laying mosaics, you need to carefully think through everything down to the smallest detail and imagine the end result. It is best if you rely on the diagram, which will initially be located on paper. At the moment, creating a mosaic can be done using a special program that can even transfer your photo to paper. The program is designed for use even by beginners.
Of course, laying out mosaics can even be chaotic without drawing up diagrams. But if you don't have enough experience, the result may not be what you expected.
You can make your interior creative and unusual with your own hands using mosaics
If the work area is large, preparing a sketch is required. The prepared diagram displays not only the parts, but also their numbering, so that there is no confusion during the installation process.
The mosaic is laid according to the following algorithm:
- The first thing to do is dilute the solution. It is advisable to purchase a special composition for gluing fragments.
- According to the intended scheme, individual fragments are laid on the surface. It is better to start working with large pieces, then fill in the empty spaces with small parts. If the plans include laying out patterns, they should be done first.
- There are several ways to apply glue. The first involves applying an adhesive solution to the entire surface, but it is designed to get the job done professionally and quickly. The second method involves applying the solution to each individual part, and is very convenient for horizontal and large surfaces.
- After all the fragments have been laid out, they must be left for at least a day. During this time, all fragments will be securely fixed.
- After the work has dried, you can begin grouting. The amount of solution depends on how the mosaic elements were glued. If they were recessed in glue, then a little product will be needed, and if they were glued in fragments, the volume of grout will be required much more.
Grouting work is carried out using a rubber spatula. It is very important to cover the surface of the mosaic so that only the top pieces remain. After the grout has been applied, it is left for 30 minutes, then the composition is wiped off with a damp cloth.
This is the whole master class on laying mosaics. Mosaic sketches from tiles or broken glass tiles allow you to create any patterns; it can be a geometric pattern or an ornament in any style. Examples and samples can be seen on the Internet.
How to draw a mosaic: important points in work
Mosaic is a specific pattern that is created from small parts fixed with glue on a base.
Mosaic is considered durable, and its design can be different; you can find the most beautiful examples in specialized literature or on the Internet.
In order to start creating a masterpiece from small components, you need to know what the end result will look like, so before you start laying out, you need to have the simplest diagram. You can also use paper templates and stencils. They can also be created from scrap materials, but paper organization is the simplest.
Before you start drawing and laying mosaics, it is better to first prepare materials and tools for work
Of course, you can draw any picture yourself with a pencil and then fill your sketch with a mosaic of the required size and color. You may not get the perfect result the first time, but gradually, as you gain experience, you will be able to do the job better and better.
Of particular importance are works that are not completed according to the plan, because beautiful improvisation is valued much more than work according to plan.
You have the opportunity to create not just a separate element on the wall, but also organize a real picture that can be moved from one room to another, thereby creating a unique design.
Beautiful drawings for mosaics (video)
Laying out mosaic drawings is a very complex and lengthy process, especially for those who are faced with this type of work for the first time. But if you consider that this is a fascinating process, as a result of which you can get a unique and inimitable process, then it’s worth working on the creation. If you are a fan of creative renovations, then we recommend that you try yourself as a creator and create a mosaic masterpiece.
Examples of mosaic drawings (interior photos)
Attention, TODAY only!
Add a comment
kitchenremont.ru
Applications made from colored paper, photo examples and lessons with descriptions
One of the most wonderful options for creating crafts is paper. Applications made from colored paper can not only entertain children and contribute to their development. Beautiful paper crafts will easily decorate your room or turn into a beautiful original postcard that will definitely delight your loved ones. In this article we will offer several options for crafts with applications made from colored paper.
The term “application” itself comes from the Latin application, which can be translated as “attachment”. This type of fine art is based on cutting out various parts and attaching them to another material that acts as a background.
A little history
Such material for appliqués as paper was born a very long time ago. But they began to use it as a component of this decorative and applied art only at the end of the 16th century. Rapid development occurred at the beginning of the next century. In France, there is a fashion for paper silhouettes. It extends to other European countries and Russia. The walls of houses begin to be decorated with small portraits and scenes from life. The silhouette crafts got their very name from Etienne Silhouette. This French official was very fond of paper appliqué, and one day an artist depicted a shadow caricature of him. From that moment on, this technique was called silhouette. In Russia, Count F.P. was famous for his work in this type of appliqué. Tolstoy. He created over 2000 different images.
In modern creativity, not only silhouette techniques are used. Plastic applique from crumpled paper, decoupage techniques, quilling, cutting out patterns, trimming, creating three-dimensional crafts and much more will help you create original and unusual crafts that will definitely become a decoration of your life.
Before you start creating crafts from colored paper in the form of appliqués, you need to purchase several simple but very necessary tools.
The most important of them will be scissors. Be sure to be sharp to avoid the effect of a torn edge on the workpieces. Pay close attention to their hands. They must be comfortable, since the cutting process is quite lengthy and your hands must be comfortable.
The next point is glue. This can be regular PVA glue, stationery glue stick or transparent gel glue. Different compositions will require different types.
Another important element will be the ruler. The best option is one with ready-made templates for drawing circles, triangles and other shapes.
Additional decorative elements for your applications can be any natural materials, sparkles, beads, rhinestones, fabric fragments, whatever your imagination suggests.
First, let's look at probably the most famous craft - flat appliqué with floral motifs.
Flat applique with flowers
All the kids in kindergarten or primary school have probably tried to create such a beautiful flower arrangement. Even this simple composition can become a real work if you put in a little imagination and effort.
You will need:
- Colored paper (one-sided can be used).
- Scissors.
- Glue.
- Cardboard.
- Pencils or markers.
In order for the flowers to be symmetrical and neat, you need to fold the paper in half and draw half of the flower, using the fold line as the middle axis. We cut out the blank, open it and get a beautiful and even flower.
You can change the shape of the same flower or use the “sliding” method for a variety of options. This is very easy to do. Just cut the flower along the petals, and gluing them, push them apart.
If you need to cut out a flower with petals arranged in a circle, then you just need to fold a square sheet of paper diagonally 3 times. And then we cut out 1 petal from the blank. It may have rounded or, on the contrary, pointed edges. Or, if you want to depict a cornflower, you can cut out the cloves.
Another option for cutting out several petals at the same time is to fold a sheet of paper like an accordion. You get individual petals, which can then be laid out in a circle and a bright core glued on.
Below are different options for creating leaves and grass. You can do such crafts with your children. Kids will have great fun spreading glue or artistically arranging paper blanks, creating amazing and incredible flowers.
The next version of paper applique is suitable either for older children or adults.
Volumetric flowers for applique
Such crafts can be attached to a postcard or made part of a decorative panel.
You will need:
- Paper of various colors (double-sided). In this master class, the colors used are black and white, but you, of course, will choose shades that you like and that will match the overall style of the craft.
- Cardboard.
- Scissors.
- Glue.
- Elements for decoration (decorative buttons, rhinestones or half beads).
Below are the petal patterns. You can draw similar ones yourself, redraw them by holding a sheet of paper to the screen, or print the templates on a printer.
The next step is to cut in all the parts. Experiment with paper. Take not just multi-colored, but, for example, embossed or simply an unusual texture. Don't just cut out the petals. You can make several cuts on each of them to make the flowers more magnificent.
We glue all the blanks strictly in the center, leaving the edges of the petals free. Glue a rhinestone or other bright detail of your choice into the middle.
Now you can glue our blank as an element of applique on a postcard.
Craftswomen who know how to handle various types of colored paper know and love the following technique for creating appliques from multi-colored paper - trimming.
Volumetric lilies made of colored paper
You will need:
- Colored double-sided paper.
- Green cardboard for the applique base.
- Scissors.
- Glue.
Cut out water lily (lotus) leaves from green cardboard. They are quite simple, but the template for cutting out lily petals is unusual. The photo below shows templates for leaves and petals.
For each flower you will need 1 leaf and 2-3 petal blanks. Although the patterns for the petals have cut out parts, there is no need to cut them out on paper blanks. You just need to cut along the marked lines to the inner circle.
Now we take the petal blank and roll each of the cut parts into a cone. Glue the edges together and get 1 layer of petals.
When all the blanks are ready, we begin creating flowers. And here the option of attaching layers of petals is possible. They can be glued on different sides (see photo). You can create as many as 4 versions of the water lily. Make two- and three-layer flowers. Arrange the tiers so that the petals are staggered relative to each other.
You can also cut off the sharp ends of the cones and get an original and unusual flower.
You can use pieces of yellow paper as cores or glue ready-made stamens.
And if you like not only to create crafts from paper, but also to sew, then you can glue a piece of foam rubber in the middle and use the original volumetric applique as a pincushion.
The next technique will also be volumetric. With its help, very beautiful and “fluffy” applications are obtained.
Sunflowers using trimming technique
For beautiful and original cards using this technique, it is best to use colored corrugated paper or just select very thin sheets.
You will need:
- Colored paper (corrugated).
- Wooden kebab skewer (thick).
- Glue (a pencil works best).
- Cardboard base for applique.
- Ready-made picture template.
- Scissors.
Glue the colored base onto cardboard to add strength.
Now let's get down to paper. It must be cut into squares with a side of approximately 1 cm. You will need a lot of such blanks.
The next step is to fold the squares. To do this, take a skewer (you can get by with a regular ballpoint pen, just make sure that it is used and does not spoil the paper with ink), place it in the center of the square and twist the paper around the skewer.
Apply glue to the paper blank and attach it to the picture.
It is best to start working in this technique from the center and move towards the edges.
First, we make a core from dark brown or black blanks. Then we start gluing the petals. At the end there is greenery and a general background.
These crafts can be made with children. Ready-made color pictures of the basics will prevent kids from making mistakes. You can also draw any image yourself, and use your imagination to make a truly original craft.
Paper applications using mosaic technique
Another option for paper applications is mosaic. The art of creating images using tiny pieces of different colors was born a long time ago. This word can be translated as “dedicated to the muses.” The East is considered the birthplace of this art. The most ancient mosaic crafts that have survived to this day are Persian boxes. The heyday of this art form occurred during the era of the Byzantine Empire. In those days, mosaics were made from precious and semi-precious stones with a background, most often consisting of gold.
Now, to make a beautiful mosaic applique, all you need is colored paper, cardboard for the background, glue and sharp scissors.
The technique is very simple, even small children can handle it. Creating crafts will be much more fun if you work together with the kids. Working with small pieces of paper contributes to the development of a child’s fine motor skills, which has a beneficial effect on the development of speech, memory, imagination and patience.
Principle of operation:
- Choose a picture as an example. If you are crafting with children, two or three large objects will be enough.
- Select colored paper in the required colors. To make the craft more creative and bright, take several shades of the same color.
- Now randomly cut the paper into pieces. It will be easier for kids to use square pieces. If you decide to make this craft without the participation of kids, then the pieces do not have to be triangular or square. Five-, six-, seven-sided parts, trapezoids, irregular triangles, any details will find their place.
- All that remains is to prepare cardboard with a pattern on which you will need to glue pieces of colored paper and glue.
- If you are using PVA glue, prepare a dry cloth to remove excess glue after each piece is applied.
A type of mosaic applique is a broken one. Its principle is simple - instead of cutting the paper into parts, it is torn. The fuzzy contours of the blanks give the feeling of blurred contours, which adds originality to the craft.
photo examples for children's creativity
Mosaic is a decorative and applied art. When a pattern or image is made from particles of homogeneous or different materials: stone, glass, wood, grain, fabric. A special type of mosaic is inlay.
Mosaic for children promotes the development of fine motor skills and creates a trusting relationship between parents and children. And you, as parents, are obliged to expand the horizons of your children, introduce them to this type of art and show your children where mosaics can now be seen in the objects and buildings around us.
Mosaics are made from pieces of simple geometric or more complex shapes cut out according to patterns, which are fixed in a layer of soil: lime, cement, mastic, wax, glue. There are two methods of mosaic: direct and reverse.
With the direct method, particles of pieces of the future mosaic are pressed into the soil applied to the surface to be decorated.
In the reverse method, the particles are glued face down onto cardboard or fabric with a pattern applied to them, then the back side of the set is filled with a fixing compound, and the temporary base is separated.
The history of mosaics goes back many millennia. The earliest surviving mosaic patterns date back to around 3000 BC. The ancient Greeks were the first known civilization to use natural stones and shells of different colors to create designs.
Review of paintings - do-it-yourself mosaic from colored grains
Readers are provided with paintings made from dyed grain for viewing, the technological process of creating which for beginners was described in the previous article.
Using this technique, you can create any of the paintings offered for viewing. Look how original and stylish pictures made from grains look.
Photo of the painting – Orchid
Blanks for the picture: a solid base made of chipboard with a pattern already copied, the picture itself.
Photo of the painting – Bindweed
Blanks for the picture: the main picture of a flower and a solid base made of plywood or chipboard with a pattern.
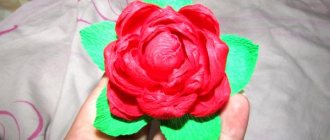
Photo of the painting – Roses
Blanks for making a painting: a solid base made of chipboard with a flower already translated and the main picture of the flower.
Photo of the painting – Irises
Blanks for the picture: a solid base made of plywood or chipboard and the main picture for transfer.
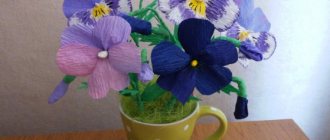
Photo of the painting – Pansies
Blanks for a picture with a flower: the main picture of a flower and a solid base with chipboard or plywood with the picture already translated.
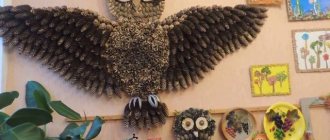
Photo of the painting – Sphinx
Blanks for the picture: the main picture and a solid base made of chipboard with a picture already translated on it and the selected picture.
Photo of the painting – Tiger
Blanks for creating a picture: a picture and a solid chipboard base.