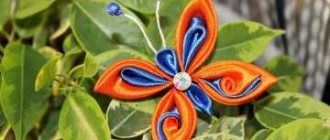
This Kanzashi style bun decoration for school uses a combination of black and white satin ribbons.
The accessory is suitable for both everyday wear and special occasions. The work uses simple petals, so the master class is suitable for both experienced and novice needlewomen trying to understand the intricacies of the popular technique. Step-by-step photos and detailed descriptions from a master in his field are a good foundation for your success and beautiful results. Good luck!
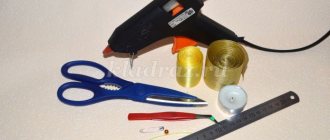
- Craft materials
- Step-by-step job description
Kanzashi hair bands
This is the set of items we will need. Now let's quickly get down to business. To make one elastic band, we need 7 white squares of white ribbon 5 by 5 cm wide, and 7 squares of blue ribbon 5 by 5 cm wide.
We cut the ribbons with scissors; for ease of work, the squares can be burned on a candle; I was in a hurry and did not burn them, because I had already learned to make friends with the ribbon).
We form a double sharp petal. To do this, fold the white square into a triangle, then again into a triangle and hold it between the index and middle fingers, and also fold the blue petal twice into a triangle.
Then we place the blue triangle on the white one, placing it slightly lower and connecting the lower corners of the triangle. We cut off the tip with scissors and grab it tightly with tweezers and solder it onto the candle.
Then I cut off the lower part of the petal, thus making it flatter, and burn this trimmed lower part over the candle so that the petal does not crumble.
We need to make seven such petals. Now we glue them together using hot glue, applying it to the side of the petal and applying the next petal. We do this until all seven petals are glued together. All that remains is to glue a bead and a flower into the middle of the flower from the double sharp petals.
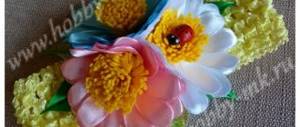
The beauty of the future product very much depends on the middle, for my daughter’s rubber bands, believe it or not, the middle of my blouse, which I decided to alter, and on the collar she had flowers with large blue rhinestones, just suitable for these rubber bands. So I quickly found a use for them, there are still two flowers left, just rhinestones of a different color, I’ll use them somewhere else.
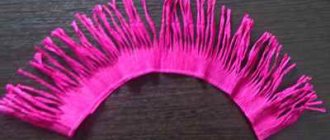
Now we need to make a white lace base for our kanzashi flower. For one lace base we need 20 cm of lace, less is possible, I just wanted the elastic bands to be larger, like bows. Now we take a thread with a needle and string the lace onto the thread, then we tighten the thread and sew the beginning and end of the lace, getting a lace flower, this is done easily and quickly and should not raise any questions, especially since there is a video tutorial.
Now, using hot glue, glue the ribbon flower to the lace flower. There is a small detail left to attach the elastic. To do this, first cut out a circle of felt with a diameter of 3 cm and stick it on the bottom of the lace flower, now cut out a strip of felt 1 cm wide and 3-4 cm long and, having threaded the strip through the hair elastic, use hot glue to attach it to just that to the glued felt circle. So our kanzashi hair tie is ready. I made two of these elastic bands so that I could tie my daughter’s ponytails.
These kanzashi elastic bands look very cute and elegant on a girl’s head. So don’t hesitate for a long time, but start creating for your daughter or daughters). Kanzashi butterflies also look very beautiful, you can make them too.
Craft materials
First of all, prepare the ribbon by cutting it into pieces. If you cut with a thermal knife, then no other actions will be required. And if you use ordinary scissors, you will have to scorch the edges with the flame of a lighter or candle. Be careful when working with fire and hot tools!
To decorate a kanzashi suitable for school, you will need a satin ribbon:
- 28 pieces of white 2.5*7 cm;
- 28 pieces of black 2.5*6 cm;
- white strip 1.2*10 cm.
Additionally:
- white felt square – 3*3 cm;
- white half bead with a diameter of 1.2 cm;
- silver rhinestone chain;
- sewing elastic 1.5 cm thick and 20 cm long;
- silver tire.
Please note that we also have other kanzashi decorations for school: a set of a tie and hairpins in blue tones, a black and white hair hoop and an elastic band with flowers. Buy materials in excess so that you have enough for everything.
Materials for the master class
As accessories for attaching kanzashi jewelry, we used a 4 cm seamless elastic band and a click-clack hairpin.
To work you will need:
- narrow white satin ribbon with silver lurex 1.2 wide;
- silver “spider” center with pearls;
- white felt bases with a diameter of 3, 4 and 4.5 cm;
- white felt rectangle 1.5*5 cm;
- silver stamens;
- silver cord.
Materials are indicated taking into account the production of two products for the set in the photo.
Making kanzashi gum: a master class for beginners
Master class on making elastic using the kanzashi technique for beginners. Step-by-step description and detailed photos.
It is best to master the kanzashi technique with simple crafts. Hair jewelry is ideal for beginners. Small errors in such products are invisible, and after gaining experience, you can move on to large-scale work. If you are completely unfamiliar with ribbon needlework, read about the kanzashi technique and its features in another publication, and here we will tell you how to make kanzashi elastic bands - a master class with photos will help even a beginner understand the intricacies.
- Preparation of materials and tools
- Master class with photos on making kanzashi elastic bands
Preparation of materials and tools
Before making a kanzashi elastic band, you need to prepare materials and tools. You will need:
- black satin ribbon – width 3 cm – length 30 cm;
- blue satin ribbon width 2 cm – length 16 cm;
- glue gun;
- gun glue;
- candle;
- matches;
- scissors;
- half beads – 2 pcs;
- black elastic band – diameter 1.5 cm;
- The base of the elastic is a circle of cardboard, black satin fabric.
It is necessary to prepare all items in advance. Let the gun warm up and load it with a glue cartridge.
Master class with photos on making kanzashi elastic bands
Cut the black satin ribbon into 3cm*3cm squares. 10 squares required.
Take 1 black square. Fold it in half
Fold the ends of the longest side of the triangle towards its apex, as in the photo.
Now use your hand to fold the diamond in half. It should look like in the picture. Take the petal in your hand. Keep it close to the middle. Take the glue gun and squeeze out a couple of drops of glue to secure the petal.
Take scissors. Cut the bottom of the product at an angle of 30-45 degrees.
If after cutting the ends come apart, you can glue them by adding a couple of drops of glue from a gun. Now is the time to light the candle. Hold the cut petal to the flame and scorch the edges.
Do the same algorithm with the remaining 9 petals. You will get 10 black finished products.
Fasten all the petals together using a hot gun. Apply 1 drop of glue at the base of the petal. Then glue the next piece to it and the rest in order.
The bottom part of the flower is ready
Now you need to cut the blue ribbon into 2cm*2cm squares. 8 squares required.
With smaller squares you need to do the same actions as with black figures.
Once all the blue petals are ready, start gluing them.
Gradually, from the first to the last, fasten the product into a flower.
There are now two main parts of the flower. Set them aside.
It's time to work on the base of the beautiful kanzashi elastic band. Take a cardboard circle with a diameter of 1.5 cm. A square of black satin 3cm*3cm. Place a bead of hot glue in the middle of the circle.
Place the circle on top of the black line. Pin the ends of the fabric together on the adhesive side. The product should be a “button”.
Turn the black flower over with the singed part facing up. Apply a couple of drops of liquid from the gun. Place a button on top of the glue and press a little with your finger.
Add a small piece of black fabric to the base to attach the elastic. Scorch it on fire.
Glue to the base on one side. Insert a prepared elastic band with a diameter of 1.5 cm. Secure the second part of the fabric with glue, thus securing the elastic band.
Now the last stage remains. Connect two finished flowers. On top of the black one, glue the blue one using hot glue.
Take the assembled product, apply two drops of liquid from a pistol to the middle of the blue flower.
Wait a couple of seconds until the glue begins to dry. Then carefully place the half bead on the glue. Press down lightly. The beautiful kanzashi elastic band is ready! Try making a headband using the same technique.
A master class on do-it-yourself kanzashi elastic bands was prepared specifically for the online magazine “Women’s Hobbies.”
How to make a kanzashi style flower
Cut the white ribbon with lurex into 10 cm strips. A total of 26 pieces . If you use thermal cutting, no additional processing is required, since it immediately singes the edges. If you cut with scissors, treat the cuts with the flame of a lighter so that they do not crumble.
Place one piece of satin ribbon with the front side facing you and fold it in half. Cut the edges of the top at an angle and singe them separately so that they do not stick together. The dotted line in the step-by-step photo shows where the fold is.
Bend the upper parts of the workpiece in different directions . Now fold the edges on one side and the other in half and solder. Straighten the petal by the “antennae”. The top on the reverse side can be slightly sharpened. To do this, solder a little with fire and press with your fingers.
This is what a petal using the kanzashi technique looks like from the front and back sides. Prepare 25 more similar ones from strips of satin ribbon.
Collect the first eight onto a thread.
Glue the center to the center of the flower. If it is made of metal, then it is better to first glue it onto a small piece of felt. If it’s made of plastic, then you can go straight to the flower.
The next 10 petals need to be glued onto a felt base with a diameter of 4 cm.
You can do it in a circle at an equal distance from each other. But with this layout, they can be laid out either nine or eleven. It's better to do it differently.
- Fold the circle in half and define the top and bottom. You can mark it with a pencil.
- Glue the first two kanzashi petals to these places.
- Divide one part of the semicircle into four equal parts and glue the petals onto them.
- The remaining four petals are opposite the first four.
Make droplets . Glue two at the same level, and one in the center a little higher. Prepare two such fans.
Place a small flower underneath. Create bunches of branches from silver stamens. You will need two bundles for the elastic band and two for the hairpin.
Glue the bunches on both sides of the fan.
Glue two identical flowers in the kanzashi style, one for a hairpin and the other for an elastic band.