Our website already has more than one interesting master class dedicated to the fascinating technology of creating products from satin ribbons in the kanzashi style. Basically, these lessons talk about creating original lush flowers with your own hands. Today we will look at a slightly different topic of crafts. You will learn how to make a butterfly, dragonfly and ladybug. It’s easy to make such products, you just need to know the basics of creating the basic elements of kanzashi. In addition, to help beginners, the prepared MKs contain detailed photos and videos that demonstrate all stages of the work.
Butterfly in kanzashi style
In order to make such a master class (mk) and to make a butterfly, you need to decide on suitable accessories, so we need:
- different shades of satin ribbons;
- needle and thread;
- decorative material in the form of beads and rhinestones;
- pin;
- rondels;
- fire from a candle or lighter;
- not big tweezers;
- openwork lace;
- textile glue.
Such butterfly kanzashi can be made from leftover satin ribbons. Take a small piece and attach it to another piece, connecting it with a pin. From them you need to make the shape of an airplane, as shown in the photo. At the point where the cut is located, we glue the bead so that the edges do not diverge. If you don’t have such material at hand, then hold everything with your hands. Apply flame to the bottom of the workpiece. Fold the edges tightly and trim off any excess ends with scissors. Step by step, do all the manipulations shown in the photo.
Brush the bottom with fire again. If you haven't beaded the edges, use your fingers to hold the edges in place. Attach the first piece to the second and see what excess material needs to be cut off with your own hands.
Our master class (mk) continues with the formation of a wing with a fold. There should be three of them, since the petals will be glued into them.
Look at the photo, you can see that a small element is glued into the core of the petal. Next, all this is inserted with glue into a larger workpiece. Glue must be applied to the seam. Do not overdo it, otherwise glue streaks will be visible.
The lower part of the butterfly will consist of round petals. Such a master class (mk) can be viewed via video or photo in our previous articles. Let's start making a ponytail.
Take a thread and a needle and sew the future butterfly. Pierce the wings at the top point, thereby capturing all parts of the workpiece. Insert the needle with the bead into the tail of the butterfly and return to the opposite side. Pull everything together and make a knot.
Let's make the body of the butterfly. On the pin, we collect one bead, then a rondelle and 1 large bead, one cap and 5 beads. Do the same manipulations with the other pin. Use round nose pliers to round the edges. Look at the photo, you should get the same body and butterfly.
Glue the body of the butterfly between the wings.
Take the openwork lace and glue it to the butterfly. Then, you can attach an elastic band or a hairpin to our craft, it all depends on where you want to use the kanzashi butterfly. The butterfly and our master class (mk), which we made with our own hands, are completely finished. Rely on your imagination and knowledge, and then your master class and butterfly will be the most beautiful.
DIY ribbon tie decor
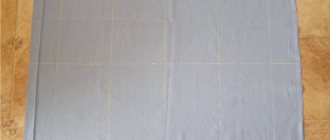
There are a great many options for decorating a bow tie. You can use both artificial or natural, precious or semi-precious stones, as well as ordinary applications (for example, if the butterfly is intended for a child). Small glitter that needs to be “planted” on a special glue is also suitable, for example, this is how you can decorate a homemade tie by applying powdered glitter along the lines marked with a blue dotted line in the picture:
A bow tie made by yourself can become both an original gift and a luxurious, exclusive element of your personal wardrobe that you will never find on anyone else.
Wear it with pleasure!
Regardless of what a man does and what field he works in, he always wants to look stately, modern and sophisticated. Therefore, a bow tie has long become an integral part of a man's attribute. Increasingly, this accessory can be seen on women - it makes the image strict, but elegant.
To diversify a formal weekend outfit or a casual office suit, just tie a bow tie. Well-chosen accessories help you look impressive and chic. You don’t have to buy branded items; you can make a stylish men’s bow tie with your own hands.
Hairpin in the shape of a dragonfly
This dragonfly, in the kanzashi style, is very easy to make with your own hands. In order to make such a master class (mk), we need the following material:
- pink ribbons;
- flame of a candle or lighter;
- metal hairpin;
- decorative material;
- textile glue.
The master class begins with cutting square ribbons. We make round petals from white material. Bend one square piece. Fold the pointed corners inward. We connect the resulting figure in the center. We cut off the excess. Cover the edges of the tape with fire. At the end of this part of the work, you should have 4 petals.
Now, let's move on to creating the body of our dragonfly. Make three pointed petals. They need to be connected using glue, as shown in the photo. We attach all the parts to a metal clip and connect them with glue. Our dragonfly is decorated with decorative material.
Look what a wonderful Kanzashi dragonfly we have created, you will see how easy it is to create such things with your own hands. If some elements are not clear to you, there is enough interesting video material on our portal.
How to make a bow tie with your own hands
Any girl can buy a tie for her man at any men's accessories store. However, it is much more pleasant for the stronger sex to receive gifts made with their own hands. The bow tie comes in different variations, but they all fall into two main categories:
- classic elegant model a la tie, which is tied at the neck;
- an accessory that is attached to the collar using a clip or a special fastener.
According to their shape, bow ties are divided into four types:
- classic, the width of which does not exceed six centimeters;
- large bow ties with a width of eight centimeters;
- diamond-shaped butterflies;
- tie models with slightly rounded ends.
A girl can sew a butterfly with her own hands for a man with step-by-step instructions. You need to decide which material is best suited for the accessory. If you use silk or corduroy, the bow tie will have a prestigious and expensive look. A more economical option is polyester, which resembles satin models, or paper. In any case, your first bow tie should be made from inexpensive material so that you don’t have to worry about failure. In order for the product to keep its shape, the manufacturing fabric must be dense.
From paper
A paper tie can be an excellent alternative to a fabric tie if you are sorely short of time and the accessory must be ready. If you use the origami technique, which does not require gluing and stitching, you can quickly make a beautiful bow tie from a sheet of colored paper. To implement your plan, you need to take a sheet of square size, for example, 15x15 cm. It is better if the sides of the material differ from each other.
Instructions on how to sew a butterfly around your neck with your own hands:
- Turn the sheet wrong side up, bend it horizontally, and then unfold it again.
- Fold each of the four corners to the center line in turn.
- Fold the top and bottom edges towards the center as well.
- Fold the piece in half, starting from left to right.
- Fold the corners on the right to the center line and straighten them.
- Straighten the product.
- Along the created folds, fold the central part in half so that it turns inward.
- Fold the top layer of the left corner to the right, folding from the top right corner downwards.
- Fold the left side back so that the corners on the right and left coincide.
- Fold the top layer of the left corners towards the center line.
- Fold the left corners towards the center line.
- Gently straighten the workpiece, carefully straighten the central part.
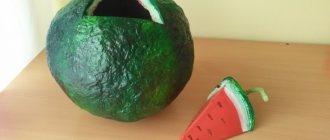
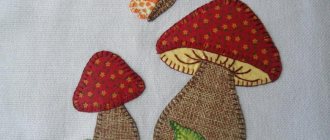
Red ladybug kanzashi
The last master class (mk) is aimed at learning how to make a kanzashi like a ladybug.
Let's do it with our own hands, without spending a lot of time. Here are the materials we need to make a ladybug:
- satin ribbon;
- black rhinestones;
- beads;
- glue;
- strong thread.
It is necessary to make one petal of a pointed shape and douse it with fire. Turn it over to the other side. You made the first wing. We still need one more of the same. We form a head from a narrow ribbon by folding it and scorching it with fire. From the remaining piece, you need to make a tail. Glue the parts together, and then the head and tail. The antennae are made from thread, 1 cm long. We decorate the wings with rhinestones.
This wonderful and touching Kanzashi ladybug will become a hair decoration, in the form of an elastic band or hairpin.
Videos of all master classes can be found on our portal.
Bow ties made from ribbons by hand: step-by-step instructions
Butterflies most often consist of two bows. To make the first of them you will need a piece of wide tape about 25 cm long, for the second - 35-40 cm.
A smaller ribbon should be folded in half so that the ends slightly overlap each other, and the junction of the ends itself is located in the middle of the part. Along this middle of the butterfly you need to make forward stitches with the needle, tighten the thread and wrap it around the ribbon to make a bow. In the same way you need to make a second bow of a larger size.
Now you should start making the base of the butterfly. To do this, you will need a thin ribbon; the finished bow will be sewn to it, and it will hide under the collar. You need to cut two parts: one according to the volume of the neck with a margin, and the other - a small size for attaching a bow.
A thin long ribbon must be treated with a match flame so that the threads do not fray. Two bows are glued or stitched so that the small one is located on top of the large one. At the back of the large bow you need to attach a long ribbon and cover it with a small ribbon. The ends of the latter need to be sewn in such a way as not to fix the long ribbon; it should move in different directions.
At the end of the work, all that remains is to sew on fasteners in the form of Velcro, buttons, etc. You can buy special hooks that are used when sewing bras.
Now that all stages of the work are described in detail, a DIY ribbon butterfly can be made quickly and easily. This element will be an excellent decoration for hair clips, jewelry and even paintings.
Ties are a very ancient decoration. Its first prototypes are depicted on the terracotta warriors that one Chinese emperor desired for his afterlife in 220 BC. The statues depict scarves tied around the neck with a bow. Warriors in Ancient Rome also wore similar accessories. In those days, a tie served not as decoration, but as protection of the throat from winds and coolness.
The tie received its role as decoration around the 16th and 17th centuries. During the Thirty Years' War, King Louis XIV of France saw beautiful neckerchiefs on Croatian officers invited for negotiations. He liked this accessory so much that a royal decree was issued that courtiers should wear La Cravat at all council meetings.
At the end of the 17th century, women began to wear ties. And to this day, this elegant wardrobe detail adds a special chic to any appropriate outfit.
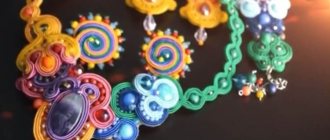
In this article we suggest you make several ties using the kanzashi technique. An elegant jabot made of ribbons for a charming lady or a strict black bow tie for a young gentleman.
We suggest making the first two tie brooches for girls. Such wonderful accessories are perfect for the first day of school or a special event.
So, a frill tie using the kanzashi technique
.
Materials for work:
- Satin ribbons in black and white, 5 cm and 2.5 cm wide;
- A small piece of black lace;
- Round decoration (an old brooch or a decorative large button will do);
- Thread and needle;
- Lighter or candle;
- Glue gun;
- Brooch pin.
It is necessary to cut two pieces of 18 cm in length and 1 piece of 20 cm in length from a white ribbon 5 cm wide. From a black ribbon 5 cm wide, cut 1 piece 18 cm long. Melt the edges of the ribbons over the fire.
From a black ribbon 2.5 cm wide, cut 2 pieces 18 cm long and 1 piece 20 cm long. From a white ribbon 2.5 cm wide, cut a piece 20 cm long.
For beautiful frills that create a frill effect, you need to make 21 pieces of round petals as follows: cut a 5x5 cm square of black ribbon. Melt the edges over the fire. Fold it diagonally (the fold line is on top). Make sure the corners line up exactly. Now take a needle and black thread and thread it into the right corner. Now you need to walk with regular stitches in a semicircle to the left corner of the triangle. The semicircle bends towards the lower corner of the triangle. Now all that remains is to tighten the thread and the triangle will form a beautiful petal. Fasten the thread. Trim the lower part of the petal evenly and melt it.
This is what happened.
Now you need to make the bow base. To do this, sew the previously prepared pieces of ribbon on the front side, making a slight overlap. Do not cut the thread.
Now fold the blank in half, placing the seam in the center of the future bow.
The next step is winding the thread. Wrap the bow tightly in the middle. Sew several times to secure, bring the thread to the wrong side of the bow. Pin.
Perform the above manipulations with all workpieces. This is what happened.
Now you need to sew bows of the same size from different ribbons, 2 together. Like this.
Now we sew a double bow from two blanks of 18 centimeter ribbons.
Now, onto the resulting double bow, sew the largest black and white bow from 20 centimeter ribbons on top. If it is more convenient for you to work with glue, you can glue the blanks together.
Now let's start creating the frill. Here you will need a glue gun. Glue 3 petal blanks together.
Glue the resulting trio between the top two layers of bows. (see picture).
Similarly, glue 4 more triplets one under the other.
Now we complement the triplets with the remaining petals. This is what happened.
Attach a hair clip to the wrong side.
To disguise the joints of the frill petals, glue a piece of lace to the wrong side.
All that remains is to attach the decoration to the front side and wait until all the glued parts are completely dry.
Next tie
a brooch
from ribbons
is so easy and simple that even beginners can handle it.
Materials for work:
- Ribbon 5 cm wide in white and gray colors. (You can, of course, choose any two you like);
- Brooch pin;
- Needle and thread;
- Lighter or candle;
- Scissors;
- White lace;
- Half beads and pearl colored beads.
You will need 2 pieces of white tape, 20 cm in length, and 2 pieces of gray tape, 18 cm and 28 cm in length.
Now, from two pieces of white and a short piece of gray, make bows in a manner similar to that described in the previous master class. This is what happened.
Now we will make a tie directly from a piece of ribbon 28 cm long.
Place the ribbon with the wrong side facing you and fold it in half so that the ends of the ribbon are perpendicular to each other (see picture).
Fold in half and iron. The result is a tie with a triangular end. Here it is.
All the elements are ready, all that remains is to assemble and decorate.
Sew small pieces of lace to the gray bow. Fasten the white bows into one big one. Now you need to sew a gray blank on top of the white double bow.
From the wrong side, glue the tie itself with hot glue and disguise the junction with lace.
Attach a hairpin.
All that remains is to decorate with beads. Here's how it happened. You can decorate to your liking.
These two wonderful options are suitable for fashionable ladies.
For young gentlemen, we suggest making such a wonderful bow tie
.
Materials for work:
- Satin ribbon 5 cm and 1 cm wide;
- Organza ribbon 4 cm wide;
- Thread and needle;
- Pins;
- Glue;
- Decorative elements and a lock (if you want).
Make two pieces 26 cm long from wide satin and organza ribbons.
Place the organza ribbon face up on the satin ribbon, also face up. Align the edges (if desired, secure with pins). Now you need to melt the edges of the ribbons folded together. Organza is very flammable. So you should melt it carefully. It is important not to overexpose the workpieces, especially if you are working with light-colored materials. You may end up with darkened and “smoky” edges.
Turn the wrong side towards you and connect the melted edges in the middle. You can iron the workpiece with an iron. The sides should overlap slightly (maximum 1 cm).
Pin the workpiece together with a pin and sew along the middle (where the sides are overlapped) with large stitches.
Now you need to tighten the thread and secure it. This is what happened.
All that remains is to assemble the bow tie.
Our master class offers an option for any neck girth, but if you know the parameters of the baby for whom the tie is being made, then be guided by them.
So, the ties.
Cut a piece of about 4 cm from a narrow satin ribbon. It will mask the seam in the center of the butterfly.
Measure the tape needed for tying and apply glue to the center on the front side. Glue the back of the bow to the glue-coated front side of the tie.
Leave until the glue dries completely.
Now apply just a little glue to the center of the 4 cm edge of the ribbon and wrap it around the center of the tie. Pull it tightly enough, but so as not to deform the ribbon and so that it does not wrinkle.
The ribbon bow tie is ready. If desired, the center can be decorated with various fittings.
A tie is an important part of a business wardrobe, a sign of good taste and “importance” of its owner. A good tie costs a lot, so the question of how to sew one with your own hands is always relevant.
This article is intended for persons over 18 years of age
Have you already turned 18?
Making an elegant tie with your own hands: basic tricks
Before you begin the step-by-step production of this popular accessory, you need to decide what exactly you want to get in the end. There are quite a few variations on the theme of a tie, and each type comes with its own master class on how to make it. The most common accessory options are the classic “noose” and an elegant bow tie. But this is not the entire list, because there is a narrow herring tie, a brooch tie, a bolo, a lavalier, a Windsor, and a neckerchief. By the way, many contradictions arise with the latter type of accessory, because the word “tie” itself has French roots and when translated into Russian sounds like “neck scarf”.
Patterning a tie is a simple matter, because it can be done even without special tools and templates at hand. How? - you ask. Yes, it’s very simple - just undo an old unnecessary tie along the seam. It will be the same pattern that you can transfer to the selected fabric.
When preparing, it is important not to forget about the “understudy” fabric. It is needed so that your future product keeps its shape and does not wrinkle with every touch. For the “understudy” role, you can choose regular lining fabric or fleece - these are the most inexpensive and accessible options. You can also buy self-adhesive fabric - friezeline. In order to attach it to the fabric, you just need to apply it to the wrong side of your workpiece with a shiny layer and carefully walk over it with a hot iron. Just a few movements and your product will achieve the desired rigidity.
Sewing a tie is also a very simple process, accessible to even the most inexperienced needlewoman. At the same time, it doesn’t matter at all whether we sew an accessory on a sewing machine or with a hand stitch, the main thing is to know how to fold it beautifully and secure it (and the rest is a matter of technique).
Another important question when sewing a tie (as, in fact, when designing any product) is how to properly prevent unwanted “shrinkage” of the fabric? In order to have an idea of how the sewing material will react to washing and ironing in the future, all these processes should be carried out before cutting it. At this stage, you should know exactly what to prepare for in the future and what you should pay special attention to.
A tie is an everyday wardrobe item; this is very important to consider when choosing what fabric to make this accessory from. Products made from cotton, linen, silk and satin are considered the most practical - these are the fabrics you should choose (for holiday options there are no restrictions on the choice of materials).
Universal accessory: a little history
As mentioned earlier, the word “tie” is of French origin, but it was the British who made the accessory itself world famous. It was with their light hand that it became a very important “status” detail of a business wardrobe. This men's accessory has long ceased to be just an accessory - it is also an indicator of the status and social position of its owner. Even today, neckerchiefs have a fairly wide price range - from several hundred rubles to a couple of thousand dollars.
The popularity of the adult tie was soon repeated by its children's counterpart. Wealthy families sought to buy it for the boy, so that from childhood he would get used to a rather inconvenient but necessary accessory.
After the sexual revolution, which took place in the middle of the last century, women's ties also appeared. Contrary to popular belief, it did not give its owner masculine features. On the contrary, a woman with a “noose” around her neck is always stylish, sexy and a little daring.
Thus, the tie gradually became part of everyday life for almost the entire population of the world. No one now sees anything reprehensible in tying a ribbon for a girl in the form of a tie or an elegant bow tie.
Among all the variety of children's ties that are usually worn to school, I would like to highlight the option with a zipper. Its feature is convenience, because you don’t need to tie it (tighten or loosen the zipper and that’s it). Therefore, if you want to make a convenient school accessory, pay attention to this model. As for the colors of children's ties, these can be either strict blue or black options, or more cheerful colors (from Harry Potter, for example).
How to make a tie out of paper?
If you need to make this popular accessory very urgently or you need it for some kind of competition, then plain paper can be the ideal material. The simplest option is a bow tie made from a napkin. For him, you just need to take a regular napkin, fold it like an accordion and fasten it in the middle.
Products made in the origami style are no less popular. Just a few correct movements - and an elegant tie is in your hands (you can easily find detailed instructions on how to do this on the Internet).
You can also make a herring tie from regular cardboard and elastic. Draw the silhouette of the future product, cut it out, attach an elastic band and... Done!
How to make a tie from ribbon?
Making a fashionable product from a satin ribbon is not only very simple, but also inexpensive, and the result is simply excellent. The uniqueness of this material is that it looks equally beautiful in any version, be it a classic noose, butterfly, brooch or “herring”. Whatever you choose, a product made from satin ribbon will look very dignified. You can also make a cute tie from scraps of satin fabric. However, when sewing a product from this material, do not forget to process the edges - without this manipulation they may “crumble”.
In addition to quite “human” options, ribbon also makes excellent bottle decorations. Cute felt or satin ties can be used to decorate champagne at a wedding or “masculine” drinks at a corporate party. By the way, when preparing a birthday cake for your beloved man (brother, friend, boss), you can also decorate it with a cute mastic tie. It will look incredibly stylish and will definitely please the hero of the occasion.
How to sew a bow tie?
A “butterfly” or bow is a classic form of tie, without which it is impossible to imagine an evening version of a business suit (and not only). It's very simple to make - take a small rectangle of fabric and pull it in the middle. This way you will get a bowtie that can be worn with an elastic band or simply pinned to your shirt with a safety pin. This is the easiest way to make a bow, but far from the only one.
You can use both simple sewing and more complex techniques such as kazanshi and origami. The first option is to compose a whole composition from individual flaps, the second is to obtain the desired result by repeatedly folding the fabric. The Internet is replete with various lessons on the proper use of these techniques.
On the World Wide Web you can also find a pattern for a classic “butterfly”, which you need to tie yourself (similar to a pioneer tie). Many of us know firsthand how to make a beautiful, correct knot for such an accessory - once upon a time, a red piece of fabric was the real pride of a Soviet child.
If you want to stand out from the crowd, try a bolo tie. This is an unusual product made of a thin cord, which is fastened with a large brooch. A bolo can be a great addition to both an everyday look and a festive one - it all depends on the outfit you choose.
The tie will also suit a New Year's suit. For a corporate event, for example, you don’t have to wear a boring office look. For such an occasion, cheerful models for a clown, elegant neckerchiefs for a stewardess, and slightly provocative bows for a dude would be equally appropriate.
Video
The fabric butterfly accessory appeared in the 19th century. It was a satin ribbon around the neck that was tied in the front with a bow. The bow tie, which is cut and sewn from fabric, appeared a little later and remains one of the main men's accessories.
I suggest sewing a man’s bow tie around his neck from an ordinary satin ribbon - firstly, it’s simple, and secondly, the result is no worse than sewing a bow tie using a fabric pattern.
So, before you start the main work, prepare the following materials:
- satin ribbon 3-4 cm wide and 1 meter long
- satin ribbon 1 cm wide and 60 cm long
- scissors
- matches
- glue
- hooks
- thread to match the color of the ribbon
- needle
Video: how to make a butterfly with your own hands
After spending a little time watching several videos, every girl will be able to give her boyfriend, husband or child an excellent handmade gift - a bow tie. Master classes provide detailed instructions on how to correctly make a pattern, sequentially sew all the elements to get the desired product that will decorate any man.
With elastic band
How to sew a butterfly with your own hands
From satin ribbon
A bow tie is a recognized attribute of both women's and men's wardrobes; It is usually made from silk or cotton fabrics; wool is much less common here.
It is also interesting that there are several wearing options: in the classic version, the one who will wear the tie must independently fix it each time, tying a neat knot in the middle, while in the simplified version the tie is already formed at the factory, and all that remains is to secure it at the back using adjustable shirt collar clasps.
However, it is not at all necessary to rush to the nearest clothing store for something new - it will be much more interesting, cheaper and even more original to try to make such a bow tie with your own hands. You should begin work by preparing all the necessary materials according to the list. So, we need:
Satin ribbon of the desired color is comfortable, the width recommended for sewing starts from four centimeters. Length – one meter.
The satin ribbon is narrower, about a centimeter wide - the required length will also be equal to a meter;
Ordinary matches or clear nail polish will be useful to handle the “loose” edges of the ribbons;
A needle (preferably thin), scissors, as well as bobbin or silk threads to match the color of the ribbon;
Hooks, Velcro, buttons or any fastener convenient for you;
Fabric glue – if you don’t like to sew;
Typically, a tie of the type that we will consider in this article consists of two bows - the smaller one is overlapped and secured to the larger one. However, you can make a simpler butterfly - then it will consist of only one bow, tied with a ribbon.
A small digression: the low complexity of the craft here allows you to do without seams, using only glue, but in this case it is recommended to iron improvised “seams”, that is, places of gluing, with an iron at temperatures acceptable for a particular fabric. However, it must also be taken into account that some types of glue may not be intended for heat treatment.
For a tie of two bows, prepare two pieces of ribbon - one shorter (twenty to twenty-five centimeters), the other longer, thirty to forty centimeters long.
If satin ribbons are not found, the butterfly can also be made from nylon, but keep in mind that then all the seams will have to be carefully hidden, because they can be visible through the fabric. If you decide to make a tie from a cotton ribbon or a piece of woolen fabric, then be prepared for the fact that such material may turn out to be quite rough in structure - which means that some difficulties will most likely arise with the drapery.
Having pre-treated the edges with transparent varnish or flame, take a twenty-centimeter piece of tape and fold it in half, matching the ends of the material. The resulting seam should be at the back, so if you see it in front of you, turn the butterfly so the front side is facing you. Using a “forward needle” seam, we assemble exactly in the middle of the workpiece; at the same time, try to overlap and stitch the ends located at the back. Ultimately, the thread will need to be tightened and secured; for strength, you can even wrap the assembly area with thread and glue it. Make sure that the glue is as transparent as possible and does not leave unsightly yellow spots on the fabric. If you don’t have a suitable glue in your arsenal, you can also coat the assembly area with clear nail polish. The large bow is performed in the same way, then the bows are connected by placing the small one on top of the large one. The joint can be either stitched or glued.
Advice
:
If you decide to make a simple bow tie from ribbons with your own hands, then you may need a ribbon a little wider, say, five to six centimeters wide.
It is recommended to make the assembly more magnificent: to do this, by making one seam “forward with the needle”, you need to make two arched seams on each side, as shown in the picture: Prepare a narrow ribbon, a centimeter wide - it will act as a base that holds the butterfly and fits under the shirt collar. The length here is selected based on your own measurements, plus a few centimeters in case you plan to attach adjustable fasteners.
The edges to which convenient fasteners will be sewn must not only be singed or varnished, but also strengthened. This can be done in several ways: the tape is slightly bent and stitched close to the edge; if desired, you can sew a square of fabric whose edges do not fray. It could be felt, drape or even a leather substitute.
Cut about three to four centimeters from the wide ribbon. We will need this piece to cover the assembly point on the small bow; the required length should not be selected end-to-end, but taking into account the fact that the butterfly will move along the tape if necessary. However, if you want to leave the tie static, you can simply sew it to the ribbon, but in this case you will have to very accurately calculate its position on the neck.
The ends of a piece of ribbon are sewn into a ring at the back, and thus the tie can move freely along the ribbon.