Kanzashi maple leaf. Master class with photos
DIY brooch “Maple leaf”. Master class with step-by-step photos
The master class is addressed to educators and parents.
Goal: to make an original and elegant autumn accessory. Such a leaf will help create a good mood on gloomy autumn days. This maple leaf can be a wonderful interior decoration, an attribute for autumn dancing, a decoration for a hat or a brooch. For this we need:
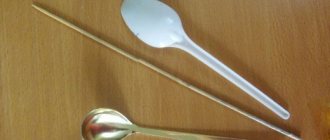
Satin ribbon (yellow / red / orange) (width – 5 cm, length – 85 cm);
Brocade ribbon (gold) (width – 5 cm, length – 30 cm) Decorative cord (7 cm) Scissors Pin (for brooch) Ruler Glue (hot gun and glue for it) Bead (for the middle of the leaf) Candle Tweezers Step-by- step process making a maple leaf from satin ribbon
We cut the satin ribbon into squares (5x5), singe the edges over a candle so that they do not crumble
Making a triangle from a square
We put 2 corners adjacent to the long side together...
And we burn the folded corner over the candle
There should be a total of 17 satin petals.
We make the same petals from brocade ribbon (6 pieces)
We take a satin petal and “put” a brocade petal into it. Thus, we get a double petal
For our maple leaf you need to make 6 double petals
Now 6 double petals need to be glued together in a circle. You will get a flower that will be the basis of our leaf.
From the remaining satin petals we make 3 “branches”. To do this, glue two petals and glue a third one between them.
We proceed to the final assembly of the leaf: we glue 3 “branches” into adjacent spaces between the petals of the base flower
On both sides of the glued “twigs”, between the petals of the flower, glue one satin leaf
In the remaining unused space between the petals of the base flower we glue a decorative cord that imitates a leaf stalk
If the maple leaf is to be a brooch, then glue a pin on the back side and cover the gluing area with a piece of satin ribbon
Glue a bead into the center of the base flower
Our maple leaf is ready!!!
We recommend watching:
DIY hair decoration using the kanzashi technique. Master class Kanzashi sunflower. Master class Painting using kanzashi technique “Violets”. Master class with step-by-step photos Firebird using the kanzashi technique. Master class with step-by-step photos
Similar articles:
Kanzashi headband. Master Class
Kanzashi. Chamomile flowers. Master class for beginners
Leaves, stems and fruits of fabric flowers
About making flowers and stamens from fabric.
Making leaves
The leaves are cut out according to a template or cut out from starched fabric along an oblique line. Immediately cut out the cloves - sharp or semicircular, depending on the plant.
Next, all leaves, even those of different shapes, are made according to the same principle: a central vein made of soft thin wire is glued to them from the underside of the leaf blade. This makes it possible to give the leaves any shape. The wire should extend beyond the leaf plate to a length of 1–4 cm - this will be the petiole by which the leaf is attached to the stem.
The wire is first wrapped in light green, yellow or brown tissue paper, cloth, or wrapped in a thin layer of pre-dyed cotton wool. At the end of the wire that will be attached to the stem, the paper or cotton winding should protrude beyond the end of the wire, so that later it will be easier to glue the sheet to the stem and hide the attachment point. The core wire coated with glue is placed strictly in the center of the sheet and ironed with an iron. If the material is very thin, then the sheet is made double, in which case the wire will be inside it (for example, in an iris sheet).
Stem processing
Most flowers are harvested through the stem by holding the flower head down and threading the corolla and calyx onto a wire. After this, the wire is turned into a stem: it is greased with glue and a strip of paper or thin fabric is carefully wound around it.
It is convenient to cut tissue paper for wrapping the stem into long strips 4–8 mm wide without unrolling the roll.
The fabric is cut into strips on the bias - as shown in the picture on the left. It's good if the paper or fabric is green, but you can also paint the stem after you wrap it and the glue dries. For some flowers (tulip), the stem must be dense, and then a thin layer of cotton wool is wound onto the wire under the winding. Poppy stems are characterized by hairiness, which can be achieved by wrapping the wire with a thin layer of colored cotton wool soaked in glue. The cotton wool needs to be fluffed into thin fibers without lumps and sequentially wound on the wire.
Making fruits
The fruits for each plant are made individually, and this is discussed below. The fruits of many plants have a smooth and shiny surface. To make rosehips or poppy pods look like real ones, they must be waxed with wax or paraffin. To do this, wax is diluted in a steam bath and, with a bristled brush, applied while still hot to the finished workpiece (see Poppy, Rosehip
). Smooth the wax with your fingers, trying to form the correct shape of the fruit. When the wax has completely hardened (the workpiece can be put in the refrigerator), the rose hips should be covered with one light layer of topcoat varnish for furniture or pistachio varnish for painting.
On the right in the photographs are boules for making fabric flowers.
An interesting technique exists for making shiny pepper pods, such as red peppers, to decorate the kitchen. You can, as in the case of rose hips, coat the glued pieces with varnish, but it is easier to make peppers differently. Using a rubber roller (for rolling photographs onto glass), PVA glue is rolled into a thin layer onto a piece of clean glass. A red plain fabric (chintz, satin) is placed on the adhesive surface and smoothed with hands or a dry roller so that there are no folds or wrinkles.
Start rolling and smoothing the fabric from one edge.
Then the fabric is allowed to dry and only then is it torn off from the glass. On one side, it will have a smooth and shiny surface, completely imitating the texture of pepper. All that remains is to cut out and glue the cone-shaped fruits. It is advisable that the fabric be of several colors: scarlet, red and dark red, so that your “bundle” of peppers looks more colorful.
We create autumn crafts with our own hands according to instructions with photos
Autumn is not a dull time, but a wonderful time for crafts
Autumn leaves of various shapes and are a wonderful handmade material. Below we will consider the option of making Japanese lanterns from them.
Take film, translucent medapol or cambric as a basis. Using the last two, your flashlight will have an authentic Japanese look, just don’t forget to give this material additional strength.
Before starting production you must have :
- medium-density semi-matte film with medium density (2 pcs.). You must choose the size yourself, taking into account a margin of one centimeter on each edge;
- double-sided tape;
- matting mesh (easy to purchase at flower shops);
- PVA glue;
- bast (decorative);
- beads;
- dense but thin yarn;
- a base for a spherical lantern made of thin plastic and with sides, which can be purchased in specialized stores or made independently. Then you need to draw a circle on a thick white film, the diameter of which should be equal to the length of the workpiece (without allowances) divided by 3.14. After this, we place it in a circle that will be 4 centimeters larger. We cut the resulting 2-centimeter rim in a circle with scissors as often as possible. Then we wrap it towards the center, thus forming a side and fixing it with plastic tape around the perimeter using glue. To enhance strength, you can glue a similar tape inside;
- the rim that will fasten the top of the Japanese lantern should be purchased in a specialized store or made independently, based on the above method, cutting out an even circle at the base with a centimeter gap around the perimeter;
- wire;
- metal candle holder;
- small-format autumn foliage, dried like a herbarium, in the book;
- awl;
- brush;
- pencil;
- pliers;
- scissors.
And now we will tell you step by step the process of making our flashlight.
Stage 1. Decorative design of the lampshade.
From the variety of collected leaves, choose the ones that suit you best and place them on the film. Then we coat each leaf with glue and fix it on film. If the glue has dried sufficiently and the leaves are firmly attached to the base, take the second film and squeeze it into a tight ball. This is done to achieve the effect of crinkled rice paper inherent in Chinese and Japanese lanterns.
Stage 2. Forming a flashlight.
Roll the lantern blank into a roll, secure it with glue and allow time to dry.
Measure the distance between the candle mounts and in the center of the base of our lantern, pierce two holes with the same distance with an awl. Insert the fastener into the base and press it together, as shown in the photo below.
Using double-sided tape, wrap the edge at the base, and then trim off the excess. We gradually fix the main part of the flashlight onto the same tape, while unscrewing the tape. In the same way we secure the upper part of the canvas to the upper rim.
Stage 3. Final decoration of the Japanese lantern.
Let's start cutting out a strip of mesh for the matting, which should be two centimeters wide and the required length. Secure them with double-sided tape and make a lower base with a fastening rim at the top of the flashlight. In a similar way, remove the yellow film and gradually attach the matting.
In accordance with our author's idea, we tie our flashlight with yarn and bast. We fix the slings and decorative beads with glue. Finally, using pliers and an awl, we attach the handle, which can also be decorated with beads.
Now you can see what an elegant flashlight we should get. Light a small flat candle and make sure that what you made with your own hands is truly beautiful.
For those who do not have enough free time, we can offer a simpler option.
Glue the outside of a small glass jar with collected autumn leaves using PVA glue. Place a candle inside and the lantern is ready!
Materials for work
If you are just starting to immerse yourself in the atmosphere of the world of kanzashi, you should watch several video tutorials on making any elements. This will make it easier for you to master all the intricacies of this science, and over time you will be able not only to follow professional master classes, but also to experiment, succumbing to a surge of inspiration.
To complete sheets of any level of complexity you will need the following materials:
- Ribbons or fabric cut into squares or rectangles;
- Scissors;
- Glue gun;
- Lighter, candle or small soldering iron;
- Wire, if you need to form a twig from the leaves;
- Tweezers.
The simplest kanzashi leaves
Beginners will really enjoy the technique, which does not require folding the tape. Using a sample prepared in advance, you need to cut out the required number of leaves, and then use a candle to carefully process the edges. You can stop there, but if you want to add texture, you can use tweezers and fire to form veins.
First, use a chalk or a special pencil to draw the future veins, and then carefully secure a small section of fabric with tweezers and quickly move it over the fire. For more confident execution, you can look at the corresponding MK.
What types of leaves are there?
There are several types of both petals and leaves. For beginners, easy-to-make leaves are suitable, but craftswomen, using the technique of folding ribbons or individual pieces of fabric, can create leaves that at first glance cannot be distinguished from real ones. They can have different shapes:
- Oval;
- Pointed;
- Volumetric;
- Flat with or without veins.
Although in most cases the leaves are made from green ribbons, some models may require foliage of a different color.
As you may have guessed, when choosing a color, your limitless imagination plays a decisive role.
Sewing master class
In order to sew flowers onto curtains with your own hands, different techniques are used. When using thick fabrics, it is recommended to prepare them first: wash, dry, iron - to prevent shrinkage of the finished product. Soft tissues are starched or treated in a gelatin solution. You can sew a rose from fabric in a few steps in half an hour.
Related article: Calculation of cable length for electrical wiring
- Prepare a light fabric - silk, satin, organza or veil.
- Cut 10 squares from fabric:
| Square side length, cm | Number of squares, pcs. |
| 7 | 1 |
| 8 | 2 |
| 9 | 1 |
| 10 | 2 |
| 11 | 1 |
| 12 | 2 |
| 13 | 1 |
| Total | 10 squares |
- Having reached the middle, attach the third element and continue sewing all the remaining elements in the same way.
- Sew the second half of the first petal with the combined first half of the second petal.
- Having reached the middle of the semicircle, place a second petal folded in the same way on top: with the sharp tip towards the middle of the semicircle.
- Holding the sole, sew with a simple stitch in a semicircle, moving from right to left. Make the stitch at a distance of 0.5 cm from the edge.
- Sewing the petals starts with the smallest ones. Fold it diagonally with the wrong side inward.
- Fold each square diagonally to form a triangle. Holding it by the “sole” with the corner up, cut off the corner, making a “boat” out of the triangle. The result will be 10 boat petals.
- When all the parts are assembled and the last petal is sewn, form a rose - gather the petals by pulling the thread.
- Fix the base with glue or hand stitches, making sure that the middle does not fall out.
- Make leaves: cut out squares with a side of 13 cm, fold diagonally 2 times, tighten the bottom with thread, sewing with a simple stitch.
- Collect the flower with leaves, securing the latter with thread or glue at the base of the rose.
- Sew roses for the curtains in the quantity provided for by the design plan, repeating the entire process.
Flowers made from thick fabric for curtains look original. For them, you can use heavy curtain fabric, from which curtains are made or colors with a “negative” effect. Features of working with such matter:
- there is a back and front side, on the back it is convenient to draw the contours of the pattern, without fear that they will be “illuminated”;
- the cut edges must be melted with a candle so that the fibers do not fall out;
- the fabric holds its shape very well, there is no need to starch them - just cut out the parts, stitch them, pull them together and, having assembled them, make a flower for the curtains.
WATCH VIDEO INSTRUCTIONS
Before sewing flowers for curtains from soft fabrics - viscose, calico, cambric, crepe de Chine - the material is starched or processed in gelatin at the rate of three teaspoons per glass of water. The gelatin is softened in a water bath, and the fabric is dipped into the hot solution. Without squeezing or twisting, remove excess solution from the fabric, dry it, smoothing it well with your hands. After this treatment, flowers on curtains or tiebacks keep their shape perfectly. It is better to starch cotton and velvet fabrics: dissolve a tablespoon of starch in a glass of cold water, pour it into a glass of boiling water.
It’s a good idea to remember the rule: thin fabric is treated in a saturated solution of gelatin or starch, and thick fabric in a weakly concentrated solution.
Anyone can make flowers for curtains with their own hands - this is a great idea to diversify the interior, giving it originality. The creative process brings a lot of positivity and positive emotions into life.
LiveInternetLiveInternet
Girls) I found these gorgeous fabric flowers, I liked them so much that I went looking for material based on the technology for making them. Maybe someone will find it useful and you can create such beauty yourself
You can decorate not only a hat with a bag with fabric flowers; they will make an excellent fashion accessory for hair or clothing. You can simply put them in a vase and decorate the interior of your home. By using different shades of fabric, you can create very beautiful flower bouquets and, with the same success, give them for the upcoming holiday. Do you like fruit bouquets rather than floral ones? They are not only amazingly beautiful, but also the most delicious) An excellent solution for a sweet gift and decorating a festive table setting is offered to us by the carving studio “Nimble Cook” - Fruit bouquets to order St. Petersburg. On the studio’s website you can view a huge catalog of fruit compositions and order what you like at a tempting discount)
Here is the pattern for these colors:
And the necessary tools
Flower making technology
To make a flower that is as close to real as possible, you need to at least look at it to understand its structure. Some books even advise taking a living flower apart, drying the parts and making patterns from them. But it's somehow cruel. Moreover, the color of the flower and its image are very important - after all, many flowers are very similar in structure, but at the same time we can always distinguish an aster from a chrysanthemum or “golden ball”.
Most ornamental plants consist of a stem, with or without leaves, that is topped by the head of the flower itself. A flower consists of petals that form a corolla, as well as stamens and a pistil (ovary). The flower head, as a rule, has a cup at the point of attachment to the stem, which facilitates the assembly of the artificial flower. But in flowers such as tulip, lily, poppy, the corolla does not have a cup and is attached directly to the stem, then the fastening must be done from the inside.
The stem may be single or have several branches, be straight or twisting, and may have thorns. The technology for creating artificial flowers is not very complicated. To make a flower, select the appropriate fabric, from which the parts are cut out according to the pattern. If the fabric is colored, then it is slightly tinted, but if it is white, then it is dyed with aniline or other dyes in the desired color. Then the parts are gelatinized, dried and corrugated. A flower is assembled from ready-made parts on a wire stem.
The corolla petals, calyx and leaves are cut out according to the pattern. Patterns for each flower are made from thick cardboard. The contours of the part are traced along the pattern on the fabric with a sharp piece of soap or a pencil, preferably of a similar color to the color of the part. The pattern is laid out on the fabric strictly along an oblique line. To avoid contamination and creases, it is better to store prepared parts of flowers and leaves in paper envelopes or candy boxes.
In order for fabric parts to keep their shape, they need to be starched. Only dry, dyed and ironed fabric is treated with a solution of gelatin or starch. Natural and artificial silks, calicoes, satins, satins are starched with edible gelatin, some cotton fabrics and velvet are starched with gelatin or potato starch.
Gelatin is prepared as follows: 3 teaspoons of gelatin are poured with cold water (200 ml) and left for at least 1 hour. Then the resulting solution is poured into a tin container, placed in a water bath (in a large bowl of water) and heated, stirring constantly. As with starch, gelatin should not be boiled.
You can prepare gelatin in a more traditional way: 3-4 tablespoons of finely chopped gelatin (or 2-3 sheets of leaf gelatin) are poured into 1.2 cups of cold water and allowed to stand and swell for 50 minutes. Then pour 1.2 cups of boiling water into the swollen gelatin and stir quickly. If the gelatin is old and not completely dissolved, then it is heated in a steam bath. The given gelatin recipe is designed for starching natural silk.
For dense fabrics - viscose, chintz - a weaker solution of gelatin is required, and for nylon, cambric, crepe de Chine - a more saturated one. The thinner the fabric, the more gelatin it will require. Velvet fabrics are carefully covered with gelatin only from the wrong side (with a flute, a cotton swab, or simply with your hands). Gelatin should not get on the fleecy (front) side of the velvet. This is done by weight, and small pieces of velvet fabric are gelatinized on a clothes brush, placing the fabric face down on the bristles. After the fabric has dried, it is carefully ironed, also suspended.
Other fabrics are dipped dry into a hot gelatin solution and squeezed through fingers to remove excess gelatin. Dry starched fabrics in a hoop, on a frame, or, after straightening and smoothing them well with your hands, on a rope. The fabric should not be wrung out or twisted.
A well-made fabric should rustle. If there was not enough gelatin or it turned out to be of poor quality, then the fabric does not hold the desired shape well, and its edges become shaggy. If the concentration of gelatin is too strong, then creases form on the fabric, like on paper, and it is also unsuitable for work. If you unsuccessfully treated the fabric with gelatin (too weakly or too strongly), do not be discouraged, but simply soak the fabric in cold water, wash it and repeat the process of treating the fabric with gelatin again. Starch is prepared in the following way: 1 tablespoon of potato flour is diluted in 1.2 cups of cold water and poured into a glass of boiling water, stirring the resulting mixture thoroughly. If lumps form, strain the jelly through cheesecloth. A dry cloth is dipped in starch, moistened in it and straightened, removing lumps. You can lay out a dry cloth on a table (covered with oilcloth) and apply a thin layer of starch on it with a flute. Place a second one on the first piece and also grease it with starch, then a third and so on. Then the flaps, one at a time, without squeezing, are hung on a rope. You can also dry starched fabric on a hoop or on a frame on which the damp fabric is secured, preferably with copper nails.
The stamens and pistil give flowers a special charm. All flowers are different, and often it is thanks to the elegantly made artificial stamens that the living feeling of the flower is created. When working on a flower, you need not only to recreate the exact outline of the petals of the corolla, but also try to convey the character and location of the stamens and pistil in the flower. Stamens are mainly made from threads, plain 10 or silk. This is done like this: on a flat strip of cardboard (or on the fingers of the left hand, or on two pencils) starched threads are wound in the amount of stamens needed. Then the threads are removed from the cardboard, tied in the middle and cut on both sides to the desired length. You can cut the threads directly on the cardboard.
To make pollen, the ends of the stamens are dipped 0.5 mm in PVA glue and then dipped in semolina, white or tinted. The tips of large stamens (lilies) can be dipped in paraffin or wax. If you need dark anthers, then you need to dip them in the old fashioned way in sealing wax or several times in PVA glue painted in the desired color, each time drying the layer so that the drop becomes embossed. Some small flowers require colored, sometimes variegated, bicolor stamens, for example white and black. They can be made from appropriately dyed fabric. The fabric is pinched into threads, which are soaked in glue and dried on glass (it is easier to tear them off than from paper). Then the threads are collected into a bundle according to color, so that the white ends are with white, and the black ends are with black (or vice versa), and trimmed to the desired length. This is how you can make dark blue stamens with white tips for cornflowers.
You can use waxed white paper, tissue paper, or colored carbon paper to make stamens for oriental poppies or lilies. The pistil of flowers can be very diverse: round ovary (poppy), oblong (tulip), three curls (bell). How to make a pestle will be discussed below, specifically for each flower.
The leaves are cut out according to a template or cut out from starched fabric along an oblique line. Immediately cut out the cloves - sharp or semicircular, depending on the plant.
Next, all leaves, even those of different shapes, are made according to the same principle: a central vein made of soft thin wire is glued to them from the underside of the leaf blade. This makes it possible to give the leaves any shape. The wire should extend beyond the leaf plate to a length of 1–4 cm - this will be the petiole by which the leaf is attached to the stem.
The wire is first wrapped in light green, yellow or brown tissue paper, cloth, or wrapped in a thin layer of pre-dyed cotton wool. At the end of the wire that will be attached to the stem, the paper or cotton winding should protrude beyond the end of the wire, so that later it will be easier to glue the sheet to the stem and hide the attachment point. The core wire coated with glue is placed strictly in the center of the sheet and ironed with an iron. If the material is very thin, then the sheet is made double, in which case the wire will be inside it (for example, in an iris sheet).
Most flowers are harvested through the stem by holding the flower head down and threading the corolla and calyx onto a wire. After this, the wire is turned into a stem: it is greased with glue and a strip of paper or thin fabric is carefully wound around it.
It is convenient to cut tissue paper for wrapping the stem into long strips 4–8 mm wide without unrolling the roll.
The fabric is cut into strips on the bias. It's good if the paper or fabric is green, but you can also paint the stem after you wrap it and the glue dries. For some flowers (tulip), the stem must be dense, and then a thin layer of cotton wool is wound onto the wire under the winding. Poppy stems are characterized by hairiness, which can be achieved by wrapping the wire with a thin layer of colored cotton wool soaked in glue. The cotton wool needs to be fluffed into thin fibers without lumps and sequentially wound on the wire.
Carefully cut and finely colored petals and leaves won't look alive until you give them shape. Using tools - boules and cutters - the petals are given volume, the edge is beautifully corrugated, the veins on the leaves and the central vein on the flower are applied. Some petals, such as poppies, are crimped by hand, which gives the petals a softer, more discreet shape.
Before you start corrugating the petals, corollas and calyxes, you need to make all the necessary holes in the middle or at the joints with an awl, so as not to damage or crumple the applied corrugation later.
Before corrugating, it is better to slightly moisten parts made of dense fabrics. To do this, wrap the part in slightly damp gauze for a couple of minutes.
For each fabric, it is necessary to select its own heating mode for the bulk, since a part made of synthetic fabric can melt, while a part made of thick fabric cannot be processed. The heated boule is held vertically and, pressing on the fabric, makes rotational movements with it. They work with a bubble on all three pillows, depending on the flower manufacturing technology. It is necessary to ensure that folds and creases do not form on the fabric. If a crease has formed, it can be eliminated by smoothing the fabric with a bulge on a hard rubber pad. If the defect cannot be removed, the part is soaked or replaced.
Corrugation of the corolla. Using heated loaves of different sizes, the petals are given a convex shape. The already painted petal is placed on a cushion of sand and pressed with a hot boule in the place where the bulge should be. Large boules make central, single indentations (tea rose), and small boules make dents at the base of the petal (poppy) or soft corrugation along the edges (iris), when fan-shaped strips are drawn from the center of the petal with a hot boule to the edges. For a rose, the inner side of the petal is treated with a bulk, while for an iris, the outer side is treated. To prevent scorch from forming on the fabric, the hot boule is first tasted on a piece of fabric from which the petals are made.
Basic techniques for processing the rim
The edges of some petals are corrugated using heated cutters: single (camellia), double-row (poppy) or three-row (clematis).
Orchid petals can be crimped with your hands through gauze. It is better to do this at the edge of the table. Several petals are folded together, bent in the middle and wrapped in gauze. With your left hand you press the petals in gauze to the table, and with your right hand you pull and twist the gauze. Corrugation of leaves. First, a central vein is made on the leaf. To do this, heat a double-row cutter and run it along the front side of the leaf blade, making grooves on both sides of the glued wire. Then a single cutter is heated and lateral veins are made, starting from the central vein to the edges. Moreover, in the center of the sheet you should press the cutter harder, and towards the edge - as if to reduce the vein to nothing. Basically, the lateral veins extend from the central vein at an angle of 30 degrees and are directed upward.
Basic techniques for corrugating leaves
If this is part of the task, then with a single cutter you can make thin branches from the lateral veins.
After all the veins have been applied and the leaf blade has cooled, the leaf is ironed from the wrong side with a not very hot iron (hook).
Based on the given patterns of the most popular flowers, you can make other plants that interest you according to the principle and similarity. Flowers made of leather, nylon and paper are made using the same patterns. And even if you are planning to make a “fantasy” flower, then it is better to correlate it with a real plant.
Based on materials from fermer1.ru/tekhnologiya-izgotovleniya-tsvetov-dekorativnye-tsvety-iz-tkani
Marrietta's inspiration