Due to their dress code, costume parties (Halloween, etc.) require first-class costumes. In addition, at such holidays there are usually competitions for the best, most detailed superhero costume. Who wouldn’t be pleased to take part in such a competition dressed as their favorite hero?
I present to your attention an article on how to do
DIY Optimus Prime costume
.
Necessary materials:
- Hot glue gun + rods for it;
- Adhesive tape (red, gray);
- Masking tape;
- Rulers of different sizes;
- Stationery knife;
- Scissors;
- Aerosol paints (primer, red, blue, white and silver);
- 4 mini flashlights;
- Helmet;
- Velcro;
- Cardboard or foam board;
- 2 empty tin cans;
- 2 plastic “visors” (for windshields);
- Hockey gloves;
- PVC pipes.
Amazing crafts from matchboxes
You can make many different crafts with your children from waste materials. Such creativity develops children's fine motor skills, imagination, spatial thinking, design and modeling skills, etc.
What crafts can be made with children or for children from matchboxes? Usually a mini-dresser and 2-3 other ideas come to mind. But it turns out that you can make very interesting toys from matchboxes. For example, robots and cars, and also transforming toys.
These crafts made from waste material (matchboxes) are more suitable for boys, but my daughter and I really liked them!
Crafts robots and transformers from matchboxes
A samurai craft made from matchboxes glued together and covered with colored paper (or even simpler -). The samurai's swords are made of cardboard, attached to the box hands with ordinary paper clips, so they can be easily removed and attached in place.
Made from 14 matchboxes, this adorable yellow transformable robot can turn into a car.
The red fire truck can transform into a robot and back.
And this transforming toy can turn, in addition to the robot, into two different models.
The video makes it clearer how this happens. Amazing, right?
And in this video there is another transforming robot, it is not in the photo.
About creating these crafts from matchboxes and other waste materials
Sergei replied that he used to be interested in modeling - gluing together models of military equipment. After they became more expensive, I began to come up with my own models from matchboxes and lids, because... This is a waste material that requires almost no material costs.
Once during his vacation, when he had a lot of free time, Sergei began making robots from matchboxes. Then he complicated them until he started to get transformers. Gradually I began to make crafts not only from matchboxes, but also from lids and other waste materials.
The first matchbox craft was this robot. Then other robots, transformers, cars and even a dinosaur appeared.
What you might need
Before you start making a robot from boxes with your own hands, make sure that you have prepared all the tools that you may need during the work:
To ensure that your work brings you only joy, read these simple tips:
- Do not glue boxes to each other using PVA glue - it soaks the cardboard and does not allow the product to stick well. Also, do not resort to using a glue stick - it is too unreliable. The optimal solution would be glue - moment or glue gun.
- Allow the water-based paint coat to dry thoroughly before spray-painting the piece.
- Treat your robot with spray paint only on the street, balcony or in the entrance to prevent inhaling large amounts of harmful fumes.
Vibrating bug
How to make a small robot? At home, you can make the simplest version of a vibrating bug. You need to stock up on the following materials:
- a motor from an old children's car;
- lithium battery CR-2032 series, similar to a tablet;
- a holder for this very tablet;
- paper clips;
- electrical tape;
- soldering iron;
- LED.
First you need to wrap the LED with electrical tape, leaving free ends. Using a soldering iron, solder one LED end to the back wall of the battery holder. We solder the remaining tip to the contact of the motor from the machine. The paper clips will serve as legs for the vibrating bug. The wires from the battery holder are connected to the motor wires. The bug will vibrate and move after the holder comes into contact with the battery itself.
Robot, like in advertising
Many people are probably familiar with the browser's commercial, in which the main character is a small robot spinning and drawing shapes on paper with felt-tip pens. How to make a robot at home from this advertisement? Yes, very simple. To create such an automated cute toy, you need to stock up on:
- three felt-tip pens;
- thick cardboard or plastic;
- motor;
- round battery;
- foil or electrical tape;
- glue.
So, we create a form for the robot from plastic or cardboard (more precisely, we cut it out). It is necessary to make a triangular shape with rounded corners. In each corner we make a small hole into which a felt-tip pen can fit. We make one hole near the center of the triangle for the motor. We get 4 holes around the entire perimeter of a triangular shape.
Then insert the markers one by one into the holes made. A battery must be attached to the motor. This can be done using glue and foil or electrical tape. In order for the motor to stay firmly on the robot, it is necessary to fix it with a small amount of glue.
The robot will move only after connecting the second wire to the attached battery.
Cardboard robot
How to make a robot at home if a child demands it? You can come up with an interesting toy from simple cardboard.
You need to stock up:
- two cardboard boxes;
- 20 plastic bottle caps;
- wire;
- with tape.
It happens that dad wants to make some kind of wonder for the baby, but nothing sensible comes to mind. Therefore, you can think about how to make a real robot at home.
First you need to use the box as a body for the robot and cut out the bottom of it. Then you need to make 5 holes: under the head, for the arms and legs. In the box intended for the head, you need to make one hole that will help connect it to the body. Wire is used to hold the robot parts together.
After attaching the head, you need to think about how to make a robot arm at home. To do this, a wire is inserted into the side holes, onto which plastic covers are placed. We get movable arms. We do the same with our legs. You can make holes in the lids with an awl.
To ensure the stability of the cardboard robot, careful attention must be paid to the cuts. They give the toy a good appearance. It is difficult to connect all the parts if the cut line is incorrect.
If you decide to glue boxes together, do not overdo it with the amount of glue. It is better to use durable cardboard or paper.
We make various robots with our own hands in step-by-step master classes
Crochet robot Bibi.
One of the cutest and funniest characters is the robot Bibi from everyone’s favorite “Smeshariki”.
It’s easy to crochet a round figure using leftover multi-colored yarn. Necessary materials:
- acrylic or cotton yarn in yellow and turquoise, as well as some black, brown, green and red threads;
- a hook of a suitable size;
- padding polyester;
- cardboard;
- wire;
- needle;
- scissors.
Operating procedure.
Using yellow threads, we cast on two loops and close them into a ring, tying it with 6 single crochets. In the second row we knit 12 single crochets, then in each row we evenly add 6 stitches. From rows 9 to 16 we knit without increases; each row should have 48 stitches. From the 17th row we decrease the loops in the reverse order until we get a round piece. As you knit, fill the part with padding polyester.
Let's start knitting the body. For one part, we cast on two air loops with turquoise threads, close them into a ring and tie it with 6 single crochets. In the second row we knit 12 single crochets. In the third and subsequent rows we make uniform increases of 6 columns, alternating classic and embossed columns. In the 9th row we knit the last increase, you should get 54 single crochets. We knit the next row without increasing, then we tie the workpiece with half-columns, inserting the hook behind the back wall of the loops. In the 12th row we alternate 2 single crochets, a bump of 4 unfinished double crochets and 8 single crochets. Then, in the 13th row, we tie the resulting hemisphere with single crochets and break the thread. We knit the second part in the same way. You can use other body knitting patterns.
We assemble the yellow base and body parts, leaving space for the eyes.
We knit randomly shaped handles from turquoise threads and attach them to the body. Then we knit wheels, an antenna, decorative keys and light bulbs, and eyes from scraps of thread. We sew the details to the figure, embroider the pupils and highlights on the eyes. First insert the wire into the antenna and twist it into a spiral. We cut the threads and carefully thread them. Robot Bibi is ready! Soft toy made of felt.
Who said that a robot must be made of metal and plastic or, at worst, cardboard? A funny robot girl made of felt can easily replace a soft toy or a miniature amigurumi figurine.
To make a small amigurumi-style toy from soft felt or fleece, cut out square pieces of the following sizes:
- 4.5 cm for the torso;
- 3.5 cm for the head;
- 2.0 cm for legs;
- 1.5 cm for hands.
For each part of the body you will need 6 squares. If desired, the dimensions of the blanks can be significantly increased so that you can sew a large soft toy.
We cut out blanks without allowances or with minimal allowances of 1-2 mm. Sew the pieces together on each side using a running stitch until you get a cube. Before sewing the last side, we fill the workpiece with synthetic fluff or other filler. We make sure that the filler fibers do not stick out along the edges of the cube; if necessary, trim off the excess.
In a similar way, we sew together all parts of the body of the future robot and connect them together with a needle and thread or a glue gun.
We sew on eyes from half beads, embroider eyelashes, and, if desired, sew on a bow and other decorations. The miniature figurine can be decorated as a refrigerator magnet, keychain or brooch. Robot made from boxes.
A funny and very cute robot is made from unnecessary boxes. You can use whole boxes to make a large product, or scraps of corrugated cardboard boxes to make a miniature figurine.
To make a small robot out of boxes, you can use the following template.
We transfer the pattern of the required size to the cardboard and carefully fold the parts along the fold lines. To avoid the formation of torn creases and folds, you should use a stationery knife. In the part for the head, we carefully make slits in the form of eyes and a nose; if desired, the shape of the holes can be modified. We glue all the allowances together using PVA or Moment glue and assemble the figure, starting with the body. The arms and legs can be made to be hinged so they can move.
If you have ready-made neat and clean boxes of the appropriate size, you can use them.
This method is perfect for beginners. In a similar way, you can make a robot from other, more durable materials - wood or plywood. In this case, it is necessary to cut blanks of the required size from plywood, sand the edges and glue them into cubes using adhesive tape. Further assembly is carried out by analogy with a figure made of cardboard or ready-made boxes. Matchbox robot.
A simple and cute robot can be made from matchboxes.
To make this craft you will need 9 matchboxes, colored paper and glue.
Cover five boxes for arms, legs and head with colored paper, and on the blank for the head draw an image of a face with a black marker. Glue the four remaining boxes together and cover the resulting blank with colored paper. Assemble the robot and, if desired, decorate it: make antennas from matches or sticks, stick or draw additional elements. Robot made from cigarette packs.
A classic craft from our childhood is a robot made from a pack of cigarettes. To make it you will need several empty packs and glue.
We assemble a body from 8 packs, glue the head on top, placing the cigarette packs perpendicular to the body.
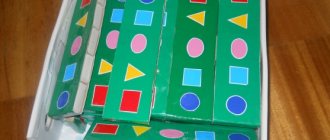
We use the lids to make ears and a mouth. We assemble the legs from three packs each and place the body with the head glued on them. From two packs we make an arm bent at the elbow. We glue the handles to the body in the places where the lids are. We decorate the robot's face and make eyes and antennae from pieces of cardboard. Application of geometric shapes.
Even kids can easily cope with making a robot image - a fun applique of geometric shapes.
It is necessary to draw and cut out geometric shapes of different shapes and sizes in advance: circles, rectangles, squares, triangles.
Using PVA glue or a glue stick, together with the child, glue the figures onto a sheet of paper so that you get an image of a robot. Use a marker to add small details or decorate the background. This work will teach kids to navigate colors, sizes and shapes, and develop fine motor skills. “Robot” earrings made of wire.
In the shape of a robot, you can make an unusual decoration - original earrings made of wire and large beads.
We cut the wire into pieces of the same size and make tight spirals out of them, winding them onto a rod or thin tube.
We make a head out of wire, four spirals and two white or silver beads, thread the ends of the wire into a large colored bead and bend it to the sides to form arms. For each hand you will need two spirals and four small beads. Having folded the hands of the robot, we begin to form the torso and legs. To do this, we again pass the ends of the wire through a large colored bead and make legs consisting of two spirals and a small bead each. Fasten and cut the wire. We make the second earring in the same way and attach the earrings. Robot made from plastic bottles.
You can make a wide variety of crafts from waste materials. A very unusual and original robot figurine is made from plastic bottles.
In order to make such a robot, you need to use a stationery knife to cut off the neck and bottom of the bottle for the body, and also cut out shaped parts for the arms and legs.
We will use lids and other parts from plastic containers as decorative elements and fastenings. Using an awl, we make holes in the right places and connect all the pieces with wire. We fasten the wire and hide it inside the figure. Robot made from mastic.
An edible robot can be made from fondant and used to decorate a cake for a children's party.
To make such a figurine, you will need food mastic in red, blue and white. We sculpt each part separately and connect it with toothpicks or glue it together. Lastly, we design the face and make additional details. Cake candles can be used as antennas.