For beginners
Thus, polymer clay is a synthetic material that resembles plasticine in properties, but hardens. This material is called plastic, or cernit, or thermoplastic.
Beginners who plan to make crafts from clay should know that this material comes in several types - one has the properties of hardening exclusively during the baking process, the other does not require firing.
Before choosing a clay craft, you need to decide on the material used.
Preparation
One of the advantages of handicrafts made from polymer is that it is budget-friendly. The largest amount will be spent on modeling material and liquid plastic. At first, most tools can be replaced with improvised means - toothpicks (to pierce holes), an old marker (to roll out), a toothbrush (to create a rough texture). Here you will find out what you must buy, additionally and what you can save on.
Master class for beginners - a simple, cute cake made of two colors (in the example, white and purple). It will help you decide whether it’s worth pursuing further. You will need a minimum of tools (brush, knife, round cutters for cutting, rolling pin, pins for subsequent fastening of products), materials, time and effort. In total you get 8 pieces of cake, on the basis of which you can make earrings and a keychain.
What is required for sculpting
During sculpting, available materials are used in order to make the working process with clay as easy as possible and help give it the required shape.
For those starting out with DIY clay crafts, there is no need to purchase a lot of tools as many of them may not be needed.
To work you will need:
- special surface for work;
- a knife, as well as a razor blade;
- toothpicks for creating holes;
- cylindrical rolling pins;
- cutters;
- gloves and napkins.
How to sculpt?
After complete hardening, the clay resembles gypsum, which is why the product is processed in a special way. Under the influence of high temperature conditions, the baked material resembles plastic.
Clay is sold in a specialized store. It is preferable to start creating crafts for children made from clay with buds, as well as jewelry.
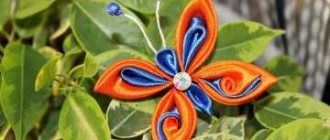
Flowers
To create a rose, a ball is initially made, which is shaped like a drop - this is the core of the bud. After this, you should roll a couple of balls, and then flatten them to turn them into petals.
They need to be wrapped around the core one by one to create a beautiful bud. Leave the first few petals in a straightened position, while bending the outer ones.
Citrus sausages
Cylindrical blanks in the shape of a lemon, which can then be cut into circles and used as individual decorations or decorated with imitation confectionery products. The lecturer shows in detail the process of creating sausages, using three colors - intense yellow (zest), translucent yellow (cut slices), light gray (layer between slices and zest). Using the above technology, you can make preparations of any citrus fruits - lemon, orange, grapefruit, lime. The diameter of the cylinders can be varied as needed. It is recommended to store it divided into two parts: one is baked and ready to use, the other is left raw (changes can be made).
Bijouterie
Crafts made from polymer clay are original decorations that are easy to make with your own hands, even if you have no modeling experience. Every beginner can make a bracelet or ring using simple techniques.
To begin with, it is advisable to choose a simple product, for example, create beads. For these purposes, it is necessary to roll out the clay, cutting out squares of the same size to roll into small balls. This way the beads will be the same size. After this, holes are made in the beads with a needle.
Tools and materials Time: 1 hour • Difficulty: 6/10
- polymer clay in yellow, red, orange, light green and dark green shades;
- key rings;
- small chains;
- connecting rings;
- nail polish (you can use clear nail polish);
- needle nose pliers;
- toothpicks.
Add some color to your everyday life with these charming and fun keychains in the shape of colorful fruits! Also, such keychains are an excellent gift for close friends and colleagues on the occasion of small holidays!
Master class for children
Modeling allows kids not only to learn about what surrounds them, but also contributes to the active development of finger motor skills.
The scope for creativity in this case is limitless, however, when choosing a master class for making clay crafts, it is preferable to start with elementary forms. For example, you and your child can make food for your favorite dolls or animals.
Rose - a simple option
Rusalina is a master of making plastic jewelry. The master class is devoted to creating a rose using the most simplified technology. Rusalina will show you how to form several dozen petals with a textured surface on both sides in 1 minute, create a smoothly transitioning color, and assemble an inflorescence so that the transition of shades is preserved. In the final part of the video, Rusalina demonstrates the process of assembling a pendant with a newly made rose. The product is baked in 2 stages - the petals are fastened, then with the sepals fixed and a metal element for hanging.
Food
It is not difficult for a child to fashion any fruits or vegetables. Visually show your baby how to use a needle to create an apple leaf with veins and give the desired pear look.
Gradually master sculpting techniques, keeping in mind that kids always strive to quickly achieve a positive result. In order to interest the baby in modeling, explain in advance that crafts are created gradually.
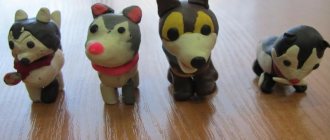
Animals
To create animals using modeling, it is advisable to use a variety of pictures with schematic images of animals.
Focusing on them, it is easy to choose a craft for future modeling and it is easier to understand how to give the elements the required shape.
For very small animals, large pieces of fabric can be used, while large figures should be created according to the hollow element method, using special molds. To make the nose, as well as the eyes, beads are used.
Clay products
How to properly prepare polymer clay for further modeling?
Before starting the work process, the clay should be thoroughly kneaded to give it plasticity.
When using red or white clay, when heated, the required temperature regime must be maintained, reaching 110 degrees, since at high temperatures the clay often loses its created shape and changes color. To make sure of this, look at the photos of clay crafts on the resource.
Can you make your own baked clay? It is possible, however, to create it you will need to find high-quality natural clay, which should be fired as competently as possible without equipment.
Therefore, you can produce this material on your own solely through trial and error.
DIY Dymkovo toy
Necessary materials:
- plastic bottle;
- sculpture plasticine or ordinary children's plasticine;
- paints;
- brush;
- flour;
- sharp scissors.
Manufacturing:
First of all, you need to use sharp scissors to cut off the neck of the bottle. You should have a blank for the future Dymkovo toy (see photo).
Now you need to cover the resulting blank from a plastic bottle with plasticine. It is very important to make an even and neat layer without streaks or unevenness.
Then build a small plasticine ball that will serve as the head in the future Dymkovo toy. Be sure to make a tall kokoshnik out of plasticine, braid a braid, wear a wreath, etc. Don’t forget about your hands, as well as all kinds of additional elements: basket, handbag, bucket, child, samovar, etc.
Now the plasticine mold must be thoroughly coated with flour, this is necessary so that the paint (for example, gouache) adheres well and does not form droplets.
Now you can start painting and decorating. Before you start painting, be sure to paint the entire figurine a single white color. Wait until the white layer dries and begin the creative process of painting.
Below we attach some examples of patterns and colors that are used when decorating Dymkovo toys. The news portal “Vtemu.by” wishes you creative success!
Photos of clay crafts
Source