A dog is perhaps one of our most beloved animals! We consider them our faithful and devoted friends. The next 2020 will pass under the auspices of these cute and funny animals. Look how cute a DIY plasticine dog turns out. This master class with photos and tips will help you create exactly the same one step by step.
To sculpt such a dog we will need:
- plasticine in brown, orange, black and white; - needle.
First you need to knead the brown plasticine, since it will be the main one. Next we roll two ovals of the same size from brown plasticine. This will be the body and head of the dog. It is not necessary to make the parts exactly the same. We determine the size of each part by eye.
We attach the head to the body and thoroughly lubricate the attachment point so that the head is attached firmly enough. To do this, simply smooth out all the irregularities with your fingers.
Now to make the front legs you need to roll two sausages of the same size. You shouldn’t make them too thick; you want them to not cover the breast.
We attach them to the sides of the body. Now we need white plasticine to make a spot on the dog's chest. To do this, you need to glue a white triangle with the tip down on the chest of the body. The triangle does not have to be smooth; on the contrary, it will be better if its edges are fuzzy and blurry. This part must be flat and very thin. The thinner it is, the better.
For the hind legs, you need to roll two balls of the same size from brown plasticine. Next you need to flatten it slightly. But we flatten it just a little.
Glue the legs to the body. The dog turns out to be sedentary. Now let's take black plasticine. You need to roll it into an oval. This will be the nose. We glue it and give it the appropriate shape.
Two small balls of white plasticine need to be flattened and the peephole glued in place. These details must be the same.
Now you need to make two flat oval-shaped parts from orange plasticine. These will be the ears.
We carefully bend the tips of the ears down. Next, let's take a needle. With its help we will draw the toes on the paws. You can also draw stripes on a white spot on the dog’s chest. They will imitate hairs. The plasticine dog is ready!
Here's how you can do it.
Let's sculpt a four-legged friend
There are tens of thousands of dog breeds in the world. Dogs can be large and small, thin and plump, long-haired, short-haired and without hair at all. As for color, there is complete, unique variety.
When sculpting with a child, it is important to give him freedom to realize his vision of the image of a four-legged friend. If your child has difficulty figuring out how to make a dog out of plasticine, step-by-step instructions will come to the rescue!
Do-it-yourself dogs at home: video master classes
The first video will reveal all the stages of step-by-step production of a dog from the most ordinary twine.
The second one is made of satin ribbons. A small souvenir made from ribbons can be attached to a hair clip. Or you can glue a magnet to the finished craft made from satin ribbons on the back side, and place your four-legged friend on the refrigerator door.
The original symbol of the New Year will be made from waste material, for example, tights. You'll have to stock up on tights of different colors, stuffing, New Year's toys, glue, and fabric paints. How to make a symbol of 2020 with eyes and eyelashes, watch the video.
Do you want to always be full? Subscribe to our blog updates. If you liked our simple master classes, then share the article on social networks.
Best regards, Natalya Krasnova.
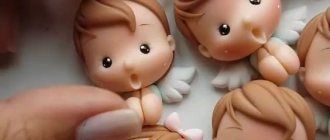
Hello, dear friends, today we will sculpt a dog from polymer clay. As you know, the next New Year 2020 is the Year of the Dog in the eastern calendar, so my child and I will sculpt a dog out of polymer clay as a keychain or souvenir for the Year of the Dog. We sculpted a polymer clay rooster for the Year of the Rooster here.
The main condition is how to easily and quickly mold a dog from polymer clay, plasticine, plastic, fimo clay. We will look at more complex sculpting of dogs in this article: “How to sculpt a dog from polymer clay.” Here, for inspiration and examples, we have collected these photographs of cute little plastic crafts - dogs, simple and light, which even a child can quickly make.
Plus, I personally love such simple “kawaii” shapes of animals - crafts made from polymer clay. Also, for such souvenir modeling with children, you can use Play Doh plasticine and dry the craft. And if you take ordinary plasticine to sculpt dogs, you will need to open it with varnish so that the craft can be preserved longer.
For some reason, the craftswomen who made these plastic dogs used them as stud earrings. I don’t know who would think of wearing such earrings, maybe children? But thanks to them for the idea. Based on these earrings, you can make keychains and figurines of dogs from clay, or plastic, or plasticine.
Earrings are dogs made of polymer clay.
Look, this is not just an ordinary dog made of polymer clay, there are even different breeds of dogs here. Dogs: huskies, terriers, spitzels. How lovely.
And this is my favorite:
And these are my number two favorites.
This dog is very cute and beautiful. Sculpting it is not that difficult. You can make it not only from polymer clay, but also from other plastic materials from plasticine to dough. But if you make it from plastic and bake it, you will get an excellent souvenir and gift.
For sculpting you need to take the following materials:
- cream or beige polymer clay - brown polymer clay - white polymer clay - a little black clay for the nose - soft pink polymer clay - ready-made eyes can be cut out of paper - modeling board - all the necessary tools for shaping the clay (stacks, bar)
Step-by-step and visual master class
1
. We start work as usual with a ball, which needs to be shaped into a head, then use stacks to make folds and a recess for the mouth. Then attach the spout from black plastic (Fig. 1-2). The second element is to mold the dog’s torso (Fig. 3-4), and the third is the dog’s hind legs (Fig. 5-6).
2.
We decorate the hind legs with white clay pads (Fig. 7-9) and glue them to the body. Next you need to mold the front legs (Fig. 11-13). They are similar to the back ones, but of a different shape. Sculpt as shown in the photo above.
3.
You also need to make pads out of white clay for the front legs and glue them to the body (Fig. 14-17). Next, put on the dog’s head and make a neck strap from pink clay. Wrap it around your neck (Fig. 19-20).
4.
Attach another diamond-shaped medallion to the pink collar (Fig. 21-22). Now you need to mold wavy ears from brown clay and glue them to the head (Fig. 23-26). Since we have a girl, it would be a good idea to glue pink bows to the ears (Fig. 27-29). Now all that remains is to glue the eyes, give them a ruddy look with paints, and don’t forget to darken the mouth as shown in the picture.
Can be varnished if desired. So the souvenir is ready. Happy sculpting.
Master class on sculpting a dog from polymer clay
Such cute and wonderful dogs, and you can make them yourself or with your kids together! Such a wonderful souvenir will be an excellent gift for the New Year or any other holiday. The most valuable thing is the effort you put into the product.
What materials do you need to take for sculpting:
Polymer clay white, black, red and other colors depending on the chosen dog - modeling board - stacks - a little patience and time
Any work with polymer clay begins with softening. Since clay usually has a hard consistency when cold, it needs to be kneaded with warm hands, which will have a softening effect.
Step-by-step master class with visual images:
1. It’s better to sculpt a dog from the body. Take a piece of white clay, roll it out into a ball, and give the ball the shape of a drop. 2-4. We sculpt the legs, cut the fingers with a stack. 5. Glue the dog’s legs to the body. 6-7. We sculpt the head, also from a ball, but a little larger. Give it the desired shape. 8-9. Using a small ball of black polymer clay, form two ears and glue them to the dog's head. 10-11. Glue a round nose and small eyes to the muzzle. 12-13. Before gluing the head to the body, make a collar out of red clay and then place the head on it.
14-17. There's just a little bit left to do. Make handles from the balls, cut out the fingers and glue the arms to the dog’s body. 19. Roll out an oval-shaped skate from red clay. Make stripes in stacks. 20. Glue a smaller oval plate to the bottom of the skateboard. 21-22. Make four wheels out of yellow clay, give them a similar shape using stacks and put a small dog on the skateboard.
A ready-made dog can not only sit on a skateboard, but also in an inflatable boat or with a life preserver. You can make all this yourself using polymer clay. At the end, the finished work needs to be baked in the oven. See the packaging for baking time.
Where to begin
If the child is very small, you can make a character from his favorite cartoon. It doesn’t matter how beautiful the work turns out, the main thing is experience.
An older child will most likely want to make a “pedigreed” dog. Then you need to decide on the breed of the dog to be sculpted. Let him only vaguely resemble his living relative, but he will be “thoroughbred”.
Let's sculpt a terrier
Modeling a terrier dog from plasticine begins with selecting the plasticine of the desired color. The most suitable colors are brown and black. So, here's the procedure.
Torso. Knead half a block of brown plasticine in your hands. We form a cylindrical part. We stretch the front part a little and bend it up 90 degrees. This will be the neck. We make the back part smooth.
Paws. We sculpt four blanks. We make two of them (those for the hind legs) thicker and longer. The blanks for the front paws remain sausages. To make the paws more realistic, slightly press the lower part of the blanks with your finger. We bend the hind legs slightly at the knee joint (this is why we made the blanks longer).
We decide where the hind legs will be on top. Lightly squeeze the upper part of the hind legs on the sides. Place the hind legs in the right place. Gently spread the junction over the body.
We attach a small pointed tail. The tail should look fun at the top.
We glue the front paws and also smooth the joint along the body.
Now you can give the body a characteristic black tint of fur to the terriers. Smooth a small piece of black plasticine over the back. From neck to tail.
The head is the most critical area of work. Cut off a piece of brown plasticine and sculpt an oblong curved muzzle. To mark the lower jaw, we attach an additional piece of plasticine mass.
We sculpt and attach the nose and eyes in black. The eyes are small. The ears are erect, with a characteristic downward bend. We insert a piece of toothpick into the neck and attach the head to it. This minimizes the chance of the head falling off during play.
The last stage is imitation of fur on the neck, muzzle and paws. The plasticine pet is ready!
- ka
As can be seen from the selection of photos, dogs made of plasticine can be very similar to their living “relatives”.
Making a cartoon puppy
To make a bright puppy you will need a larger assortment of colors. Brown, white, red and a little blue.
Make two balls (smaller and larger). We make the head from the smaller one, and the body from the larger one.
Using your little finger, press two indentations under the eyes on your head. We sculpt white circles into the resulting holes; they fill the entire recess. We sculpt a round muzzle from white plasticine and attach it as a base under the nose.
To complete the eyes, we sculpt two blue circles (iris), and two slightly smaller black circles (pupil). First we stick blue, then black circles into the white recesses for the eyes. As a highlight, you can glue a tiny white dot to each pupil.
The ears will be brown and white. Roll out two brown and two white circles. We stick them to each other, forming triangular-shaped ears. We attach it to the head and slightly bend the ends down.
We make the body from the second, larger ball. Give the workpiece the shape of a drop. Using a toothpick, attach the head to the body.
To give your puppy a white tummy, stretch white plasticine from the neck down along the tummy.
For the front paws, roll two sausages. For the rear ones - two balls. We stick them in the appropriate places. Finally, we stick white balls to the ends of the paws. Using a stack, we press our fingers onto them.
- The tail, as usual, is thin towards the end.
We make a flattened tongue from red plasticine and attach it just below the spout.
A red collar will be a bright decoration. For texture, we pierce holes on the collar in a circle with a toothpick.
Finally, we imitate wool. Using a stack or nail scissors, we cut a lot of strips. You can fluff up the ponytail by cutting its upper part with scissors.
Modeling is a very exciting and useful activity. And a dog, maybe not even one, made of plasticine can become a faithful friend for children.
Let's get started
Before you start sculpting, you need to knead the polymer clay well. Take a small piece of foil and crumple it so that we get a cone. We will use foil to save plastic. Roll a small piece of yellow clay into a ball.
Using a roller, roll out a ball of yellow clay into a layer, attach a foil cone to it, cut off the excess edges with a stationery knife, and wrap the cone with the resulting sheet of plastic. We carefully smooth the joints with our fingers and stacks. Now you need to insert a pin-nail into the upper part of the cone; the head will rest on it.
Now let's start sculpting the head. Roll into a ball and a small cone as shown in the picture.
We attach a small cone to the ball. We form the dog's face.
We sculpt a tongue from pink polymer clay and attach it to the muzzle.
Using a stack with a ball, we make small indentations in the eye area. Attach the head to the body.
We attach the ears to the head.
We make paws from two small balls and two sausages, as shown in the pictures.
Don't forget to make a ponytail.
Next, we make a collar from the flattened flagellum and the flattened ball. To make a heart, you need to roll out a small piece of pink color, draw the outline of the heart with a stack and then cut it out with a stationery knife along the outline. Gently smooth the edges.
We will make several spots from orange plastic.
At the final stage, using a stack or a toothpick, we draw our dog’s fur with small strokes.
If you insert a pin with a loop during the modeling process, you will get an interesting keychain. Such a dog will be a wonderful gift for the coming 2020, which is its symbol.
Video “How to sculpt a dog, 32 ideas” from the youtube channel Neverending Story.
Good day, dear needlewomen. Have you already thought about New Year's gifts? A DIY dog would be a great option.
Such a presentation has a number of advantages:
- low costs, since you can find many materials in bins;
- uniqueness, handmade products do not find their counterpart in one hundred percent similarity;
- positive energy, a piece of the soul will be invested in every masterpiece.
Handwritten gifts will also benefit their producers. Since the creative process develops hand motor skills and expands thinking.
Ideas for working together with children
Before you sculpt a dog from plasticine with a small child, you need to take care of the material itself: if the baby is not yet ready to knead the plasticine on his own, you should do this for him in advance or buy special air raw materials that do not require heating.
At the same time, you need to roll the blanks themselves - balls, ovals, sausages and cones. In addition, the baby will be interested in simple cartoon characters that do not require special technology and precision.
Some of the simplest examples of positive puppies are the following:
- Bobik;
- Jack;
- Puppy in a box.
Send your photos
Do you also make beautiful crafts?
Send photos of your work. We will publish the best photos and send you a certificate of participation in the competition. Plasticine is considered one of the best simulators for child development. Modeling allows you to develop fine motor skills and imagination of a growing baby. Children love to sculpt with plasticine. Such a useful activity gives them the opportunity to create new friends and new toys.
Besides, almost every child dreams of a dog. If he doesn’t have a live pet yet, you can mold a plasticine friend and bring him to life in your imagination. Well, let's figure it out: how to sculpt a dog from plasticine?
Recommendations and features of sculpting dogs
Before you start work and prepare the necessary materials - plasticine, stacks, toothpicks and a board, you should learn the basic rules of modeling:
- Look at the presented photos of dogs made of plasticine;
- Consider in detail the characteristics of the selected breed;
- Prepare additional fillers: foil or cling film is suitable, which can be rolled into a ball and then covered with plasticine, thus saving material;
- To avoid fragility and instability of the figure, you can use toothpicks as a frame;
- The junctions of body parts and other parts should be well smoothed, thereby making not only an aesthetically beautiful, but also a durable structure;
- Do not exclude the possibility of using additional tools: a garlic press, a fork, a comb - to create strands of wool; tweezers - for attaching small parts;
- To prevent working instruments from getting dirty, they should be soaked in water.
How to make a dog from plasticine
Simple examples with step-by-step instructions on how to make a dog from plasticine. Today we will look at ways to sculpt dogs, we will sculpt with you dogs named Bobik, Jack and a cute puppy for whom you yourself will come up with a nickname.
Plasticine dog named Bobik
We will need orange, black and white plasticine.
1. Make the body in the shape of a cone: roll the sausage, one side should be thicker than the other. 2. Next, roll the ball for the head, flatten it a little to make a cylinder. 3. Then we make 4 identical balls; these will be our paws. 4. We attach them as shown in the figure: to the base of the body. 5. Next we make two identical sausages for the ears. 6. Crush these sausages with your fingers.
7. Let's attach them to the head. 8. Now we make a nose from black plasticine and, of course, we make eyes from white and black. 9. We glue the nose and eyes to our Bobik, and in the back you can also attach a tail in the form of a circle. The plasticine dog Bobik is ready!
We sculpt a dog named Jack from plasticine
To sculpt such a dog, you need two shades of plasticine - brown and black, and there is no alternative to them, unless you want to mix these two colors in arbitrary proportions or use beige.
1. Prepare two softened balls. We will subsequently use black to make the body, and a lighter shade will be needed to make all other parts of the body. 2. Pinch off a little plasticine from a brown piece and roll into a small ball. 3. Turn this ball into a head by sticking a black protrusion in the shape of a dog's nose. Cut the mouth immediately. 4. Stretch a little black plasticine onto the lighter field in the places where you want to designate the eyes. Attach the nose and add brown eyes. 5. Also attach triangular ears to the head.
6. Make an oval blank from a black ball. Then slightly deform the part by narrowing it in one place - this part will be the back. 7. Place a lighter cake on the front of the chest and belly. 8. Make four paws. Be guided by the photo and figure of the dog. 9. Attach the legs.
10 Attach a dog tail to the back. 11. If desired, you can insert a long red tongue into the shepherd’s mouth. Our dog is ready and of course everyone recognizes the breed of this dog? - Shepherd.
Cute plasticine puppy - how to make a dog
To make such a puppy from plasticine, you will need plasticine: brown, white, black and a toothpick.
1. First we sculpt the head. And for this we roll the ball. We sculpt it from brown plasticine. Carefully smooth out all irregularities with your fingers. 2. Next we will sculpt the body. We need to make a cone. It should be narrower at the top and wider at the bottom. Just like on the dog’s head, we thoroughly smooth out all the unevenness, cracks and wrinkles. 3. Stick the ball to the top of the cone. The body and head of the dog are ready. To keep the head more firmly on the body, you can insert a match into it so that it sticks out a little. Then we stick this protruding part of the match into the body. That is, we put the head on the dog’s body, as it were.
4. We move on to sculpting smaller parts. Let's mold the ears. One will be brown and the other white. We sculpt a figure in the shape of a droplet and flatten it so that the droplet becomes flat. And then we sculpt the ears to the dog’s head. We stick them so that they stand and the wide part looks up. Then carefully lower the ears so that they hang down. 5. Now we sculpt the muzzle. For it we take white plasticine. And we roll a small oval. After that, flatten it a little. And we stick the dog to the head. 6. Let's make a nose. It will be black. First we roll the ball. And then we form a triangle out of it. But the corners should not be sharp. Therefore, we make them a little rounded. The nose will also be slightly flattened and stuck to the muzzle. 7. Let's move on to sculpting the eyes. First we sculpt their white part. Roll small balls and flatten them so that they become flat. We stick them to the head. Then we roll black balls, which should be half the size of white ones. And we flatten them too. We sculpt these circles to the white part of the eyes.
8. And all that remains is to make the paws. We mold them from white plasticine. Roll into four balls, two of which should be slightly smaller than the other two. The larger ones are the front legs. And we stick them to the dog’s body from below. And we stick one smaller ball on the sides of the front legs. 9. Take a toothpick. You can take a match or a needle. And we make a couple of notches on each paw. This is how we designated the fingers. This is such a cute dog made from plasticine!
Dalmatian puppy made of plasticine
After the famous cartoon “101 Dalmatians,” all children know and imagine what dogs of this breed look like. These are white spotted animals that grow up to be quite large dogs. Let's make a puppy together - small, cute and stupid. Let's make a white dog and turn it into a Dalmatian with black spots all over its body. This detailed guide will allow you to make a figurine in no time.
Chihuahua dog made of plasticine
Cute lap dogs that fit in a lady's clutch or on the palm of your hand are unusual Chihuahuas. They live even in the smallest apartments and do not require much space. If you want to have a small copy of this wonderful dog, we suggest you mold it from plasticine. We just make a copy to get an interesting craft.
How to make a Rottweiler from plasticine
The Rottweiler is a reliable guard dog. If the owner trusts a dog of this breed to guard his estate, then he can be confident in the safety of his property. Perhaps these representatives of man’s four-legged friends can be considered the most severe and courageous.
This lesson describes in detail and clearly shows how to make a Rottweiler from plasticine. This is not an ordinary mongrel, but a beautiful purebred dog, so when sculpting this individual you need to copy certain features, prepare the right color to imitate the color and get a good look at what the animal looks like.
Plasticine lap dog
The small and cute lap dog looks like a real blonde flirt, a fashionista and a capricious creature. She has long snow-white fur, which her owner constantly strokes and decorates with pink bows. This dog is sometimes carried in hands or in a purse; it looks like a plush toy. To make a lap dog from plasticine, we will need white plasticine, as well as a detailed description of the work, which is given in this lesson.
Get ready for the fact that you will create the figure in a special way; we will not have to separate the paws, tail and protruding ears separately. This is because the lapdog is a dog with very long hair, so the paws, tail and ears merge into a single lump along with the body.
DIY plasticine puppy
The little puppy stands on his hind legs and thanks his owner for the tasty treat he prepared for him. These dogs look so cute. And every child dreams of such a pet. In any case, anyone can afford to mold a small puppy from plasticine. And with this detailed description at hand, it will be easy to do. The little dog is just a figurine, it will not bark or caress, but it will be made with your own hands, and the sculpting process is very interesting.
How to make a St. Bernard dog from plasticine
Saint Bernard is a kind dog, which, at times, people even leave as a nanny for their children. With its entire appearance, this animal inspires confidence; despite its considerable size, such a dog will never harm anyone. However, there is one big disadvantage in caring for this animal - the gorgeous dog sheds a lot, so not all owners can withstand this test. The thick coat is renewed periodically, which causes a lot of inconvenience.
This lesson tells you how to make a St. Bernard from plasticine, which will not require any costs and will not disturb your household in any way. First of all, it will be interesting for children to sculpt such an animal; the simplest blocks of plasticine can turn into a figurine of a purebred dog with some skill. So, let's look at what is needed for the job, how to efficiently sculpt to obtain a believable result.
Spaniel dog made of plasticine
The dog is a beautiful breed - a cocker spaniel, a real aristocrat who lives in a house with people. And this lesson shows how to make such an individual from plasticine. Such animals are considered very friendly friends of humans and faithful dogs.
To repeat the sculpture of a selected object from plasticine, you need to carefully examine the image of the animal. The Cocker Spaniel has a medium-length brown, glossy coat, floppy ears, and a long muzzle with a pointed nose. Let's consider step by step how to sculpt the chosen breed of dog.
How to make a boxer dog from plasticine
The Boxer dog is a very beautiful and graceful animal with smooth fur. Most often, Boxers are red with white accents. These dogs are very playful. And in this lesson we also invite you to play young sculptors with your children. Creating animal figurines is very exciting, and if it is also such a wonderful purebred dog as a boxer, then the game will become doubly exciting.
We create a beautiful dog in several stages, all of which are described here. If, after looking at the animal in the picture, the sculpting task seems impossible to you, then this guide will convince you otherwise. You can create any craft if you have detailed instructions at hand. That's what this lesson is.
Yellow puppy made of plasticine
A little yellow plasticine puppy is a wonderful craft for kids. It will be interesting for them to sculpt such a friend of man. You can name your little animal Lemon, due to its unusual color. So, we have already come up with a name for the dog, and now let’s move on to exciting modeling, having prepared everything necessary for work.
DIY plasticine pug puppy
Purebred pug dogs are so cute, like plush toys. You want to stroke them and squeeze them. Children are especially fascinated by puppies. Modeling a dog from plasticine is always interesting, and if it is also a lesson in creating a purebred individual, then the process becomes even more exciting. To make a human friend's baby, you will need very few materials. Let's look at which ones, as well as the whole process from start to finish.
Modeling - a dog made of plasticine
Let's take an oblong piece of plasticine. At one end we will extend two hind legs and a small tail.
On the body, please note, too much material is not required: the pug dog is basically compact, especially when it is young. The head is big. Therefore, the front legs will fall almost in the middle of the block! But still, you shouldn’t overdo it either: very enlarged heads of cartoon characters cannot be an example to follow for supporters of realism. Immediately choose the correct proportions so that you don’t have to correct them later. We have outlined the contours, now we will decorate our pug to a dog’s appearance.
Let's stretch out the front, slightly crooked legs. The feet are quite large, mind you. In the auxiliary picture, we specially drew a dog with bent legs in order to properly understand their structure. So we'll go blind.
The pug's chest is wide and powerful, but the abdomen should still be lean. The back is flat, slightly rounded, like, say, a sofa cushion. The hind legs are slightly “X-shaped”, they are strong and stable. The tail of pugs is usually wrapped in a steep ring; it is not customary to dock it. The wide neck smoothly turns into a large head. Pugs are a decorative breed and retain juvenile (childish) features throughout their lives. The pug's muzzle is like this: a large forehead in folds of skin, a flattened nose, very wide-set eyes with an expression of good-natured curiosity, neat hanging ears. To convey the structure of our pet’s eyes, let’s roll two tiny balls and place them in the right place.
Now you can add some shine: let’s smooth out the unevenness, emphasize the muscularity of the legs, highlight the shoulders, and you can add a few folds on the neck and muzzle.
Look, the dog is ready, now you can take a break and drink a cup of coffee. But what is it, before he even appears in the world, our pug is already reaching into the mug - he’s interested in everything. Well, gee, it’s time to train him and get him used to order.
When planning to make a plasticine dog with your own hands with your children, decide what breed you would like to copy. Our master class will show you step by step how to sculpt an aristocratic Great Dane. But you can try to create a simple dog figurine, repeating the main distinctive features. Of course, creating an exact copy of an individual of a particular breed is a more difficult task, but it can be mastered by school-age children, under the guidance of adults. This lesson provides detailed instructions for sculpting a Great Dane dog from plasticine.
Prepare:
A block of gray plasticine or black and white to mix until gray; stack from a plasticine set.
Steps:
1. To make a sufficient amount of gray mass, prepare a white and black block. Mix them thoroughly until completely homogeneous. Thus, you will get a gray color, and its quantity will be 2 times larger, just enough for an animal figurine. Dogs of the Great Dane breed have a beautiful dark gray, ash color. Reproducing the correct color is the first condition for creating an exact copy of the selected object. 2. Knead the mass in your hands, use it while still warm for further work. 3. To make a dog that lies gracefully on the floor, repeat all the steps here. First make a large torso. Draw out the oblong part, bend it slightly, and sharpen it at the tail. 4. Glue a tall mound on one (wider) side. This will be the massive neck of the animal. The Great Dane has a small head compared to its body. Instead of a head, stick a small gray ball on the neck. Also continue modeling the head of your sculpture by adding a nose piece. 5. Using a thin blade, press down the plasticine on the nose to give it a more streamlined shape. Select the nose from above. 6. Now move to the back. Immediately make a tail - a long thin sausage from the same dark gray plasticine. Attach it to the back, smoothing the clay with your fingers. Pull out 2 additional portions of plasticine and glue them as the hind legs. The top of the legs should be wider than the bottom. Press down additional details to show that the dog is lying down. 7. Great Danes have very long, although thin, legs. Add enough plasticine to the hind legs to create proportional details. Also glue the front legs. Bend forward. Cut your fingers into stacks. 8. Start designing the face. Make your nose more expressive. It is better not to add a black drop to the tip. It is advisable to show that it blends in with the color of the muzzle. Press the eyes with the tool. Glue the ears to the head. In Great Danes they are very long, pointed, similar to a hare's. Raise them symmetrically upward. 9. Fill in the eye holes with play dough to complete your figure. You can additionally treat the muzzle with a stack of plasticine to make it more believable and rough.
A beautiful plasticine Great Dane dog is ready. The figurine will protect its owner, the sculptor, and will become a real talisman. Check out other crafts. It is believed that dogs and their owners are very similar. And there is nothing surprising here, as the popular wisdom says, “whoever you mess with, you’ll gain from that”! Dogs are smart animals; they subtly sense a person’s mood and character. This means that a dog, living with people, knows how to find an approach to everyone. Especially to those who truly love her. And in love mutual understanding is born, and dogs respond with devotion to a person’s feelings. Children love pets, especially dogs. You can frolic with them on the street, and you won’t get bored in their company even at home. And dogs will always listen and support, pressing their heads against the owner’s warm hand. We will devote our today's master class to sculpting a dog from plasticine who follows fashion and loves bright accents in clothes. And if we try, we will get a cute breed dog in a red scarf.
What to prepare to create a plasticine dog:
Set of colored plasticine; - a board or plastic napkin for modeling; - matches, stack. How to make a cute dog wearing a red scarf
In order for things to go smoothly, you need to prepare everything you need in advance and only then start working. Therefore, choose the desired colors of plasticine, prepare your tools and you can start!
From black plasticine, make oval blanks for the head and body of our dog. Make holes in your head for the ears. From black plasticine you need to make a semicircle muzzle and ears - elongated narrow droplets. Use the round end of a match to make shallow indentations under the eyes, carefully insert the ears into the indentations so that they fit snugly to the head. Using a stack, give the semicircular muzzle a shaggy look (use a stack to cut out the corners, imitating wool). Connect the muzzle to the head of the dog, using a stack to mark the recess under the nose. Roll out a large oval nose from black plasticine, and small balls for the eyes from white plasticine. Insert the eyes into the recesses, pressing lightly. Use a toothpick to highlight the dots for the pupils. Make small black pupils and a tongue from pink plasticine. Carefully insert the pupils into the prepared area. Stick the nose to the animal's face. Using the round end of the match, lightly press on the nose to create nostrils. From an oval blank for the body, you need to do the following: smooth the top with your finger, pulling the edges down, as in the picture. The edges will appear to be flared. You also need to make a sharp tail out of black. Using a stick or toothpick, make notches from top to bottom, imitating fur on the body. It is better to do this in 3-4 rows to make the coat look thicker. Use a stack to cut notches on the tail to make it look realistic. Make a wide strip for a scarf from red plasticine, and thin flagella for a pattern from white and green plasticine. First, lay the white stripes at an angle, with green stripes on top of them. The strands will make a cross pattern. Press the strips down, flattening the scarf. Trim off the excess along the edges, making a stack of fringe on both edges. Connect your head to your body so that the scarf rests against your head. Fold the ears. Our dude dog is ready! What a wonderful Scottish terrier we have! What should we call this wonderful shaggy friend? Maybe Felix? Charlie or Jerry? What nicknames do you know? As soon as you come up with a name for the dog, you can go for a walk and show it local attractions or secret places. Or introduce her to all family members and your friends.
Working on realistic dogs
The master class of plasticine dogs does not end here, because next up are more complex sculptures that only older children and adults can do, as they require compliance with all the nuances of the animal’s natural physique, correct proportions, perseverance and painstaking work.
The result should be a very realistic copy of the most popular pet, which can be varnished and used as a toy or souvenir.
Ideas for making handmade dogs for the New Year holidays
The Dog is officially recognized as the symbol of 2020. According to holiday custom, every home should have an image of the mistress of the year. It can be presented in different guises: a souvenir, a toy, a magnet, a keychain, a painting, a calendar, etc. However, one of the best options is considered to be a DIY product.
Felt crafts with patterns
Felt is a dense material, similar in texture to felt. Available in rolls and sheets of various colors. The fabric varies in thickness. For future small puppies, it is better to purchase a thin canvas.
Working with such raw materials will bring a lot of pleasure to the needlewoman. Felt does not require any finishing at the edges and is easy to glue together. You can cut any shape out of it and it won't take much time.
Master class on producing a Scotch Terrier
This toy is easy to make. Even a child can cope here. Therefore, if you have children, feel free to involve them in the process. Any type of needlework develops motor skills and thinking, and instills taste.
We will need:
- felt in light colors;
- glue gun;
- threads of similar colors;
- needle;
- scissors;
- brightly colored ribbon;
- pen;
- black beads;
- safety pins;
- paper;
- filler (sintepon).
Sewing steps:
- Print the templates according to the pattern and cut them out. Attach finished samples to the material using pins for more convenient cutting. For one dog you will need to make 2 patterns for the side of the body and legs, as well as one piece for the ears and forehead.
- Attach the fabric pieces to each other and fasten with pins to make stitching easier. Don't forget to leave a small hole for stuffing the toy.
- Make the eyes from black beads, attaching them with thread and a needle or a glue gun.
- Make a collar from the ribbon. Glue the felt flower to the side of the neck girth.
- Just four steps will lead you to creating your masterpiece. The step-by-step instructions for all felt puppies are similar to the steps described above. Only the patterns are different.
Sample of a dog with a spot
To sew such a toy you will need sheets of felt in contrasting colors.
The puppy's mouth can be embroidered using black floss threads.
Such small products are well suited for making keychains and magnets. Simply insert a key ring or attach magnetic tape.
Keychain pug
The photo shows how much of each part will need to be cut. The step-by-step production of a pug-shaped keychain includes standard steps.
In the same way, you can make different versions of the 2018 symbols using patterns.
Arm yourself with all the necessary items, print out the patterns, select the appropriate colors of the material and go ahead and create masterpieces.
Polymer clay figures
Interesting solutions can be realized with the help of such a creative object as plastic. It is available in different structures:
- liquid;
- rubber;
- translucent;
- with added sparkles;
- capable of glowing under ultraviolet rays;
- mother-of-pearl;
- for the production of dolls and removal of molds.
The color range of the material is quite extensive. This will allow you to create puppies of any design.
Before you start working with polymer clay, learn the basic recommendations:
Prepare your work surface and necessary tools:
- stationery knife;
- toothpicks;
- rolling pin
- Select baking dishes that will not be used in the future for baking products. It is advisable to cover it with baking paper.
- Take sandpaper to sharpen irregularities and plastic varnish so that the products retain their original appearance longer.
- If you want to make dogs in the form of jewelry or a keychain, then stock up on accessories.
- To gain entry-level skills and understand whether you will enjoy sculpting, watch Anna Oskina’s training lesson.
Dog made of polymer clay: step by step with photos
We will need the following items:
- polymer clay of different colors;
- board or other working surface for modeling;
- tools.
Manufacturing stages:
- In order for the clay to become softer, a warm temperature is needed. Your hands will do. Remember it a little and it will become elastic. First of all, mold the body of the future polymer puppy. Roll the piece into a ball and form a teardrop shape. Form the legs. Use a stack to give them fingers.
- Assemble the parts together: body, legs.
- Take black material and give it the outlines of ears, eyes and nose. Attach them to the muzzle. Attach a pink collar and place your head on it.
- Mold the handles and attach them to the base.
- Use the red ball to form a skateboard with wheels using yellow clay.
- By combining a dog with a sports attribute, you get a finished toy.
Knowing the basics of working with matter, you can understand the stages of making a figurine from the pictures. The image shows the production of a Dalmatian.
As we can see, only two colors of plastic are required here: black and white. Magazine image source: Porcelana Fria
A more complicated option is a puppy in a basket. You will need colored clay, toothpicks and glass.
Cute snow-white dogs made of polymer clay are easy to make. Their step-by-step instructions are shown in the photo.
They can be made in different poses and placed on a shelf as a talisman for 2020.
Do you want to be able to sculpt any puppies, including cartoon characters? Watch the video with the master class.
Step-by-step technique for weaving a dachshund from beads
- The color range is not limited. Decide on it yourself. The photo shows a brown beaded dachshund.
- Weaving technology is divided into two levels: lower and upper. This can be seen from the joint line in the picture. The wire is taken 2-3 mm thick, depending on the size of the beads.
- Take one black bead, a couple of brown beads and stretch. The length of the wire will be one and a half meters.
- Second row: the top tier consists of three beads. Pull the other end of the wire through them and fasten so that you get two rows.
- Further weaving occurs in the same way.
- The third row should contain 4 and 5 beads, the fourth - 5 and 7.
- Fifth row: in the upper tier a black bead is strung after every two brown ones, in the lower tier there are five plain ones.
- No more dark beads will be needed. In the sixth row you need to leave a remaining section for the ears. Upper level – 10 pcs., lower level – 5 pcs.
- There are 10 beads in the seventh row, into which the second end is pulled and not pulled in too much. The extra piece for the ears goes through the six beads in the center. There will be 4 beads in the lower tier at this stage.
- We weave the ears with a regular flat fabric.
- The eighth row contains nine and six parts, the ninth - seven and nine, the tenth - six, eleven.
- Six beads are strung on the upper tier, and 13 on the lower tier. Here the second end of the wire is threaded with the remainder of a thirty-centimeter piece for the paws.
- The twelfth and thirteenth rows consist of the same amount of beads as the previous one. Here you need to draw the second tip without tightening the foot.
- 14 row: 6 and 13 pcs.; 15 row: 6, 12; 16th row: 6, 11; 17 - 18 rows: 6 and 10 pcs.; Row 19: 6, 9.
- In the twentieth row, which contains 6 and 8 beads, it is necessary to draw a remaining segment to form the hind legs.
- 21 row: 6 and 8 beads.
- In the 22nd row, a tail of 11 beads is formed in the upper level. There will be 6 parts at the bottom.
- In the 23rd row the base of the body is completed. Here you collect 2 and 1 beads.
- Using the remaining wire, weave the hind legs using a three-dimensional technique.
This toy can be hung on the Christmas tree or on the front door as a talisman in the coming year of the dog.
Dogs for the New Year from scrap materials
Do you want to please your loved ones with special gifts without going broke on purchases? You can create wonderful things with the symbol of the year with your own hands. You don’t have to spend a lot on accessories for creativity, since many items are usually found in almost every home.
Toy for the year of the dog made from plastic bottles
Surely in every home there is unnecessary drink containers. Don't rush to throw it away. You can make various crafts from them, including gifts for 2020.
A detailed master class of the dog in the photo from the city of masters can be seen in the video.
The symbol of the coming year made from plastic bottles can come in different sizes, colors and shapes. It all depends on the source materials and your imagination.
To make this craft we will need the following materials:
- bottle,
- glue or double-sided tape,
- colored paper,
- covers (4 pcs.),
- straws for cocktails (2 pcs.).
The creative process itself takes little time and includes the following stages:
- We measure the circumference of the bottle and cut out two strips of the required length from paper of different colors.
- We make 2 ears, a tongue, a nose, eyes, a tail and four small hearts to decorate the dog’s future paws.
- Glue the lids to both ends of the tubes.
- We dress up the plastic body with the prepared parts and get a nice toy.
- You can simplify the making of the craft and make it without cutting and gluing additional parts. All you need is paint. Beads for eyes and nose are optional. Everything can be drawn. However, you do not need to have any artistic talent.
- Take two bottle bottoms and fasten them together with glue. Next, take paints and decorate the plastic base.
- The drink container can be lined with fabric, and then you get an interesting option for the image of the hostess of the year.
Step-by-step instructions for a piggy bank in the shape of a pug
A product made from a plastic bottle can not only decorate a shelf as a toy or souvenir, but also perform useful functions. For example, storing money.
We will need:
- two-liter container, washed after the drink;
- four skeins of sewing thread;
- dye;
- glue gun and adhesive tape;
- newspaper;
- flour diluted with water in a ratio of 1:1;
- paper bags;
- hole puncher;
- black marker;
- decoupage;
- red, black paper;
- felt;
- traffic jams;
- file;
- patterns for the bottom (1), ears (7.8), nose (6), eyes (4.5), tongue (2);
- grinding tool.
Piggy bank step by step:
- Glue spools of thread to the body. They will serve as legs. We attach figures made of transparent material (file, food bag) to the places of the ears. Mark the center line with a marker.
- Attach the paper and form a tail. To make it stable, we wrap the part with adhesive tape.
- We glue the base with newspapers using flour and water. After the first layer has dried, apply the next one. There should be a total of 3 layers. For convenience, it is recommended to cut the newspaper into strips. To make the layers dry faster, you can use a hair dryer.
- We cut a hole for coins, apply decoupage and paint the product.
- We make holes in the blank for the nose using a hole punch. If the device is not at hand, cut them out yourself.
- We decorate the edges of the paws with black felt, apply dots imitating a mustache, eyes, nose and tongue on the face.
Thus, we get a beautiful handmade piggy bank.
Toy made from plastic bags
From simple, everyday objects accessible to everyone, quite good things are obtained.
The following items will be needed:
- bags (quantity depends on the size of the dog);
- foam;
- threads, needles;
- textile.
This dog is made as follows:
- Cover the foam with fabric. You should get a body with a head, paws and a tail. Patterns are not needed here.
- We make wool from bags. We cut them into strips and sew them to the woven base. You should start from the tail.
- Eyes and nose can be cut out of either fabric or paper.
- Straighten the “hairs” of the craft and decorate it with a bow, collar, etc.
If such products are sewn in small sizes and laces are tied, they will serve perfectly as Christmas tree decorations.
Holiday cookies
Treats in the shape of dog faces will decorate your New Year's table and are suitable as gifts for relatives.
To bake these creations you will need:
- flour (3 tbsp.);
- two eggs;
- butter (100 gr.);
- vanilla sugar (1 tsp);
- baking powder (1 sachet);
- sugar (0.5 tbsp.);
- two tablespoons of sour cream and cocoa.
Cooking technology:
- Chop the butter into small crumbs and grind it with sugar.
- Add sour cream, eggs and beat the contents with a mixer.
- Mix the flour with baking powder and form a mound with the whipped mixture in the center.
- Knead the dough and divide it into two parts, one of which is colored dark with cocoa. Then put it in the refrigerator for half an hour.
- Cut out several dark and light colored hearts from the dough. To make ears, cut the figure in half.
- Place the products on a baking sheet and bake in an oven preheated to 180-200 degrees. Cooking time is 15 – 20 minutes.
Detailed instructions for New Year's baking are described in the video.
Handmade dogs can be made using any type of needlework technique. Here everyone chooses a method to their liking.
Gray Husky
Making a husky dog from plasticine involves using gray and white colors, and only small bright inclusions will be blue eyes and a red tongue.
- Divide the layer of gray plasticine into three different parts - the head, the body and a small piece for the tail, ears and two paws;
- The middle piece is the head, roll into a ball, then roughly divide into zones - for the eyes and muzzle;
- The muzzle is a white oval, attached to the front of the head, which is pre-shaped with flat, light cheeks;
- White triangles should also be attached to the place intended for the eyes. Then designate the eyes themselves using three pairs of multi-colored, flat circles - a blue iris, a black pupil and white highlights;
- The nose is a wide drop or oval;
- The ears are voluminous triangles on the top of the head. They can be either simply gray or using a white tint - the inside of the ear;
- The body is an oblong cone with a barely noticeable bend at the top - the neck, from which the white breast should come (it can be made smooth by smoothing it tightly over the gray body blank, or voluminous and fluffy using a masher);
- Paws: front - two identical gray sticks with white toes and two light balls - rear;
- The tail is a sausage, fringed on one side;
- Connect the head to the body using a toothpick, then proceed to the paws and tail: smooth out all the parts, removing rough edges of the joints.
Pug dude
Modeling from plasticine for children should not only develop, this work should bring pleasure and fun. Therefore, megamaster.info recommends that you make a pug according to the instructions below. Prepare:
- plasticine;
- knife for working with material;
- board;
- matches (can be replaced with toothpicks).
How to organize your work:
Dude Pug (Step 1)
- Take plasticine of a light shade (yellow or beige) from the set. Roll into a ball. We mix some of the light material with black and get the basis for creating the ears and muzzle. Use the round part of the knife to mark the location of the future muzzle.
- From a dark color we make a semicircle and ears in the form of droplets. We connect the obtained parts with the previously made ball. On the muzzle, use a match to make recesses for the eyes, mold these parts and insert them into place. (Step 2)
- We are finishing making the muzzle. Make it oval, but also attach it to the right place. Highlight the nostrils with a match. Cut out the mouth and add a tongue to it.
- Let's start creating the body. Our pug is called a dude because he is wearing a fashionable sweater. Using any color you like, make an oval - this is the main part of the sweater. Attach a semicircular piece of the main shade to one side of the oval. (Step 3)
- Roll out thin “pancakes” from two colors and cut out triangles. Additionally, we make a thin strip, which we press to the edge of the clothing. Place the triangles you have made on the sweater to create a pattern.
- All that remains to add to the dog is the tail and paws. When everything is ready, connect the head and body using a toothpick or match.
The stylish pug is ready, add a bow tie to make our dog even more elegant.
You learned how to make a dog in a sweater out of plasticine. All that’s left is to come up with a name for the dog and go for a walk with him.
A plasticine hare will complement the craft well.
Materials for modeling
- brown plasticine;
- plastic spatula;
- board and napkins.
Instructions for sculpting a dog from plasticine
1. You can replace the brown color used to create this plasticine craft with black, beige, orange or white.
2. Roll a small ball to sculpt the head.
3. With three fingers, grasp the plasticine on the ball on one side and pull out a thin corner, forming a sharp dog’s face.
4. Attach a black ball to the protruding part of the muzzle, and also make two small holes for the eyes.
5. Insert white plasticine into the recesses and stick on black pupils. Decorate the tip of the nose with a white dot.
6. Attach the oblong ears. Add eyebrows and stack them to make them shaggy.
7. To create the body, make an oblong sausage. Curl one side upward to show the neck.
8. Connect the head and neck by inserting a match into soft plasticine.
9. Make the dog’s paws from the same brown plasticine. The front ones can be made in the form of ordinary thin tubes, and the rear ones can be squeezed to create parts that look like commas.
10. Attach the legs to the main workpiece.
11. Attach the tail to the back, leaving cuts on it in a stack.
So your cute toy dog made of plasticine is ready. You can play with such a miniature without fear that it will break, because the plates can be adjusted at any time.
Plasticine modeling exercises remarkably develop fine motor skills of the hands. This, in turn, has a good effect on the child’s development. In this visual master class we will show you how to make a dog from plasticine. Today we will make and bake such a funny dog. A dog is molded from plasticine very easily and quickly.
The child must be taught how to sculpt from plasticine correctly. To do this, you need to prepare yourself and prepare your child. Before you start the lesson, you need to knead a piece of plasticine and warm it in your hands. After this, it will become soft and the child can easily work with it. The final stage of work is no less important, when after finishing work you need to wash your hands and wipe them with a small dry cloth. When your hands are dry, it is recommended to wash them with soap. During classes, it is necessary to constantly guide the child’s actions, help him hold plasticine correctly in his hands while performing a particular figure.
We also suggest watching a detailed lesson on how to make a funny dog out of plasticine.
A dog is molded from plasticine very easily and quickly.
For this master class we will need a block of brown and black plasticine, and quite a bit of white and red. So, let's get to work. We take prepared plasticine of two colors - brown and black. First, we divide each block in half. After this, we divide the resulting four pieces in half again. Brown plasticine will go on the body of the dachshund, for the head, and two more pieces will be needed for the paws. We don’t use all the black plasticine. We don't need the first part. From the second we make ears, a nose and a tail, and from the third and fourth parts we make paws. So, all the necessary plasticine parts are ready. Now you need to give them the required shape and secure them in the right places. Using our fingers we stretch out the muzzle of our dachshund, attach the paws, nose and ears. We attach the dog's tail in the same way. We make the eyes from two small black circles of plasticine. But so that our dog can “see” we attach small balls of white plasticine to the center of each black circle. Using a stack, we cut the dog’s muzzle at the bottom to form a mouth. Then we insert a small red tongue there. Our funny dog, made from plasticine with your own hands, is ready! You can also make a bone for the dog from white plasticine. Let our dog be joyful, well-fed and satisfied with life!
Evgenia Epifanova
Modeling in the senior group "Puppy"
Age group
:
senior preschool age
.
Theme: Puppy
Nod theme: artistic and aesthetic creativity
Goal: to develop children’s ability to sculpt a four-legged animal - a puppy
Tasks :
Educational:
Reinforce sculpting
: rolling plasticine between the palms;
Practice using pinching and pulling techniques;
Strengthen the ability to connect parts, pressing them tightly against each other, and smoothing seams;
Continue to introduce children to the properties of plasticine (soft, pliable, able to take any shape)
;
Strengthen the ability to work with a plasticine stack.
Educational:
Develop independence.
Educational:
Cultivate accuracy when working with plasticine. Make children want to do something nice;
Cause a positive emotional response to the overall result.
Types of activities: gaming, communicative, educational and research, productive, creative
Forms of organization: Group
form of training organization
Forms of implementation of children's activities: gaming, cognitive-research, communicative, self-service, visual.
Equipment: plasticine; modeling boards
;
cloth napkin (for each child)
; dog toy
Demonstration material: toy – puppy
, picture - diagram
of sculpting a puppy
.
Preliminary work: looking at illustrations, reading stories about animals, riddles - solving riddles about animals, outdoor games, looking at the illustration “ Puppy”
»
.
We sculpt a hunting terrier
The dog that we suggest you make belongs to one of the terrier breeds. Take the instructions below and make your own dog.
Hunting Terrier (Step 1)
Before molding a dog from plasticine, prepare:
- plasticine in dark shades;
- knife for working with plasticine;
- board;
- toothpick.
To create a realistic dog, it is advisable to use brown and black colors for the base material. You can combine colors if you want to design an exact copy of the presented breed.
Let's start sculpting:
- Take a brown block and separate half of it. Warm the material and knead it. You need to mold something similar to a bullet, roll the material in your palms and press lightly to get a long body. On one side, the body needs to be slightly raised. Do this so that the end of the part takes on a right angle - this is the neck. We made the central part of the future dog.
- Let's start making the paws. Roll four sausages, note that the two blanks for the front legs should be slightly shorter and thinner than the two that are designed for the hind legs. The paws located in front do not need to be changed much. We leave them as sausages and lightly expel them below. Press the curved part down on the sides and top. (Step 2)
- When the paw blanks are ready, we attach the rear parts first. Carefully iron the joints, make stretching movements along the body. Glue and iron the paws located in the front part.
- Roll out a thin worm for the tail. Attach it.
- Pinch off the black plasticine and make a small cake. Attach the resulting piece to the back and smooth it thoroughly. For a natural look, extend black from the back to the ponytail. (Step 3)
- Let's start making the muzzle. Its shape should be oblong and resemble a crescent. We carry out the work in brown. We bend the lower part of the muzzle towards the bottom, this will highlight the jaw. Additionally, we glue a small part for the jaw.
- Glue the nose, eyes and ears onto the finished base. Ears need to be lowered.
- Using a toothpick, press lines throughout the entire product to obtain a fur texture. The same toothpick can be used to firmly attach the head and torso. Carefully insert the piece of wood into the body and place the head on the protruding end. After fastening, iron the elements so that the joint is not visible.
The terrier is ready. Now you know how to make a dog out of plasticine. The finished craft can be an excellent talisman made by yourself. Take the prepared dog with you on the hunt. Who will we look for? For example, a plasticine hedgehog, and you will learn how to make it from the article that we published earlier. A dog of any breed can be made using a similar principle.
Step-by-step photo lesson:
To begin with, we will not go into details and sculpt an animal of a certain breed. Let's focus on an ordinary mongrel, this lesson will help you get an idea of sculpting a dog, and then you can complicate the task. The brown color of plasticine is quite suitable for realizing the idea. Also, the work cannot be done without a spatula.
Cut a small part from the block, knead and roll into a ball.
Draw out the ball, sharpening the nose of the dog's muzzle.
Stick a black nose on the front part, cut the mouth with a stack.
Using the tip of a spatula, make round holes for the eyes and insert white and black grains into them.
Using small amounts of dark plasticine, mold the ears and fix them on the head. The ears may also be white or beige.
Turn the bulk of brown plasticine into the body of a dog. First make an oval roll, then sharpen the neck and stick out the chest in a semicircle.
Prepare balls and rollers for sculpting the hind legs.
Squeeze the balls into flat droplets and attach to the dog's lower body. Attach the legs.
To make the front paws, stretch the plasticine into thin tubes and bend them at the ends. At this stage, you can use matches, placing them at the base of the limbs.
Attach the front legs to the body, cut the lower pads with a stack.
If you wish, you can attach a collar ring to your neck. It is better to do this at this stage, while the head is not yet attached.
Attach a ponytail at the back, which can be made fluffy using a stack.
Attach the head by piercing the neck with a match. And to completely complete the animal figurine, go over the entire surface of the chest, making it fluffy.
A faithful dog made of plasticine is ready to settle on a shelf in a children's room and serve its owner-creator faithfully.
From the series “Belka and Strelka” - made of plasticine.
The photographs of the master classes are step-by-step, so even a child can make a dog.
Puppies are completely different, unique, with their own character and habits. Their coat color can be red, ash, white or spotted. But they are all incredibly affectionate and playful, like children. Each puppy is unique in its own way. The same can be said about children's crafts. Any child conveys his vision and strives to make a unique figurine of a small animal. You should definitely listen to the opinions of young creators. They will choose an image that they like, decide on materials, and how they can make a unique thing. For those who have difficulty modeling children's crafts, this master class is given. It is the modeling of a puppy from plasticine that is shown here. Everyone loves plasticine, it is inexpensive and allows you to create a wide variety of masterpieces.
Spitz
This dog breed is one of the easiest to breed. You will need plasticine of the same tone and a plastic knife.
Manufacturing:
- The work begins with the dog's chest. To do this you need to roll into an even ball.
- The next detail will be the back of the body. It should be smaller than the chest and slightly thinner towards the tail.
- For the head, roll a ball with a smaller diameter than the chest.
- An elongated muzzle is formed from a separate strip.
- The head and body are connected, and the joints are carefully sanded with a finger.
- From 4 identical parts you need to mold short, thick legs. They are attached to the body.
- The whole body is smoothed with the fingers. The plasticine is smeared to the bottom. To imitate lush hair, a strip of plasticine is attached from the top of the head to the shoulder blades and smoothed out. If the breasts are not lush enough, then similar steps must be taken.
- The ears are attached to the head, and the tail is attached to the back of the case. It needs to be made from a flat strip that widens towards the bottom. The Spitz's tail lies on its back.
- All that remains is to work out the small details using the stack. You need to draw wavy and long hair, and also mark the place for the eyes.
When designing the muzzle, you need to take into account that Spitz eyes are small and close to each other.
Dachshund
This breed of dog is considered one of the most unusual, and it is very easy to mold it from plasticine. For this you will need black and brown colors.
How to make a dachshund dog from plasticine
Manufacturing:
- The base of the body and head is made of black material. The body should have an elongated shape. Narrower at one end than the other. For the head, roll a round ball, and then make a narrow, long muzzle from brown plasticine.
- The nose and pupils of the eyes are indicated in black. Iris – brown. The nose does not have a simple round shape, but an elongated one. Part of the plasticine needs to be stretched to the bridge of the nose.
- A light stain should be applied to the lower part of the body.
- The paws should be thick and short. They need to be made of two colors. Dark on top and light on the bottom.
- The tail is made from a thin sausage that tapers towards the end.
Dachshunds have floppy ears. 2 parts resembling the shape of a drop are molded from black plasticine and secured to the sides of the head.
Husky
The husky's body is molded from gray or ocher plasticine. To decorate the face and light areas, you will need white or beige, and black for the pupils and dark spots. The eyes of dogs of this breed are blue.
How to make a husky from plasticine:
- The sculpting process begins with the head. You need to roll a round ball of the main color.
- Cheeks and an elongated muzzle are formed from light plasticine.
- Small flat black circles indicate the eyes. A blue iris is attached to the top, and then a small, black pupil.
- The nose is indicated in the form of a dark drop.
- Three thin stripes are made from white plasticine and a pattern is laid out above the eyes, reminiscent of eyebrows. The position of these eyebrows should give a stern look to the dog's face.
- The ears are made from a basic and light color. From each piece of plasticine, 2 equal parts are separated. Then combine dark with white. The base color should be the back of the ear. The details are placed on the top of the head. The ends of the ears point away from each other.
- The body should be oblong and stocky. In the neck area you need to imitate white fur. To do this, you need to pass a small piece of mashed material through a crusher. Carefully place the resulting strips on the dog’s chest in the form of strands of fur.
- The front legs are formed from white plasticine. They should be thick and of medium length. No matches will be needed.
- The hind legs are made of two colors. The thighs will be a basic color, and the part below the knee will be light.
- The husky's tail widens slightly towards the end. If desired, you can add a light spot.
All that remains is to connect the head and torso. It is advisable to align all joints and blur their boundaries.
Rex from the animated series
One of the modern and most beloved cartoons of all children is the one that tells about a family of dogs flying into space. Of course, the puppies in this cartoon are so mischievous and restless. They constantly find themselves in interesting situations and solve any problem that comes their way with great success.
If your kid is a fan of this cartoon, he will probably want to have a figurine in the form of his favorite character. We invite you to learn how to make a cartoon dog named Rex from plasticine. The finished craft turns out to be as believable as possible; it’s fun to play with and use in your collection.
It should be said right away that the work of making Rex cannot be called simple. It is not easy for the reason that the task here is to copy a specific puppy, and not a simple dog. We tried to explain each step in detail and of course supported this work with photographs.
Before making this dog from plasticine, be sure to prepare white plasticine; if you don’t have it, you will have to purchase it; you cannot use another one, since the result will be a completely different dog.
You will need black color to make glasses for the puppy, of course this is an unexpected decision, because dogs don’t need them, but in our work we are considering a cartoon character.
Let's look at how to make a cartoon dog step by step:
Rex from the animated series (Step 1)
- As has already been said, the main color of the craft is white; without it, you cannot make a dog that looks like a natural one. You will need a lot of white mass since you will need to mold the whole body from it. To ensure that the material is used rationally, we recommend dividing the block into several parts. Consider the figure of the dog, you will notice that the head is larger than the body, so separate a larger piece for it. Determine the size of the remaining pieces for the paws and body. (Step 2)
- From the pieces intended for the paws and body, roll out oblong ovals. We attach all the legs to the body. You can give your future puppy any position, sitting or standing. Using a toothpick, make notches on the paws to highlight the toes. Don't forget to make Rex's tail out of white. Attach it to the back. (Step 3)
- We work with our heads. Roll the largest piece into a ball. On the resulting figure, we extend a small bump in front. Use your fingers to pull the cheeks to the sides. Draw fur on the resulting head.
- We attach a black ball to the ledge made earlier - this is the nose. Please note, it is big. Cut a mouth underneath the bulge. Glue the eyes and use the sharp end of a toothpick to push the edges over them. We roll two balls of small diameter, squeeze them and make the shape of drops - these are ears. We attach them to the head. (Step 4)
- All that remains is to make the glasses. Take black color and roll out a thin worm. Make something like glasses and attach it to your eyes.
- We connect the head and torso. For this purpose, take a match or a toothpick and stick it into the body, leaving part outside. Place your head on the protruding edge of the piece of wood.
The cartoon Rex is ready, this plasticine modeling for children will be exciting. The kid will be very pleased with the result, because now he has a hero from TV.
Master class “Dog in a cap” made of plasticine
New Year's holidays are approaching, which means it's time to prepare various decorations, cards and gifts!
Of course, adults can go to the store and buy all the paraphernalia for the celebration. And the children are looking forward to the upcoming preparations and want to make the most of their creative potential, bringing bold ideas to life. Let's help our little creators and make a wonderful dog in a bright cap together. The dog will be made of plasticine, and therefore the fussing children can be seated at the table and captivated by the process. And so that the result of such an interesting and exciting activity will please your child, we have prepared a master class designed to explain in detail the progress of the work. So let's get started! For work we will need the following tools and materials:
Plastic board or mat for modeling; - a stack or plastic knife; - matches and toothpicks; - a set of bright multi-colored plasticine.
How to make a dog in a bright plasticine cap
When working with children, it is very important to organize the process. Therefore, prepare high-quality plasticine and tools in advance, explain to the children how to work with plastic material. You can choose any suitable color for the dog, we took brown. Take some of the plasticine for the head and make a round piece. For the muzzle, make a flat semicircle, and for the ears, make two identical triangles. Connect the muzzle and ears to the head. Make sure that the parts are firmly connected to the head. Bend the ears, slightly extending the tips. Using a stick or a sharp toothpick, make transverse notches on the muzzle. Make indentations for the eyes using a match (rounded side). Use a stack to make a notch for the spout. Let's move on to the design of the eyes. Make small balls from white plasticine, slightly smaller ones from blue plasticine, and the smallest ones from black plasticine. Insert the white balls into the special recesses, press the blue balls in the center to form an iris. Stick black balls-pupils in the center. On the muzzle, use a stack to select the mouth. Stick on a black nose and pink tongue. Roll out an oval body, four legs and a tail from brown plasticine, as in the picture. Press the body against a flat surface so that it is flattened on the abdomen. Use a match to make indentations for the paws on the abdomen. Put the limbs back in place. Connect the tail to the body, smoothing the plasticine at the junction. Select the fur on the body and tail using a brush or toothpick. The lines can be of different lengths and depths, so the fur will look more realistic. Insert a toothpick into the body and connect it to the head. The dog is ready! Now let's take care of the cap. Make a cone from red plasticine, two ropes and two bells from green plasticine. Wrap one strand around the bottom of the cap, press it with your fingers and highlight the lines with a stack. Wrap the other tourniquet around the cap, pressing lightly with your fingers. Attach bells to the tip of the cap. Place the cap on the dog's head. Hooray! Our dog in a bright cap is ready! This funny dog resembles Santa Claus's elf helper. Or maybe he dressed up in a gnome costume for the New Year's masquerade. This means it’s time for us to prepare our holiday outfits or think through our fairy-tale image. And a funny dog will definitely help you with this!
Print Thank you, great lesson +25
This photo modeling lesson for children shows how to make a dog out of plasticine with your own hands step by step, which is very relevant. A dog is man’s ancient and most faithful friend, who will never leave his owner in trouble. You can play with a dog, you can train it, and you can even talk to it.
Since children have a clear idea of what a dog looks like, it will be easier for them to create this figurine of an animal from plasticine, compared to some unusual exotic option.
However, the help of parents will never be superfluous. Other dog-themed lessons:
Shepherd
The plasticine shepherd is made of two colors - brown and black:
- The base of the head should be a small brown ball.
- The muzzle is made separately, from black plasticine. It should be quite large, elongated and wide. In the places where you plan to place the eyes, you need to lift the black plasticine from the muzzle and lightly smear it.
- The eyes are made of brown with black pupils.
- The ears are shaped like sharp triangles, the corners of which should point slightly away from each other.
- The nose is indicated by a small brown oval.
- The body is formed from black plasticine. It should taper towards the back. The front of the chest is brown.
- Paws are sculpted from light plasticine. The back legs of the Shepherd are slightly shorter than the front legs.
Spaniel
To create this dog you need 2 colors of plasticine - coffee and white:
- The head is made from an oval blank. At the end of the muzzle there should be a light spot from which a white stripe extends to the middle of the forehead.
- The spaniel's body is elongated and squat. It almost does not taper towards the back and remains uniform from start to finish. Therefore, you need to make an oval blank, in which the place of the neck will be marked.
- The paws of this breed are thick and short.
- The tail is shaped like a sausage with a blunt end.
- The spaniel's ears hang almost to the ground. Parts in the form of elongated drops are created from brown plasticine and secured to the sides of the head.
- For the eyes, you need to make small depressions and insert black balls into them, filling the eye sockets halfway. The bottom part should remain empty. Overhanging eyelids are indicated at the top.
All that remains is to add a black nose, and the plasticine spaniel is ready.
Puppy in a plasticine box
If you put a plasticine dog in a gift box, then this figurine can be given to friends as a souvenir.
Step-by-step instructions for creating a craft:
- You need to start with the box. You can make it round, this will greatly simplify the task. It is necessary to roll out a layer of material about 5 mm thick. Then, cut out a round bottom and a strip that will serve as the walls. Connect the parts together.
- It is not necessary to create the puppy's body; you can only sculpt the head and front paws. A small ball is rolled for the head, then the lower part is extended to take the shape of a muzzle.
- There will be a cardboard lid on top of the dog’s head, as if the dog was looking out of the box by lifting it. Therefore, it is better to make the animal’s ears drooping.
- The paws are made from thick “sausages”. The fingers are separated with a plastic knife.
- The eyes and nose are indicated in black.
- The lid of the box is made according to the shape of the bottom. For beauty, you can put a bow on top.
The main feature of such a craft should be large, plaintive eyes with glare. They can be made from small pieces of plasticine.
Plasticine puppy
This craft is very easy to do. And therefore, sculpting a dog out of plasticine is a great way to get creative with children.
To sculpt a dog we will need:
Plasticine (brown, white, black); - toothpick. First we sculpt the head. And for this we roll the ball. We sculpt it from brown plasticine. Carefully smooth out all irregularities with your fingers.
Next we will sculpt the body. We need to make a cone. It should be narrower at the top and wider at the bottom. Just like on the dog’s head, we thoroughly smooth out all the unevenness, cracks and wrinkles.
Stick the ball to the top of the cone. The body and head of the dog are ready. To keep the head more firmly on the body, you can insert a match into it so that it sticks out a little. Then we stick this protruding part of the match into the body. That is, we put the head on the dog’s body, as it were.
Let's move on to sculpting smaller parts. Let's mold the ears. One will be brown and the other white. We sculpt a figure in the shape of a droplet and flatten it so that the droplet becomes flat. And then we sculpt the ears to the dog’s head. We stick them so that they stand and the wide part looks up. Then carefully lower the ears so that they hang down.
Now let's sculpt the muzzle. For it we take white plasticine. And we roll a small oval. After that, flatten it a little. And we stick the dog to the head.
Let's make a nose. It will be black. First we roll the ball. And then we form a triangle out of it. But the corners should not be sharp. Therefore, we make them a little rounded. The nose will also be slightly flattened and stuck to the muzzle.
Let's move on to sculpting the eyes. First we sculpt their white part. Roll small balls and flatten them so that they become flat. We stick them to the head. Then we roll black balls, which should be half the size of white ones. And we flatten them too. We sculpt these circles to the white part of the eyes.
All that remains is to make the paws. We mold them from white plasticine. Roll into four balls, two of which should be slightly smaller than the other two. The larger ones are the front legs. And we stick them to the dog’s body from below. And we stick one smaller ball on the sides of the front legs.
Take a toothpick. You can take a match or a needle. And we make a couple of notches on each paw. This is how we designated the fingers. This is such a cute dog made from plasticine!