Orchid is a popular and beloved beautiful flower. Beading will help capture its timeless beauty for many years to come.
You can make such a beauty out of beads with your own hands using the presented master class, which contains photos explaining the weaving process and video lessons from experienced needlewomen that will be useful for beginners.
Materials needed to make an orchid
Standard set of materials required for weaving:
- Beads, different colors.
- Decorations.
- Thread for weaving from beads.
- Beading needle.
- Regular threads.
- Glue.
- Scissors.
- Pot.
- Alabaster or plaster.
It is worth remembering that a properly designed place to work will significantly speed up the process.
Video lesson:
Blue orchid
To make a blue orchid, we will need dark and light blue beads, green, orange and yellow, green, gold and silver wire, thick wire for the stems, threads, glue and plasticine. Weaving is done in the French style.
The instructor talks in detail about all stages of work: by repeating the movements, you can hone them to the point of automaticity. The five blue petals of the flower are different, and each requires a different number of beads. The stamen is made of yellow beads; a yellow bead is fixed in the center. All parts of the flower are connected to each other.
Meaning of colors
Before answering the question of how to make an orchid from beads, you need to understand the meaning of a flower of a particular color:
- White color symbolizes love.
- Red color awakens the desire to create.
- Blue orchid signifies spiritual connection and friendship. Makes an ideal gift for parents.
- Yellow color brings joy.
Weaving
This section will discuss a step-by-step master class on weaving an orchid from beads.
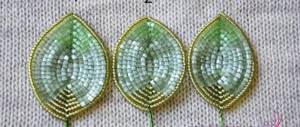
Leaves
You need to weave 10 leaves: 4 small leaves, 7 centimeters long, 3 medium leaves, 9 centimeters long, 3 large leaves, 9 centimeters long. The increase occurs due to the addition of arcs.
- A 20 centimeter wire is taken and a small ring is made at one end.
- 20, 25 and 30 green beads are strung on a wire.
- Then the remaining beads are collected onto the working end. Turns are made from it around the main axis, in total there should be 6 turns on each leaf.
- After completing each revolution, it is necessary to connect the row with the main axis using a wire. The connecting wire should be smaller than the main wire.
- After turning and securing the last row to the axis, the end of the remaining wire is hidden, and its excess is cut off.
- The rest of the leaves are made in the same way.
Little bud
- A thin wire is taken and three green beads are placed on it. The other end is wrapped around the wire to secure them. Then we make two turns around with 10 and 18 beads.
- The second petal is made in the same way.
- The bead is placed on the wire of both petals and hidden in the middle between the petals.
- You need to weave 2 more buds.
Big bud
The large bud is made of green, white and pink beads. Colors are taken randomly.
- According to the algorithm described above, only with three turns, not two, petals are made. The proportion of different colors of beads is at the discretion of the master.
- From the upper end of the petals you need to leave 5-7 centimeters of wire and connect the petals to each other using them.
- A bead is placed on the resulting axis of 3 petals and covered with petals.
- The petals curl together.
- You need to weave 2 more of these buds.
Stamen
- A large bead and 26 yellow beads are placed on the wire.
- The ends of the wire must be wound together 3 times at the base of the bead.
- Then 5 beads are placed on both ends.
- Then 21 beads are placed on them and a loop is made. The pestle is ready.
- 4 yellow beads are placed on the wire and a round loop is made from them. Then you need to make another turn around. The ear is ready.
- In total you need to make 7 pestles and 14 ears.
Flowers
- 6 white beads are strung on a wire.
- The working thread makes one turn around 17 white beads. Then another 4 turns are made with a constant increase in the number of beads. The excess wire is cut off and the ends are hidden. The round leaf is ready.
- 8 beads are placed on the base (you need to take beads of several red and pink shades).
- The first turn of 23 beads is made. Then 1 more bead is placed on the main end. In total, you need to make 4 such turns with a constant increase in the number of beads. With these extra beads you can create a sharp petal.
- To make the tongue you will need two shades of red. 3 beads are placed on the wire. One turn of 7 beads is made. Then 3 more circles with increasing intensity.
- The center is slightly pressed inward to give the shape of a petal.
- In total, you need to make 7 reeds, 14 sharp and 21 round petals.
- 2 round and 2 sharp petals are combined from a pair and connected to each other.
Technology for making orchid leaves and petals
So, let's begin our master class and start creating the elements of our beautiful orchid.
Leaves
Let's start by trying to make an element from dark green beads. We will have 4 of them in total, absolutely identical in execution technique, but different in length, increasing by 1 cm. The smallest is 7 cm.
We take a piece of wire, taken by the central axis, and string the required amount of beads onto it, corresponding to the length we have determined. We will have 3 additional wires perpendicular to the axis, which conventionally designate the top, middle and bottom and ensure reliable stitching of the leaf in three places. Then we weave 4 arcs in this way, forming a round top and sharpening its lower part. Having completed this stage, measure 60 cm of wire and cut it from the coil.
Next, we move on to making the fifth arc, to do this we fix it just below the middle, making sure that during the entire work the wire is inserted from the wrong side and output from the front.
Now, let's turn our work back to go to the other half, fix the wire at the same level as on the opposite side. We turn our work again and, now walking in the usual direction of the working wire, finish the row. The final stage will be another full row.
That's it, our leaf is ready. The quantity of beads may vary and will depend solely on your desire. We recommend, however, to make them of different lengths, with a difference of 1 cm in the direction of increase - this will make the product more organic and natural.
If you encounter any difficulties during the work, carefully watch the photo and video master class, which will more clearly demonstrate the process of creating leaves with arcs.
Heart petals
We collect 6 beads of the main color on the central axis and make three arcs, gradually increasing the length of the row. The top will be round and the bottom will remain pointy. We will make the fourth arc a mix, diluting the main color with any other color you like; for us it is white. Next, continuing to alternate the color of the beads, we perform the fifth half-arc, and, without bringing it to the last bead before the axis, we finish. Down, forming a 6th arc, we go only in white. Having reached the bottom, we weave the right part in the same way as the left.
Thus, we get an orchid petal that resembles a heart shape. To create a flower we will need 2 of these samples. These leaves will be like the inner part.
Oval and round shapes
The back or outer part will be made up of oval ones, which, unlike the inner ones, will be plain and smaller in size. To make them, we need to put 8 beads on the axis and then make 4 arcs, traditionally making sure that the top is round and the bottom is sharp.
Round petals are made in exactly the same way, only during their manufacture a larger circle is specified by adjusting the number of beads in the arc.
Petals with a pointed tip
In essence, they are absolutely opposite to oval petals, and are made exactly the opposite: their bottom is round and the top is pointed. They are very reminiscent of the shape made of beads for a lilac branch. It also consists of 4 pairs of arcs, with each arc increasing by several beads. It is very important to constantly monitor the petal, trying to give it symmetry and a little sharpness. This type of petal is used as an outer petal when assembling a flower.
Petals with frilly edges
The orchid flower looks simply luxurious and elegant, and all thanks to the oblique mosaic weaving technique used. The combination of flowers of various shades emphasizes the subtlety and fragility of the petals, even if woven from beads.
Oblique mosaic weaving
The patterns are quite easy to read and involve first weaving one half of the petal, then the second half is done in complete symmetry, after which the work moves to the center and passes through small beads, with additional beads being weaved. The work on the petal is completed by pulling it quite tightly, giving natural relief to the flower.
The patterns of such weaving are quite easy to read and involve first weaving one half of the petal, then the second half is done in complete symmetry, after which the work moves to the center and passes through small beads, with additional beads being weaved. The work on the petal is completed by pulling it quite tightly, giving natural relief to the flower.
We really hope that our master class was useful and brought you one step closer to creating wonderful flowers. Be sure that with just a little practice, you will not only become a skilled florist, but you will also be able to independently draw up your own patterns and demonstrate your personal master class.
Be creative and remember that the main thing is desire, and everything else can be done with your own hands!
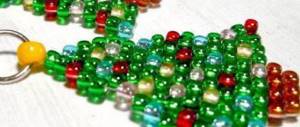
Flower assembly
- The tongue and stamen are connected to each other. The bead should lie above the cup.
- There are 2 ears attached to the side of the stamens.
- One round petal is attached above the stamen, after which a prepared pair is attached below. All elements are aligned, the petals are slightly curved.
- The flower is collected.
Building a branch
- Before starting, the wire under all elements must be wrapped with wire and green thread.
- One small bud is attached to the top of each branch. Large buds are attached just below.
- Even lower, flowers join the branch.
- Almost at the very base, the petals are divided into even parts, towards each branch and connected to each other.
Soil for orchids
- 0.7 liters of water is poured into the container.
- 0.25 kilograms of dry gypsum is poured into the water. Stir the solution until there are no lumps.
- Let the cast sit for a couple of minutes.
The prepared solution is poured into the pot; 2/3 of the pot’s capacity should be filled. Then the orchid is installed there; you need to let the solution dry. To do this, attach the flower so that it stands straight, leave it in this position for 24 hours.
After the plaster hardens, the flower needs to be beautifully positioned. Bend the petals of the flowers slightly and straighten the leaves outward. You can also decorate the plaster with pieces of bark so that it is not visible.
This was the usual technique of weaving an orchid. You can also make flowers using the mosaic weaving technique. However, this option is very difficult to perform and is not recommended for beginners.
Weaving an orchid from beads is a rather labor-intensive process that requires a lot of time and effort. But the result is worth it; as a reward for his work, the master will receive a flower at home that will delight him with its bloom all year round.
You don’t have to copy colors from others; you can experiment and come up with your own palette of shades that will look unusual.
Making a flower
1. The flower consists of three elongated petals, two wide petals and a “lip”.
For elongated petals, we string twelve beads - this is the central frame (Fig. 8, 9). We weave twelve rows around using a circular technique - this is the top and bottom of the petal. For one flower you need to make three such petals.
2. For wide petals, we string three beads - a central frame, fourteen rows around, the top is rounded, the bottom is pointed (Fig. 8, 9). For one flower you need to make two such petals.
Make specks of dark red beads on all five petals from the base to the middle, symmetrically alternating three white beads and one dark red.
3. “Lip” consists of five parts: three petals and two tubes.
3.1. Two identical petals are made of pink beads. The central row is four beads, there are eight rows around. The top and bottom are rounded. In the upper part, before the penultimate and last rows, string one bead on the central wire.
3.2. The lower petal of the “Lips” is also made of pink beads. The central row is six beads, with ten rows around. To extend the petal, add two beads to the central wire before the penultimate and last rows, as in the previous paragraph. We make the central row and the next six dotted, alternating two pink and one dark red beads.
3.3. For the bottom tube, we string twelve dark red beads, make four rows around it, connect the bottom and top wires, and twist.
3.4. We make the upper tube with parallel weaving: seven rows of seven beads each, connected into a tube.