Needlework
07/10/2018 Anastasia Prozheva
People of all ages love toys. Kids love to play with them, lovers give them as a symbol of tenderness, and adults collect them. Handmade items are especially valued. We invite you to learn how to weave toys from rubber bands; our selection of master classes with detailed photos and video instructions is suitable for beginners.
What types of elastic bands are there for weaving?
The range of rubber bands used to make bracelets, toys and other products is quite wide. They can differ from each other not only in colors, but also in texture and density. At the same time, they are united by a manufacturing principle that is similar to the process of producing balloons.
In order to make such elastic bands, a tube of a certain size is dipped into a mass of molten silicone or rubber. After hardening on the surface of the tube, the mass is removed and cut into rings. The main attention in the manufacturing process is paid to such a parameter as strength. This is due to the fact that in the process of making toys from rubber bands, the material is greatly stretched.
Today there are the following types of rubber bands from which you can weave a toy or something else:
- Iridescent with a smooth surface.
- Curly elastic bands.
- Pimpled with pearly protrusions.
- Elastic bands of the same tone with teeth.
- Elastic bands in several colors.
- Chameleon type rubber bands.
- Neon rubber bands.
In the process of weaving toys from rubber bands, you can use either one of the above types or combine them with each other. It all depends on how far a person’s imagination can fly.
Special weaving kits
Typically, rubber bands for making are sold in small bags of 100 pieces each. However, when searching for information on how to weave toys from rubber bands, you may find that this amount may not be enough. In this case, it makes sense to purchase other special kits for making toys using the rubber band weaving method.
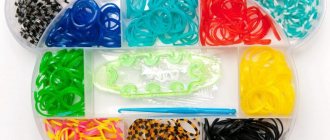
Such sets usually include:
- Slingshot or weaving machine.
- A hook with which loops are transferred.
- Multi-colored elastic bands in quantities from 600 to 18,000.
- Clasps.
- Charms and pendants.
It is also worth remembering that the machines for making such wicker toys may differ in size. Therefore, the largest set contains 3 weaving machines, metal hooks, elastic bands and beads.
Famous weaving techniques
Before looking for diagrams and instructions on how to weave toys from rubber bands, you should familiarize yourself with what techniques there are for making products from colored rubber bands. Each of them may be more useful or appropriate for weaving a particular item.
Today, the following methods exist:
- On the machine.
- On a slingshot.
- On the fork.
- On fingers.
Weaving on a fork and on fingers is best suited for making a ring or a beautiful colored bracelet. And using a machine or slingshot allows you to create toys, keychains, wallets and even cases for mobile phones.
Symbol of enlightenment
The owl is a wise bird that is a symbol of knowledge. Such a small gift can be presented to a student or student. A small keychain in the shape of an owl can be woven on a loom.
The whole point of working with this tool is to sequentially put rubber bands on the posts, and then sequentially throw them off towards the center.
To work you will need:
- Rainbow Loom machine;
- Hook;
- Rubber bands.
Carefully follow the attached step-by-step instructions and you will succeed.
Pull out the middle row of the machine slightly. The notches of the posts should face you. Put on elastic bands, connecting the columns in pairs. There is one elastic band at the edges and two in the center. In the second row there is only one elastic band in the center, there are pairs everywhere. Look at the photo.
A pair of orange rubber bands will form the bird's beak. The crossed pairs of the primary color will be the shoulders.
Next are four pairs of white elastic bands. To make the paws, you need to twist the orange iris on the hook three times and remove the twist with a pair of elastic bands of the main color. Do the same with the bird's eyes. Strengthen the parts as in the photo.
Now you just need to remove the bottom row with a crochet hook around the entire craft. Then the middle row and the head are woven. Pull the last loops through each other and fasten. The keychain is ready.
If the photos did not help you understand the weaving technique on the machine, you can watch a video that clearly shows the process. This will allow you to easily complete this craft.
Weaving toys on a machine
Today you can find a lot of videos on how to weave toys from rubber bands. It's better to start with simple products. One of these is ice cream.
To make this toy you will need:
- Machine.
- Hook.
- Elastic bands - 30 pieces for the main color (for crimson, for example, red), 8 brown for a stick and 8 white for a layer.
The machine is positioned so that the recesses for the hooks are turned in the opposite direction. Weaving begins with the first protruding column. Two red elastic bands are thrown over it and pulled onto the left column. After this, two red elastic bands are located on the first and second column. This operation is repeated four times. The first row ends by placing two white elastic bands on the last row. The same steps are repeated on the middle columns. On the right side, two elastic bands are stretched from the first upper column to the second. Three more rows are made in a similar way. The last row ends with white elastic bands.
The stick is made as follows:
- In the middle row, three rows of brown elastic bands are made, starting from the row with white elastic bands.
- On the last column you need to place a brown elastic band, which will act as a contact rubber band.
Making contact rubber is quite simple. It is wrapped around the hook three times, the resulting loops are carefully removed and put on the middle post.
After this, red rubber bands are taken again. They are pulled in a horizontal position, starting from the second row of posts. The result should be a triangle. The same operation is repeated three more times. The result should be four triangles. On the fifth row, a triangle is created from white elastic bands. The lower part of the white triangle is hooked and transferred to the previous white column.
Contact rubber bands are made on the outer two columns of the last row. After this, you can proceed to weaving.
The weaving algorithm looks like this:
- Place the machine so that the recesses face the master.
- Insert the hook into the last column of brown elastic bands.
- Pull the contact elastic band back, grab the two lower elastic bands, remove it from the post and move it forward.
- Knit the middle row in the same way.
- Insert the hook into a row with white elastic bands and bring the two lower elastic bands forward.
- Knit to the end.
- Transfer the elastic in the last column to the first column in the middle row.
- Repeat all steps on the left side.
Before removing the finished toy from the machine, it must be secured. To do this, an additional elastic band is pulled through all the rows and secured with a knot. After this, the ice cream can be removed from the machine, confident that it will not disintegrate.
Little heart
We suggest you make a small toy in the shape of a heart. Your significant other will definitely appreciate such a cute souvenir. To create a craft, take:
- Rubber bands;
- Plastic fastener;
- Hook.
To weave a heart, you can use either a plastic hook from the Rainbow Loom set or a regular crochet hook.
Twist the elastic band of the main color (red or pink) three times and put it on the hook.
Remove the resulting curl with two elastic bands. Their loops are put back on.
Now the heart needs to expand. To do this, pull one elastic band through the outer loops. Hang its right eye on the hook first, then one of the removed loops, then the left eye. It should look like this.
This operation must be repeated 7 times.
Insert another hook and remove all the loops on it.
Add one elastic band seven times, according to the pattern described above. It should turn out like this.
Next, you need to separate the apexes of the heart. To do this, take an elastic band of a different color, hang one of its ears on your finger, and remove six weaving loops from the other. Attach the second eyelet to your finger too.
The next six loops must be carefully passed through each other without removing them from the tool. This can be done with a second hook or just with your hands. Remove the first part (3 loops) with a hook and an elastic band attached to your finger.
Remove all the loops from the hook onto the second elastic band. The heart is ready.
Now you need to weave a pendant for it. Drop the loops from your fingers onto another elastic band. Adding one iris at a time and dropping the loops towards the center, weave a chain of the required length. Thread a clasp through the last pair of loops.
The keychain is ready to please your loved one.
Related article: DIY paper bat for Halloween with templates
Weaving from rubber bands on a slingshot
Most often, a slingshot is used to weave a bracelet with patterns, both flat and voluminous. But this is not the limit of its functions. You can weave toys from rubber bands on a slingshot, not only on a machine. True, the toy will be small in size.
The easiest example of this type of weaving to perform is making a spider. The algorithm looks like this:
- An elastic band is put on one of the posts of the slingshot and twisted four turns.
- Another elastic band, twisted in half, connects both columns.
- Both elastic bands are tightened in a knot using a hook.
- Repeat the operations three times.
- Remove all the loops and drop them in the center.
- Parts connected with a knot are put on the slingshot.
- The elastic band is folded in half and the bottom row is removed.
- All loops are transferred to one side, the bottom row is removed.
- All elastic bands tied in a knot are cut to obtain spider legs.
There are other toys that can be woven using a slingshot. In skillful hands, it can become an excellent basis for creating toys with filling using the lumigurumi technique.
Origin of rubber bands
Chong Chun Ng is the inventor of multi-colored elastic bands and a machine for weaving them. This man gave amateurs a new type of needlework, which firmly occupied its place in the hearts of craftsmen.
The emergence of a new type of creativity was facilitated by Chong’s desire to help his daughters. They loved to weave colorful bracelets, and their dad came up with a machine that greatly simplified the weaving process. The inventor liked the idea so much that he decided to patent it. The loom was called Rainbow Loom - rainbow loom.
At first, sales of sets of elastic bands and braiding tools did not move at all. Then Chong Chun Ng decided that he needed to tell people about the capabilities of his machine. The inventor's daughters and niece filmed video tutorials on weaving using Rainbow Loom and posted them online. And this gave a strong boost to kit sales. Needlewomen really liked weaving from colored rubber bands. From this bright and durable material you can create wonderful little things - bracelets, keychains, toys, various accessories and wardrobe items.
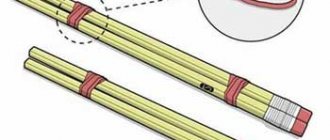
There are a lot of tools for weaving from rubber bands. Rainbow Loom kits include two machines - a rainbow machine and a slingshot machine. You can weave almost anything with a rainbow loom. Bracelets and small figurines are most often made on slingshots. But needlewomen even use improvised means to complete their work, for example:
- Combs;
- Table forks;
- Crochet hooks;
- Own fingers;
- Wooden sticks and pencils.
Related article: How to sew women's shorts with your own hands: pattern and sewing master class
So even without a machine you can weave. If the rubber bands are of good quality, then the products made from them will be strong, bright, and durable.