An electric lock is a useful thing that, in principle, you can make with your own hands. For example, for a gate latch on your property, a hidden lock for a shed. Whether this makes sense given the affordable price of Chinese electromechanical locks, including those designed for gates, is doubtful. But if you love tinkering, then why not. We will tell you three ways to make an electric lock with your own hands.
Advantages and disadvantages
The advantages of the simplest electronic mechanical locks include the fact that they are opened from the outside with a key, and from the inside with a special button.
For example, if a key is accidentally pressed and a person remains at home, but the door is not slammed, the door will remain open. There are also electric motor locks. They include an electrical control structure for the bolt (locking the door) and an electronic motor that controls the bolt.
The bolt is locked in such a way that it is impossible to press the door itself. In addition, these locks can operate in different modes, the bolts can close in different ways, it depends on the level of protection at the moment of closing.
Simple, friction-free design features give the advantage of electric door locks. They hold the door closed using a powerful electric magnet that attracts power to the door. They are trying to somehow combat this problem by using a variety of additional devices.
Electromagnetic locks should not be installed if there is no source of constant power supply.
The newest, faster and more reliable structure is a solenoid lock that controls the bolt thanks to a magnet. The advantages include combined electric motor and magnetic structures. This system will also work when the electricity is turned off, and the door itself will be closed.
Important point!
Electric locks come with different control structures - both remote and contact. They use electronic locks, magnetic cards, radio key fobs and keys with a code. The disadvantage is that they are dependent on energy consumption.
Electromagnetic locks
Electromagnetic locks are less similar to classic mechanical locks than other electronic locks. They consist of three main parts:
- Electromagnet plates.
- Reciprocal metal plate.
- Control systems.
These electronic locks are widely used as a locking mechanism on metal entrance doors. The microprocessor system that controls them operates both in intercom mode (reads and processes information from the keyboard and remote handsets) and analyzes information from contact keys.
Advantages
Thanks to the high reliability of the electromagnetic lock in combination with the significant force of attraction of the plate to the lock (50-500 kg), such a door guarantees a sufficient degree of protection of the premises from third-party penetration. The installed electromagnets and the outdoor part of the electronic lock control system are protected from moisture, which increases their reliability.
Electromagnetic lock for 230 kg
After being disconnected from the power supply, electromagnetic locks can operate for a short time on a battery connected to the control system. After the battery is discharged, the electromagnetic lock will automatically open.
Flaws
The disadvantage of this system is the poor noise immunity of the communication lines of the control system with feedback tubes installed in each apartment, which can lead to failure of the entire system during a severe thunderstorm.
Independent repair and installation of this system is rarely done, since it involves performing a large amount of installation work with subsequent adjustment of the control system.
Types and purchase of electric locks
Electric locks are electromagnetic and electromechanical:
- The first type of lock is based on an electromagnetic field created by applying voltage.
Thanks to its effect, the mechanical bar reliably fixes and holds the door in the closed position. - An electromechanical lock operates on a short-term voltage supply.
This system does not require a stable voltage - energy is supplied only when the door is opened.
An electric lock can be purchased for use together with an intercom, a keypad with a code and a device that reads plastic cards. You can buy this lock and put it on any door; these locks are predominantly equipped with devices that specifically close the door and are thus able to ensure the operation of any electric and electromagnetic locks without any interruptions.
If you purchase an electric lock, you can also consider the closing speed; it is determined by special control valves. The system of this closure must correspond to the weight and dimensions of the door.
You also need to make the right choice of electric locking structure.
These basic properties should be taken into account:
- slamming;
- power off;
If you purchase an electric lock, you will need another battery; it needs to be changed after three years.
It is possible to purchase both a rim lock and a mortise lock; they open remotely and close when slammed. At the moment, it is possible to purchase an electric lock with a variety of additional capabilities. For example, if the lock has the Hands-free property, the door will open without hands. This function is indispensable for summer residents and lovers of shopping.
Review of the best models and prices
Overview by installation method:
Mortise electromechanical
Cost from 1400-1600 rubles.
They have high security and secrecy, since the lock itself cuts into the door, and the handle remains visible. These locks can be opened with keys.
Overhead electromechanical
Cost from 1000-1200 rubles.
Their assembly is easier compared to mortise ones; they are installed on the door from the inside. They are usually used for doors made of metal or wood.
According to the method of controlling the bolt:
Motor class
Cost from 600-1000 rubles.
These locks are quite reliable, have a long service life, but are also the most complex. They have a DC electric motor - it opens the bolt. If the door is closed, the bolt cannot be released due to the pressure of the electric drive. There are brands of locks with several bolts, multifunctional operating schedules, the disadvantage of which is the opening time.
Solenoid locks
Their cost can be from 300 rubles.
They operate from electromagnetic windings. The bolt, which is the core, is retracted past the barrier created by the spring thanks to the electromagnetic field powered by the coil. These locks have a relatively low cost.
Platoon class locks
The cost of such locks varies from 200 to 600 rubles.
Locks are used to keep doors closed against springs; they are cocked during closing and then unlocked using an electric pulse. They do not require constant power supply.
Electromagnetic models
Of course, purchasing a mechanical lock is a good budget option, however, electromagnetic models are more reliable and efficient; they are installed on the front door in apartments, private houses, offices, etc. Such locks have the main difference - they operate on electricity. Energy consumption is small, and therefore you don’t have to worry about extra kilowatts on the meter. In addition, you can use rechargeable batteries so as not to lay a cable to the nearest network.
- Electronic.
The basic model is an electronic lock that you can program yourself. It can work on different principles. In some products, the scheme for receiving a combination is based on its manual entry on the keyboard. Other locks operate by receiving a radio signal, which sends a special key programmed to store the required code. In order for the system to work, it is necessary to provide the lock with power. For convenience, some models are equipped with a display. Buttons can be either regular push buttons or touch buttons, as in more expensive and modern products. - Magnetic.
They also require power from batteries or mains, but the principle of operation of the magnetic lock is based on a slightly different approach. The main element is the magnetic key, which is the carrier of the code. It can be in the form of a tablet, key fob or card. In order to open the door using a magnetic lock, you need to attach the key to the receiving plate. After processing the signal, the mechanism is activated and the door opens. The device of a magnetic door lock is clearly demonstrated by the intercom.
Electromagnetic door locks are considered the most reliable for security
A magnetic and electromagnetic lock are essentially the same device. The main condition is the use of a magnetized key to enter the code and unlock the mechanism. In exclusively electronic models, the circuit is based on the delivery of an electrical impulse.
Installation and configuration
To correctly install an electric lock, you should take into account all the points, and this means making all measurements, without any errors, so that all existing devices function normally. Be sure to tighten all existing bolts tightly so that they do not come loose when opening and closing. The next thing you need to do is be sure to test the lock itself.
The location of the device may depend on the nature of the building. In the case of using an intercom with an electromechanical lock, you can use a structure with two or more panels that can be controlled from all rooms.
To correctly configure the electric lock on the front door, you first need to consult a specialist, because Not every door can have a lock. The price may depend on the type of lock and the door itself. The owner's requirements must be taken into account. If you install it yourself, you can send a photo of the door, but again, be sure to consult with professionals. They will help you choose the right device and give you all the necessary information to correctly install the electric lock yourself.
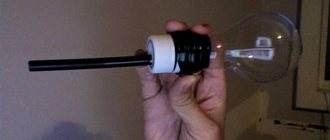
It happens that random events force and mobilize to new ideas and creativity. What kind of radio amateur are you if you repeat everything and buy it ready? So it happened to me that I didn’t have to think long. And now the pockets are not loaded with excess cargo. It was winter, the key to the linen room broke, right in the lock. Attempts to remove the “stub” of the key were unsuccessful. I decided not to buy a new lock, but to remake the old one. In addition, three neighbors use the premises. While searching on the Internet for a simple combination lock, every now and then I came across circuits based on microcontrollers or several microcircuits. I needed to solve the problem simply and quickly. I decided to test a circuit based on a Johnson counter. What I found on the Internet was not suitable for repetition. The circuits were “raw”, non-working and did not have a time delay to hold the lock drive.
Electronic combination lock - circuit diagram
This circuit exists in different variations, and on different counters ( K561IE8, K561IE9, K176IE8, CD4022
and the like).
I modified the circuit based on CD4017 (decimal counter divider with 10 decrypted outputs QO...Q9). CD4017
chip (Johnson counter) is
K561IE8, K176IE8
.
I found a chip with the designation EL4017AE
, which I used in this device. When repeating a device, do not be lazy, identify the markings - they differ in characteristics (operating voltage). All necessary project files are .
So, the working of the electronic combination lock circuit is very simple. When the correct four-digit serial code is entered, a logical one appears at the output of the microcircuit (Q4), which leads to the opening of the lock. When you dial an incorrect number (buttons S5-S10), which is not part of the code, the circuit goes to its original state, that is, it is reset through the 15th pin of the microcircuit ( RESET
).
When S1 is pressed, the single state on the third pin Q0 of the microcircuit is supplied to the input of the field-effect transistor VT1, opening, it supplies voltage to pin 14 ( CLOCK
) which switches the single state to the second pin Q1, then when the buttons S2, S3, S4 are pressed sequentially, the signal goes to Q2 , Q3, and ultimately, when entering the correct code from output Q4, the signal opens transistor VT2 for a short time, determined by the capacitance of capacitor C1, including relay K1, which with its contacts supplies voltage to the actuator (electric lock, latch, or automobile “activator” (actuator) )).
There is one thing, the code cannot consist of the same digit. For example: 2244, the values should be different, like: 0294, etc. One way or another, there are a lot of possible code options, about one ten thousand, which is quite enough to use this combination lock in everyday life.
Now about the design of the castle
The scheme is simple, tested, it has been working for a year and a half without problems, in hot and cold conditions. And most importantly, it’s easy to repeat! You buy radio components, you can use the circuit board.
As a drive for the lock, I used a simple automobile electric drive (actuator). The kit also includes fastenings - metal strips that need to be redone, as can be seen in the photographs. It all depends on what kind of lock is used for the renovation. You can install a ready-made electric strike from FASS LOCK Itemno:2369
(8-12V,12W). In this case, the capacitance of capacitor C1 is changed so as to obtain a time delay of 0.5-1s.
In my case, I attached a metal strip to the plastic handle of the lock, attaching it directly with self-tapping screws. From it to the drive, a spoke is put on (comes complete with the activator), and then the electric drive itself is also attached with self-tapping screws to the base of the door. The relay board is installed on the door and wiring from the keypad and power is supplied. As a body, I used a plastic coffee lid, drilling two holes for fastening.
The keypad for dialing the code is made from the remainder of a U-shaped aluminum profile, for furniture facades, purchased at any furniture fittings store. The profile is cut based on the number of buttons (10 pcs.). After this, you need to drill holes for the buttons, the diameter is slightly larger than the diameter of the button, so that the button with the cambric (tube) on it fits into the hole. This way it will be centered and, as a result, move freely when pressed, without jamming. This is done so that when filling the buttons with glue there is no mixing, but more on that later.
Noki, or how to turn a regular door lock into a modern electronic home security system
Electronic locks are becoming increasingly popular and have become one of the links in the smart home concept. These are often complex mechanisms that require significant modifications to the existing door. Developers from Noki Home Solutions GmbH have thoroughly worked on this issue and released an electronic device that is installed on top of an existing lock.
The main advantages of almost all smart locks are the same:
- Automatic unlocking of the lock when the owner approaches the door. Agree, this is a very convenient function, especially if your hands are busy with some things. But the issue that arises from this is not always covered - the system of protection against accidental opening of the door when the owner of the house passes by it with a smartphone.
- Connection via Bluetooth and Wi-Fi channels with connection to a home router. Here, too, everything is very clear - it turns out to be a passive protection system that notifies the owner with notifications about the opening/closing of the door, no matter where he is. In addition, a log is kept.
- Possibility of opening/closing the door from anywhere in the world.
- Advanced encryption and enhanced security.
- The ability to issue one-time electronic keys to friends.
Noki is installed on an existing keyhole on the inside of the door. This means that no one from the outside will know that you have such a smart device protecting your peace of mind. Moreover, even the core will remain the same as it was before. The dimensions of the new product are 79 x 58 x 58 mm, and the weight is 350 g.
A special pad is screwed onto the old lock, then the key is inserted into the keyhole, and the electronic lock itself is snapped on top. It turns out that when a signal is given, special clamps turn your regular key from the inside. Smart and simple? Without a doubt!
It is immediately worth noting technical limitations and possible problems. The distance from the center of the keyhole to the edge of the door must be at least 29 mm, and the cylinder must protrude above the lining by at least 3 mm. Also note that if, with the key inserted on one side, it is impossible to insert the key on the other and open the door, then you will still have to change the core or take a closer look at other smart locks. And so the ability to open the door from the outside using a key will be an excellent backup method in case the Noki .
Four AA batteries are used as batteries. They will provide autonomous operation of Noki for 10 months (approximately 4,800 openings from new batteries or 16 openings per day).
Using Bluetooth and GPS modules, Noki will always know where you are - outside or inside. This prevents the door from accidentally opening when the owner with a smartphone passes the door inside the house.
To open the lock remotely from anywhere in the world, you need to purchase Noki complete with a Bridge module, which should be located in a power outlet no more than 10 meters from the electronic lock. Next, synchronization and connection to the router occur, after which, through a proprietary application, you can receive notifications about activity, as well as remotely open and close the door. In the near future, the developers promise to release a version of the software for Apple Watch. The electronic key is protected by 256-bit encryption.
order Noki for €139. A more interesting Noki Combo Package, including the lock itself and the Bridge module, will cost €199. The new product is funded on the Kickstarter crowdfunding platform and has already doubled the amount required to start production. The first batch of Noki is expected to ship in December. International shipping is free.
PS If you add a smart Ring video call to the Noki Combo Package, you will generally get a reliable system that does not require security services. Official page of the Noki project on Kickstarter.
See also:
- Friday Smart Lock is a smart lock controlled by iPhone.
- Blueguard is an advanced door lock controlled by iPhone.
- Sesame is a smart door lock that opens with your iPhone.
- August smart lock with iPhone key.
- Noke is a keyless padlock controlled by iPhone.
- i-Bell is a smart door lock equipped with a video camera and speaker.
- Skylock - lock + alarm for cyclists (video).
May 29, 2020 Tags: Accessories, Apple News.
Comments for the site
Cackl e
Filling buttons
Now it's time to secure the buttons into place in the pre-drilled holes. We insert the cambric into the buttons and put them in their place, as can be seen in the photo. Afterwards, you need to fasten them with drops of glue or hot melt glue. But this must be done carefully, so that there are no gaps left if you fill the buttons with epoxy resin! Because my first panel, filled with epoxy, remained as a museum exhibit. The epoxy is very fluid and it seeped into the buttons and glued them together. Like this. I had to do everything anew and this time I filled the panel with hot glue. The buttons can be pre-glued, so as to secure them in place, with a two-component, instant glue used by furniture makers for gluing MDF, sold in the same place as aluminum profiles - in furniture fittings stores.
Of course, before pouring, you need to solder all the wires to the buttons and LEDs as you can see in the photographs. This all adds up to a durable, waterproof and non-removable keypad, as well as a beautiful design that can be applied to any entry door, safe or garage door. Also, the device can be used for security systems.
Now we drill two holes for screws to attach the panel. Also, one or two holes for LEDs (d=3mm). One of them (green light) on the right to indicate that the lock is open. The other one is not used, it can be connected to the power supply for a constant glow or through an additional button to illuminate the keyboard when it is pressed. Accordingly, the LED should be white (ultra bright), fixed so that the light flux is directed towards the buttons. You can cut another piece of the profile and attach it to the keypad on top, or even use a ready-made keyboard from a calculator or other devices. And if you make the front panel from plexiglass, then you will have a solution for illuminating the entire keyboard!
And lastly, the numbers can be applied ready-made, or you can draw them yourself using a felt-tip pen, and then cover the aluminum profile with simple tape. This is done immediately after drilling the holes for the buttons. Of course, there are a lot of wires in relation to devices on microcontrollers, but not everyone has the opportunity to make such devices. The essence of this lock is that even a person who does not have any special skills in radio electronics can assemble it. I bought the parts, assembled it over the weekend, hung it up and connected it. All. This circuit does not require any adjustments. And yet, the code can be changed at any time. All wires from the keyboard are connected inside the combination lock body. Don't forget to label each wire. I used self-adhesive labels for price tags.
I would like to note that over the past time, there are no obvious signs of abrasion on the buttons! Most likely due to the black plastic. They are used daily. But it doesn’t hurt to clean and change the code from time to time.
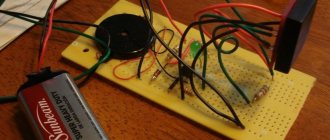
Device power supply
The device is powered by an uninterruptible unit from Dantom
.
It has a built-in 12V/7A gel battery. You can assemble the same one, the circuit is very simple, it produces a constant small charging current (several milliamps with a fully charged battery, and 70 - 100 with a discharged one). This is enough to power several electric locks and electric strikes. Or make a smaller unit if you only have one door with a combination lock. Let's say on: L7812CV
,
LM317
,
KR142EN8B
. Also, the system can be powered from switching power supplies.
Schematic diagram of power supply unit RIP
Printed circuit board BP RIP
In the proposed backup power supply (RPS) circuit, a moisture-proof transformer is used, but you can use any other 20-40 Watt, with an output voltage of 15-18 Volts. If there is only one car actuator under load, then a less powerful transformer will do. For several electric locks, the electrolytic capacitor C1 must have a higher capacitance than that indicated in the diagram - for a greater energy reserve when triggered and, accordingly, a smaller voltage drop across the load. Capacitor C2 – 0.1-0.33mF, C3 – 0.1-0.15mF. The radiator for IC1 is larger, about 100-150 cm2, since in a case with a battery, extra heating is not needed! The output load current for L7815CV is 1.5A. Moreover, if a plastic box is used as a housing, do not forget about the ventilation holes. Diode D8 and fuse FS2 serve as short circuit protection.
Security RIPs have a button ( tamper
) against unauthorized hacking of the device - we won’t need it. On the board, to connect wires, it is better to use soldering instead of terminals, as the most reliable method of fastening. Also, it is appropriate to play it safe and take the spare power wiring out of the room, in case of an unforeseen event (stuff happens in life).
Electromechanical solenoid lock for automatic telephone exchange
In old equipment you can find a solenoid that operates on at least 24 V, preferably 36 or even 48 V. These were often used by signalmen. When voltage is applied, the lever extends or retracts. For example, this one.
To lift a heavy latch, you will have to make a system of levers and springs. You can supply voltage from two connected 12 V batteries from a UPS for a computer.
You can control the electric lock from a regular button that supplies voltage, or from the ACS controller. In the latter case, you can use card readers, code panels, and so on. True, if the solenoid fails, you will have to look for a new one. But if you have a lot of them, say, from disassembled old equipment, then it’s not a problem.
Video of a homemade lock in action
That's all, I hope you found it useful. ).
Discuss the article HOW TO MAKE AN ELECTRONIC CODE LOCK
Every person thinks about the safety and security of their own property. To do this, it is important to choose a high-quality locking device. Many people choose an electric lock, which meets any requirements and is considered a reliable device. However, the price of such a product is higher than that of mechanical analogues. Therefore, not every person is ready to shell out a large sum for the purchase and installation of an electrical structure.
The simplest design of an electric lock, available for self-manufacturing and installation
There is a way out of the situation - this is a homemade electromechanical lock. A do-it-yourself electric version guarantees reliable protection, as well as cost savings, which is important. At the same time, making an electric lock is not difficult. It is enough to decide on the model and adhere to a number of recommendations.
Attention!
One of the main advantages is the absence of the need to go outside to open the door. The electrical design operates automatically, and its mechanical component guarantees manual opening as needed. A card or an ordinary version is used as a key.
Electronic mortise lock
It will not be possible to install such a lock quickly; this task is much more difficult. To perform the installation correctly, you will need to make recesses in the canvas and on the box to accommodate the housing and the strike plate.
Mortise electronic lock
To do this, it is recommended to adhere to the following scheme:
- remove the fabric from the loops;
- make markings for the recess; it should be slightly larger than the dimensions of the lock itself (by 2 or 3 mm);
- using a chisel or an electric drill to make a recess on the frame and door leaf;
- If any irregularities or nicks have formed, clean them thoroughly;
- if the doors are metal, you will have to use a special tool.
After installing the lock case and other devices, you can connect the lock. Everything you need for this is included in the kit. If there is no connection diagram, then the Internet will help, where you can find a suitable method and connect in the correct way.
How to make an electronic lock yourself is shown in this video:
The operating principle of an electromechanical structure?
The principle of opening an electromechanical device is based on the use of a solenoid. It goes like this:
- Voltage is applied to the solenoid contacts.
- Next, the spring retainer is reset.
- The working bolt enters the lock due to the action of the spring on it.
- The lock opens.
To close the lock, the process is reversed. From inside the room, the mechanism is operated using a special button or using a control mechanism. The lock opens mechanically from the outside. A special key is used for this.
Installed electric lock intended for gates or wickets
How to choose the right product?
Choosing an electromechanical lock is not difficult. To do this, consider some features. The first thing people pay attention to is the type of mechanism. It can be overhead or mortise. In this case, the appearance of the product is similar to the mechanical design.
They also pay attention to which side the product is mounted on. In accordance with this, designs are left-handed and right-handed. It is worth considering the preferred method of unlocking and locking, as well as the features of the process. The following design options are available:
- Electrical blocking.
- Motor.
- Solenoid.
- Electric strike.
If you purchased the lock or made it yourself, it’s time to start installing it. It is better if the work is entrusted to an experienced professional. But if desired, they do everything themselves.
Components of a high-quality electric lock required for installation
It is important to remember that the safety of use directly depends on the correctness of installation work. The complexity of installation is determined by the selected locking element. The overhead product is easier to install. The operating algorithm in this case is as follows:
- Markings are made on the gate or door leaf. It involves determining the places where the fasteners are located. Use an ordinary pencil.
- Holes are drilled in the canvas in accordance with the markings, which are used for installing fasteners.
- Install the locking device and secure it carefully.
- Install the counterplate.
- Check the correct functioning of the element and, if necessary, adjust the position.
This completes the installation of the overhead electromechanical structure. The mortise mechanism has a complex installation, but you can handle it yourself. The algorithm in this case comes down to the following steps:
- Markings are made on the end part of the door leaf. To do this, apply a lock and trace it taking into account the holes for fasteners.
- Next, a special niche is cut out in the metal structure. It turns out to be a special “pocket”.
- A lock case is installed in it.
- The places where the device is attached are marked on the canvas and cut out.
- After the holes are made, the lock body is secured. Use ordinary self-tapping screws for this.
- Additional structural elements and a square rod are placed in specially prepared holes.
- Perform marking and installation of the striker plate.
- Check the functionality of the product.
Electromechanical lock with electronic and manual opening
Attention!
Checking the operation of the device comes down to assessing the quality of the electrical part. It is important to ensure that the lock and strike plate are mounted at the same height. The lock bolts must fit into the holes prepared for them without sagging or “clinging.” Only in this case do we talk about correct installation work.
Required tools and components
The composition of the necessary components and parts will largely depend on the complexity of the design of your electromechanical lock. In this paragraph, we will describe the most typical parts and tools that may be required for the manufacture of an electromechanical locking device and its control system. Let's start with the details.
- Circuit board and radio components according to the diagram. We will need them to make the lock control unit, although no one is stopping you from adapting a ready-made factory unit.
- Details of the security mechanism of the mechanical part of the lock (bolt, levers, springs).
- Ready-made lock case or materials for its manufacture. Naturally, the higher quality the materials, the better.
- A specialized electric drive for electromechanical locks or a standard drive for a car's central locking system.
- Small electric motor.
- Gears and rims.
- Drive spoke.
- A small metal rod with a handle that will be attached to the lock body and will become part of the electric strike, if of course you need one.
- A relay designed for a specific load, fasteners for a lock.
- 12 volt power supply and electrical wiring of the required length and cross-section. Experts recommend using multi-colored wiring in order to avoid mistakes when connecting all elements of the protective system.
- Control elements for an electromechanical lock, calling panel, handset or monitor for a video intercom.
It is not for nothing that we consider not only the details of the locking device itself, but also its control elements. Because installing only an electromechanical lock without connecting it to the network and auxiliary devices means doing all the work in vain. In addition to parts and components, we will also need tools. It is also quite difficult to identify a complete list of them, so we will focus on typical ones.
- Soldering iron, solder, side cutters, pliers.
- A set of various screwdrivers.
- Set of needle files and files.
- Drill with drills for metal with a diameter of 1.5 to 15 mm. If you work with a printed circuit board and parts, you will need thinner drills.
- Instruments for measuring voltage.
The process of self-manufacturing an electromechanical lock
To manufacture an electromechanical lock, we begin with the control unit. In this case, you need to either purchase a ready-made board for the control unit with the necessary parameters, or make it yourself according to the attached diagram (Figure 1).
We solder the necessary radio components to a specially prepared printed circuit board and put it aside for now. Now let's start making the lock body. Let us note right away that it is better to make the case in such a way that it fits both the control unit and the mechanical part of the lock, except in cases where the locking device is planned to be used outdoors.
The case is best made of metal with a thickness of at least 3 mm. The shape and size of the case will depend on the size of the components. Now you can proceed to installing the elements into the housing according to the diagram (Fig. 2). We will briefly describe the procedure for carrying out the work.
- We drill 3 mm holes in the lock body for mounting the electric drive. We securely “mount” the drive on the bolts in place according to the schematic diagram (Fig. 2).
- We attach a metal gear to the output shaft of the electric motor.
- We fasten the ring gears so that they communicate with the gear wheel.
- We attach small metal plates perpendicular to the gear wheel, which will act as blocking elements.
- Install return springs.
- Directly at the gear wheel we install 2 moving elements with radial grooves.
- We install return elements.
- We install the locking element (crossbar) connecting it to the drive mechanism using a drive spoke. We install a spring at the base of the crossbar.
- We install a vibration return element (special leaf spring).
- We assemble and install the mechanical secret, communicating it with the bolt, not forgetting to drill a hole for the keyhole. In general, everything.
To summarize, we note that it is quite possible to make an electromechanical lock yourself. However, this requires a certain skill, desire and ability to handle tools. It is best to use ready-made components for electromechanical locking devices supplied by their manufacturers. In this case, your homemade device will be somewhat more expensive, but there is a greater chance that it will be reliable and work stably. Have fun crafting!
Advantages and disadvantages of electromechanical design
Electromechanical products, the installation of which is done by hand, have advantages and disadvantages. The main advantages include:
- High reliability.
- Burglary resistance. Without electricity and a key, it will not be possible to open the mechanism. The electromagnetic design is vulnerable in this regard.
- Durability of service.
- Simplicity and high speed of repair work if necessary.
- Availability of a backup battery, which is convenient during operation.
- Possibility to supplement the product with a special additional power source. This will increase the reliability of the device.
- It is possible to combine the product with other security systems, including an intercom.
There are also some disadvantages. Firstly, the likelihood of failures during operation. They become possible in cases where moisture gets into the product or low air temperature is observed. In general, these shortcomings have now been practically resolved. This is done by installing protective housings and auxiliary elements, which has a positive effect on the operation of the product.
A simple design of an electromechanical lock, installed on the gate with your own hands
A simple and high-quality electromechanical lock with your own hands is a feasible task for every person. There are no difficulties in this, so you can safely do everything yourself. This will also allow you to be proud of your own skills and abilities. The electromechanical design will ensure reliability and protection of the home, as well as comfortable operation. Now you don't have to go outside to open the door.
Every owner of a residential or office space dreams of reliable protection of his property. The best way to solve this problem is with an electronic lock on the front door, which does not have a key hole, which means it is almost impossible to pick up a tool for breaking.
Invisible locks
This type of locks is specially designed for hidden installation. Both electronic deadbolt locks and compact latch locks can be used as these locks. Invisible locks can be installed in various parts of the door leaf, or built into standard mechanical locks, which significantly increases their resistance to burglary.
The lock comes complete with a control system that reads signals sent via a radio channel. Radio networks can be used as a signal source for opening and closing an electronic lock.
The lock is powered from a separate power supply (usually 12 or 5 VDC). Auxiliary battery power supplies are used to independently power the lock during a power outage. When purchasing an invisible lock, you need to pay attention to the condition of the locking tab; the best option is when the tab is initially retracted.
Important: if there is no power for a long time, the self-closing lock will not be able to be opened.
Advantages
This lock is quite simple in design and contains a minimum number of working components, making it easy to set up and, if necessary, repair.
Flaws
Cannot be used as a separate locking mechanism due to the simplicity of the design.
Standard equipment for electronic lock
Electronically controlled locks consist of several elements, which are usually included with the device when it was purchased. The main elements include:
- locking device. It can be installed inside the door leaf (mortise lock) or on the surface of the door (overlay lock). The locking mechanism consists of a housing, inside of which there are bolts that hold the door in the closed position and an electric motor with which the bolts are driven. The lock body may provide for the installation of a door handle;
- a striker plate installed on the door jamb and necessary to hold the bolts in the closed position;
- Control block. The block consists of a device that processes signals for opening and closing the locking mechanism and a controller that serves to control the lock, independently encode the keys and combine the component parts of the mechanism into a single system. Batteries are built into the control unit to ensure the lock operates in the event of a power outage;
- The unit is connected to a constant current source (electrical socket) via a network adapter.
- a device for reading information from a key. Electronic locks can be biometric or built-in invisible locks. The electronic combination lock opens when the code is entered on the panel. The biometric lock is activated by recognizing a fingerprint or retina. An invisibility lock can be opened by a signal transmitted by a key fob, card, cell phone, and so on.
- a set of keys (key fobs, cards).
- mounting bolts of different sizes.
Additionally, the electronic lock can be equipped with a closer, which allows the door to open and close smoothly, which increases the service life of the locking mechanism and is connected to an intercom, which allows you to open the door remotely.
Lock components
Electronic locks consist of several components:
- Locking device. If this element is mortise, it is attached directly to the canvas itself, and the overhead element is attached on top of the structure. The lock is equipped with a body, inside it there are crossbars that hold the doors in the “closed” position. There is also an electric motor that drives the crossbars. Some models have door handles on the body.
Electronic lock locking device
- Locking plate. It is mounted on the jamb, with its help the bolts are held in the “closed” position.
Electronic lock strike plate
- Control block. Contains a device that processes the input signal to operate the lock. This unit also includes batteries that are connected at the moment when the electricity goes out. The block is connected to a power source - a socket.
Control block
- A device that is designed to read information from the used key.
Electric locks are divided into:
- code;
- biometric;
- built-in invisible locks.
An electronic code device opens the door when you enter a code using special buttons on the panel. The biometric lock is triggered when it recognizes a fingerprint or retina. The invisibility lock opens using a signal from a special key fob.
Coded electronic lock
Electronic locks are often equipped with a special closer, which allows the doors to close smoothly and silently. This system increases the operational period of the locking mechanism, connects to the intercom, and it, in turn, can open the doors remotely.
Installing an electronic lock
According to the installation method, electronic locks are divided into two types:
- overhead devices;
- mortise devices.
Overhead locks are installed on the surface of the door leaf, and mortise locks are installed inside the door.
Installation of an electronic lock
Overhead locks are mainly installed on metal doors, on gates or.
To install an electronic lock, you will need:
- marker, pencil, tape measure, corner. This set of tools is necessary for marking the plane of the door at the installation site of the main mechanism;
- electric drill with a set of different drills;
- screwdriver
The first stage of installation begins with the installation of the locking mechanism. To do this, a number of actions are performed:
- in the selected location (most often the locks are installed at a distance of 90–110 cm from the floor level), markings are applied to the door leaf. At the same time, the locations of the locking mechanism housing and fastening points are indicated on the door;
Markings on the door can be made by attaching the lock body to the door leaf or by first drawing a layout of the device.
- the intended holes for fastenings are drilled. In this case, the diameter of the drills used must correspond to the diameter of the fastening bolts;
- a through hole is drilled in the door to connect the device body and the reading mechanism;
- The lock body is installed and secured in the marked area.
The second stage of installation is the installation of the locking plate, that is, the device that will hold the locking bolts. Installation of the striker plate is carried out in the same way as installation of the housing according to the plan:
- Markings are made on the door jamb. When determining the location of the strip area, the location of the lock must be taken into account. It is best to close the main mechanism and mark the location of the crossbars. It is also necessary to mark the mounting locations of the device;
- holes for mounting bolts are drilled;
- the counterplate is fixed.
The crossbars should fit smoothly into the striker. Tight entry and excessive friction are not acceptable.
The third stage of installing a lock yourself is to install a reader and other necessary equipment. In this case, you must be guided by the following rules:
- the reading device is installed on the outside of the door, as close as possible to the lock, since in the case of contact opening, this mechanism must be connected by wires to the locking device;
- the control unit, which connects to the network adapter, is located near a permanent power source indoors;
- It is advisable to place the connecting wires in specialized boxes or corrugated hoses. This will help protect devices from moisture and give the door an aesthetic appearance.
An example of installing an electronic lock is discussed in detail in the video.
Installation of an electronic mortise lock
Installing an electronic lock by cutting into a door is somewhat more difficult, since special niches for the body and striker must be drilled in the door leaf and jamb, respectively. The following scheme is provided for the formation of niches:
- door leaf . This improves the convenience of working;
- the dimensions of the niche are noted, which should be 2 - 3 mm larger than the dimensions of the lock;
- using a drill, chisel, hammer or other equipment, a part of the door leaf and jamb is removed;
- Uneven surfaces are smoothed out after work.
How to connect an electronic lock
After the lock body and all the necessary equipment are installed on the door, you can begin connecting it. In most cases, the device connection diagram is included with the lock. If there is no diagram, then you can follow the following instructions:
- the control unit contains a controller to which all equipment must be connected: a locking mechanism, a reader, and so on. For this, electrical cables supplied with the lock are used;
- the locking device is connected to the opening code reader;
- then all system components are connected to the corresponding terminals of the controller;
- the power adapter is connected;
- the functionality of the mechanism is checked.
If you cannot connect an electronic lock yourself, then it is more advisable to seek help from specialists.
Electronic locks belong to the category of the most reliable locking mechanisms. A significant drawback of the devices is the inability of the lock to operate correctly without exposure to electric current. For this reason, it is recommended to install two locks on the front door, one of which is electronic and the other mechanical.
Electronic lock placement
The installation of mortise and overlay devices is different. The latter are often used for installation on metal entrance doors, gates or garage doors. To properly install such a device, you will need:
- construction pencil or marker;
- square;
- screwdriver;
- electric drill with drills of the required diameter;
- yardstick.
These tools will help you make the correct markings on the plane of the canvas and at the location of the mechanism. The first stage is placement of the device. To do this you will need to perform the following manipulations:
- Retreat from the floor level according to the standard 90-110 cm. Apply a mark in this area. Then mark the location of the locking mechanism, housing, and fasteners.
- The marking can be simplified - take the body, attach it to the canvas, and trace it with a pencil.
- In those places where there are marks for fasteners, drill holes with an electric drill. Use drills slightly smaller than bolts.
- Then make a through hole in the place where the housing and the reading mechanism are connected. Install and secure the housing in the prepared area.
Now it's time to place the strike plate that supports the locking bolts. They are installed in the same way as the housing, according to a predetermined plan:
- Make markings on the side of the door, on the jamb. When the location of the bar has been determined, it is important to consider the area where the lock will be installed. The best place to start is to close the door and mark where the bolts are located. Place marks for fasteners.
- Using an electric drill, make holes for the bolts of the required diameter.
- Attach the striker to the prepared area so that the crossbars fit into it exactly. If they are tight and catch on the bar, adjustment will be required as friction is unacceptable.
After this, you need to install a reader and other equipment, without which the lock will not work. To do this, it is important to adhere to the following rules:
- The reader is installed on the back side of the sash. Mount it as close as possible to the installed lock so that during contact opening the device can be combined with the locking mechanism using wires.
- The control unit connected to the network adapter is located next to the active power source indoors.
- The electrical wires that connect all these parts are placed in special corrugated tubes or boxes. This will protect the devices from the effects of high humidity, and the appearance of the door will become aesthetically attractive.