The secret of the intercom key. Which one will open any door?
Everyone has intercom keys in their pocket. Let's figure out how they work and whether they can be demagnetized, and whether there is one key for all doors.
Types of keys for intercoms
There are several families of intercom keys.
1. “Pills.” Officially, the standard is called Touch memory (TM) or iButton; these are contact keys in a MicroCAN housing. Tablets use the 1-Wire protocol, but the formats are different.
In the Russian Federation, these are mainly keys of the Dallas model, with which intercoms Vizit, Eltis, Z-5R, S2000-2, etc., Cyfral (keys DC2000A and Tsifral-KP1, etc.), Metakom work.
Resistive “pills” are quite rare - the resistance is read from them.
2. "Droplets" . RFID tags in a plastic case of round, oval or teardrop shape. Sometimes they are issued in the form of bracelets or cards.
Inside there is an RFID tag, just like in subway cards, beepers on goods in supermarkets and other similar things. Basically, “droplets” can be short-range (Proximity, read at a distance of up to 10-15 cm), since the more “long-range” Vicinity tags, which operate at a distance of up to 1 m, are unsafe in this case.
In the Russian Federation, EM-Marin Proximity keys are most often used, but there are also older HID tags or newer MiFare ones, as in metro maps.
3. Optical . Real dinosaurs. Somewhere in the provinces they still exist. Such a key is a metal plate in which holes are drilled in a certain order.
There is a photocell inside the intercom that detects whether the holes are drilled in the correct order.
Security is below par, forging a key is a piece of cake, and some intercoms with optical keys were successfully opened with a nail file without a trace.
How does the intercom determine whether the key is correct?
At the factory or company that installs intercoms, a special code is written . Then it is saved in the intercom memory.
When you bring the key to the intercom, it reads the code and compares it with the values from its memory. If the key value is there, the door opens.
By the way, you can open several intercoms with one key . You just need to enter the code of this key into all the necessary intercoms. It is clear that intercoms must be compatible with the key.
Moreover, there are special modules that allow you to save all the keys from one intercom and transfer them to another.
This is how they will reinstall the intercom in your entrance, and you won’t have to change the keys. Although, of course, the intercom installer may well try to make money on this.
The only exception is, perhaps, MiFare . They include a rewritable memory area into which the unique intercom code is copied.
When a master “from a stall” clones such a key, he copies only the factory code, but not the intercom code. As a result, the intercom may reject such a key - the anti-clone system will work. Only a service company can copy the factory code.
How to make a copy of the key?
Usually for this they take a blank - an empty blank without a code . Then the master reads the code from your key and writes it onto a blank.
As a result, you get two identical keys. And since the code of the original key is already saved in the intercom, its clone will also allow you to open the door.
Discs can be rewritable or non-rewritable. If you remember the word “finalization” when burning discs, take a pie from the shelf, then it also applies here.
Technically, you yourself can assemble a key duplicator (programmer) based on Arduino or Raspberry Pi, and then make copies of the key for all occasions. There are plenty of instructions on the Internet, as well as offers to buy a duplicator for a thousand or two rubles.
The main thing is not to miss the type of intercom and key.
So, some keys are designed for a frequency of 125 KHz, others for 13.56 MHz, and so on. In addition, they can be of different types. Be aware of the anti-clone protection that your intercom may support.
Can keys become demagnetized?
It happens that you carry a “tablet” or a “drop” in your pocket, and after a while it goes bam! – and stopped working. And such nonsense every month. Something is wrong here. “Probably demagnetized” is the most popular explanation.
In fact, such keys are not demagnetized . They don’t even have a magnet, and ordinary magnets are not harmful to keys.
It's more a matter of a simple lack of contact. The blanks are cheap, they are purchased in China in bulk for a few cents apiece, so the contact may well come off, for example.
Key housings are usually not sealed. So if the key gets wet in your pocket or is often in a humid environment, it won't last long.
Theoretically, keys can be “killed” by electromagnetic radiation or a strong electrical impulse.
For example, if you put the key in the microwave and turn it on at full power or plug it into an outlet, it will stop working. But a powerful neodymium magnet, like those used in a store to remove tags, is unlikely to harm the key.
Static electricity is also not good for keys. If you carry the pill in your back pocket and squat frequently, causing the synthetic fabric to rub against the key, it won't last long either.
Finally, from frequent use, the “tablet” can simply push in the opposite direction and stop contacting the intercom. Just push it back in and it'll go away.
What is a master key and where can I get it?
After installing the intercom, the specialist remains with a special key. It may even say something like: “Master key. Don't give it to anyone."
But this key usually cannot open the door . It is needed to add new keys to memory. In an intercom, the master key code is stored in a special area so that the device can distinguish it and respond accordingly.
It’s clear that mere mortals are not given a master key. Otherwise, the service company would not be able to charge money for adding records of new keys to the intercom.
But it is possible that the master key fits several intercoms. Or when for some intercoms the “tablet” is a master key, and for others it is a regular key that opens the doors.
Here everything depends not on the key, but on what records are in the intercom’s memory.
What happens if the master key is lost ?
Usually, intercoms still have the option to register a new master key. This is, of course, a potential hacking opportunity. But, objectively speaking, it’s easier to get into the entrance by posing as a plumber than to break into something.
It is more interesting to have a universal key, or “all-terrain vehicle”. Its code is registered in all intercoms of the entrances of one house or yard.
“All-terrain vehicles” are made for postmen, utility workers, craftsmen, etc. Agree, this is much more convenient than carrying around a garland of different keys.
Also, some RFID keys of the new format, for example, RF3.1, allow you to record codes for up to 8 intercoms.
Often intercoms also support blocking keys . This is a security feature: after the door is opened with a locking key, the other keys do not work and the door is locked. The lock can be removed either by a master key or a blocking key (it all depends on the intercom settings).
By the way, it happens that a key is set as a blocking key by mistake. So if your neighbors often cannot get into the entrance after you, check if your key is blocking access.
Is it possible to fool an intercom?
Yes, now you can buy an emulator that simulates keys of different types and produces the desired value for each intercom. The emulators even have displays and a keyboard installed, which allows you to select the desired key and display its name.
It's a funny thing, it costs about 10 thousand rubles. But it does not work without problems - it does not bypass all protection, and sometimes it may not work.
won’t hack the intercom itself , it will only pretend to be a copy of the required key. To program it, you will still need the keys themselves, which are already known to the intercom, and a duplicator device.
You can often hear that an intercom can be disabled with a stun gun. Yes, thin electronics really can’t handle a serious charge. A mechanical shock 10-15 cm below the intercom panel has the same consequences. But this is damage to property and an article of the Criminal Code of the Russian Federation.
Theoretically, you can still forcefully pull the door towards you. But to overcome the force with which the magnet holds the second part of the lock, remarkable power will be required.
Some key-key intercoms can be opened using a Krona battery. The method is humane and safe for intercoms, but it rarely works.
Is it possible to open the intercom with a smartphone?
NFC intercom models are gradually entering the market . More often they are installed in large offices, less often in residential buildings.
If you have this option, your smartphone supports NFC, and the intercom operates at a frequency of 13.56 MHz, you may be able to refuse keys.
But for MiFare, for example, the smartphone must also have a Secure Element chip, and their availability, even within the same smartphone model, often differs from market to market. If there is still a chip and the other conditions are met, everything can work out.
There are also NFC adapters that can turn an old intercom into a new and promising one. You can open the door with both a tablet and a smartphone.
Remember that you may find yourself outside the door in the cold, but charging at home. And yes, the number will not work with an iPhone . Apple has severely limited NFC capabilities in its devices.
What about intercom access codes?
Here, too, everything depends on the intercom. But most models that are installed in the Russian Federation now support entering combinations of characters that allow you to open the door. This often works on Visit intercoms and less often on models from other manufacturers.
We deliberately do not publish combinations, at least because the list for all models will be long. will almost certainly google the master code for your intercom . Unless, of course, the door opening code was changed during installation for your own safety.
These are not at all the numbers that are written to your key. For example, the length of a simple key for DS1990A tablets from the Dallas company is 6 bytes, which is 281474976710656 different combinations. You are unlikely to remember a combination of this length, but you can read it on the keychain itself. A hexadecimal key is usually laser engraved on the surface.
PS Previously, there was a horribly banal life hack: keys with the code 00 00 00 or FF FF FF could open all doors. It was these values that were recorded in the free cells of the intercom and participated in the comparison when checking the key. But this hole has long been closed.
(4.63 out of 5, rated: 193)
Electronics for everyone
Blog about electronics
You've lost your intercom keys and can't make a duplicate. You want to go visit a friend, but you don’t have the keys to her entrance. Or you just need to give a shit to your enemy, but you can’t get into his house, then this article is for you.
A few words about the principle of operation...
There is an opinion that there is a magnet in the intercom tablets, and it opens the door. No, that's not true. The tablet is a ROM with a key hard-wired into it. This ROM is called Touch Memory, brand DS1990A. DS1990A is a brand of intercom keys. Communicates with the intercom via the one-wire bus (single-wire interface). This bus was developed by Dallas and allows two devices to communicate using just one wire. If the device is passive (as in our case), then it also transmits power to it through this wire. It should also be noted that a common wire is also needed (for the circuit to close), but, as a rule, all the grounds of the devices connected to this bus are connected together. The key contains a 60 picofarad capacitor, which provides short-term power to the key at the time of response. But the master device must constantly (at least every 120 microseconds) generate a one signal to charge this capacitor so that the ROM in the tablet continues to be powered.
Giblet tablets. As you can see, there are no magnets there!
In short, discarding all the clever terms, we can simply say that everything that is necessary for the operation of the device is transmitted through only one wire. For comparison, USB requires 4 wires to work, but here there will be only two, and when connecting the ground, only one. By the way, the 1-Wire bus turned out to be so successful that industrial networks were even organized on it, including in our country.
Internal structure of the tablet
One-wire bus organization
The One-wire bus works as follows. There is a master device and a slave device, in our case a passive key. The main signals are generated by the master, logical one and zero signals. The slave device can only forcibly generate zero signals (i.e., simply drive the bus to ground through the transistor). A simplified diagram of a master and slave device is shown in the pictures.
If you look at the diagram, it is easy to notice that by default the master is always +5 volts, a la logical unit. To transmit a logical zero, the master closes the bus to ground through a transistor, and to transmit a 1, it simply opens it. This is done to provide power to the slave device. The slave device is made similarly, only it does not generate +5 volts. It can only sag the bus to the ground, thereby transmitting a logical zero. A logical unit is transmitted simply by the “silence” of the device.
Work protocol
You can immediately clearly notice that only the Master rules the parade, the DS1990A key itself either holds the ground (the master himself sets the bus to zero), or simply remains silent; if he wants to transfer a unit, then he simply remains silent. Let's look at the drawing.
Reset pulse and initialization pulse.
The intercom constantly generates a RESET pulse in idle mode. When the tablet is connected, it responds with a PREFERENCE impulse, showing the master that he can work with it. These are some of the longest pulses. (you can find out more about the pulse duration in the datasheet in the archive).
An example of an intercom reading a key.
After the PREFERENCE pulse is generated by the key, the master device waits for some time and issues a command to read the ROM, usually this is a family code, in our case 33H. Pay attention to how the transmission of zero and one is done. In any case, the pulse “drops” to the ground, but if one is transmitted, then it is quickly restored (about 1 microsecond), but if there should be zero, then the pulse “hangs” on the ground for some time, then returns to one again. Returning to unity is necessary so that the passive device constantly replenishes the energy of the capacitor, and there is power on it. Next, the intercom waits for some time and begins to generate pulses for receiving information, 64 pulses in total (i.e., it receives 64 bits of information). The key is just to match the durations correctly. If he wants to output zero, then he keeps the bus at zero for some time, but if not, then he simply remains silent. The intercom does the rest for him.
Contents of the DS1990A key.
In intercoms, and simply devices where similar devices are used to open doors, a key of the DS1990A standard is used. This device is an 8-byte ROM with information recorded by a laser.
Key dump diagram.
The low byte contains the family code. For DS1990A it will always be 01h. The next six bytes contain the key serial number. The very secret thing that identifies the key. The last byte is called CRC, this is a parity check that ensures the authenticity of the transmitted data. It is calculated from the previous seven bytes. By the way, note that this is not the only standard. There are rewritable ROMs on which information can be stored, and there are also encryption keys. But the whole variety of Dallas tablets is simply impossible to consider in one article; you can read about them on the disk.
Physical device of the key.
Probably, all of the above has discouraged any desire to work with key emulators, because the key must be read, and this is such a hemorrhoid. It turns out not! The Dallas manufacturers took care of us and placed all the information we needed directly on the key, and in hexadecimal at that! It is engraved on it and can be read, and then later sewn into our wonderful emulator.
From all this information we are interested in the following:
CC = CRC is the parity byte 7th byte in the firmware SSSSSSSSSSSS = twelve nibls //nibl = 1/2 byte // serial number, i.e. the key itself in hex codes. FF = family code, in our case it is equal to 01h - the zero byte of our key.
It turns out that we can simply write a program, put the entire key into it, manually copying the dump visually from the real key, and we will get a ready-made emulator. It is enough to simply take the key from your enemy and rewrite what is written on it. Which I generally did with success.
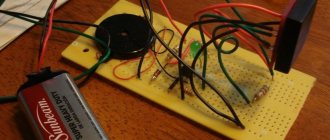
Emulator.
Now we have come to the most delicious thing - an intercom key emulator. First, I found a ready-made emulator on some website, installed it in my AT89C51 and it didn’t work (which is not surprising). But it’s not fun to use other people’s firmware and catch other people’s specially left bugs in the code. Therefore, I started making my own emulators and writing my own programs for them. In general, I tried to make an emulator on 6 different microcontrollers, different architectures, belonging to two families of AVR and i8051, all made by Atmel. Not all of them made money, and a lot of programs were written. At first, the general Napoleonic tasks were set to make a universal emulator with the ability to select a key, but then I abandoned this idea due to its messiness and pointlessness, let other people who would be interested in this article take care of it. But the cost of the emulator, not counting the labor expended, is less than 70-80 rubles, you can even keep it at 30 rubles if you do it, for example, on ATtiny12.
The principle of operation of the emulator.
We have examined in some detail the principle of operation of the intercom, and accordingly it will not be a big problem to describe the algorithm of the DS1990A emulator program. We look carefully at the diagram and think about what needs to be done. And you need to do the following. The leg of the microcontroller hanging in the air (not yet connected to the ground, the reset pulse) will be considered a logical unit by the controller. It means that after supplying power to the controller, we must wait until our leg goes to the ground, and to zero. As we heard zero, we rejoice, wait a while and switch the port from read mode to write mode. Then we drop the bus to zero and hold it for a while - we generate a PRESENCE pulse (see the pulse duration in the datasheet). Then we switch the bus to read mode again, and wait for what the intercom master will tell us. He will tell us a read command consisting of 8 bits. We will not decode it, because... in 99.999% of cases he will tell us the command to give his dump, a la 33H, we just count 8 pulses and don’t worry. We wait further. And the most difficult and interesting part begins - we need to quickly look at what the intercom is telling us and answer it quickly too. We need to output the serial number bit by bit, consisting of the 8 bytes that I mentioned above. I did it in the following way (no matter what microcontroller, the principle will be the same everywhere), loaded a byte into some free register, and shifted it to the right, and looked at the carry bit. As soon as the intercom drops the bus to zero, then if my carry flag is set to one, then I simply remain silent for this impulse and wait for the generation of the next bit reading impulse from the master. If I have a zero in the transfer flag, then after the intercom drops the bus to zero, I switch the microcontroller port to output mode and forcefully hold the bus at zero for a while, then release it and switch the controller port back to read mode. Based on the duration of the pulse in the ground, the device master understands whether a one or a zero was transmitted to it. In principle, that’s it, then the intercom should beep joyfully and open the door.
It's time to test all of the above in practice. For debugging, so as not to constantly run to the intercom, I took out a board that reads intercom keys (read intercom). The device is called Wachdog, and in fact it is a universal harvester, but out of all the abundance of functions, I only needed the ability to read keys. This card reads keys into the USB port, and any program working with a COM port (virtual COM port) could get the key.
Tester board. Seeing the inscription Dallas.
After a little hesitation and a war with the debugger, the code turned out. Here is an example of the data output code for the intercom on the AT89C2051. (In general, the AT89C2051 is a popular, but outdated controller. One of the first that I programmed. The peripherals are minimal, the memory is also nothing. It can only be sewn with a high-voltage programmer. Although there is a new replacement for it, the AT89S2051, it can already be flashed in-circuit through some kind of AVR ISP, and maybe through AVRDUDE - I haven’t checked. The most interesting thing is that it is compatible with ATTiny2313, so the code can be ported to Tinka. Note: DI HALT)
DI HALT:
We wrote this hellish code with Dlin back in 2006 in his apartment. They were laughing to the point of hiccups over their stupid things. That was the first time I touched AVR. I sat fiddling with a procedure for reading from EEPROM in an assembler that was completely unfamiliar to me, while Dliny was tinkering with a demo board for his future emulator. I especially remember my joke with the watchdog, when my MK was reset while writing to EEPROM and cutting out an i2c memory chip from the board using a cutting wheel. Eh... never mind, I’ll drive you to Moscow and we’ll have a blast again!
Results.
As a result, I got a lot of emulators. True, some of them still need to be brought to fruition. Although a few are 100% working. You can see examples of emulators in the photos.
The most interesting is the CRC check, which is carried out by the intercom. You will need this if you want to install a Dallas lock on your computer, for example. An example of calculating CRC on the A89C2051 (although this code will work on all microcontrollers of the i8051 family.
DO_CRC: PUSH ACC ,save accumulator PUSH B ,save the B register PUSH ACC ,save bits to be shifted MOV B,#8 ,set shift = 8 bits , CRC_LOOP: XRL A,CRC ,calculate CRC RRC A ,move it to the carry MOV A,CRC ,get the last CRC value JNC ZERO ,skip if data = 0 XRL A,#18H ,update the CRC value , ZERO: RRC A ,position the new CRC MOV CRC,A ,store the new CRC POP ACC ,get the remaining bits RR A ,position the next bit PUSH ACC ,save the remaining bits DJNZ B,CRC_LOOP ,repeat for eight bits POP ACC ,clean up the stack POP B ,restore the B register POP ACC ,restore the accumulator RET
Conclusion.
As you can see, intercom keys are not as simple as they seem. However, they can be emulated by anyone who knows programming and a soldering iron.
DI HALT:
Deeds of bygone days, deep legends... Long - WDR! (will be clear only to the initiated)))))
Possible mistakes and recommendations from experts
Work should be carried out in a well-lit room during the day. It is worth performing the re-encryption procedure alone, without the participation of third parties. The most common mistakes occur when working in groups. Basic recommendations and troubleshooting:
- The code key must be turned smoothly, using force, but in moderation. It is not always possible to carry out this procedure the first time;
- When the work is completed, the functionality of the lock must be checked on both sides. It is not uncommon for the opening mechanism to work properly, but problems arise when closing;
- If, after correct recoding, the key jams or you have to use force to open the door, then you will have to change the code again;
- Despite the completeness of the recommendations of specialists in our article or in other sources, the manufacturer’s instructions cannot be neglected;
- You need to use the factory keys to set the code that came with the lock. Purchased low-quality devices can cause poorly performed work and completely ruin the mechanism.
Recoding a non-working or jamming lock on a metal entrance door is done when the locking mechanism is in the working position. If during the process the master turns or extends the crossbars, this may cause the device to break. Most often, mistakes are made when using a transcoding L-shaped key. It must be inserted all the way and turned until a characteristic click occurs. If the mechanism is not completed, it will make it impossible to change the position of the code plates.
If encryption is carried out with errors, this may lead to the need to replace the entire device.
Contactless key for intercom
VARIETIES OF KEYS FOR INDOORPHONES AND BLANKS FOR COPYING THESE KEYS.
Intercoms have become a part of our people's lives. They allow us to close the doors of our houses and apartments from unwanted
guests, keep the entrances clean. Typically, multi-subscriber intercoms with push-button panels are used (for communication with apartments)
and key readers at the central entrances and simple controllers with key readers at the back entrances. In elite houses they find
Also used are panels and controllers on gates, wickets, etc. and barriers. To access the entrances, all residents are given keys. They
are contact
(i.e. they need to be applied to the reader) and
contactless
(they just need to be brought to the reader at a distance
CONTACT KEYS (DALLAS, CYFRAL, METAKOM)
Key DS-1990 (DALLAS)
Intercoms and controllers are produced by many companies. Almost all intercoms work with contact keys of the DS-1990 (DALLAS) series.
These keys have a factory-hardwired unique 48-bit key number, an 8-bit family code (01) and an 8-bit CRC 8 checksum.
When the key is applied to the reader, the key circuit power capacitor is quickly charged and the key outputs a signal to the 1-WIRE bus
presence. In response to this, the intercom issues a command to read number 33 h (or 0 Fh) and receives a 64-bit key number via the bus (starting from
Key CYFRAL Key METAKOM
Some intercoms also work with their own keys that differ from DS-1990.
These are intercoms from CYFRAL
(use a key based on the 1233KT1 scheme) and
METAKOM
(use a key based on the 1233KT2 scheme).
These keys differ in that they operate not according to voltage, but according to the current consumption of the circuit and have different coding. When applied
them to the reader, the key begins to continuously issue a code sequence. This sequence starts
sequence (in 1233KT1) or start bit (in 1233KT2) and the code of the key itself. To create a complete copy of these keys, you must use
special blanks such as UK -2007, RW -2007, KS
-07, RW-2000 or universal TM -01, RW -1. After writing the code in them, they
work exactly the same as the original key. True, everything is not so simple with this, signals from the workpieces may have a different frequency, the workpiece itself
may consume a current different from the original key, etc. This is the basis for the action of the filters that companies now install in their intercoms.
Some intercoms, after reading their key, write it into memory in the DALLAS key code (DS-1990). The creation of copies is based on this
these keys on blanks designed for copying DS-1990 keys. True, you first need to convert the key code to CYFRAL or
METAKOM to the DALLAS key code (DS -1990) using special algorithms (different intercoms have different ones. It depends on how it is written
number in the intercom memory). Now there are already 7 encodings for the CYFRAL key and 2 encodings for the METAKOM key.
Blanks for making DALLAS copies are several times cheaper than universal ones (TM-01 and RW-1), and most intercoms CYFRAL and
METAKOM work with both their own keys and DS-1990 keys. Therefore, they are trying to reduce the cost of this process by switching to blanks for
copying DALLAS keys.
BLANKS FOR COPYING KEYS
RW-1990 (TM-08) RW-1990.1 (TM-08V2) RW-1990.2
— these blanks are used to create copies of DALLAS keys (DS-1990).
UK-2007 RW-2007 RW-2000
— these blanks are used to make copies of CYFRAL and METAKOM keys.
TM
-01 C , TM -01 F , RW
-1 are universal
blanks for recording DALLAS, CYFRAL, METAKOM keys.
In addition, there are unusual keys and blanks for copying them.
This is a square version of the TM-08V2 blank and a 3-lead KT-1 blank.
3-lead blank KT-1
The first requires an adapter to the duplicator reader for reading and copying.
The second requires a special duplicator with a third wire and probe (TMD-1KT or modified TMD-5 RFID).
CONTACTLESS KEYS (fobs and cards)
Keychain EM-Marine (125 KHz) Card EM-Marine (125 KHz)
Contactless readers work with cards and key fobs at a frequency of 125 kHz. These cards and key fobs, when presented to the readers, begin
continuously output a 64-bit code sequence. It has a title, manufacturer number, unique key number (with bits
row parity), checksum (column parity bits) and stop bit. The card or key fob code is transmitted in Manchester code.
The beginning of the code is determined by the header bits.
Blanks for copying (RW125RF, T55x7, etc.) have a slightly more complex structure and allow you to write code more
64 bits with the ability to record code of various lengths, in various formats for issuing this code (amplitude, phase, frequency, etc.).
There is even a password setting feature to protect against overwriting.
Contactless readers are installed either directly into the panel or separately.
The controllers in the panel simply accept the card's response and pass it on to the main panel controller. There it is already being decrypted,
conversion to a key code and recording in the intercom memory. Some readers (type CP - Z 2, CP - Z 2 L, etc.) have a built-in
controller that receives the card code, converts it into the code of a regular DALLAS key (DS-1990) and emulates working with this key
via the 1-WIRE bus (that is, it issues a code based on commands from the intercom or controller). Such readers can be connected as
additional to intercom panels that work with simple TM keys.
Techcom key (13.56 MHz) TKRF blank
TECHCOM series intercoms
work only with their own keys at a frequency of 13.56 MHz. To make copies of these keys use
special preparations TKRF
RFD -3
or
TMD-5 RFID
key numbers in them .
Some intercom companies are trying to release their new types of keys that currently exist
duplicators would not be able to copy.
An example is .
First, it released contactless keys for its intercoms operating at a frequency of 13.56 MHz.
To copy them, an FK blank and a special duplicator for it, RFD-4, were developed.
Now it has released new keys with memory that cannot be copied by this duplicator.
Judging by fragmentary information, they made a more complex reading protocol. An intercom reader is not easy
reads the key number, but also works with its memory. Reads the code stored there from it and compares it with the written one
in the intercom memory. If everything matches, it opens the door. Then a new code is generated and written into the key’s memory
and in memory of the intercom. That is, every time the key is applied to the reader, a synchronous change occurs
information in the key memory and in the intercom memory according to a special algorithm.
This is done in a similar way to working with a DS-1971 key (as in some car alarms).
DUPLICATORS FOR MAKING COPIES OF KEYS
TMD-4 KeyMaster PRO 4 RF
To make copies of keys for all these blanks, mainly autonomous duplicators TMD-3, TMD-4,
KeyMaster 3 RF ,
Duplicator RFD-3 Duplicator TMD-5 RFID
For making copies of TECHKOM
TKRF
blanks only its own
RFD -3 or TMD-5 RFID
.
To register new keys in the intercom memory, in case of loss of old ones, you need to call a specialist from the company that services
given house, but this is not always possible, since not all residents agree to pay for maintenance. In this case, resort to purchasing
a duplicate key, which is made on a special blank based on any of the keys for a given entrance. Easy to prepare
the number of this key is written down. Nowadays you can duplicate a key at almost every step. On the one hand, it saves time,
there is no need to call and wait for a technician, but on the other hand, these duplicates are not always correctly perceived by intercoms. Manufacturers
intercoms are trying to weed out such keys and are upgrading the software and hardware of their intercoms and controllers.
Manufacturers of blanks try to bring the parameters of their blanks closer to the parameters of similar keys and make blanks
universal (for recording any keys).
In general, there is a standard struggle between a projectile and armor. In this case, as always, the consumer (i.e., the resident of the house) suffers.
Problems in making keys arise only in those cities and areas where service companies want to keep
the process of recording and selling new keys to residents is in their hands and they use only “branded” keys.
In general, in most intercoms the password to enter the recording mode can be read (and in controllers the master key code can be read) and
write simple DS-1990 keys into memory. This is always more reliable and they work more stable than duplicates. To facilitate these tasks
I introduced a mode for reading passwords and master keys into my MASTER series devices.
When reprinting or quoting this article, a link to my website is required.
How to encode the key to an intercom: RFID and Touch-Memory
Failure of the intercom key is a very rare phenomenon if we consider the so-called tablets, and very likely if we are talking about a contactless RFID system built on cards triggered from a long distance.
If for some reason the entrance door, the gate of a private house or the lock at work no longer unlocks, the question often arises: how to reprogram the key to the intercom? For the average user, this process does not mean complex intervention and participation in programming a personal identification device.
Features of programming intercom keys
To understand why programming individual intercom keys only involves recording a new identifier and linking it to the subscriber on the device installed in the door, it is worth paying special attention to the mechanics of operation and the internal structure of the usual tablets and cards.
Intercom key devices
All keys are built on a one-time device circuit. If a failure or physical violation of the internal structure occurs, the personal identifier is simply thrown away or destroyed. Neither repair nor reprogramming without the use of special industrial devices is provided.
RFID
Small keychains and cards are already familiar to many people. For such a key to operate, it does not need to be leaned against the reading pad. You just need to bring it a certain distance.
The keys are ranked according to their operating range:
- with an identification zone of 100-150 mm, common format, Proximity type;
- with a detection range of up to 1 m, Vicinity type.
Despite such differences in range, all identifiers work according to a simple scheme.
RFID intercom key
An intercom using keys of this class has a low-intensity electromagnetic field radiation unit in the contact area. Inside an RFID card or key fob there is a simple circuit; it includes an inductive oscillating circuit, a miniature transmitting antenna and a chip that generates a signal.
When the key is brought into the radiation zone, energy is generated and the internal electrical circuit is activated. The card or key fob transmits a radio frequency signal, the intercom recognizes the identifier and unlocks the door if it is registered in its memory.
There is simply no simple way to reprogram an RFID-class intercom key for most types of products. The identifier is formed by a factory-sprayed chip, the number of unique combinations (cards and key fobs) is huge, changes to the code are not provided.
RFID Key Programming
The key can deteriorate either due to mechanical kinks or breaks (as a result, damage to the chip or transmitting antenna grid occurs), or due to exposure to strong electromagnetic radiation, comparable in strength to a microwave oven.
Touch-Memory
Touch-Memory is the contact tablet most people are familiar with. There is also a microchip inside this key.
However, the identifier is transmitted via a single-channel electrical circuit. When the key is applied to the contact pad, the data reading circuit is closed in the intercom.
A unique code stitched into the tablet is transmitted and checked against one of those stored in the device’s memory. If identification is successful, the door will unlock.
A Touch-Memory tablet can be damaged by exposure to strong static voltage by applying the tablet to electrified clothing. This is quite difficult to do, since the pulse must pass between certain points of the contact pad, but this is the most common cause of breakdowns.
The tablet with the chip is very durable, it is difficult to damage it mechanically, the key is that, in addition to exposure to static, it can be burned in the microwave. Touch-Memory tolerates any other influences, including the most powerful neodymium magnets, without consequences.
The way to program access keys for an intercom of this class is to use a special programmer. It is used to make clones of tablets, as well as universal master keys for a series of intercoms.
Touch-Memory is divided into classes. They depend not on the internal structure and principles of operation, but on the manufacturers, each of whom creates an internal circuit with certain characteristics and a methodology for generating a unique code.
Programming the Touch Memory intercom key
The following types of Touch-Memory are widely used:
- with markings starting with DS (Dallas), used in a huge number of models Vizit, Eltis, C2000 and others;
- marked DC, as well as Cifral KP-1 - Touch-Memory data is intended only for Cifral intercoms;
- K series, widely used in Metacom access control systems and other intercoms.
Similarly, there are classes and RFID formats, for example, the oldest HID, the popular EM-Marin, and also used in Mifare cards triggered from a long distance. Therefore, before figuring out how to program a personal key for an intercom from an entrance door, you first need to purchase a Touch-Memory or RFID compatible format.
Do-it-yourself intercom key programming
The method for encoding a personal key for an intercom from work, home or friends' entrance consists only of recording the data of the corresponding personal identifier into the memory of the device controlling the door. To do this yourself, you need to access the service functions from the front panel keypad.
The technicians who install the intercom are required to reprogram and change the factory master codes and other service information of the device.
Changing the standard access code for the intercom
If this is done, the methods for registering your key in the intercom using standard access combinations will not work. However, a huge number of devices on the door respond to factory codes and allow you to activate service functions.
Algorithm of actions
The easiest way is to find out how to encode the key for the intercom from the entrance door from a service company. Some of them provide such data.
But there is a set of standard actions for intercoms of common brands.
- Rainmann, Raikman - press call, enter 987654, after the beep - 123456. If the invitation P appears on the display - press 2, apply the tablet, press #, , #. Recording into memory is done with the * button;
- Vizit - dial #-999, after the invitation sound, dial code 1234 (for some series - 6767, 0000, 12345, 9999, 3535). After this, press 3, after a pause - the apartment number, apply the key, press #, *. If the factory code (1234 and others) is not accepted, the intercom will emit a two-tone signal;
- Cifral, Eltis - hold the call button until there is a reaction (sound, prompt on the display), enter 1234, then the apartment number, call. In response to the invitation to place the key, exit the menu by pressing the * button.
The most modern versions of the Cifral intercom use fairly complex code sets. The method for encoding the key to the intercom from the entrance door looks like this: call, 41, call, 14102, 70543.
Entering the standard factory code into the intercom
Then you should wait for the invitation to appear on the screen, press 5, enter the apartment number, after the inscription on the Touch display, attach the key. A sound signal indicates recording into memory.
Conclusion
You can record any of the purchased keys, which are mistakenly called blanks, into the intercom memory. In reality, it is a working mechanism with its own unique code. It only needs to be registered at the entrance device.
A variety of key application techniques are available. The same one can be used on several intercoms of the same brand, provided that registration has been made on each one. The main thing is that the Touch-Memory tablet or RFID card or key fob must have a format compatible with the device on the door.
Source: https://bezopasnostin.ru/domofony/kak-samomu-zaprogrammirovat-klyuch-ot-domofona.html