Features of the material
Laminate is a floor covering that is used quite often due to the quality of the material itself and ease of installation. The structure of the laminate includes 4 layers: protective, load-bearing, stabilizing and decorative. Thanks to this structure, composition and production technologies, the high-class material is:
- wear-resistant;
- resistant to loads and mechanical damage;
- resistant to temperature changes;
- antistatic;
- moisture resistant;
- Resistant to chemical stains.
Shelves for rooms
It’s easy to make a shelf for a room from whole sheets or medium-length scraps. They can be angled or straight, depending on your choice. As in the case of a kitchen shelf, this design is not able to withstand heavy loads, but you can place on it:
- small toys;
- photo frames;
- costume jewelry;
- office;
- fragrances and candles;
- watches and much more.
Another way to use leftovers is as a shoe rack. Its size will depend on how many pairs of shoes you want to place on it.
Makes great boxes and boxes.
Laminate can withstand heavy loads, which makes it an incredibly valuable material in everyday life. You can, for example, build additional shelves and drawers or assemble modest furniture for your home yourself. Laminate is the ideal material to make convenient drawers for the kitchen, office or balcony. Additional storage areas will definitely not be superfluous.
You can easily make many shelves.
It is best to use corners to fasten laminate panels, as there will be problems with nails and screws screwed into the end. Large enough laminate panels left over from a renovation can be used to build sturdy shelves.
Photo background
A photo backdrop is a background surface for creating beautiful photographs. This product is ideal for people who are interested in the art of photography. The photophone will also be useful for needlewomen who prefer to take photographs and post the results of their work on social networks, and for culinary bloggers.
Nowadays, aged wood is a very popular material for photo backdrops, so you can easily find a suitable laminate. Also suitable for making a photophone is a material with colors that imitate leather, marble, and other types of stone. Textured laminate looks best. Smooth lamellas look less impressive, but are still used in design.
To make crafts, they look for pieces of laminate of a suitable size of one type or combine several textures together. The dimensions of the photophone depend on the needs of the user. To photograph small works (jewelry), items with a side of 15–20 cm are made. To display medium-sized objects (toys, hats, dishes), it is better to make a larger photo backdrop (50 x 50 cm or 60 x 60 cm). Large items are photographed using photophones up to 1 x 1 m.
Photophone made of laminated parquet
Making a photo backdrop is quite simple. You just need to connect the lamellas together, leave them in their original form or scratch them a little (aging them) and treat them with acrylic paint. To enhance the effect of aging, it is worth rubbing the half-dried paint with a sponge or cloth in certain places. Since the edge of the stand still does not fall into the frame, it is not necessary to process it, and defects in the middle can be hidden by the exposed objects.
Bonus: furniture restoration
We repair furniture with laminate.
Old furniture, especially in the country, can be quite easily updated using laminate. It is enough to fix the new panels on top of the worn surface of the furniture. The most important thing is that after such “modernization” the furniture will retain its strength and durability.
There will always be something in your home that needs to be placed in a box or storage unit. Then you will know where everything is, how to find it, and, thanks to the box, things will not be scattered. But such storage items may be in short supply. The solution to this problem is to assemble a box or storage box from laminate with your own hands. They can come in different sizes depending on your needs. All you have to do is cut out the leftovers and glue them together.
Here's what you should know when performing such work:
- To cut the laminate, use a jigsaw so that the cut areas are smooth without burrs or chips.
- When working with a jigsaw, hold the part that hangs from the surface with your hand so that it does not break off or fall. Otherwise, there will definitely be chips at the tear-off site.
- Thanks to the decorative layer, the material has a beautiful aesthetic appearance. But if you want to paint it, use acrylic paint. It is practically odorless and fits well on the surface, hiding all flaws in the material. Apply a coat of paint especially carefully to the edge.
- It is better to fasten the finished parts together using universal glue, since nails and screws in the laminate do not hold well and can split it.
READ MORE: Budget menu for celebrating the Old New Year
You can put anything in such a box:
- Kids toys;
- clothes or underwear;
- books;
- documentation;
- tools and building materials;
- wires and much more.
If you are a gardener, or simply grow crops in your garden, you can make a convenient box for seedlings from laminate. Unlike the store-bought version, you can choose the size that suits you. After assembly, it can be placed on a windowsill or mounted on a special rack.
If you make a large box, you can store fruits, vegetables and cereals in it. The operating principle is the same, but with one condition: the box must be equipped with a lid. It can be secured with ordinary hinges, which are sold at any hardware store. You can purchase door hardware as a handle or make it yourself.
Small laminate box
Even small leftovers can be used. Then the material will be used completely, without residues. For example, you can make pots from small planks that are suitable for indoor plants. This design is not suitable as a pot with soil, but it is quite suitable for decorative purposes, so its size should be slightly larger than the size of the pot with the plant itself. Then the pot will easily fit into your product. If necessary, it can also be easily removed.
Homemade cardboard boxes
Do you have nowhere to store jewelry or nice little things? Then this article is just for you. We suggest you learn how to make a box with your own hands from cardboard and paper. Let's consider options that will not only be functional, but will definitely please the eye with a beautiful appearance.
Hexagonal origami box
Let's start with instructions on how to make a hexagonal paper box. We will use the origami technique. Before you start making, prepare:
- two square sheets of the same color (size 15.5 by 15.5 cm);
- square sheets of a different color (size 15 by 15 cm);
- ruler;
- pencil;
- scissors.
Ready? Then step by step we fold the box from plain paper:
- We take one of the large leaves to make the top part. If you have paper with a pattern or color, place it with the decorated side down.
- Fold the sheet in half and iron all the fold lines. We open it and turn the sheet towards us so that the fold line is perpendicular.
- Now take the lower left corner and pull it towards the intended center line. Fold it so that a new corner is formed on the right side. Make sure all points are even and iron the fold line.
- We unfold the sheet with a free corner and wrap it. We unfold the sheet again so that the long corner is at the top. We take the lower part and bend it towards the upper corner, but not all the way, but so that the tip is visible, it is enough to leave a corner less than a centimeter long.
- Iron the fold. Fold the tail remaining at the top onto itself and press tightly. We open the workpiece.
- After this we make horizontal folds. We apply the lower part to the horizontal line, so the space is divided in half. We do the same with the other side. We unfold the product.
- Then fold the bottom part upward until the colored and white parts intersect. Turn it back and fold the right side of the paper. We turn the material towards us with the right side and fold the triangle so that its side touches the top. We unfold the workpiece again.
- Fold the resulting figure in half. Let's expand. From below we already have the side of the box. And now we need to hold this side and iron all the vertical lines.
- We begin to assemble the box from the side. We fold the lines diagonally, make movements so that the material begins to wrap inward. When the opposite side remains, put the remaining paper inside.
One piece is ready. We will need to make another one from a sheet of the same size. Let's connect these details. We make the second half in a similar way, but from sheets of a different size.
The product turned out very beautiful, if you liked it, check out the article about paper boxes. And we move on and now find out how boxes are made from cardboard and fabric.
Round cardboard box
Let's look at an interesting option for making a box from cardboard and beautiful fabric. There is nothing complicated in this, but the process will be painstaking and first we have to make the foundation. And for this we need:
- cardboard figures (2 circles with a diameter of 16.3 centimeters, 4 circles with a diameter of 15.5 centimeters, a strip with a length of 50.8 centimeters and a width of 8.7, leaving a space at the end with a size of 3.5 cm);
- ruler;
- stationery knife;
- hot glue and a gun for it;
- Super glue.
For the upcoming work, megamaster.info recommends using a stationery knife, as scissors can crush the material. Now let's move on to the instructions on how to make a cardboard box:
- We take circles with a size of 16.3. We glue them together two at a time. It is better to apply the glue in a spiral to ensure a strong bond. We press them tightly against each other. We do the same with two other circles of 15.5 cm each.
- Now take a long strip of cardboard. We iron it so that it becomes corrugated and easily takes the desired round shape. Apply glue to the remaining edges and press. The end result should be a ring.
- The blanks for the frame are ready. Next we will collect them. Place the first glued 15.5 cm circles on the bottom. Glue these parts together. You need to apply glue both inside and outside.
- Let's do the remaining circles. We apply glue to both large and small workpieces. Glue them together, but so that the small circles are located in the center of the large ones. We have a lid, check whether it fits tightly to the main part.
Kitchenware
Even a schoolboy can do this.
Laminate flooring makes great kitchen utensils! True, for this you will have to arm yourself and work properly with a jigsaw. By and large, even a fairly skillful and enterprising student can make kitchen utensils from laminate. Something similar (previously) was done by schoolchildren in labor lessons.
The spice box looks good.
Laminate panels are also ideal for hot pads. You can use glue to make an excellent box for storing spices using laminate scraps.
Everything for your kitchen
There are many options for using the product.
For kitchen
Due to the strength of the laminate and its environmental friendliness, you can make various kitchen utensils:
- Stands for protecting table tops. The polished surface does not withstand high temperatures and very often marks from mugs remain on it, which spoil the entire appearance. From laminate you can make special stands of various shapes that will protect surfaces from the appearance of marks.
- Cutting boards. A protective plastic layer can protect the product from scratches for a long time.
- Kitchen apron. If there are a lot of leftovers, you can use them to decorate the kitchen apron, which will be very easy to care for.
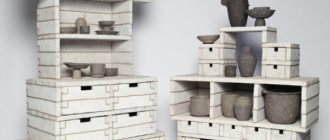
There are never enough structures for storing things. Therefore, from laminate, you can make beautiful boxes of different volumes and shapes. They can be placed in any room. They are also suitable for storing items and things for various purposes:
- Kids toys;
- synthetic detergents and other household chemicals;
- shoes;
- cleaning products;
- boxes for seedlings.
The drawers can be placed in any convenient place, built into the wall or replaced with a bulky chest of drawers. For summer residents, such drawers can be a real godsend for placing and storing things in a country house.
You can also make shelves of any shape and size from leftovers. By using your imagination, you can make very stylish bookshelves or flower stands.
READ MORE: Which floor is better to make in the garage, which option is cheaper
If there are a lot of scraps left or they are large enough, you can make furniture. The material will provide such items with a beautiful appearance. For example, make a spacious and comfortable shoe rack or hanger. To do this, you will need to fix the slats on the wall, and screw hooks for outerwear to them.
It is also quite possible to make a miniature coffee table. However, it is worth remembering that he will additionally need legs.
If there are pets in the house, laminate will be an excellent material for making a house or stand for them.
The material is suitable for making a bed. Moreover, this will be a piece of furniture made according to your own design. Additionally, it can be equipped with drawers for storing bed linen.
The remains of the laminate will be useful for making a screen for the battery and decorating the window.
To decorate a window, you first need to remove the old trim. Remove the old slopes, level the surface, and, if necessary, foam all existing deep defects. After this, you can begin finishing work. The resulting opening will look very original and at the same time be combined with the floor covering.
The batteries in many apartments are not particularly beautiful and design. Therefore, they should be disguised. When making a screen, do not forget that air must circulate. Therefore it is necessary to leave holes. It will also help protect children from contact with a hot radiator, and will give the room a finished look.
When making decor, you can fully demonstrate all your design abilities, because the flight of imagination does not limit anything. Laminate crafts will become unusual decorations for your home or apartment. For example, if there is a baby in the house, then a dollhouse will make him very happy.
Laminate is also suitable for making an original box. If you decorate it with beautiful patterns or line it with velvet, you will get a wonderful gift.
Leftover laminate flooring is often used to decorate walls or doorways. They lay out various patterns or make an unusual panel.
These are not all the options for using leftover laminate flooring. By showing your imagination and spending very little time, you can make an unusual thing or beautifully decorate a room.
Take a look at your kitchen. What do you need to work comfortably? Due to the strength and special characteristics of laminate, you can make various kitchen items from its remains:
- stand for hot dishes;
- shelf for storing spices and other small items;
- cutting board;
- cup stand;
- vase for sweets.
To protect the polished surfaces of kitchen furniture from hot pots, kettles and cups, you can make stands of various shapes. It is especially necessary to take into account in your work the fact that there is no need to glue, mount and assemble a certain structure. Simply cut the laminate sheet to the shape you choose.
Laminate table
When you have a large amount of laminate leftovers, you can use them to decorate the wall between the kitchen table and the shelves above (kitchen apron). This will be a good alternative to conventional tile or mosaic finishing, especially since you will save money on it.
If you want to make a shelf, you should consider that the structure may not withstand heavy loads, so placing heavy objects there is not recommended. Below are instructions on how to make such a shelf.
For work you will need:
- pencil and ruler;
- universal glue;
- brush for applying glue;
- jigsaw
READ MORE: Waterproofing the bathroom floor, materials and device, how to do it yourself
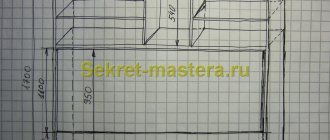
To make a shelf, you need to cut the laminate into the following elements:
- back wall 32 cm high, 40 cm wide – 1 pc.;
- side walls 32 cm high, 10 cm wide – 2 pcs.;
- horizontal walls for shelves 40 cm high, 15 cm wide – 2 pcs.;
- slats measuring 40 cm – 2 pcs.
Let's consider the stages of work on assembling the shelf:
- Make markings and cut out all the parts. To make the back main wall, connect several sheets of laminate, first lubricating the joint with glue for secure fastening.
- The structure will be strengthened with wooden slats. They need to be glued to the back wall. First, mark the location of the adhesive to secure them parallel. Measure 15 cm from the top of the wall and draw a horizontal line. Measure 15 cm from it again and again draw a line. In these places you need to glue the slats. A space of the remaining 2 cm is formed below.
- Apply glue to the slats and glue them in place.
- Take the horizontal walls and glue them to the rail on top. Grease the ends of the horizontal walls that will connect with the side walls with glue.
- Immediately attach the side walls to ensure they are securely in place.
This shelf can be hung using a bracket or simply placed on the kitchen table.
Crafts
For handmade lovers, laminate can become a popular material. From different types of laminate they create unique accessories, useful items and interesting things. Handmade crafts will fill your home with coziness and replace expensive store-bought decor.
Laminate makes beautiful and durable doll houses. Girls of any age can enjoy this toy. For the safety of the child, there are no sharp corners or elements that could cause injury. To make the house, only safe adhesives without an unpleasant odor are used. The corners are covered with soft cloth, felt, foam rubber. Using saws and other tools, they cut windows, doors, build fireplaces, tables and chairs, and other doll furniture. Other materials are also used to furnish the premises of the house:
- paints;
- paper;
- foil;
- fabrics;
- colored cardboard.
Homemade bird feeder
Also, bird feeders, birdhouses, and cat houses are made from laminate, where animals will rest and play. The inside of the cat's housing is covered with material on which the pet will sharpen its claws, and soft bedding is placed on the floor. In addition, the laminate will become the basis for the manufacture of boxes, pencil holders, boxes for stationery, buttons, threads, and jewelry. Beautiful velvet or other soft material, or artificial suede is placed inside such boxes, and a variety of decor is glued to the outside: beads, buttons, coins.
Wall decor
You can make a pano.
Laminate is a flooring material, but it can also be used to decorate walls in an apartment. It makes an original decor. For example, you can make panels on which flower pots will subsequently hang. Another useful recipe is to create panels from laminate scraps of different lengths.
When creating panels, it is recommended to use laminate of different shades. You can find additional boards in the store; they often simply throw away the leftover laminate.
Mosaic
Often, after repairs, there are pieces of different floor coverings that differ in appearance, color, and texture. They are used to make a mosaic, which is suitable for creating a picture, a functional area or finishing an entire wall. Various interior items are also decorated with mosaics. It is important that all materials have approximately the same thickness and similar technical parameters. Lay out the mosaic in any order on a sheet of plywood, starting from the border. This decor looks very beautiful if its outline is dark and the center is light.
Source: kraska.guru