Register Login
Publication date: February 20, 2019
In recent years, wind energy has strengthened its position among other areas of the industry. The share of this area in the total volume of energy generated is growing steadily; today there are entire countries that use wind generators as the main devices for generating electricity. For example, in Denmark in 2020, wind turbines produced 42% of all electricity in the country. Slightly behind this state are Portugal (27%), Spain (20%), Ireland (19%) and Germany (18.8%). The undoubted leader in the development of wind energy in the country today is China. According to WindPower Intelligence, the country's installed wind power capacity is 171.8 GW. In 2020, the country commissioned about 19.5 GW of capacity, which is 37% of the total global capacity.
As for Russia, with regard to issues related to wind energy, our country occupies a middle position. On the one hand, an incredibly large territory and plains are formed by fairly even winds. But there is another side - the winds in Russia are predominantly slow, low-potential. In some areas, especially sparsely populated areas, violent winds are observed, so the opportunity to build a horizontal wind generator on a site with their own hands seems very attractive to Russians.
In addition, wind power can be combined with other sources of alternative energy, such as solar power plants.
How does a barrel windmill work?
The design of the device is simple: a wheel with blades is mounted on a pipe, which is driven by the force of the wind. To transmit torque to the generator shaft, a gearbox is built into the device. The inverter converts direct current into alternating current, which is then supplied to points of consumption - devices and household appliances connected to the network. Provided that the elements are mutually compatible in terms of operating parameters, such a barrel windmill is surprisingly efficient, supplying the required amount of electricity to the site and relieving part of the load on the network.
The operating principle of a wind generator is based on the rotation of blades driven by wind of medium or significant strength. Through the gearbox, rotation is transmitted to the generator shaft, where mechanical energy is transformed into electrical energy. The power of the device is determined by such parameters as the size of the wheel with blades, wind strength and mast height. The higher the listed parameters, the more powerful the windmill design, and the more electricity flows to the facility to the end consumer.
Depending on the direction of rotation, wind generators with a vertical or horizontal axis of rotation are distinguished. It is much easier and cheaper to construct the former, so this option will be considered below.
Vertical wind generator made of barrels
- home
- >Vertical wind turbines
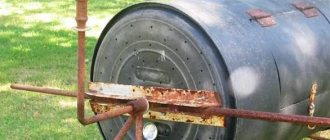
An interesting vertical wind generator in my opinion, the peculiarity is the use of blades that open in the wind and centrifugal hanging weights that regulate maximum speed, thereby limiting the rotation of the rotor at high wind speeds. Information about this windmill was taken from the YouTube channel, author Valera Zharkov - www.youtube.com/watch?v=mQsd55fi4pg.
The blades are made of iron barrels; at the edges the area of the blades is increased by strips of galvanized sheet metal, which are attached to aluminum rivets. The frame is welded from a profile pipe, the wind generator is installed at a height of 3.5 m from the ground.
>
The generator is made of a 2.2 kW asynchronous motor, belt drive. The motor rotor is converted to neodymium magnets. In this form, the wind generator in a low wind of 3-4 m/s gives a charging current to the battery of 1-2 Amperes. The windmill is low-speed, does not make noise, moves in the wind of about 3 m/s, but then can continue to spin until the wind subsides completely.
>
>
>
The weights are suspended on chains, they do not make any noise during operation, so that the closing blades do not knock on the frame, and shock-absorbing rubber bands are attached to the edges. The meaning of the work is this: in a weak wind, the blades going into the wind open, pulling the loads, and when going into the wind, they close, reducing their windage. And when there is a strong wind, the loads cover the blades due to centrifugal force and the power of the windmill does not increase further. This is, as it were, protection from excessive generator power and protection from hurricane winds.
>
>
In addition to the windmill, there is also a 100-watt solar panel, polycrystalline, which produces a maximum of about 5 Amperes for charging batteries, works very well in the sun, provides much more energy than this wind generator in low winds, the sun is clearly more useful than the wind. There would be 2-3 more panels like this and there would be at least enough energy for the whole house during power outages.
>
The windmill and solar panel charge two car batteries with a capacity of 190Ah each, the batteries are connected in parallel, that is, the system is 12V.
>
The charging controller is hybrid, it can work with both a windmill and solar panels; excess energy when fully charged is discharged onto ballast heating elements. On the front side of the controller there is a forced electric brake of the wind generator, which can be used to short-circuit the generator windings, thereby stopping the wind generator.
>
There is also a 6 kW gas generator, in case of a power outage when the batteries are discharged. In general, the battery capacity is only enough for 3 hours of operation of all appliances in the house, this, of course, is not much at all, but it allows you to survive power outages, and if you save money, then the light will last for a long time. The solar panel alone charges the batteries in about two days; if the wind blows, charging occurs much faster.
The system also has a 12/220 volt inverter with a power of 2 kW, although the sine wave is modified, it is better to use a pure sine wave as some devices may not work properly, for example, asynchronous motors may hum and overheat.
>
Of course, the system needs to be expanded, but so far there is no money for this, and all this is expensive. The wind generator did not live up to expectations, although it was large, it was of little use. It needs five times more to have a noticeable output in a weak wind, but in a light wind it only gets a couple of amperes. The sun turns out to be much more efficient and cheaper, and simpler.
What materials to use to build a windmill from a barrel with your own hands?
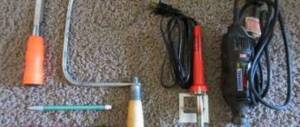
The blades of a wind generator can have dimensions from 50 cm to 6 m. For their manufacture, an ordinary metal barrel with a volume of 50-100 liters made of steel or aluminum alloy is quite sufficient. As a rule, the designs of such barrels have significant strength and rigidity. Moreover, they are often used for transporting fuels and lubricants, where the use of durable containers is due to safety requirements. You will also need a pipe for installing the blade structure, a car generator, fasteners and a small metal profile for mutual fastening of the windmill elements.
The sequence of manufacturing a vertical windmill from barrels
At the first stage, it is necessary to manufacture and install the blades. To do this, vertical slits are made on the side surface of the barrel according to the number of elements. So, if four of them are planned, five cuts are made at a distance equal to the width of the blade. The rounded surface of each element requires additional improvement to achieve the required aerodynamic characteristics. Therefore, the front and rear cut of the blades bends slightly to speed up the rotation of the structure. It is important not to overdo it here, so that in a strong wind the windmill does not bend from the enormous load and fly off the mounts.
If the shape of the blades requires some adjustment, this can be done with a wooden hammer, lightly tapping the flexible metal. The number of rotating elements can be from two to six, depending on the desired power of the device. The finished blades are installed on the wheel and securely fixed with a screw or rivet connection. Then the structure is put on a pre-prepared metal pipe installed vertically. It is important to carefully calculate the number and location of attachment points in order to simplify the subsequent adjustment of the rotation of the windmill.
To convert the mechanical energy of rotation of the blades into electrical energy, a car generator with a rotor corresponding to the average wind force will be used. The higher its speed, the larger the rotor diameter should be. All of the listed elements are connected and tested in operation by untwisting the blades. It is important to test the windmill before installation in order to immediately make the necessary changes to the design and install a fully functional device.
Horizontal wind generators: design features
The superiority of horizontal wind turbines over vertical ones in terms of efficiency is especially pronounced when it comes to industrial scale. However, the number of blades on horizontal wind turbines is limited so as not to increase the load on the long mast of the wind generator. If we are talking about the construction of a large structure, there is a high probability that at some point the pressure on the impeller with many blades will become higher than permissible limits, and in this case the mast simply will not withstand the load and will break. This is why industrial turbines usually have no more than three blades.
You can experiment with smaller structures: for example, in the regional center of Mikhailovskoye, horizontal wind turbines were created that can produce a charge in a wind of three or even two meters per second.
Another feature of horizontal wind generators is the ability to point them towards the wind. Since the direction of winds over the earth's surface is unstable, the axis of rotation of the wind generator must be quickly adjusted if necessary. Large structures are often installed where a single direction of air flow predominates, so the ability to adjust the axis of rotation is limited. In the case of small wind turbines, special mechanisms are used - shanks, which adjust the position of the wind generator automatically.
Installation of a vertical windmill from barrels
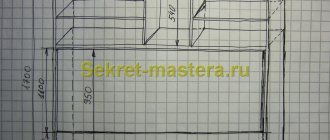
The finished generator is installed on a solid concrete foundation with three-point fixation for maximum structural stability. It is important to choose a level place for installation with dense, stable soil that is not prone to crumbling. The climatic conditions of the region are also important, in particular the strength and direction of the wind. After the concrete has hardened, you can install the mast - dig it into the ground and secure it securely with guy wires.
To obtain the maximum amount of wind energy, the mast must be raised to a height of up to 20m. This solution allows the wind generator to operate in wind conditions 20-30% stronger than at ground level. Thus, the amount of generated electrical energy can be increased by 1.7-2 times.
DIY decorative windmill
Good day, dear DIYers! In this article, Vladimir Natynchik, the author of the channel of the same name, will tell us how to make an interesting craft for decoration. The author will make a decorative windmill from practically trash.
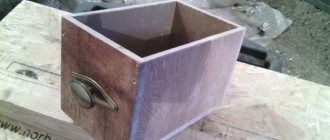
So, let's begin. Vladimir has these boards, these are used boards from a pallet.
He disassembled the pallets and took out nails from them. It is admitted that rusty old nails are very difficult to get out of a pallet.
He begins processing with trimming, cutting off all substandard parts.
And then along the entire length with a level, you can usually make a full mark.
Now drill through holes at the bottom of each workpiece; the diameter will depend on what kind of pin you will use.
The next manipulation pulls all the workpieces together with a pin, washer and nut into one “plate”.
Next he makes patterns from two A4 sheets glued together with tape.
He makes a stencil out of them, then turns them over, aligns them in the center and repeats the same manipulations. The outline has broken down.
Using an electric jigsaw or circular saw, saws off the excess.
Already cut it out, now sands the entire surface with a belt sander.
I sanded the surface and made these edgings on the sides.
Now each workpiece is moved apart from each other according to coaxiality.
To finish, all that's left to do is install a bearing so that the windmill can spin freely.
Now he takes the seatpost, the bicycle saddle was on it. It cuts in these places.
You get this construction. That is, a nut, a bearing nut and a lock nut.
Everything fits perfectly.
Now he trims off the excess length of the stud near the locknut so that it does not interfere.
He cut it and threaded the wire inside the hole.
The mount is also painted red.
This is the kind of windmill Vladimir came up with.
Based on it, you can make not only a decoration, but also a scarecrow for annoying birds, by gluing, for example, an image of a bird of prey.
You can also attach the “wind chime” to the bottom bar or along the edges. Thanks to Vladimir for the interesting idea.
Happy crafts to everyone!
Source
Become the author of the site, publish your own articles, descriptions of homemade products and pay for the text. Read more here.
Connecting a windmill from a barrel
After installation, all that remains is to connect the device to the generator, following the rules for installing an electrical circuit. The generator is attached directly to the mast where the windmill is installed, and a battery is connected to it to accumulate and “storage” the generated electricity. To avoid short circuits, it is necessary to install a windmill using wires with a cross-section of 2.5 sq. mm and higher. If the operating parameters of the device turned out to be lower during testing, you can connect a DC-AC converter to the circuit.