Digging up a garden is the hardest part of the job if you are lucky enough to have a private plot. Often the result of such occupational therapy is a torn back and strained muscles. But if you have a miracle shovel you made yourself (drawings will be in the article), from now on digging will be quick and easy. Why with your own hands? Yes, for the simple reason that, like a good quality shovel, such a unit will cost a lot of money in the store. And every self-respecting home owner will always have materials for homemade crafts, be it old pitchforks, remnants of twigs or corners. With a little magic, they can be turned into the summer resident’s first assistant - a miracle shovel.
Mechanical shovel for digging a vegetable garden
Homemade items from a washing machine motor:
1. How to connect a motor from an old washing machine through or without a capacitor 2. Homemade emery from a washing machine motor 3. Homemade generator from a washing machine motor 4. Connecting and adjusting the speed of a commutator motor from a washing machine - automatic 5. Potter's wheel from a washing machine 6. Lathe from an automatic washing machine 7. Wood splitter with an engine from a washing machine 8. Homemade concrete mixer
7 country miracle helpers!
Unusual hand gardening tools (photos, videos, drawings)
1. Fokina flat cutter
The flat cutter is a great achievement of the agricultural mind. This is the first truly universal garden tool. Not just for cultivating the soil, but a tool for comprehensive cohabitation with the cultural plant community and soil.
Fokina flat cutter drawing:
Fokina flat cutter “Swift”
2. Ripper Miracle shovel “Plowman”
Ripper Miracle shovel “Plowman” drawings:
A shovel that can be classified as a ripper-cultivator - “Plowman”. The mechanism of the Plowman ripper is simple and quite effective. Raising the earth is carried out by the operation of a simple lever. The main load falls on the legs, which press the working forks into the ground. The lifting of the soil comes from the force of the hands, which relieves the back and is therefore attractive to the elderly and gardeners suffering from lower back pain. Two opposing forks, passing one through the other, loosen the soil without turning it around, providing a loosening depth of 15-20 cm.
Miracle shovel Prokopenko
Advantages of the design of a shovel or soil ripper or potato digger
1.Deep tillage without soil turnover.
2.High labor productivity.
3. Significant physical effort is not required when processing the formation.
4.Available in production.
A special feature of cultivating the soil with a miracle shovel is that the garden is dug lengthwise rather than across. With both outstretched hands, we take the miracle shovel by the edges of the top bar, step on the platform (footboard) and it easily goes into the ground. With a slight movement (can be combined with light shaking), taking two steps back, we move the shovel from a vertical position to an almost horizontal one. After this, we take a step forward, pull the shovel back 30 cm, give the shovel a vertical position, drive it into the ground and repeat the cycles until the row ends. Then we proceed to processing the next row.
Materials: half-inch labor, round timber (or hexagon) with a diameter of 15 mm.
For ease of transportation, a collapsible design can be made.
Miracle shovel Prokopenko drawings:
3. Miracle turning forks
Miracle forks allow you to dig up the ground without putting any strain on your back due to the unique rotary working method. Miracle Forks do not require bending or squatting. Efforts are applied only to the “steering wheel”. At the same time, digging productivity increases 3-4 times.
Miracle forks are adjustable in height over a wide range, which allows you to ideally adjust the tool to your height.
Miracle forks rotating photos:
4. Miracle shovel of the monk - Father Gennady
Miracle shovel of the monk - Father Gennady photo and drawings:
5. Miracle Cleaver
The Miracle Cleaver is a tool for easily and safely chopping wood. You will be able to chop three times more firewood, spending the same time and the same effort as when working with a regular splitter. At the same time, even women and children will be able to chop wood, because the main work consists only of raising and lowering a weight weighing 3.3 kg.
One Miracle Cleaver replaces four tools: a cleaver, an axe, a hammer and a chisel. If you follow the instructions for use, the tool is absolutely safe.
The miracle cleaver allows you to chop even very thick logs. However, it does not require any special skills and is very easy to use.
Miracle cleaver photo:
6. Miracle potato hiller
The miracle hiller is designed for loosening the soil on potato beds and hilling up the sprouted potatoes.
Thanks to an optimally calculated design, the new invention promotes high-quality soil cultivation (loosening and hilling) and the correct formation of the crest of a potato ridge. The distance between the discs is adjustable, which allows you to loosen the soil near the bushes and hill up the bushes.
The miracle hiller will allow you to hill up potatoes without much effort and in the shortest possible time, avoiding the labor-intensive and tedious work of cultivating the soil with a hand hoe. It takes two people to work as a potato hiller.
Miracle potato hiller photos and drawings:
7. Soil ripper "Tornado"
The “Tornado” soil ripper loosens the soil and easily copes with perennial weeds such as wheatgrass or field bindweed.
Soil ripper "Tornado" photos and drawings:
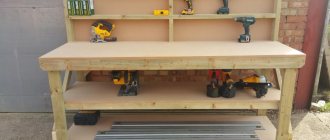
Improved Shovel
Tricks
When drilling holes in flexible or hollow material
When drilling holes in flexible or hollow material, it is easy to damage the surface of the material with the drill chuck when the drill bit sinks.
A good shock absorber in this case can be a circle of felt or porous rubber placed on a drill. The emergency lighting bulbs burn out very quickly - at night.
The emergency lighting bulbs burn out very quickly - at night the voltage is increased.
To be able to turn them on at full heat at night, it is enough to install a double switch and mount a semiconductor diode of type D226 in its body. In one position of the switch the light bulb lights up at full power, in the other - at half power. Heels will not wear out if horseshoes are made on them and
Heels will not wear out if horseshoes are made of 2 mm thick steel wire on them. Such horseshoes do not knock; they are easy to make and secure yourself.
Digging with a regular shovel is not easy: you work bent and lift the cut layer up. And so hour after hour. Moreover, you won’t get much work done with a small shovel; when digging with a big shovel, you will quickly get tired. What should I do? You can modify your usual shovel using the advice of I. Pyatnitsa, a resident of the Sumy region. A three-centimeter strip is cut off from the lower edge of its bayonet with a chisel, thus making the end of the blade not smoothly rounded, but trapezoidal. Then the plane of the blade is straightened with a hammer, making it immeasurably easier to deepen the tool. And finally, a clamp is attached to the pipe with which the shovel is mounted on the handle. To do this, cut a strip 19 cm long and 1.7 cm wide from a steel plate 0.3 cm thick. Having bent it to the shape of the pipe, weld the resulting part to the pipe at a distance of 30 cm from the sharpened edge of the bayonet. A hole with a diameter of 0.5 cm each is first drilled in the ears of the clamp,
The most important part of the device is the stop. A block measuring 24 X 6 X 3 cm is planed from a pine or spruce block. One end of it is hewn until its width matches the diameter of the pipe. A hole with a diameter of 0.8 cm is drilled 2 cm from this edge; a metal tube is passed into it, into which, in turn, a bolt is inserted (a thick nail or a piece of 4-5 mm steel wire can be used). Two rubber shock absorbers 0.5-0.6 mm thick are nailed to the block; The upper one is 7 X 3.5 cm in size, it is cut from a car slope, the lower one is 14 X 4 cm in size - from an old motorcycle tire.
The finished stop is inserted into the clamp so that the ends of the bolt (nail, thick wire) protruding from the stop pass through the holes in the ears of the clamp. After which the ends of the bolt are bent along the outside of the clamp, thereby firmly connecting these two parts.
I. Pyatnitsa also changed the handle of the shovel: he planed it not straight, as usual, but slightly curved (15-16° vertically away from the worker). As a result, when digging, it became easier to throw the soil out of the furrow.
But making such a shovel is still half the battle. It is important to learn how to work with it. Hold the end of the handle with your right hand, and use your left yoga to bury the blade into the ground at an angle of approximately 70°. Then the cutting is pushed away from itself until it stands perpendicular to the soil. And then they press the stop to the ground with their left foot, while the handle of the shovel is sharply pulled towards themselves. As a result, a portion of the soil seems to be thrown forward by itself.
It is very convenient to “get” potatoes with such a shovel. Deepen it at a right angle next to the bush of the plant, then slightly move the cutting towards you and sharply move it forward again - to a position perpendicular to the ground. Now press the stop with your left foot and throw the tubers towards the harvested row.
Muscovite P. Kuznetsov approached the digging process in his own way. True, he remade not so much the shovel (he only increased its handle to eye level, thereby increasing the support lever), but his shoes. The sole of the left boot was lined with a strong board 4 cm wide and 1.5 cm thick. Well, its length depends on the size of the shoe: it is important that, having completely covered the foot, it also protruded 2-3 cm beyond the edge of the toe. That's all. Now, with the usual movement, stick the shovel obliquely to the ground, pressing on its blade with your left foot, and move it away from you. In this case, the upper edge of the bayonet will slide along the plank attached to the boot and, breaking out from under it, will end up above it. Immediately pull the handle towards you with your right hand; the shovel will rest against the plank and turn the soil layer upward.
To throw it away, you just need to unscrew the bayonet, but under no circumstances lift the shovel with both hands by the handle - then you will dig the ground twice as fast as usual, and fatigue will not come soon.
Another version of the stop (Fig. 1, 1) is made of two metal tubes. Of these, at the bottom of the handle, close to the blade pipe and from its rear, form two sides of a right triangle. Its third side will be the lower 30-centimeter section of the shovel handle. When welding the joint between the hypotenuse and leg, do not forget to leave a small protrusion of the tube. Put a rubber “shoe” from a crutch for the disabled on it - during operation, this shock absorber will prevent the lever from being pressed into the ground. The support you have built will take on the lion's share of the load, which usually falls on the left hand.
But G. Grabor from Voronezh decided to dig the ground not with a shovel, but with a four-armed pitchfork. To make work easier, he equipped them with two stops. They are made from a metal rod. One of them, 10 cm long, is mounted above the left shoulder of the gun. By pressing it with your foot, you can deepen the forks without strain. The second stop is strengthened at the bottom of the handle, and part of it, 19 cm long, is attached to the fork handle with a bracket, and the other part, 17 cm long, extends from the first at an angle of 95-100°. To the end of the last segment, another rod, 15 cm long, is welded horizontally. Leaning on this stand, the gardener easily presses the buried fork, turning out the next lump of earth. For greater stability of the structure, an iron spacer is inserted between the sides of the curved rod.
M. Dobrovolsky from the Vladimir region acted a little differently. He shortened the teeth of the fork to 16 cm. He welded another fifth tooth on the left side of the tool, then straightened the plane of all the teeth and bent them at the point of attachment to the crossbar by 20° relative to the handle. To the bottom of the handle, he attached two isosceles metal triangles (each side is 26 cm) with rivets. Since their “tops” facing the ground are moved apart by 15 cm and a rod is inserted between them as a spacer, during operation they provide reliable support on the soil.
Soil sticking to the bayonet of a shovel causes a lot of trouble for excavators. To combat this “evil,” P. Kunin from Maloyaroslavets made two unique windows in the blade of the shovel. Each of them has a width of 55 mm and an arbitrary length. The “windows” are placed symmetrically to the vertical axis of the bayonet so that the strip of metal between the edge of the blade and the outer edge of the hole is 30 mm on top and 20 mm on the side.
There are other ways to improve a shovel. Let's say, Muscovite N. Kovalevsky made its blade from a rectangular piece of steel 18 cm wide. The length of the blade does not differ from the usual bayonet of a shovel. He bent the sides of the blade outward with perpendicular sides 1 cm high, and ground its lower edge on the inside to nothing. Then he welded the blade to a normal spade pipe, inserted a wooden handle into it, onto which he placed a metal tube, smoothly curved on top along a radius of 10 cm. So what? The new weapon turned out to be much more reliable than the factory one, and, in addition, it does not cause calluses on the palms.
It is better for older people to equip their tools like the Omsk resident G. Egorov: then there is no need to continuously “bow” when digging a garden. Attach a crossbar-handle to the upper end of a regular handle - by pressing on it, it is more convenient to drive the tool into the ground. From below, at the very blade of the shovel, attach a braid with a loop, the length of which will be equal to the length of your arm. For what? Press the bayonet with your foot and turn the lump of soil out. Then, without bending, firmly pull the tape up. And she, sliding along the surface of the iron, will roll off the cut layer exactly as a plowshare does.
Craftsmen have also designed tools to destroy weeds with deep roots, as well as the roots of forest trees hidden in the ground. One of them can be easily made from an ordinary shovel that has become unusable: cut off its edges, leaving a protrusion on the right side for resting your foot, and bend the left edge outward with hammer blows until an angle of 75 cm is formed between the longitudinal axis of the bayonet and the edge. The resulting tool is stuck into the ground next to the weed stem and, turning slightly, is pulled out along with the “pest”.
Another option: take an iron corner measuring 25 X 25 or 30 X 30 mm and 40 cm long (Fig. 1, 2). Cut one end of it with a hacksaw at an angle of 30° - you will get something like a sports spear. On the opposite side, drill two holes in the metal and pass bolts through them: with them you will attach a wooden handle to the iron. This spear easily penetrates any soil and cuts, for example, the rhizome of thistle at such a depth from which new shoots can no longer break through to the surface of the earth. And in order to cut through the roots of forest growth in the area, use a chisel to knock out four sharp large teeth with a base width of 1.5-2 cm in the blade of an old shovel - the resulting saw-like tool cuts the tree, but slides off it. The same tool is good for digging medium-heavy, heavy and rocky soils to a depth of 20 cm, as well as digging up onions, carrots, other root vegetables and potatoes in peat bogs.
And another tool that makes it easier to fight unnecessary thick underground tree roots. Take a worn-out ordinary shovel and use a hammer to straighten its bayonet. Then, perpendicular to the top edge, cut the steel sheet on both sides (its total width should not exceed 12 cm) and use chalk to divide the bayonet in half horizontally. Then grind the lower part of the bayonet from right to left to the chalk mark at an angle of 40-45° to the handle. Sharpen the resulting beveled edge more sharply - and get to work: the work will become much easier, because you will cut off the rhizomes not with a direct blow, but with an oblique blow, with a drawbar.
To care for the soil, you have to hold a whole set of tools - a shovel, a rake, a hoe, a pitchfork. Is it possible to combine them, to have one universal tool that can easily turn into any of the above?
Omsk resident V. Slesarev offers his own version of this design. He took a short metal tube and, at the same distance from its edges, perpendicularly welded two steel plates that were absolutely identical in configuration. Between the resulting sectors I inserted a short tube that fits tightly, ending at the bottom with two massive hooks (they cover the first tube). I used a drill to punch matching holes - first in the bent parts of the hooks, then in the sector plates and the short tube. I passed a locking pin through the latter and thus connected the structure together. He drove a wooden handle (according to his height) into a short tube. To the longer one, at equal distances from each other, I welded four pointed rod-teeth. Then he made a “bayonet” of a shovel from sheet iron - an isosceles triangle, the base of which turns into a rectangle. He turned its two converging sides into something like a saw, and sharpened the wide side like a knife blade. The resulting part was applied to four tooth rods so that the top of its triangle was pressed against the transverse tube. Then on the bayonet of the shovel I marked the places between the hooks of the short tube, and also slightly in front of the sharpened rod-teeth. Then I welded a clamp on the bayonet between the hooks of the short tube, and drilled holes in the part of it that extended beyond the sharpened rod-teeth. Now you just need to pass the wire through the holes in the hooks and clamps, then tie the wire, insert the tips of the teeth into the holes of the bayonet, and you will get an excellent shovel.
Should I turn it into a pitchfork? Remove the cutting bayonet from the teeth. Do you want to have a rake? Remove the locking pin from the sector plates and short tube, turn the wooden handle 90° and reinsert the pin into the holes. Need a hoe? Without changing the position of the working part of the gun, attach the bayonet again. Finally, it's time to mow the grass. Release the bayonet and, turning it 180°, that is, with the tip forward, attach it again to the teeth, only a little lower.
A miracle shovel for digging soil - a well-groomed garden without effort!
Agriculture will never be abandoned by humanity, and agricultural products are always in demand. With the onset of the warm season, a busy time begins for summer residents - preparing the garden for spring sowing, because it is known that only weeds grow on unkempt soil. Work on the earth continues from the melting of the last winter snow until the first snow of next autumn.
And then heavy garden shovels and forks are used for loosening. Noble work ends not only with a well-groomed appearance of the garden, but also with an aching back and a complete breakdown the next day. It seems that there is no way out of this vicious circle.
Fortunately, human ingenuity does not stand still, and salvation has finally been invented: a miracle shovel for digging the earth.
A hand cultivator that eliminates hard work
The miracle shovel is a combination of a ripper and the most ordinary forks.
The components of this ingenious tool are extremely simple:
- A handle that controls a shovel.
- Front and back stops that give the tool stability.
- Fasteners connecting all parts.
- Forks for loosening.
- Digging forks.
The forks are connected in such a way as to move towards each other and lock like a lock, and there are stop mechanisms on the sides. The simple design of this new piece of equipment makes it easy to break up clods of earth, greatly simplifying and facilitating work in the garden. The emphasis is placed specifically on the forks of the tool, which perform the main function.
A hand cultivator not only loosens and breaks up the soil, but also pulls out the roots of weeds. It makes it easy to remove root vegetables and potatoes without damaging their integrity.
The working principle of the miracle shovel
Thanks to minimal physical effort, the instrument can be used by people with spinal diseases and pensioners. The soil is loosened by a pitchfork, and there is no need to turn it over. The back not only does not participate in the process, but generally remains straight, excluding the endless bows and squats characteristic of ordinary digging of a garden.
The algorithm of actions is very simple:
- The cultivator handle is placed vertically, and the fork teeth rise behind it.
- The worker stands with his foot on the stop or the upper bridge of the main forks and presses with his body.
- The teeth stick into the ground and the stalk pulls back. The forks lift a layer of soil that passes through the second forks and is crushed there.
- The worker takes another step back to the uncultivated area of the garden and repeats all the steps again.
At first glance, it may seem that moving backwards is not very convenient, but there is still land ahead, ready for sowing, which does not require additional effort. Moreover, a manual ripper does not plunge a thin fertile layer into the soil, as happens with a bayonet shovel.
Advantages and disadvantages
Like any tool, the miracle shovel has its drawbacks, which you should be aware of when purchasing it:
- The device is only suitable for straight areas - it will not work to dig up the soil figuratively. Narrow and curved areas will have to be processed manually.
- For the process to be effective, a person’s weight must be at least 80 kg, otherwise it will not be possible to dig up the ground to a given depth.
- The tool will not be able to dig holes.
- It is impossible to work in low greenhouses.
- If the mechanism breaks, repair will not be easy.
- The weight of the product is much higher than the weight of a conventional bayonet shovel, which can lead to severe fatigue at the end of the job.
Advantages and disadvantages of the tool
The Mole shovel-ripper is widely used among experienced and novice gardeners.
The practical use of the multifunctional tool revealed the main advantages of this original design:
- The device significantly speeds up work in the garden or vegetable garden. In just 60 minutes, using the Mole miracle shovel, you can dig up an area of up to 1.5-2.5 acres.
- Simplicity and low cost of operation - using the Mole tool you can do the same work as with a walk-behind tractor. But it does not require additional consumables or refills.
- The miracle shovel Mole does not disturb the layers of fertile soil and does not lead to the death of worms.
- The tool easily pulls out the roots of weeds that are not even visible on the surface of the soil.
- The original tool makes the work much easier for a person. It reduces the load on the shoulders and back, which makes work more productive and efficient.
- The miracle shovel Mole is reliable, multifunctional and durable. It can be used for arable and sowing work, as well as loosening the soil.
The miracle shovel Mole also has several disadvantages. This tool is most effective only if the worker’s weight exceeds 75-80 kg. In addition, the device cannot be used in greenhouses with low ceilings, as well as for processing narrow beds, since often the width of the working part of the shovel simply exceeds the dimensions of the row spacing.
The Mole shovel is a convenient, practical and multifunctional tool. It will be a good helper for gardeners and gardeners. The device will help in sowing and arable work, facilitate loosening the soil, and make work on the plot much easier and more productive.
The best models of the domestic market
Today's market for wonderful shovels is quite diverse, but it is worth noting the models that consumers choose most often.
"Tornado"
The tips of the forks are capable of plunging into the ground up to 23 cm and leaving a strip of about 50 cm behind them. Capable of uprooting weed roots, works with rough or dry soil. Suitable for both autumn harvesting and preparing for planting.
"Digger-7"
The tool combines hoeing and digging, removing grass in the process. Excellent cultivation of rocky soil, ideal for a well-kept garden.
"VolBer"
Capable of processing up to two hundred square meters per hour, weighs up to 15 kg. Excellent for removing weeds from the soil.
Forte QI-JY-50
This miracle shovel is designed for snow removal. It is small in size and works on large areas and in hard-to-reach places.
"Assistant"
The model prepares the land for planting crops in the spring and puts it in order before the arrival of winter. Even turf is accessible to her. Simple in design and yet very effective.
Handling the hand cultivator
Of course, it takes some time to get used to a hand-held cultivator, but after it you don’t need to additionally loosen the soil - a regular garden rake will suffice. With proper use, the product's performance will only increase.
People who have already used this miracle product give some useful tips:
- You should not try to plow wet soil with a miracle shovel: a lot of effort will be spent, but there will be no benefit.
- When cultivating virgin soil, it makes sense to first remove the turf with a bayonet shovel.
- You need to work from the far end of the uncultivated land to the near end, backwards.
- If different people will work with the cultivator, the handle should be adjustable.
You should take care of the cultivator in the same way as other garden tools. It is stored under a canopy, protected from rain and monitored for rust formation. On the eve of winter, carefully wipe all teeth from any remaining clay and polish them with a dry cloth. Moving fasteners may be lubricated with machine oil during storage.
Whether or not to purchase a miracle shovel is, in any case, the choice of the gardener himself, but it’s probably worth listening to the voices of the happy owners. Ours is no longer the worst and poorest quality. It’s better to try than not to decide and then regret it.
What is different and what can
To be precise, this is not a shovel, but a ripper, since it not only digs, but also breaks clods. The miracle shovel consists of two (sometimes one) slats with pins movably connected. Some models also have a back stop - for easier digging of dense, heavy soil. So in reality it looks more like double pitchforks (see photo below).
Miracle shovel and its components
From the picture it is clear that this tool does not have a shovel as such, but the differences from the classic bayonet shovel do not end there. It also has a much higher handle - it should reach your shoulder. It is also convenient if there is a crossbar at the top - you can operate it with both hands.
The miracle shovel performs three operations at once:
- loosens the soil;
- breaks clods;
- “extracts” the roots of weeds without tearing or cutting them (in any case, damaging them much less);
- Digs root vegetables easily - you can dig carrots, potatoes, etc.
But its main advantage is that it greatly facilitates digging the earth, and the main load falls not on the back, as when using a conventional bayonet shovel, but on the legs (driving the working forks into the ground) and on the hands (turning the forks out of the ground). During work, the back is in a vertical position and is almost not loaded.
Another version of the miracle shovel
The only downside to this tool is the weight. It is really much larger than the bayonet one. But the super shovel can be rearranged; there is no need to lift it. Or rather, it is raised only a few times: when it is placed on the ground at the beginning of the row. Then, by pulling the handle, it is simply tightened a little.
There is another very attractive point in using a miracle shovel - it digs the garden at least twice as fast. This occurs due to the wider working part - up to 50-60 cm. Provided there is little physical activity, this is very good.
How to work
Although this design is not particularly complex, working with it has its own characteristics. First, you need to start from the far edge of the bed, then move back, gradually dragging the forks back. Well, the general procedure is this:
- Holding the handle, place a miracle shovel and rest it on the front ripper.
- Stick the pitchfork into the ground. Drive them in until the back stop touches the ground. If the ground is heavy or dense, additional force may be needed - press your foot on the crossbar of the front forks.
- Pull the handle towards you. With this movement, the forks will begin to move upward. As they rise, they pass through the forks of the front stop, breaking up the lumps.
- Pull the device back a little, repeat all the steps (plug, squeeze, pull the handle).
It's actually very simple. It’s worth trying a couple of times and then everything repeats automatically.
Differences between the Mole shovel and other tools
The miracle shovel Mole is available in several modifications, one of which is a tool called Plowman. Each type of instrument has its own characteristics and purpose.
What is the difference between the miracle shovel Mole and the Plowman - this modification, unlike the standard device, was developed specifically for loosening the soil. The range of tooth lengths for this type of tool is 12-15 cm. Thanks to this, the Plowman easily processes various types of soil and quickly enters the ground, regardless of the worker’s weight.
The miracle shovel Mole differs significantly from the usual bayonet shovel. To drive a bayonet tool into the soil, the worker needs to make every effort - bend down, lift the shovel with a lump of soil and turn it over. This puts increased stress not only on the arms, but also on the abdominal and back muscles. When loosening with a Mole, the load goes only to the hands, making the work longer and more productive.
Constructions
In addition to the option shown above (called “Tornado”, “Digger” or “Plowman”), there are several more variants of miracle shovel designs under different names.
Assembly drawing of a miracle shovel
Soil ripper without front support
This design also has working and support forks, but does not have a front stop. Because it is less bulky and weighs a little less. But the front stop gives increased stability during operation. And the weight when dragging is not so important.
The handle is attached to the working forks, the back stop is welded to the comb of the second forks. Both of these structures are movably connected to each other (even door hinges can be used).
Ripper miracle shovel for easy tillage
The photo shows one of the implementations, which is made on the basis of a corner and a round pipe. When working, the pins are driven into the ground by pressing on the crossbar, and not on the stop, as in most models.
Miracle shovel Mole: design features
The design of the miracle shovel Mole is very simple - it consists of two opposing forks, a movable working area with an attached handle. Externally, the tool resembles a large fork attached to the frame with a bolt connection.
As a standard, there are 5 teeth on it, and on the working bed there are 6 of them, although the number of teeth may vary depending on the type of tool. The teeth are located opposite each other, due to which they do not touch when lifting the working parts of the shovel.
On the back side of the bed there is an arched foot rest, which looks like an inverted letter “P”. In front, a fragment of the fixed frame is slightly raised and can be used as a support for loosening.
The dimensions of the Mole shovel, depending on the model, are 40-50 cm, the teeth are up to 23-26 cm. They are made of steel. The weight of the instrument reaches 4-5 kg. This weight is quite enough to loosen the soil with minimal effort and time.
What and how to make it from
The designs, as you have seen, are different, but the set of materials will be approximately the same. Their number differs, but the cross-section and characteristics remain unchanged.
You can use a round or profiled pipe, metal rods or “parts” from forks
Materials for production
They usually start with making the frame. It is often made from a profiled pipe, the optimal cross-section is 30*30 mm or so. The wall thickness is important - at least 3 mm. Some models used a corner. The shelf width is also about 30 mm, the metal thickness is at least 3 mm.
The handle can be made from the same profile pipe, or you can use a round one. The thickness of the walls is also important. In principle, having made a latch, you can use a wooden shovel holder. Some purchased models provide for the installation of a wooden holder.
The main attention should be paid to the material that is used for the teeth of the working forks. It must be good structural steel. The forks are made from a rod of at least 8 mm in diameter.
What craftsmen make them from:
- They cut it off from an ordinary fork and weld it onto a miracle shovel.
- Straighten the suspension springs.
- Car springs are sawn into narrow strips.
If you can find a good rod - round, square or hexagonal - it doesn't matter, it will be much easier for you. Not a bad option, by the way, with a pitchfork. But you have to buy good ones, and this is not cheap. And one more thing: calculate the dimensions of the miracle shovel so that the working forks have 8 pins. Then you will need to buy two jokes of ordinary pitchforks.
If the design is chosen with two forks - working and thrust, you can place pieces of a suitable length of metal rod on the thrust forks. The loads here are not so high, so the strength should be enough. The diameter of the rod is 10 mm; you can use ribbed reinforcement, which is used to reinforce the foundation.
Dimensions
Most companies that produce miracle shovels have a range of sizes for this product. Our people are different in build and physical fitness. For men, you can make more massive models, and for women and older people, smaller and lighter ones. The average sizes are:
- The width of the working part is from 45 cm to 60 cm. There is no need to do more: it will be difficult to dig and productivity will only decrease, not increase.
- The length of the working fork pins is 220-300 mm.
- The distance between the pins is 70-80 mm.
- The length of the handle is according to your height; it is more convenient if it ends near the shoulder.
The dimensions of the miracle shovel can be selected “to suit you” - it is important that it is convenient to work
All other sizes are selected depending on the design and material used.
Blueprints
Miracle shovel working forks
Detailing of the stop and forks
Full design with front stop
Option with single forks and rear support frame
Other dimensions of the digger and different design of the stop
Making your own miracle shovel Mole
Every gardener or gardener can make a miracle Mole shovel on his own. For this
You will need steel rods to make the teeth and square tubes for the frame. The cutting can be purchased separately or removed from an old shovel.
A drawing with the dimensions of the Mole miracle shovel, you can use the standard one or change the parameters, adjusting them to your individual requirements, height, weight and level of physical development.
A metal square tube is used for the manufacture of stops and the frame of the structure, and hardened steel is used for the teeth of the moving forks.
Making your own miracle shovel Mole:
- Sharpen one of the edges of the steel pins using a grinder at an angle of 15-30°.
- Weld a jumper made of a metal pipe onto a stationary frame, attach the pins of the counter forks to it. To make them, you can use reinforcement; the edges should not be sharpened.
- Using a hinge mechanism made from a steel strip, connect the two parts of the forks. For this purpose, bend two arcs, drill holes and fasten the parts with bolts.
- Weld a fragment of a round pipe to the movable fork bar.
- Insert a cutting into the resulting nest - a new one or taken from an old shovel.
- For maximum convenience and ease of use, attach a T-bar to the top of the tool handle.
After completing all work, test the finished device in operation. If it is convenient to use, it means that the dimensions of the Mole miracle shovel were chosen correctly.
Tool for digging earth: how to replace a shovel
“Don’t be stubborn, give the shovel to your most harmful neighbor!” urges FORUMHOUSE member with the nickname Boris Annenkov and author of the book “Give a Shovel to Your Neighbor.” The participants of our portal, if they did not give the shovel to their neighbor, then at least successfully combine it with other, non-traditional tools for digging and loosening the earth. These tools allow you to dig up beds faster and with less effort. And after working with them, neither your back nor your arms hurt.
In this article we will cover:
- How to make a miracle shovel: drawings, instructions, reviews.
- An easy way to make a potato digger.
- How to make a flat cutter.
When is a miracle shovel useful?
In order for your new tool to delight you with its productivity, you should remember that it is not omnipotent, and give it only the work that it really can do. The miracle shovel is not capable of digging a hole. You should not entrust her with figure digging around flower beds or other curved elements of country house arrangement. Since to lift the fork you need to press down on the handle with your weight, such a shovel is not suitable for a fragile teenager.
But if we are talking about quickly, “with a twinkle,” digging up 10-20 acres for potatoes, then the miracle shovel has no equal. And most importantly, the gardener won’t even remember about his lower back.
Do-it-yourself miracle shovel - video
DIY miracle shovel
One of the most popular innovative digging tools is the miracle shovel, which consists of twin forks: some are stationary, the other are movable. Mobile forks lift the soil and push it through the teeth of stationary forks. The soil is loosened to a depth of 20-25 cm.
We offer you drawings of the device: it is simple. A participant of our portal, who had previously seen welding machines only in stores, successfully welded such a miracle shovel for herself.
Recommended dimensions of the miracle shovel:
- frame width: 35 cm,
- frame length – 78 cm,
- length of working forks – 23 cm.
According to the experience of operating the unit by the participants of our portal, for its effective operation the ripper must be tilted approximately 25 degrees towards the ground.
A member of our portal with the nickname Mount “slowly sawed with a grinder” on winter weekends and tested this device at the dacha on the May holidays.
I'm shocked: what in previous years I spent several days on, I did in a matter of hours. And the quality of digging is much better: you don’t even need to harrow with a rake. Damp soil sticks to an ordinary shovel with terrible force, but this tool could cope with wet soil, although it worked better where it was drier.
Mount notes that the fork shovel works well on undug soil (although this tool is not intended for virgin soil), and pulls out roots. If you pour peat onto the dug up soil, the unit mixes it with the soil no worse than a mixer.
Digging up beds with this device is very simple: go in one direction, turn, go in the other direction. 10 minutes - and the bed is ready!
And - most importantly - there is no fatigue, as there was from a shovel. At first there were very skeptical remarks from the female contingent about the worthlessness of the device, but after the first 15 minutes of use there was silence.
Our user specifically made this unit lightweight so that it could cope with the most difficult soils, including virgin soil.
Over three years of successful operation, the following advantages were identified in comparison with motor cultivators:
- the miracle shovel does not cut the roots of weeds and thereby does not contribute to their spread throughout the garden, but completely pulls them out;
- You can use it to hill up potatoes: walk along the rows while simultaneously removing weeds, loosen the soil, and then hill up;
- The tool is convenient for digging up long beds;
- there is no need to break up lumps and loosen the dug up soil with a rake;
- The device loosens the soil without turning over the fertile layer.
A similar device called “two shovels” was made by a user with the nickname Dva11.
I looked at the options for shovels on the Internet and in stores and made my own. Due to the large lever, less effort is required and there is no need to bend over too much.
This is an easier option than the previous one, but it also requires effort. Saddle frame made of 15x15x1.5 profile and 4 mm electrodes; The forks themselves are made from a 20-piece pipe and seven teeth from a horse rake (the distance between them is approximately 6-7 cm).
The length of the teeth is 28 centimeters, but due to the fact that the axis is raised by three centimeters, 24 centimeters go into the ground.
A similar tool was put together by a FORUMHOUSE member with the nickname TOSA1970.
It helps a lot when digging, and your back doesn’t get tired like with a regular shovel.
Tool Application
The mechanism of how the Mole miracle shovel works is very simple and is based on the principle of leverage.
Guidelines for using the tool:
- install the device in the area that requires loosening;
- the handle of the tool, which serves as a lever, must be in a vertical position;
- Place the teeth on the working forks perpendicular to the soil and immerse them in the ground under the weight of the working frame;
- if the teeth have entered the ground, partially press your foot on the metal bar or the back stop of the working forks;
- press the handle of the tool first towards you, then down.
After the working forks have lifted the clod of earth and pushed it through the counter teeth of the ripper, pull the miracle shovel back along the bed and continue working.
In what areas is Mole not used?
On this topic:
Quickly plant potatoes with one foot movement (video)
On some land plots the Mole garden shovel cannot be used. This tool is not suitable for cultivating virgin lands overgrown with wheatgrass. First of all, such an area needs to be treated with a walk-behind tractor or a bayonet shovel and only after that use the Mole.
The multi-tool is not intended for use on clayey, hard or rocky soil. In such cases, it is easier to use a bayonet shovel.
DIY potato digger
Nobody likes picking potatoes out of holes - this is the most difficult and tedious thing in the whole process of digging potatoes. Mount has made another hand-held gardening tool, a hand-held potato digger, which itself removes root tubers from the holes and also cleans them from the soil!
The advantage of this unit is that you don’t need to shake the ground with a shovel. He stuck his pitchfork under a bush, stomped on the lever with his foot - clean potatoes flew out of the ground.
This tool is convenient for digging all root crops. It is much easier to work with it than with a shovel - you don’t get tired at all!
A potato digger is also used for digging up a vegetable garden. But she needs to dig her garden not along, but across the plot.
How to make a flat cutter from a braid
Vladimir Fokin invented his flat cutter after he was unable to use a shovel. This garden tool is capable of performing many operations: loosening, weeding, hilling, mowing, forming beds, etc.
Its main purpose is to remove weeds and at the same time loosen the soil at a depth of 2-5 cm, but without turning the top layer of soil. Supporters of organic farming know that this method of loosening does not destroy beneficial microorganisms living in the soil, and therefore increases its fertility. The Fokina flat cutter is a bracket that is curved in several places at certain angles, its three cutting surfaces are sharply sharpened. The bracket is secured to the handle. It is important to learn how to work correctly with a flat cutter, then this tool will have no price.
Here's how you can check yourself: if your back is straight when working, your body is tilted quite a bit, your thumbs on the handle look up, then everything is correct. If you hold the tool correctly, the physical load when working with it is reduced several times.
Fokin is my father-in-law. Letters of gratitude, especially from elderly people or people with poor health, stood in bags in his home.
A FORUMHOUSE member with the nickname Antol13, based on Fokin’s flat cutter, made his own tool - a super flat cutter Kosar. This super-effective tool is made from a Sable braid that was lying around the house unnecessarily.
Here's how to make a flat cutter from a braid:
- Use a grinder to cut off the stiffening collar so that during operation the flat cutter does not experience resistance and does not cling to the ground. The recommended length of the flat-cutter blade is 17 cm. But it is better to first make the blade longer; after testing, you can always shorten it.
- The recommended attack angle of the flat cutter blade is 35 degrees. If necessary, you can increase it by bending it in a vice with a gas wrench.
- After testing, adjust the length of the flat cutter and the angles of the working surfaces.
- Make grooves on the handle on both sides for better fixation.
- For better fastening and to prevent loosening, make a stainless steel clamp at the top of the tenon.
The flat cutter exceeded all expectations. I have never experienced such pleasure at work. Two working edges allow you to do the job quickly and with good quality without bending.
Characteristics of the “Vyatka Plowman” manual plow.
The “Vyatka Plowman” shovel is an interesting invention of the Orthodox priest Gennady Khlopov, which significantly increases labor productivity and, at the same time, sharply reduces the gardener’s chances of dying from lower back pain. At the same time, Gennady Khlopov’s miracle shovel retains a certain continuity: it looks like a bayonet shovel, is also extremely simple in design, and according to the drawings, a Vyatka plowman shovel is easier to make for a home craftsman than many other types of miracle shovels.
Products for inventors. Sale up to 50%