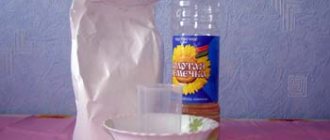
You will need: Show in full... flour salt water multi-colored gouache rowan (birch) branches old disk
Salt dough makes it possible to do with your hands something that sometimes you cannot see in person.
A sprig of rowan will lift your spirits at any time of the year with its beauty, brightness and the feeling of peace that it gives us.
You will need: flour salt water multi-colored gouache birch twigs old disk
LET'S START WORK!
To get started, let’s prepare salt dough in two colors: red and green. Birch twigs, old disk And we will also need gouache when designing the finished work.
Preparing the twigs
Lay out the branches on the disk as we need them. Remove the excess length of the branches.
Making leaves
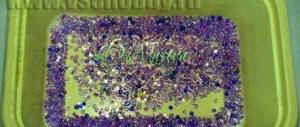
We begin to lay out oblong-shaped leaves and apply a pattern on them in a stack.
Making berries
We form a bunch of rowan berries from the balls of red dough. We draw a pattern on the berries with a cross.
We finish sculpting the leaves
On the remaining branches we make leaves of the same size.
We prepare the work
Dry the finished rowan branch, then paint it with gouache in appropriate tones to add brightness to the work. Dry and coat with acrylic varnish.
Source
How we sculpted from salt dough
The secret to a successful holiday... The most interesting thing is that everyone has their own. On weekends, most people want to sleep in, but for some reason kids wake up very, very early on weekends. On weekdays you can’t wake up, and on weekends there is neither light nor dawn. I want to talk about our first weekend of this year, because as always we promise ourselves that, they say, from this year everything will be different: I will devote more time to family, children, etc.
It's only been one weekend and we're doing well so far. For a very long time my daughter has been asking me to bake a cake, but I have a thousand excuses for everything, and I still don’t have time. I say that I will buy any cake that she likes in the store, and my daughter answers me: “The most delicious cake is the one made by your own hands, mommy!” And so…
Hurray - a New Year's miracle! Today the whole family will bake a cake! The most important thing is to involve dad in our activity, and this turned out to be not at all easy! As soon as he got a construction kit for grown-up boys called a “car,” all his free time was devoted to it. But for the sake of the upcoming tea party, our dad gave in and agreed to help us with his presence! While I was preparing the cake, I enticed my household into making my own cake - from salt dough! Knead the dough according to this recipe:
- 1 cup salt, preferably “Extra”
- 1 cup flour
- 1 teaspoon sunflower oil
Add water gradually to form a thick dough. We fill the molds from the shortbread set with the finished dough, carefully take out the finished figures and dry them in the oven. We are also making cakes, from which we will make a cake for the dolls. The figures have dried and the volumetric appliqués are ready.
And while I was in the kitchen further preparing the cake, my household members were already painting the figures. What wonderful toys they turned out to be, just a sight for sore eyes! But don’t forget to control the preparation of the cake! We need to be on time everywhere: let's see how mom makes a cake and make a cake for dolls!
Hurray, the cake is ready! We all sit down at the festive table together and drink tea and cake! We have never had such a delicious cake!
The next morning I woke up to someone tenderly kissing my hands and whispering: “My beloved hands, thank you for the cake, for everything you do for me, you are tired, rest, and I will go help you!” There was a suspicious silence, I jumped up and ran to the kitchen...
The process of sculpting from salt dough was repeated more than once! Every time the figures turn out better and better! By the next weekend I bought a book on modeling plasticine figures, but it will be a new weekend and a new story... Try it too. I think that everyone, especially children, will be delighted with this activity!
Nina,
LiveInternetLiveInternet
“The Cheerful Chef” clock with decorative elements and a pendulum made of salt dough. Master class from the author Olga Griga.
Author's text: I couldn't find a clock with a pendulum, so I found an inexpensive Chinese clock on sale with a round pendulum and an additional semicircle at the bottom. I've seen a lot of these on sale now. If you find a separate mechanism, you can give the watch any shape using plywood or other dense material.
1. Draw a sketch. If the clock is round (as in the photo), trace the circumference of the clock on paper. This is the center of our composition. And then we draw our cook, as if he was sitting comfortably near the clock. The cook’s body should be slightly on the circle, so that in the future there will be something to glue our cook to the dial! (All parts of the body) Also pay attention to the arrows. Mark on the circle the extreme points to which the arrows reach so that they can move freely and the cook figurine does not interfere with them. I had to trim the long arrow slightly. It's better to use small arrows. Nowadays you can find various hands for watches on sale. There are arrows in the form of a fork and knife! Draw the sketch well. Note that one of the cook's legs will be a pendulum. And the second one is extended along the bottom of the dial and covers the fastening of the second leg to the base of the pendulum. (Think over these little things in advance!) So that the pendulum fastening is not visible. When the sketch is ready, you can continue! We get the sketch on a scale of 1:1
2. Take tracing paper and transfer the drawing onto tracing paper.
3. Next, prepare the salt dough! To 4 parts salt (extra fine) and 2 parts water, you can add 1 teaspoon of wallpaper glue (dilute in warm water). And knead the dough, slowly adding flour. The amount of flour from experience is difficult to determine immediately, and there is no point in adding a lot of flour at once; add it little by little until the dough becomes like plasticine. Here, of course, you need to practice a little. I will say one thing, the dough needs to be kneaded long and hard, the longer you knead it, the more plastic it becomes! You can constantly wet your hands if you feel like there is not enough water. In principle, you can replace the salt dough with polymer clay or plastic, now this is enough goodness to make a chef out of it.
4. The dough is ready. Wrap it in cellophane and pinch off a piece at a time so that the rest of the dough does not dry out. We take a baking sheet, put our tracing paper on it and start sculpting! We tear off a piece of dough approximately large enough for us to make the body! With wet hands (it’s more convenient to work this way), we knead the piece in our hands and give it the shape of the body.
The pattern before your eyes is a drawing on tracing paper. Apply the part to the drawing to ensure accurate proportions. The body is ready. Next we sculpt a shoe (attach it to the pattern), and make a second shoe. Then we sculpt a leg - the pant leg of the left leg and use water to glue the edge of the pant leg to the shoe. We do everything on a pattern! Using a knife, you can add pleats to your trousers. We also do the second leg, we sculpt it separately from the cook himself, on the side since it is a separate pendulum element. In the same way, we put the second leg on the shoe using water, as in the photo.
Then we make the arms (first the hands, and then put the sleeves on them). Then the head, then the cap. Then came the small details. Buttons. Oh yes! We forgot our apron! Roll out the dough thinly and cut out a rectangle. The edges were pressed down, the bottom was made wavy, and the top of the apron, on the contrary, was gathered! Remember your childhood modeling from plasticine! Wet the cook's body where the apron will be slightly with water and place the apron on top, as in the photo. Remove any excess. Make a belt and a bow from a thin flattened dough sausage. Do the same with the neckerchief. Finishing the small details. Ears, nose, hair, laces, balls for the dial (I made roses and leaves like on the cake and just buttons, as in the photo). Also, don’t forget to use wire to make holes for the antennae! (which we will then make from wire and glue into these holes)
5. Oh yes, we forgot the cake! Our chef holds a cake in one hand. Using sausages, we make a plate on the hand, then the cake itself and decorate it with cherry balls. Instead of a cake, you can come up with anything! Check if you forgot any details?
6. Let's put our cook in the oven! On low heat, 50 degrees, dry our figurine until golden brown. This may take a considerable amount of time (it all depends on your oven, so you need to keep the process under control!) Look into the oven for the first hour, if the temperature is too high, the figurine may swell! Avoid this, if the figure has not changed in the first hour, then everything is going well and you can turn up the heat to 100 degrees and gradually increase the temperature so that the dough browns a little! Check the oven often to avoid burning! As soon as you see that the figurine has become a ruddy cream color (like the face and hands in the photo), you can remove the product from the oven. Let the craft cool completely, it is better to continue working the next day.
When the figure has cooled down, you can start painting it with acrylic paints.
8. Next, let's deal with the clock. Choose a decoupage card or napkin you like (the background of the clock you have in mind, like stripes in this case).
Glue the background onto the clock base. “Age” the edges of the clock using a sponge and acrylic paint. You can also spray it on the surface, for an even stronger aging effect (we put a little paint on a bristle brush and run our finger along the brush at the level of the dial, splashing the paint on the surface in small droplets). After drying, coat with any acrylic varnish.
9. We glue our cook to the dial using the irreplaceable “moment” glue. We glue the second leg to the base of the pendulum. We mark where our roses and leaves will be on the dial, glue them, and also the remaining navel marks (as in the photo). Now our watch is ready!
10. The only thing is that the center of gravity of our clock can be shifted (since the figure is located more on the right), so the clock needs to be attached to the wall in two places, as I did, or some kind of counterweight-weight should be attached on the other side to the reverse side. We attach our pendulum. And now the clock is ready!
Source https://www.livemaster.ru/topic/2227199-master-klass-po-lepke-iz-solenogo-testa-chasy-s-mayatnikom-veselyj-povar