Summer residents who spend the summer on their plots in the fall are faced with the problem of disposing of plastic containers from all kinds of soft drinks. A plastic bottle tree can be an unexpected way to turn trash into garden decoration.
On this topic:
Large-sized palm tree for a spacious hall - areca, care in...
Aug 27, 2020
How to make the work of a summer resident easier: a miracle shovel with your own hands,...
Aug 15, 2020
A note to poultry farmers - how to make a drinking bowl for chickens...
Aug 1, 2020
Date palm - care at home, photo...
Jun 11, 2020
BACK FORWARD 1 of 46
How is this possible? It’s very simple, if you carefully study the instructions about making a palm tree from bottles, prepare all the necessary tools, consumables, and be sure to stock up on a good mood.
Making a voluminous palm tree out of paper with your own hands in MK
To make a paper palm tree we will need:
- Corrugated green paper;
- Plain colored brown paper;
- scissors;
- thin wire about 25 cm;
- glue.
First, let's make a trunk for our palm tree. To do this, take a wire, some corrugated paper and regular brown paper.
1) We wrap the wire with a piece of corrugated paper, this is necessary so that the brown stripes do not slide off when we stick them to the wire. And the shape of the trunk will be more durable.
2) Cut the brown paper into strips of approximately 2-3 cm. Fold each strip 6 times and create a fringe from them. To do this, make a neat cut from any edge.
3) Now glue the brown fringe to the frame of the palm tree. Apply glue to the edge of the strip and wrap it tightly around the frame so that the base is not visible. We do this 3 times to make the palm more voluminous.
Leaves.
In order to create foliage for our palm tree, we cut the corrugated paper into strips of 1 cm and about 6 in length. Fold in half and cut out the leaves. We give each leaf an elongated shape, similar to a palm leaf. The leaves need to be made in 2 sizes - small ones will go to the top of the palm tree, and large ones will serve as the main part of the crown.
Now all that remains is to assemble the finished palm tree from the parts that we made. To do this - Glue leaves to the top of the finished trunk - first small, then large.
At the end, we fix the workpiece on the stand.
And the palm tree, made with your own hands, is ready. You can decorate the base with small colored pebbles or sand to create a finished look. Origami palm tree:
A voluminous palm tree made from modules made using the origami technique will also look original. For this you will need:
- 14 sheets of thick green paper,
- 16 sheets of yellow paper,
- Glue.
- utility knife or scissors
To create a palm tree using this technique, we will first need to collect the required number of modules. You will need 210 green modules and 243 yellow ones. To make the module we will use the diagram below.
After assembling the required number of modules, we begin to create our palm tree step by step.
Palm base:
1) First, we need to make an island for our palm tree on which it will stand. To do this, we make up the first and second rows of each of the 9 green modules and turn them inside out.
2) On each corner of the module of the second row we put on one module of the third. In total you will need 18 green modules.
3) We assemble the fourth row by analogy with the third.
4) And in the fifth row, you will need to attach 36 modules.
Sand beach:
1) Starting from the 6th row, we include yellow modules in the work.
2) It is necessary to form rows 6 and 7, each should consist of 36 yellow modules.
Trunk:
1) From the 8th row, the trunk of a palm tree begins to appear.
2) Evenly distribute 18 yellow modules. We insert them into the spaces between the modules of the first and second row, simulating sand.
3) In the 9th row we distribute 8 yellow modules and repeat this action for 19 rows in a row.
Palm leaves:
1) Now we need to make branches for our palm tree. In total, we need 6 identical leaves for this. To assemble one sheet you will need green modules - the first 2 rows should consist of 6 green modules each. The modules of the second row are put on backwards compared to the first. We make the third row as follows - 2 green modules are each put on one of the corners of the previous row. In total, you need to collect 12 rows in this way.
2) The remaining five leaves are collected in the same sequence.
We complete the creation of the palm tree by gluing the leaves to the top of the trunk.
Our original palm tree made in origami style is ready.
Let's get started
- We create a crown for trees;
- We make the barrel;
- We combine structural elements;
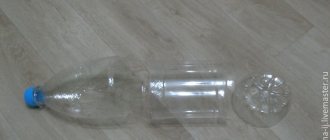
Let's start creating leaves. To do this, take a green bottle and, using a stationery knife or scissors, cut off the bottom, as shown in the photo.
Then, on the resulting workpiece, stepping back 3-4 cm from the throat, we make frequent longitudinal stripes.
Note! The more often the stripes appear, the fluffier our leaves will be.
In the same way we prepare 5 more blanks. We insert the resulting blanks on top of each other. In order to fasten them together, we use wire or rope: we thread it through the neck and fix it. The first sheet is ready.
We bring to your attention the second method of making palm branches. To do this, take a green bottle and remove the bottom using a utility knife. Visually divide the bottle into four parts and cut it. The result is a workpiece as shown in the photo below:
Then we decorate the resulting leaves, for this we make sharp teeth along the perimeter of the leaves, bend the resulting fluffy leaves outward, and fix them.
Assembling a trunk for a medium-sized palm tree
Let's start assembling the tree from the trunk. It requires a metal tube that easily fits into the neck of the bottle in diameter. The tube should be 50cm longer than the palm tree: this part will be in the ground.
We used a 150cm long tube entirely to assemble the barrel. For installation on the ground, reinforcement 1 m long was driven into the ground 50 cm deep, onto which the tube of the supporting structure of the palm tree was placed. Below are step-by-step instructions and a diagram for assembling crafts for the garden. The step numbers here and below correspond to the numbers in the pictures:
The result was a palm tree trunk. The diameter of the tree is not the same due to the use of different bottles, but this is how it happens in nature.
Share this page with your friends
Origami is an extraordinary activity called paper art. The sheer amount of things that can be made from a regular piece of paper is simply amazing! Everything that exists in the animal world and in nature can be recreated in paper origami format. You can start learning origami with simple projects, for example, making a palm tree. In fact, there are many ways to make an artificial palm tree from paper - from primitive and small in volume to complex tall structures made from paper modules.
Master class on making a crown for a medium-sized palm tree
Now let's take care of the crown of the exotic tree. To assemble it, we also chose a design that makes full use of plastic bottles. The bottles vary, and we pre-divided them into five groups for the five branches of the tree, trying to keep each set roughly the same. To assemble the crown, you need to follow these steps step by step:
Like the trunk, the crown of a palm tree can be made in different ways. It is very convenient to choose the desired option based on the size of the tree. Returning to a medium-sized sample, you can create a fluffier crown. However, in this case you will have to cut the bottles in 5mm increments, that is, do three times the amount of work with your own hands. In addition, in this case only the top third of the bottle is used, which will require three times more starting material.
Benefit from the idea
Plastic food containers are made to store various drinks, and, as a rule, the material does not decompose quickly and can rot for hundreds of years. In addition, if there are no specialized landfills at the place of residence for the disposal of such waste, then people will have to throw away the containers near their home. This, in turn, will pollute the area.
Of course, you can find a different approach and burn the garbage, but this will pollute the atmosphere; in addition, there are already enough harmful sources that destroy the environment. There is another unique approach - plastic bottles can be used to make some decorative items, for example, palm trees.
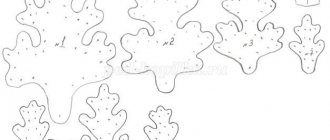
Other options for making an artificial tree crown
Options for palm tree crowns with different leaves
Note that palm leaves can be cut using different patterns. If you awaken your imagination, you can come up with something new and make your own palm tree from plastic containers.
Please note that the crown shown in the photo below is a good fit for making a large tree.
Having already had some experience, we understand that this option will require a large amount of source material. As you can see, only the lower parts of completely identical bottles, strung on wire, are used here.
To prevent individual links from entering each other, the upper part of each workpiece is cut and bent inward.
We hope that you will get the best palm tree from plastic bottles. The video below will help you clarify the missing details.
Such palm trees are of course more suitable for a themed party, but no one can stop you from making a piece of Paradise on your site! It’s not difficult to make them, and most importantly, you don’t need to buy anything special. The trunks consist of cardboard sleeves, and the leaves are made of paper. I like to make things that are easy to make and easy to take apart. We will need:
- cardboard rolls for toilet paper and paper towels;
- burlap or other fabric that matches the texture;
- long wooden skewers;
- green paper;
- hot glue;
- foam balls;
- scissors;
- brown paint.
First we'll make the trunk.
Cut the fabric into strips that will make it easier to wrap around the trunk. Stack the bushings on top of each other and wrap them with fabric. Secure the fabric with hot glue to the cardboard. Gradually increase the height of the trunk. We will make an insert from a foam ball on the top of the head. Cut a square of fabric, place a ball in the center and wrap it around.
Secure the corners of the fabric with hot glue. Then, with the ends of the fabric down, insert the workpiece into the barrel. Add hot glue to the base.
In the photo below you see how we will attach the leaves to the palm tree. Poke a skewer through the fabric into the foam ball. Draw the leaves on paper, cut them out and glue a wooden skewer to the center where the vein is supposed to be.
You will attach the nuts to the trunk in the same way. Paint the balls brown and place on a skewer. Secure at the base with hot glue. Then secure it to the trunk or stick it into the same ball at the top of the trunk.
Attach the palm tree trunk to the wall of the gazebo or to a fence post. Or first make such a simple construction as in our case. That's all! This is the kind of fairy tale you have created!
Every mother knows that it is very important to develop fine motor skills with a child. Such activities have a positive effect on the development of mental abilities, speech apparatus, as well as manual skills. The more such activities in a child’s life, the sooner he begins to speak, understand his mother’s speech, and becomes a full-fledged member of society. Also, every mother knows how difficult it is to interest a baby and persuade her to do something specific, especially necessary for the mother, and even to devote a long time to this activity. This article describes techniques for making a palm tree from paper with your own hands. Such fine motor skills activities will delight your child and make him want to finish what he started.
Firstly, the baby will do crafts in the company of his mother, which is always pleasant for him, and secondly, a palm tree is a plant that you will not see on the street, so it will be very interesting to see the result and enjoy your unique plant, even if it has grown from paper.
There are many options for execution. Here are just some of the master classes.
Lesson #1
In the first master class we will look at a lesson on making a Christmas tree.
You will need:
- plastic bottles;
- wooden or plastic stick or tube;
- awl;
- scissors.
1. Take 6 plastic bottles of any color, pour out the remaining contents and rinse them thoroughly. Don't throw away the caps - you'll need them later. Also remember to tear off the labels.
2. Using scissors, cut off the bottoms of the bottles. Cut the bottom of each subsequent bottle along a line located approximately 2.5 cm higher than that of the previous bottle.
3. Now cut each bottle into several vertical strips. If desired, you can paint the bottles green at this stage.
4. Use an awl to make a small hole in each cork, the diameter of which should match the diameter of the base stick.
5. Now place the resulting parts on the base stick so that the larger part is at the bottom.
6. Take a vase or bottle and insert a Christmas tree into it.
7. To decorate the tree, glue a race or any other decorative decoration to the top.
To decorate the Christmas tree, you can also use thin decorative braid, or, for example, stick small toys or miniature balls on the branches.
Volumetric origami
To complete this voluminous craft you will need:
- 14 sheets of green high-density paper or cardboard;
- 16 sheets of yellow or brown paper;
- glue;
- scissors.
A palm tree consists of a certain number of constituent elements. To obtain the finished product, you need to collect 210 elements from green paper and 243 elements from yellow (or brown). The components are assembled according to the diagram in the photo.
Do not be afraid, all actions are performed quickly and simply and any mother and baby can do it.
When all the component elements are ready, you can smoothly move on to the next stage - assembling the palm tree.
First of all, it is necessary to create a frame for the product so that the palm tree can stand on its own and not fall. To do this, two levels of nine green modules are built, after which they are all turned inside out.
Next, one green element of the third is put on each corner of the second-level element. A total of 18 elements will be required. The fourth level is built similarly to the third. To create the fifth level you will have to attach as many as 36 elements!
To make the palm look more natural, you need to add soil around the five levels of grass at the base of the tree.
To do this, from the sixth level yellow elements are added to the performance. The sixth and seventh levels consist entirely of 36 yellow elements. Starting from the eighth level, we move on to creating a palm tree trunk.
18 yellow elements are uniformly distributed throughout the frame of the tree, in the part that acts as the soil from which the palm tree grows. At the ninth level, you need to distribute eight yellow elements, and repeat this action for 19 subsequent levels.
The palm trunk is ready. You can move on to making leaves. A total of six leaves need to be made for the finished product. The leaves are made from green elements.
The first two levels of the sheet consist of six elements. The elements of the second row are put on as if on the wrong side (if we compare the first level).
To complete the third row, you need to put two elements on each of the corners of the second level. According to this scheme, 12 levels are assembled.
The remaining five leaves are made using the same algorithm. To complete the job, you need to glue the leaves to the top of the trunk. Now the palm tree is absolutely ready!
By adding some imagination, using the same principle, you can create an entire tropical forest from palm trees or even build your own uninhabited island with dense palm vegetation.
Videos on how to make an origami-style palm tree can be viewed here:
Simple option
If the child is very young, making a palm tree using the origami technique may seem quite difficult to him, or he may simply not have enough perseverance due to his small age.
For such babies and their mothers, there is a simpler option for making a palm tree from paper.
To work you will need:
- newspaper;
- green paper;
- brown paper;
- scissors;
- glue;
- scotch.
The first step is to start creating the palm tree trunk. The dimensions of the material and blanks used depend on the desired size of the finished product, so they are not specified in the article.
To do this, take newsprint and roll it tightly into a roll, then wrap it with tape.
The diameter does not need to be small; the larger the diameter of the trunk, the more stable the palm tree will be.
The next step is to take brown paper and cut it into strips of length equal to the circumference of the palm tree trunk. On each strip, cuts are made along the bottom approximately to the middle, something like a fringe is obtained. The more often you make cuts, the more beautiful the finished product will look.
The outline of a leaf is drawn on green paper. You can take a finished image from the Internet and transfer it to paper, or you can decide for yourself exactly how the leaves of your palm tree should look.
The number of leaves is also up to mother and baby to decide. It is important not to skimp on the material so that the palm tree does not look too modest and dull, but also not to overdo it, otherwise the appearance of the finished product can become very careless.
The place where the trunk and leaves are glued is wrapped with a fringed strip.
The product is ready. You just need to let it dry and you can build your jungle!
Realistic coloring
If you have minimal artistic skills, you can make a truly realistic paper palm tree. The tree is assembled in stages from the same materials, only ordinary thick white paper is used, and paints will also be required.
After assembling the tree, you need to arm yourself with a brush and put a photo of a real palm tree in front of you. The main task: to draw various details on the product. This does not mean that, for example, the trunk is painted only brown. First, a light shade of brown is applied, and then, where there are shaded areas, they need to be brushed, but only with a darker shade.
After the base layers, all the details are drawn until the master achieves realism. Such manipulations are also carried out with foliage. You need to draw veins, dark and light areas, and so on on them. At the end, chiaroscuro is applied. Pale colors are used. The process is long, but the work will be worth the wait.
Sources:
https://sdelaysam-svoimirukami.ru/1584-palma-iz-plastikovyh-butylok.html https://moy-karapuzik.ru/palma-iz-plastikovyx-butylok-s-poshagovymi-foto/ https://www .infoniac.ru/news/Pal-ma-iz-plastikovyh-butylok.html https://dekormyhome.ru/rukodelie/palma-iz-plastikovyh-bytylok-svoimi-rykami-poetapno-s-foto-i-video. html https://hendmeid.guru/podelki/palmyi-iz-plastikovyih-butyilok
Bottle palm tree: possible benefits and methods of use
As you know, plastic used for the production of food packaging does not decompose for hundreds of years when it gets into the soil. Centralized removal of this kind of waste is not established everywhere, and no one wants to litter nearby areas with plastic waste. What should a summer resident do in such a situation? Do you really have to take old plastic bottles to the city?
Don't rush! If you carefully collect bottles of brown and green plastic, in the off-season the whole family can turn this container into an unusual evergreen tree in an evening.
A palm tree made from bottles will perfectly decorate:
- local area;
- unsightly corner of the garden;
- plot next to outbuildings;
- children's playground;
- a border of earth near an open one.
A palm tree made from plastic bottles according to the instructions below can become a spectacular decoration at any party, wedding, theme evening or children's party.
Making an original decorative item will not cause difficulties even for people who are far from this kind of creativity. The main thing is to prepare everything you need before making a palm tree from plastic bottles.
Materials and tools
First of all, let's decide on the quantity and quality of materials. What container is suitable for our craft? Of course, every home has used plastic bottles, but are all of them suitable for our work? Of course not. We strictly choose only brown and green bottles for the trunk and crown. For a larger plastic beauty, a container with a volume of 2 liters is best suited; for a smaller tree, a one and a half liter container will do.
We will need:
- 15-20 brown bottles for a large tree trunk and 15-10 for a small one;
- 6-8 green bottles to create 1 palm leaf;
- stationery knife or scissors;
- a metal rod or wooden handle for attaching the trunk;
- wire and rope;
- scotch.
Below are detailed instructions for making a palm tree with diagrams and photos.
What do you need for a palm tree made from plastic bottles?
What should you stock up on before starting work? First of all, the DIYer will need green and brown plastic bottles. The green ones are blanks for the foliage of the tree, and the brown ones are the future trunks of the evergreen beauty. Moreover, the height of the plant and the splendor of the crown directly depend on the amount of containers collected.
The list of necessary materials and tools for creating a palm tree from bottles includes:
- plastic containers;
- sharp stationery knife and scissors;
- durable tape;
- metal rod or plastic tube for the barrel;
- thick rope or braided wire for the base of the leaves.
When selecting plastic bottles for a palm tree, you need to take into account that trunks and leaves made from containers of the same diameter look better. If you have smaller green bottles in stock, they can be used for leaves in the middle of the crown, but small brown vessels will have to be used for tree trunks of a different type or size. Different shades of plastic are not a hindrance. They will only add vitality and brightness to the man-made plant.
original tree
A tree made from transparent bottles also looks interesting. For the base you will need a branch from a real tree. You can choose the right one when pruning fruit trees and shrubs in spring. Then take the bottles and cut off their top and bottom parts. Divide the resulting plastic cylinder into two wide strips.
It is best to make holes in bottle products with a hole punch or a hot awl or nail.
Form branches from them, cutting out neat leaves along the edges, without touching the middle of the base. The central part of the branch should be wide enough so that holes can be pierced in it to attach the branches to the wooden “skeleton”. The frame of the tree can be strengthened with additional iron rods, giving the craft an interesting shape, to which you will also need to attach plastic branches. Dress the tree in foliage, giving the product a finished look.
To make wood, you can use containers of any size and color. In this case, everything depends only on the master’s idea.
Bottle palm: manufacturing instructions
A step-by-step description of all the intricacies of creating a plastic tree will help you quickly, literally in the evening, step by step create a palm tree from plastic bottles of the intended height.
The process consists of three operations:
- leaf assemblies;
- creating a plastic plant trunk;
- connecting all parts and installing the finished tree.
Before making a palm tree from plastic bottles, the container must be washed and all paper and film labels removed from it.
Although there are many options for creating a plastic tree, the most magnificent long leaves with any chosen method are obtained from large, for example, two-liter bottles.
Making a palm tree crown from bottles
The bottom of the prepared green bottles is cut off with a stationery knife or scissors. It is no longer needed, and the upper half will become a blank for the sheet.
It is carefully cut towards the neck into thin longitudinal strips. The larger the diameter of the plastic bottle, the thicker and more luxuriant the green palm leaves will be.
These are not the only option for creating leaves. If you cut the top of a plastic bottle, as in the photo, into four “petals”, and then cut each of them several times, you will get beautiful feathery foliage.
The resulting fragments of leaves are sequentially strung on a strong rope or durable electrical cable. A lid must be screwed onto the first piece in order to secure the “petiole” of the leaf with a knot at the top. The last part of the bottle is screwed in the same way.
A palm tree made from plastic bottles can have a top of any size, but trees whose crown consists of at least 5–7 leaves look better.
There should be a long stalk at the base of the finished palm leaves in order to later assemble and securely fasten the entire structure.
Assembling a palm tree trunk from bottles
To obtain a tree trunk similar to a natural one, you will need almost the entire bottle, except for the very bottom.
From the bottom almost to the very neck, longitudinal cuts are made on brown bottles, dividing the container into equal petals.
Only a small fragment of the bottom goes to waste
This is what the finished part of the future bottle palm tree trunk looks like.
The assembly is carried out in the same way as the green leaves of a tree were collected. To secure the palm tree in an upright position, its trunk will need a strong, rigid core. It can be made from a metal rod of suitable length and diameter or a tube.
Assembling a palm tree from plastic bottles
The finished palm leaves are attached with glue or tape to the top of the tree so that they form a uniform crown diverging on all sides.
This is what the finished tree top looks like.
The design turns out to be quite heavy. Therefore, it is advisable to secure it with such a heavy base. If it is not possible or suitable material to make a welded platform, the rigid plastic or metal base of the stem is buried at least half a meter. This kind of “root” in the hole is strengthened with brick chips and compacted after filling with soil. Large trees are best concreted.
A video on how to make a palm tree for your garden plot from plastic bottles will explain all the nuances of the creative process and help you turn your yard or corner of the garden into a real oasis with your own hands.
Quick assembly
Now that all the structural elements are ready, let's begin the assembly. There are several options for arranging ready-made elements. Let's stick to something simpler. We prepare the top of the trunk, cut off the neck from the brown bottle. Almost at the very bottom we make several cross-shaped cuts. This is where we will insert our crown. The assembly process is presented more clearly in the diagrams below.
Important! For the resulting masterpieces, it is necessary to make a foundation so that they stay well in the ground and do not wobble.
If you have the opportunity, you can prepare a welded structure for subsequent concreting.
What wonderful and unique trees we have, so you can create a whole exotic evergreen alley in your garden that will be the envy of your neighbors. Imagine and create interesting crafts for your site, and involve children in the work.
Use your imagination and decorate your tropical beauties using multi-colored bottles of smaller diameter: add fruits to palm trees in the form of bananas and coconuts.
Pay attention to the creations of your colleagues, take notes and use the techniques and elements you like in your work. Some work options are shown in the photo below: