A dog feeder is simply necessary in cases where the owners go on vacation for a long time, and it is not possible to feed the pet every day. This feeder can be installed in an apartment or in the courtyard of a private house.
On this topic:
How to feed birds correctly - we help birds...
Oct 11, 2019
How to make a bird feeder: simple models
May 28, 2018
With love for the smaller “brothers” - a pen for dogs with your own...
Apr 13, 2018
We are waiting for our feathered friends to visit us - a vintage feeder with...
Feb 17, 2018
BACK FORWARD 1 of 6
There are plastic dog feeders on sale. As a rule, they are vertical and horizontal containers, which are connected to each other by a plastic tube.
The cost of a factory feeder is not justifiably high, so many summer residents make their own dog feeders from cheaper materials. The operating principle of such feeders is simple.
Making a feeder
To make an automatic dog feeder you will need:
- two water tanks with a volume of 20 l;
- plastic pipe for sewerage with a diameter of 110 mm;
- electronic timer and partition.
The bottom of one of the bottles is completely cut out. The second container is cut in half. The neck of both tanks is cut off. In a vertical container, in place of the neck, make a hole with a diameter of 100 mm so that the plastic pipe fits tightly to it.
A hole with a diameter of 110 mm is made in the second bottle and put on the pipe. Then a slot is made in the horizontal bottle so that the dog can stick its head into the feeder.
At this point, the manufacture of the feeder is completed, but you can still embed an electronic timer with a valve into the pipe.
Types of feeding accessories
There are several types of bowls:
- Single element.
- Double accessory.
- Sippy cup.
- Travel bowl.
- Automatic feeder.
Single and double accessory
Single containers have become most popular. Their photos can be seen in the review. They are easy to clean and inexpensive. Such accessories are easy to use and convenient during feeding.
Double bowls are not as popular. But they are acceptable. Instead of washing two accessories, you can wash just one. However, they are less comfortable for pets. Food from one compartment will constantly flow into another, which usually contains water. Accordingly, its taste will deteriorate. The best option is only in situations where there are two dogs living at home.
For messy dogs
A sippy cup is a good option if your dog is large or untidy. A sippy cup can hold water even if it gets knocked over. Water is supplied using a special membrane from a large compartment.
A sippy cup is also suitable if the dog has long ears or a beard. The advantages of the design include the possibility of use on the road.
For traveling
The travel bowl has a special design. It is a bottle with a device through which you can drink water. This container is convenient during long walks, traveling and at exhibitions.
Automatic feeding option
If the owner is busy, he needs an automatic feeder. What is she? An automatic bowl is different in that food and water are placed in separate compartments. From these it will be fed into feeding containers. In addition, an automatic feeder is good because the owner can choose the time for feeding food and its quantity.
There is also an automatic feeder that has a heating system. This bowl is perfect for puppies. An automatic feeder will prevent them from going hungry and eating cold food when the owner is not at home. There is also an automatic bowl equipped with a voice announcement system and other various features.
There's even an interactive bowl. You will learn about it by watching the video.
How to do it yourself?
You can make a stand for the feeder yourself, using your imagination and available materials.
If you know how to use a welding machine, then you will not have any difficulties making a bracket from an iron tube. And you yourself will position the bowl at the adjustable height that will be comfortable for the dog. You can also use wood as a material.
It is necessary to ensure proper waterproofing; without this, the stand will quickly become unusable. After all, animals often spill water from their bowls when drinking. The structure can quickly rot and lose its presentable appearance.
A wooden stand will perfectly complement the interior of your home or apartment.
Design advantages
First of all, you should understand what is good about an automatic feeder and why it is so indispensable for pets. The main feature of this design is the portioned food supply. This property is very important, since all cats can be classified into several groups:
Most often you can find the third type - the glutton. The problem is that they cannot control the amount of food they consume. Even if the owner leaves the food in the bowl for several days, the cat will eat everything in 2-3 sittings. Of course, excessive oversaturation and subsequent hunger should not be allowed, because in this case the cat’s digestive system will suffer.
Installing a feeder with an automatic feeding mechanism will help to successfully distribute the load on the animal’s digestive system. In addition, such a design will be useful when the owner wants to form a certain food discipline in the pet. There are a number of reasons why it is recommended to purchase or make your own automatic cat feeder:
- Many pets like to eat at night, late in the evening, and also early in the morning. The automatic device is convenient because the owner does not have to get out of bed to feed the pet in the dark.
- The next argument is the cat’s optimal diet. It is preferable that the animal eats every 1.5-2 hours, but in small portions. In this case, such a device will become an indispensable assistant.
- Another reason to get an automatic feeder is the predatory nature that lives in every animal, despite domestication. The main instinct of cats is to independently obtain food. The purchased structure will not be able to provide game elements, but a homemade unit can easily cope with this purpose.
Making an automatic cat feeder from a watch
To make this zoo gadget you will need:
- old quartz wall clock;
- environmentally friendly clay or a bowl of suitable size with compartments;
- a sheet of plywood or thin plastic for the lid;
- wooden plank;
- tin or plastic jar with a wide bottom;
- battery;
- nippers or scissors;
- a pair of nails;
- soft wire;
- file;
- lighter;
- rubber suction cups;
- marker.
Please ensure that the materials you use do not contain toxic substances.
Automatic cat feeder - part 1
I have a cat who only eats dry food. From an “operational” point of view, this is simply an ideal option: simple, clean, convenient. But there are a couple of points that bothered me a little: if you pour a lot of food into a bowl, the cat cannot stop until it fills itself to a spherical state; it is difficult to pour a little bit several times a day, since during working hours it is unattended. And, finally, if you have to leave somewhere for a couple of days, then upon arrival the cat greets you almost with tears in her eyes - there was no one to feed!
{ads2}
Therefore, I took the trouble to create an automatic feeder for a cat that eats dry food. Of course, you can buy a ready-made one for about 3,000 rubles, but this is the cost of food for almost a year - it suffocates the vile amphibian!
I decided to make a feeder from improvised materials. Currently, the project is in the first stage - the mechanical part of the dispenser has been manufactured, all that remains is to make the structure and electronics.
Dispenser
The dispenser is made of four main parts: an oblique plastic plumbing tee 50 mm, a plastic pipe with a diameter of 50 mm and a length of 35 cm and an electric central locking drive. These parts are shown in the photo. The fourth part is the cap from a spray bottle, for example, from hairspray, air freshener, etc., this part is shown in the photo below.
The plastic parts are subjected to slight processing with a knife, but it must be remembered that despite the apparent plasticity of the material, it is prone to cracking, so it is better to cut carefully, without fanaticism.
{ads1}
First of all, we remove all the rubber seals that are in the plumbing fittings. After this, carefully cut a hole in the influx of the horizontal part of the oblique tee , as shown in the photo. The slot width is about 4 mm, and the circumference is about 40 mm. The length can then be easily adjusted, so if you do something wrong, don’t worry.
The next stage is the manufacture of the feeder . To do this, cut a piece of about 15 cm from a straight pipe and cut a slot in it about 2 cm wide. I say all sizes “approximately” because... I did it myself “on the spot.” Due to the cheap cost of materials, you don’t mind ruining something, so I didn’t bother with the exact dimensions. The photo shows what should happen. The transverse cut in the slot should be made slightly wider than the slot itself - this is so that you can slightly compress the edges of the slot, reducing the diameter so that the feeder can be inserted into the tee.
Now we process the fourth element of the dispenser - the same cap from the bottle. We cut off the sides, leaving 12-15 mm from the bottom, drill a hole 12-13 mm from the center and fix an M4 screw there with a length of at least 20 mm. This cap will subsequently be placed on the uncut part of the feeder and secured to it with self-tapping screws, known among drywall makers as “seeds.”
We insert the feeder into the horizontal (straight) part of the tee . the feeder rotates, the slot will open a passage for feed, which will come from the oblique outlet of the tee . By rotating the feeder back and forth, we select 2 of its positions for the closed and open states.
{ads2}
You should strive to ensure that when open, the feeder slot completely falls into the lumen of the oblique outlet, and when closed, there remains a gap slightly larger than the average size of a grain of dry food. There is no point in achieving complete blocking of the outlet hole; anyway, through a gap of up to 1 cm, food does not spill out at all. After the open-close positions are determined, we mark through the slot the location of the hole for the lock, which should prevent the feeder from falling out of the tee and limit the angle of its rotation.
Having found the desired position, we take out the feeder , drill a hole, insert it back and install the lock , which is nothing more than an M4 10-15 mm long. You may have to work hard with the installation, because... The clamp be secured securely, and the screw must be turned from inside the pipe. But, since the screw is not far from the edge, and the pipe may still be slightly deformed, this process can still be completed successfully. As a last resort, you can drill another hole on the diametrical side of the pipe - for a screwdriver.
{ads1}
From this moment on, the narrative loses linearity, because... the adjustment phase begins. The photographs show ready-made positions of the component parts, i.e. found during the fitting process, everything is fixed, but when repeating the device, you should not rush to fix it! First you need to fit everything, everything, and only then fasten it. Although, if something goes wrong, you can always replay it - everything is attached with self-tapping screws, and the material is plastic, so there is always a path for retreat.
We put the cover on the feeder . Here you may need to remove any stiffeners that may be there the cover This is done with a knife or side cutters. The lid is put on quite tightly, while the feeder must be held on the opposite side so as not to press it inward and not to destroy the slot with the clamp. Now you see that if you apply some lateral force to the screw the lid the feeder will rotate and open and close the feed passage. Things are starting to become clearer, aren't they?
We insert into the oblique outlet the remains of the plastic pipe from which we cut the blank for the feeder. This will be called an extension pipe .
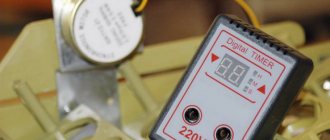
The last thing remains: installing the drive . We put its moving part on the cover pin and lightly secure it with a nut. Then we find the desired position of the drive (here I won’t give better advice other than “choose the position yourself”) and fix it with a long self-tapping screw, screwing it directly into the plastic of the extension pipe . You saw what should happen in the end in the very first photo of the article. 12V is applied to the drive the feeder , opening and closing the feed path. Having adjusted the position of the lid , we fasten it with “seed” screws in three places for reliability.
Tests can be carried out. We pour the food into the extension pipe (of course, the feeder must be in the “closed” position), hold this pipe vertically, while the oblique tee itself is inclined, making it possible to pour the food into the bowl. We supply a current pulse to the drive - oops! the food is spilling out! All that remains is to secure it all on some kind of base and make electronics that will send a short pulse to the drive and, after a split second, change the polarity of the current so that the feed is poured out only for a short period of time, exactly as long as necessary to pour out one portion of feed.
All photos (and additional angles) at once in the form of a gallery:
I will inform you about how the frame is made, the electronics circuit, etc. as the project progresses, stay tuned for more!
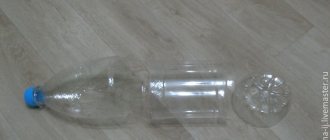
PS I plan to use a 5-liter plastic water bottle as a container for food: its neck fits perfectly into the pipe, and food can be poured into it for a couple of months!
{ads1}