Always in anticipation of a magical holiday, the whole family starts making New Year's decorations for the green beauty and home. And the most favorite craft is rightfully considered the main symbol of the New Year holiday - Santa Claus.
We suggest you make Santa Claus out of paper. With such a simple material you can create real masterpieces with your own hands. You just need to devote a little time to this activity and show all your limitless imagination.
Study our master classes on making Santa Claus with your own hands and you will be able to please your loved ones with unique New Year's gifts, made with soul and attention.
Modular origami Santa Claus - master class
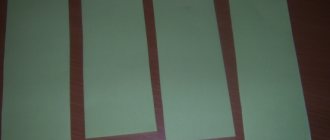
We will need: sheets of A4 paper: blue - 14 pieces for 211 modules, white - 13 pieces for 207 modules, pink - 1 sheet for 17 modules.
We divide each sheet into 16 rectangles, from which we will make modules.
Step one. Fold the rectangular sheet in half lengthwise. Using another fold, we outline the middle line.
Step two. We bend the edges of the rectangle folded along the middle, as shown in the photo. Turn the piece over and fold the bottom edges up.
Step three. We fold the corners, bending them over the large triangle, and then bend these corners inward. We bend the resulting figure in half - so we have learned how to make a module. Now, in the same way, we make the required number of modules indicated above from the rest of the paper.
Step four. Let's start making crafts. We take 5 white modules and arrange them as in the photo (we place the top row module with the smaller side up). Next, we assemble a chain of 3 rows of white modules. Each row consists of 25 pieces.
Step five. We close the chain into a ring and turn it over. Next, we perform 3 rows with blue modules. From the seventh row we make a beard. To do this, insert 2 white modules with the smaller side facing out. We insert the remaining blue modules of row 7 as usual.
Step five. In the 8th row we fasten 3 white modules, as usual, with the long side, the remaining modules are blue. With each next row we add one white module on each side of the beard.
WATCH: How to make a paper deer
Step six. In the 11th row we insert one red module into the middle of the beard - this is the mouth. Row 12 consists of white modules. We put them on blue modules with the smaller side facing out, and on white modules (beard) with the long side, as usual. In the 13th row, opposite the red module, we put on the white one with the long side outward, and 2 pink modules each with the smaller side (see photo).
Step seven. In the 14th row we put on 6 pink modules with the smaller side, and we put on white modules as usual. Row 15 - we put on 17 white modules and 8 pink ones. In the 16th and 17th rows we put on all the white modules with the smaller side outward - this is the hat.
Step eight. The last 18th row consists of blue modules with the smaller side facing out. We assemble hands from 3 white modules and 5 blue ones. Glue the finished eyes and insert the nose (part of a children's mosaic). Santa Claus made from paper using modular origami technique is ready. We hope that after studying the master class, the Snow Maiden, made in the same technique, will appear next to your Santa Claus.
Santa Claus made of paper using origami technique - master class
We will need colored paper and a little patience. We offer you several schemes according to which you can easily make Santa Claus with your own skillful hands. You can hang it on the Christmas tree, decorate a greeting card with it, or give it to friends for the New Year.
DIY Santa Claus from colored paper - master class
We will need: red paper, pink paper for the face, white paper for the beard, cotton wool, markers, scissors and glue.
Operating procedure:
- Using a compass or a small plate, draw a semicircle on red paper. We cut it out, fold it into a cone and glue it together.
- We cut out an oval from pink paper, draw eyes and a nose on it with a felt-tip pen and glue the face of Santa Claus to the cone.
- Next, glue on the beard and hat from white paper. To do this, cut out white strips, cut fringe on them and twist it with scissors. We glue strips with twisted fringe to the cone at the bottom of the face in several rows, giving the beard fullness. We make a hat from the same strip. A beard, hat and fur coat for Santa Claus can be made from cotton wool, which is glued to the cone along its lower edge, on the face and the upper part of the cone. An elegant Santa Claus made from paper, made by yourself, is ready. Using a cone, using your imagination, you can make a Snow Maiden.
WATCH: Making a snowman using origami technique
Santa Claus made of colored paper strips - master class
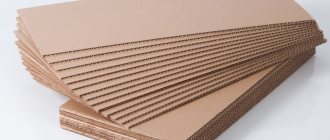
We will need: thick colored paper, white corrugated cardboard, scissors and glue.
Operating procedure:
- Cut out 6 strips measuring 1 cm by 15 cm and 6 strips measuring 1 cm by 10 cm from red paper. Glue them into rings. We assemble a ball from 6 large rings, fastening it with glue at the top and bottom. Using small rings, we assemble a smaller ball using the same pattern. The result is the body and head of Santa Claus.
- Cut out a small circle for the face from pink or orange paper. We cut out a mustache, beard and hat of any size from corrugated cardboard and decorate the face with them. Cut out and glue the eyes and nose. Glue the face to a small ball, which we then glue to the body. Cut out mittens and felt boots from cardboard and glue them to the craft. The New Year's symbol made from paper, created with your own hands, is ready.
A few more ideas for creating Santa Claus with your own hands
By using your imagination and using the patterns we have proposed, you can make Santa Claus even from a paper napkin.
A paper cone allows you to make many versions of Santa Claus with your own hands.
And this family of Santa Clauses is made from ordinary toilet paper rolls.
Father Frost and Snow Maiden using the popular modular origami technique.
We hope that our master classes helped you understand the technique of making Santa Claus from paper and encouraged you to be creative. Use a little imagination and create your own kind Grandfather or even several. They will decorate your holiday and create a magical mood!
Santa Claus made of paper
If you have children, then they will probably like Santa Claus made from paper. Origami as a paper craft technique will help you with this. The complexity of creating Santa Claus (origami), the design of which you have chosen, may differ significantly. Starting with the simplest options accessible to a child and ending with more complex ones, sometimes even beyond the capabilities of an adult who first encountered such a technique.
To make this Santa Claus using the origami technique, you will need paper that is red on one side and white on the other. Cut out two square pieces. The side length of the larger square is 10.5 cm. The smaller figure has a side of 8.5 cm.
DIY New Year's Santa Claus made from paper
an original New Year's Santa Claus with your own hands from paper if, in addition to colored paper sheets, you use disposable paper plates. You may have noticed that this white plate has an openwork edge, the same as we cut out with scissors if we need to make a beard for our Santa. We will use the plate as a beard and face. But first we need to cut out the base for our craft, in this case the base will be a large red triangle; it can be cut out from thin double-sided colored cardboard, which is often used when making children's New Year's crafts with their own hands. The paper plate needs to be folded, but not in half, but about a quarter of the plate, we will use the remaining part to create a face for our Santa. We will also need beige paints (you can mix white and yellow). With these paints we need to decorate the inner circle of our plate, leaving the wavy edges white.
Santa Claus will have a fluffy nose with his own hands; we will make it from threads following the example of a pompom for hats, using yellow or orange threads. The pom-pom for the cap can turn out to be just as fluffy, or it can be cut out from white paper. Near the nose we will have a mustache consisting of two elements that need to be cut out. The eyes can be made from two parts: cut out a white and black circle, the black one should be smaller in size and glue them together, placing one on top of the other, and then glue them to the plate. Our face is ready. All that remains is to decorate the sharp edge of the triangle with a white pom-pom circle for the hat. And glue a paper rectangle over the plate - a strip that will mark the beginning of the cap. To make such a Santa Claus out of paper with your own hands, you don’t need a diagram at all; you can look at a photo example and repeat it using the materials available to you for children’s creativity.
DIY paper Santa Claus: diagram
You've probably already looked at a lot of master classes on the Internet on how to make Santa Claus and the Snow Maiden with your own hands, but most of the descriptions presented are more suitable for adults; these ideas will be too complex for children's creativity. It will be interesting for kids to work with multi-colored paper sheets, sheets of cardboard, cut out various figures with scissors and glue them to the surface. First, you can watch with your child on the computer how Santa Claus is made from paper with your own hands video , and then invite the baby to make the same figure on his own.
The main decoration of Grandfather Frost is, of course, his luxurious beard, and we definitely have to make it for our paper old man, besides, it’s so easy to implement using only white paper and scissors. However, before making the ford, we need to complete the base; for this we will use colored cardboard - preferably choose red. The cardboard can be one-sided, because we will roll it into a cone. We will also need a sheet of plain paper or corrugated paper; it will definitely make a voluminous and curly beard. As always, the main assistants in completing this children's craft will be ordinary stationery scissors and PVA glue. On the cardboard you need to draw a contour: a circular sector (almost a semicircle). You can see which figure should be drawn on cardboard in the step-by-step master class. From this sector we will make the basis for our future craft. The most beautiful and bright base will be red, but you can also use blue cardboard. Such figures will become an original decoration for the New Year tree, and even preschool children can complete the task without the help of adults.
We will have a three-dimensional Santa Claus made of paper with our own hands The joint can additionally be taped. The base can be in the form of a non-sharp cone, i.e. At the back you will staple only the edges of our circular sector. We need to cut out a small circle from a white sheet of paper, this will be the face of our craft, and a long white strip, from which we will make a curly beard and bangs. Now he will process the edge of the white strip: one side must be cut into strips, without cutting to the end, since in children's appliqués we make grass under a tree or flower. Since our beard should be curly, we can add volume to it by twisting the stripes onto a match or pen rod. Now you will see how luxurious the beard of the future main symbol of the New Year turned out. A DIY Santa Claus made from colored paper can become a toy on the New Year's tree, but to do this you need to make a loop on top. You should cut out two mittens from brown cardboard; if you don’t have cardboard of the corresponding color, you can cut out the elements from white paper and then paint them with the chosen color or even make an interesting geometric pattern on the mittens. The mittens should be glued to the sides, slightly below the head. In the middle of the base on the front side, we first glue a white circle, draw eyes and a mouth on it, make a carrot nose, glue a piece of “curly” paper on the sides, below and above the face. When the glue dries, our craft is ready to become an interior decoration.
DIY Santa Claus from colored paper
A do-it-yourself Santa Claus toy made from paper using the origami technique is a task for a real master, at least that’s how it seems when you first see the diagram for its implementation. But if the kids enjoy making paper boats and airplanes, then you can focus their attention on other figures that can be made using this oriental technique.
If you make several of these figures, then by attaching them to a thread, you will get an original New Year’s garland that you can use to decorate a child’s room where it is too early to put up a Christmas tree or hang Christmas balls. This craft will be a great pastime for the whole family; you can organize a small family competition to see who can create the most beautiful Santa Claus using the origami technique.
We will make origami from a colored sheet: it should be red on one side and white on the other. The sheet must be given a square shape by cutting off the excess part. Origami is always performed according to the following pattern: a square sheet is folded in the correct sequence until the required flat figure is obtained. The origami technique is famous for the fact that it allows you to get a bizarre, complex figure without using a drop of glue or scissors to create it. Older children will be interested in the technique of modular origami, where it is necessary to create a three-dimensional figure from paper modules. The folded “triangles” are fixed together in a chain without glue, thus forming layers. You can use triangles of different colors - in this case, our choice fell on blue and white paper. Following the diagram, you can make your figurine with an original pattern on the “fur coat”.
DIY paper Santa Claus: template
When children make Santa Claus with their own hands from paper, the template can come in handy. You print the template on a printer on white or colored paper, then cut out the elements along the contour with scissors. The children's task is to glue the elements to the base so that they form a picture, in our case it should be Santa with a curly beard.
Mothers always choose complex New Year's crafts: they create life-size Santa Claus and the Snow Maiden, guided by the technique of creating dolls from nylon tights, and sew costumes for them with their own hands, sometimes even embroider fur coats with beads, felt felt boots from wool, and make painted kokoshniks for the Snow Maiden.
Making the head and putting the whole figure together
Now let's work on our grandfather's cap.
Take a small square and bend the adjacent sides so that you get white stripes along the edges, but no more than 1 cm. Turn the workpiece over with the white side up and fold the left and right corners towards each other as indicated in the diagram. A little effort on your part - and Santa Claus (origami) will acquire such a wonderful hat. The process diagram will help you understand everything in detail. Turn the hat over and fold the corner located at the bottom up, and then bend its tip in the opposite direction. So our origami-style Santa Claus acquired a head with a hat and beard.
Now glue the head to the body. That's all, your origami Santa Claus is ready. You can decorate Christmas cards or packaging for New Year's gifts with this craft. The product is suitable for decorating windows. Or you can use it as a Christmas tree decoration. All you need to do is just experiment with the size of the square blanks.
Snow Maiden made of paper
Using the origami technique, Santa Claus is not the only character that can be made. Everyone knows perfectly well that his granddaughter Snegurochka is supposed to be his partner. By creating your favorite fairy-tale characters, you will plunge headlong into the Christmas mood and give it to everyone around you.
To create it you need single-sided sheets of paper in white, blue and brown. Involve children in the process and go into a fairy tale with them, creating wonderful New Year characters. To fold the head, use a square piece with a side equal to 9 cm. Fold it in half in a diagonal direction. And then follow the diagram. Fold the top sides toward the center fold and fold the long corner back. Bend the bottom corner back and fold the braid in half.
Folding the Snow Maiden's fur coat
To create a fur coat, use a square with a side equal to 15 cm. Place the colored side towards you and fold it in half. Bend the sides at the sides by half a centimeter, and at the bottom by 2 cm. Bend the upper corners to the midline and turn over to the other side. Follow the instructions shown in the diagram. After you receive the finished fur coat, you need to insert a white strip between the upper and lower folds. Make it from a 2 cm wide rectangle. First, bend it in half vertically, and then bend the edges to the center line. Place the strip under the folds and glue it lightly.
Now we make mittens from paper squares measuring two by two centimeters. Fold the pieces in half and then fold the opposite corners towards the center. Bend one corner from the side towards you. Now the mittens are ready.
To make a hat for the Snow Maiden, take a rectangle with sides 4 and 5 cm. Bend it in half from top to bottom. Now fold the top corners towards the middle, and bend the paper edge up from the bottom. Fold the top corner and hide it under the lapel. Put the hat on the Snow Maiden's head.
Thus, with the help of origami, Father Frost and Snow Maiden are ready for the celebration. Use them to decorate your home for the New Year holidays.
Santa Claus using origami technique. Master class with step-by-step photos
The master class is designed for teachers and parents. Purpose:
The craft can be done during constructive activities with children 4-7 years old.
The finished craft can be hung on the Christmas tree. Goal:
making Santa Claus crafts.
Objectives:
- to arouse interest in the origami technique; — develop creative abilities; - attention
Father Frost
Santa Claus walked through the forest, past maples and birches, past clearings, past stumps, walked through the forest for eight days. He walked through the forest - decorated the Christmas trees with beads. This night on New Year's Eve He will take them down for the boys. There is silence in the clearings, the yellow moon is shining. All the trees are in silver, Hares are dancing on the mountain, Ice is sparkling on the pond, New Year is coming. Z. Alexandrova
Necessary materials:
- a sheet of colored paper, red or blue; -PVA glue; - glue brush; -scissors; -vata; - felt-tip pens.
Take a sheet of colored paper. It is usually rectangular in shape. Fold as shown in the photo, cut off the excess part.
The result is a square. Place it with the wrong side up, with the corner from which the fold line comes towards you. We begin to bend the right corner of the square, as shown in the photo. Then we bend the left corner in the same way. Don't forget to iron the fold line each time. Bend the bottom corner of the resulting figure away from you, as shown in the photo. Turn it over. Now bend the top corner towards you, as shown in the photo. We bend it towards ourselves again, as in the photo. Turn it over. Bend the left corner downwards, focusing along the side line. Then we bend the right corner in the same way. The bent corners can be glued together so that they do not open.
To make New Year's crafts using the origami technique, you will naturally need paper. The most important thing is that you don’t necessarily need special paper for origami; regular colored red paper will do (the back side should be white so that the lapels of Santa Claus’ fur coat are visible).
Before you start folding Santa Clauses using the origami technique, look at the symbols. Descriptions for some diagrams are in English, but the arrows have the same meanings all over the world.
DIY paper Santa Claus. Master class with step-by-step photos.
Author: Natalya Nikolaevna Erygina, additional education teacher of the first qualification category, MBOU DOD SUT, Angarsk
Description: The New Year holiday is one of the most beloved, and Santa Claus is a favorite New Year's character. In different countries, the good old man is called differently: in Spain - Papa Noel, in Romania - Mosh Jarile, in Holland - Sinte Klaas, in England and America - Santa Claus, and in Russia - Father Frost. In Russian folklore you can find many different fairy tales and legends about Frost - the owner of snowy fields and forests, who brought cold, snow, and blizzards to the earth. He was called differently: Moroz, Morozko, and more often, with respect, by his first name and patronymic Moroz Ivanovich. This material will be useful for additional education teachers, technology teachers, and kindergarten teachers when preparing for New Year-themed classes; children of primary and secondary school age and creative parents.
Application: The Santa Claus toy can be used to decorate the New Year's interior, as New Year's gifts.
Goal: Involvement of students in the independent production of holiday souvenirs.
Objectives: educational:
- teach how to make a New Year's souvenir - Santa Claus, using an action algorithm and step-by-step photos;
developing:
- promote the development of attention, fine motor skills, aesthetic taste, creative abilities;
- awaken the desire to engage in applied creativity; educational:
- to cultivate accuracy, the ability to achieve successful achievement of the goal.
To make a toy you need: - one sheet of white paper “Snow Maiden”; - one sheet of red printer paper;
Santa Claus with a bag
origami snowflakes. Try and experiment!
New Year's holidays are coming and it's time for gifts; what could be nicer than a gift made by yourself? It is not necessary to master complex techniques and spend hours on end doing needlework. To get your dose of positivity, you can make some simple but fun New Year’s craft. In this master class we will talk about how to make paper Santa Claus using the origami technique. This ancient technique will allow us to quickly and easily make a cute New Year's craft.
To make an origami paper Santa Claus we will need:
- red colored paper (one-sided); - scissors; - black marker.
How to make a paper Santa Claus using the origami technique with your own hands
1. Cut out a square of arbitrary size from colored paper. To make it even, you must first draw it from the wrong side using a ruler and a simple pencil, and then cut it along the contour. Pencil lines, if they remain on the square, carefully erase with an eraser so that Santa Claus using the origami technique turns out neat. We fold both diagonals and pull one side of the square to one of the diagonals.
By the way, for lovers of simple but beautiful crafts, we also suggest making a tutorial for which you will find at the given link.
2. Do the same with the second side.
3. Connect the bottom vertex of the resulting figure to the top.
4. Turn the future Santa Claus origami paper over to the other side. The result is a red pentagon.
5. Bend the top to the bottom edge.
6. Shorten the triangle slightly by tucking it in as shown in the figure.
7. We bend the right and left sides back.
8. Draw the eyes with a black marker. Funny origami paper Santa Claus is ready!
Even a preschool child can handle making this craft. You just need to help him when handling the scissors so that the child does not get hurt. This small souvenir can be used to decorate a New Year’s greeting card. You can decorate the symbolic figurine of a cheerful, funny old man at your discretion - with sparkles, rhinestones, half-beads and other decorative elements that you have available. Or you can leave it the way it turned out. You can make many of these crafts and make one long garland of them. Or attach loops to them from the most ordinary threads and hang them on the Christmas tree. In general, the use of origami paper Santa Claus can only be limited by your imagination.
DIY Santa Claus from modules
Master Class. "Santa Claus" craft from paper modules
Purpose:
This master class is intended for fans of modular origami. Such a toy can be a decoration for the New Year tree or as a gift, or take part in a New Year's exhibition.
Target:
Learn to create a figure of Santa Claus from a regular sheet of paper. To cultivate imagination, perseverance and interest in three-dimensional modules when assembling figures.
Master class: “Santa Claus” craft from paper modules
Paper Santa Claus will require the following materials:
- Red and white paper. Cardboard is also possible, but it is more difficult for small children to work with and requires effort when cutting and gluing;
- Moving eyes. It doesn’t matter if you don’t have them, because you can cut out white and black circles of different sizes and make the eyes yourself. Alternatively, draw;
- Scissors, glue, a simple pencil.
That's all, but if desired, Santa Claus can be decorated with various stickers, drawings, and snowflakes. I have a composter for this purpose, from which many, many graceful snowflakes have been produced.