How to make a paper bag
DIY paper bags (a simple method without markings or rulers)
Sometimes I'm itching to “reinvent the wheel.” Don’t go on the Internet and use the ready-made fruits of human thought, but disassemble/figure it out yourself, with your own hands...
This is what happened with paper bags. After all, there are diagrams on the Internet! But no, I picked up the paper and began to twirl it, remembering how it looked when “from the store,” and how it can be done. It’s possible! Moreover, you can do it “by eye”, without a ruler or marking the sheet - just fold it carefully so that the edges of the paper are parallel to each other.
I made these New Year’s bags from “designer paper” made using the hot decoupage method (I will give the “recipe” in the next post):
So, a master class on paper bags is for those who are interested in making not only gifts, but also packaging with their own hands.
1. Take a sheet of paper. I took a regular, white, A4 size. We also need narrow double-sided tape or glue.
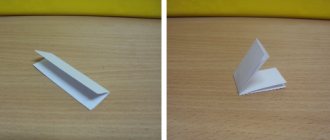
We wrap the edge of the sheet, slightly wider than the strip of tape. We fold the other edge towards it so that it slightly overlaps the first fold (approximately 1-2 mm)
2. Glue the edge using double-sided tape. You can also use glue, but make sure that it does not leak over the edges and wait until it dries.
3. Decide how thick your package will be - we determine it by eye. And carefully bend our paper “tube”, keeping the edges parallel. This is how we get smooth edges of our “parallelepiped”.
4. Make an inward fold on the sides of the bag. We align the edge to the edge so that it is parallel.
5. Now we make the bottom of the bag. We look at the side part and measure from below a distance approximately equal to the width of the side. We bend the bottom of the bag first in one direction, then in the opposite direction.
6. We make the bottom like an envelope - as if we were packing a box in paper: we wrap the corners inward at 45 0.
We glue the “ears” with double-sided tape or regular glue.
7. To make the top of the paper bag look neater, fold the edge inward. In addition, if we want to make a bag with handles, then it will be stronger.
We make handles from tape - using a needle or through holes (if you have a hole punch).
Homemade paper bags are also good because you don’t have to make ordinary handles, but use your imagination - for example, stretch a ribbon through one or two pairs of holes and tie a bow:
Or wrap the top of the bag a couple of times and secure it with tape (loose tea is often packaged in a similar way, only instead of tape there is a flexible strip with wire).
For herbal tea, I made these bags from colored office paper. Kraft bags look good (in combination with red ribbons or white lace). You can make bags from magazines or last year’s calendars... And my friend makes them from ebru paper: https://domnaraduge.com/ebru/.
Have a nice pre-holiday effort!
When taking this article with you (to a blog, to a website, to a magazine), part of it (including pictures), please put a full and active link - mentioning the author and the site. It’s not difficult for you, but it’s nice for me
22 reviews DIY paper bags (a simple method without markings or rulers)
I really liked everything: how to make a bag, making designer paper, and the Christmas angel!! Thank you very much!
Everything is just great! I respect those who like to do everything with their own hands. Why pay someone to do something you can do yourself in 15 minutes! It’s interesting and very pleasant to do it yourself.
Thank you. I looked at so many ways. Yours is the easiest.
yes, it’s really simple - my children and I made such bags, they are easy to repeat.
Wonderful master class! And the bags are so cute! I also like to make bags myself, but I always use a ruler and a pencil. Now I will know how I can do without all this.
Very nice and comfortable.
Thank you very much for the detailed master class. Very interesting.
Since the appearance of this post, I have only been making gift bags myself) Thank you very much for the ideas, the master class and the reminder that you can often make much more “heartwarming” and interesting things with your own hands than store-bought ones)
Great idea)) Friends will like it
Thank you very much for MK. Everything is very clear and simple.
Thank you very much for mk. I always struggled with these bags, but it turned out to be simple and convenient)))
Cheers! Enjoy and pack! Or so - pack it and enjoy!
Oksana, thank you very much for the super way - you are on time as always! I was planning to play with a ruler the other day and make bags, but now everything is even easier thanks to you :)
Great ideas! I'll definitely do it!
What you need for the New Year.
Thank you very much - easy and simple!
Mk is super. Where can I find such paper?
Hello! Tell me, what other ways can you attach the handles to the bag?
Yana, you can simply thread a needle and ribbon through it and tie a knot. Or you can use a hole punch to make holes and thread them through them. I wrap the top of the bag inside - two layers of paper are stronger.
DIY paper bag: step-by-step instructions for making a simple bag and one in the form of a shirt and tie for February 23
In order for the gift to be as impressive as possible, not only the gift itself is important, but also its packaging. If you have modern materials, you can come up with a lot of interesting ideas for decorating holiday surprises. For example, you can make gift boxes from thick cardboard, and they don’t have to be square at all! You can simply take beautiful wrapping paper or wrap a gift with it, decorating the top with ribbons or beads. However, the question often arises: where to pack large gifts, especially if they have an irregular shape? The ideal packaging solution for such items would be a beautiful bag made of bright paper. You can buy it in a specialized store, but it is much more interesting to make it yourself. So, in this article we will learn how to make a paper bag with our own hands.
- a sheet of A4 paper (a finished bag of paper of this size will be quite miniature. If you need to pack a large gift, then you should choose a larger paper format)
- scissors
- glue or double-sided tape (the latter option is even more convenient)
- ribbons or braid for decorating bag handles
- hole puncher
To make a gift bag, you can take any colored paper, plain or with prints, however, it is still better that it is thick enough. Bags made of craft paper, decorated with white lace and cord, look very impressive and have become popular lately.
1) We begin our master class by wrapping the edge of the sheet 1-2 cm wide (if you plan to use tape for gluing, it should be slightly wider than the adhesive strip). We fold the opposite edge towards each other, so that there are a few mm between it and the first fold.
2) Glue the edges with double-sided tape or glue (you need to be careful and wait for it to dry completely so that there are no unsightly marks left).
3) Now you need to select the width of our bag. After this, carefully bend the paper “tube”, keeping the edges parallel. This is how we get even edges of our “parallelepiped”.
4) We make internal folds on the sides of the bag - make sure that both lines are parallel to each other.
5) Now we start making the bottom of the package. From the bottom of the sides we measure a distance approximately equal to the width of the sides. We bend the bottom of the bag first in one direction and then in the other.
6) The bottom is folded in the same way as a postal envelope or like decorating a box with wrapping paper: we wrap the corners inward at an angle of 45 degrees. We glue the free parts with double-sided tape or office glue.
7) To make the top of the paper bag look neater, fold the edge inward. In addition, it will be more convenient to tie the handles of the bag to such a double fastening, the holes for which can be pierced with a hole punch or an ordinary stationery awl. Please note that the top edge of the bag can be designed in different ways. You can make “classic” handles like a bag, you can tie a bow, or you can wrap the edges of the bag several times and then secure it with a beautiful sticker (for example, they pack loose tea or coffee).
8) The stylish paper bag is ready, you can wrap a gift in it!
This package is universal and suitable for any occasion. Or you can do something special for themed holidays - for example, an unusual package with a tie for February 23rd.
To make a paper bag for February 23 you will need
- blue checkered decorative paper or kraft paper
- red cardboard
- scissors
- pencil
- glue gun
- ruler
- double sided tape
1) First of all, let’s transfer the diagram of the bag to the back side of the sheet. It is not too complicated, because it consists only of rectangles, which will then be folded into the necessary elements. The yellow lines in the diagram indicate the lines along which you will need to bend the workpiece, and the white lines indicate the lines along which you will need to make cuts with scissors.
2) In order for our package to turn out smooth and with clear edges, we need to properly outline the fold lines. They can be marked by drawing the blunt end of scissors along the ruler - this will form small grooves along which the parts can be easily bent. In this case, all preparations must be carried out on the back side of the workpiece so as not to damage the design on the paper.
3) Now carefully bend the workpiece along the lines outlined in the previous paragraph.
4) We begin to give our workpiece the shape of a bag. To do this, glue the middle triangle onto the rectangle to the left of it. Then we glue the outer triangle under the adjacent rectangle. Then we glue one rectangle onto another, hiding the triangles between them. All fold lines should form a 90 degree angle.
5) Glue the last side. Glue a 2 cm wide strip inside. The edge of the wall should coincide with the fold of this strip and form a right angle.
6) Now we bend the sides from above inward in half. If you bend one of the sides not in the middle, you will immediately see how the bag is deformed and will not look quite even and neat. The bend should be made to the middle of the height of the bag.
7) We glue thin double-sided tape to the inside of the lid. With its help, the lid will be attached to the bag.
8) On red cardboard we draw the details for the tie and cut out the blanks.
9) Glue both parts together, attaching the top part to the bottom part just a few millimeters.
10) Attach a cardboard tie in the middle of the bag to the lid. The paper bag in the shape of a shirt and tie is ready!
For greater clarity, we suggest watching the following video tutorials, which demonstrate in detail how to fold paper bags yourself.
How to make a paper bag with your own hands?
Recently, paper packaging has become increasingly popular. It is more environmentally friendly than polyethylene and plastic. In many stores, such packaging can be purchased ready-made, and if you wish, you can make a paper bag with your own hands at home.
Paper packaging is used as containers for various goods. Inexpensive paper is used to make bags for popcorn, baked goods and other food products. Loose tea is sold in such bags. Even the charcoal for lighting fires is packed in paper. Most often, such paper bags are made from kraft paper or parchment and look quite simple.
There are other bags that are made of thicker paper and covered with a laminated layer. They are used for gift wrapping and have beautiful colors. Today, branded paper bags with a logo and contacts are very popular. This is a kind of successful advertising. They are developed by designers. Some of these packages are a real work of art.
Making paper bags does not require any special skills. First of all, you need to decide on the paper. If you want the bag to last a long time and not tear, it is recommended to use laminated paper, which is a moisture-resistant material. You can also take a thick packing slip of the required size.
Also, to make a paper bag with your own hands, you will need scissors, a pencil, a ruler, paper glue or double-sided tape (9-12 mm), eyelets, a machine for punching them, decorative cord (or tape for handles) and cardboard. It is not always used and serves to make the package more durable.
First of all, you should outline the size of the future package in height, length and width. A drawing is drawn on the back of the prepared sheet of paper using a pencil and ruler.
You should start with vertical lines. We place the first mark, retreating 1.5-2 cm from the left edge of the sheet. This area is necessary for gluing. Next, measure the distance from the first mark, equal to the length of the package, and draw a second line. The next label will determine the width of the package. Then we mark the length again and then the width. Each subsequent mark begins to be measured from the previous one. Thus, we should get a drawing of the package in a spread on a sheet of paper.
Now you need to draw horizontal lines. For the first one, you should retreat about 3-4 cm from the top of the sheet. From this line, measure a distance equal to the height of the package, and put marks for the next one, where the bottom will be. Its size depends on the width of the paper bag. The diagram below shows what the finished markup should look like.
First you need to assemble the sleeve. To do this, glue or tape is applied to a small vertical strip on the left side. The right edge is glued to it. When working with glue, be sure to ensure that it does not protrude onto the front of the bag.
Next, we make folds along all vertical lines. On the sides you need to make a fold exactly in the middle. After this, we bend the top line and, straightening the workpiece, tuck the upper part inward.
All that remains is to make the bottom of the paper bag with your own hands. Cut out a rectangle from cardboard that will match the size of the bottom. We make a fold along the line that is located at the bottom of the package and open it. We put a piece of cardboard inside and apply a little glue to the middle. First we lay the short sides, and then the long ones. Coat the edges with glue and iron the bottom.
Most often, handles for paper bags are made from decorative lace, but you can also use satin ribbons, braid or other materials. The main thing is that they are durable. It is necessary to cut two pieces of cord of the same size. It is recommended to lightly singe their edges so that they do not unravel.
Now you need to punch holes into which the handles will be inserted. To make the bag more durable, we glue strips of cardboard under the folded top. Using a grommet machine, make two holes on the front and back sides of the bag, punching through the paper along with the cardboard. The holes should be located in the place where the handles are planned to be attached. If you don't have a grommet machine, you can make holes with a hole punch.
All that remains is to insert the handles. We pass the lace or ribbon through both holes located on one side of the bag. We tie knots at the ends so that they are on the inside. That's all, the paper bag is made with your own hands.
Bags can be decorated with any available means and materials. These can be various applications cut out of colored paper, bows, buttons and even dry leaves. In this case, it all depends on your imagination. In general, making paper bags is a creative process and requires an appropriate approach.
In addition to decorating the package itself, you can come up with unusual handles. They can also be of any suitable material. You can not insert handles at all, but simply wrap the top of the bag.
Now you know how to make a paper bag, and you don’t have to waste time looking for gift wrapping, but make exclusive packaging with your own hands.
Sources:
DIY paper bags (a simple method without markings and a ruler) DIY paper bags (a simple method without markings and a ruler) Sometimes I’m itching to “reinvent the wheel.” Do not go on the Internet and use ready-made fruits https://domnaraduge.com/bumazhnye-pakety/Do-it-yourself paper bag, step-by-step instructions for making a simple bag and in the form of a shirt with A do-it-yourself paper bag can be made literally from scrap materials, but with it the gift will look like much more impressive and solid. https://sdelala-sama.ru/1749-bumazhnyy-paket-svoimi-rukami.html How to make a paper bag with your own hands Recently, paper packaging has become increasingly popular. In many stores, such packaging can be purchased ready-made, and if you wish, you can make a paper bag with your own hands. This article describes in detail the technology for making such bags at home. https://fb.ru/article/172873/kak-sdelat-paket-bumajnyiy-svoimi-rukami
leebra.ru
Alternative options
In addition to the basic pattern of folding a paper bag for gift wrapping, there are many variations in its design. For example, the same ropes can be replaced with satin ribbons. If you don’t want to bother with the top due to the lack of a hole punch, you can simply fold the top edge of the packaging bag with an accordion after the gift itself is placed in it. Other origami designs allow you to create gift boxes, others involve gluing decorative pockets.
You can come up with various decorative elements that will be a kind of lock for the bag. In addition, if you wish, you can even print out the unfolded gift bag and fold it. As a rule, such designs are intuitively easy to assemble. Often this requires gluing the side edges and gathering the bottom. The top can be secured with narrow satin ribbons and decorative buttons. In addition, it can be openwork, which is done using a figured hole punch.
How to make a paper bag with your own hands. Of course, it’s very easy to buy a paper gift bag in a store, but how nice it is to make a gift bag with your own hands in the size you need and decorate it the way you need. Do-it-yourself gift wrapping made in RETRO style is especially beautiful and fashionable today.
To do this, designers around the world use ordinary wrapping paper, twine and natural decorative elements, including lace, twigs, wood or. To make it easy for you to make a paper bag with your own hands, I offer the following Master Class on how to make a paper bag with your own hands.
You will need:
Wrapping paper
Double-sided tape (or regular office glue - pencil)
Scissors
Hole puncher
Twine (or ribbon, woolen threads)
Decorative elements for decoration
So, to start, cut a rectangular piece of wrapping paper. The size depends on your gift. If the paper is wrinkled, it must be ironed. In my case, I use a shopping paper bag, I ironed it with a very hot iron.
On one side, where the paper was folded 1 cm, we glue it with double-sided tape (or spread it with glue). We tear off the protective layer from the tape. Glue the two sides together, then draw the other side with your hand for a more precise bend.
Next, we turn our blank away from the bottom by 3-6 cm (depending on the width of your gift). We straighten it as shown in the photo. We bend the lower part again, and glue pieces of double-sided tape onto the upper part, as shown in the photo.
We tear off the protective layer of tape. We lower the upper part of the bottom of the paper bag down and smooth it with our hand.
Then we put our hand into the bag and straighten it a little, straighten the bottom of the paper bag, and press the side parts inward.
We make holes with a hole punch. Cut the handle for the bag to the required length. We tie a knot on one side, thread it through the holes and tie a knot on the other side.
Friends, hello!
It all started when I saw absolutely incredible wallpaper!
“In these rainy times, color therapy is absolutely necessary,” I thought and bought a roll