Firdaves Samatova
7 year old children love to work with paper. They especially like origami. We all know that origami develops fine motor skills and perseverance. Children enjoy doing origami in the afternoon. Last year, for Mother's Day, we made these flowers - water lilies. The children liked that it was made without glue and quickly. I will be glad if it is useful to someone.
We will need:
4 sheets of white paper, A4 size.
2 sheets of green paper, size A 4.
Thin wire or thread.
We take sheets of white. green paper.
We divide them into 4 parts, we need 16 such quarters. Just 4 sheets of four pieces. 16 pieces. And 8 green ones.
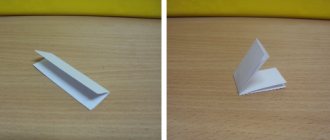
Bend in half.
We bend the corners.
We bend the edges.
And bend it in the opposite direction. Insides out.
We need 16 of these.
Green stripes are done differently, except for the last step. We make the last fold inward. The entrails must be inside.
Now we take the green blank, and put two white ones on top of it.
Makes 8 sets. We adjust them evenly to each other.
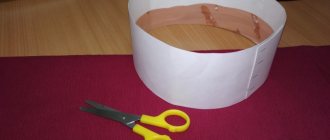
We tie them in the middle with wire or thread.
We begin to shape the flower.
Fold over the top layer. We choose the level and depth of the bend as desired. This is what it looks like.
Then we fold the bottom white layer. In any case, you can fix everything by hand.
Here the second layer of white petals is bent. It already looks like a water lily.
We begin to bend the green petals.
Bend green leaves unevenly. This will give the water lily a lively appearance.
Well, that's what happened.
It seems similar.
Master class on paper making. Volumetric paper toy “Water lily – pin holder”
Master class for primary school teachers and for further use in the classroom
Target
: Direct mastery by students of working techniques for performing technological operations, the formation of skills and abilities to work with tools.
Material
: colored paper, pencil, ruler, compass, scissors, piece of foam rubber
Step by step description:
1. Mark two circles with a radius of 7 cm on the wrong side of the yellow paper
2. Cut out the circles
3. Fold each circle three times - it will be divided into 8 parts
4. Unfold the circle and cut it along the folds. Leave the middle whole
5. Glue each part into a petal bag.
6-7. On the wrong side of the velvet paper, use a compass to mark a circle with a radius of 9 cm.
8. Draw a notch on the circle - you will get a leaf. Let's cut out the sheet.
9. Glue the bottom rim onto the green leaf with one drop of glue.
10-11. Glue the upper corolla - its petals should lie between the petals of the lower one.
12. Cut a piece of foam rubber to form a core and paint it.
13. Glue the core.
14. Assembly is complete.
It's always interesting to learn how to fold a new origami model. Making a water lily is the best way to develop your folding skills. By the way, the water lily model is very beautiful and popular.
Any hobby is, first of all, pleasure from the process of creating something new. And the art of origami also provides enormous opportunities for the development of imagination.
Every hobbyist can figure out how to improve their favorite model, or make a craft in new unexpected colors. But there are models that do not need improvement. Another bonus. Origami water lily is a flower that never fades or fades.
How to make such a flower with your own hands? You need to choose the model that seems most elegant and learn how to perform all the specified actions according to the scheme.
How to make a paper water lily with your own hands
To make a water lily beautiful, the first thing you need to do is cut out three flowers with 12 petals each from cardboard. In this case, two of them should be the same size (about 10-15 cm in diameter), and one should be slightly smaller (no more than 8 cm in diameter).
The flower that will be located below all should be left without any changes. The remaining two need to bend the petals with scissors or a pencil.
Now you need to glue all three parts together by dropping a small drop of glue into the center of each of them. The small flower should be on top.
All that remains is to make the middle. To do this you will need a small strip of yellow paper. It is cut into fringes and twisted into a spiral, fixing the edge with glue. When the part is dry, it is glued to the center of the flower. Additionally, water lily leaves are cut out of green paper. Now you know how to make a water lily out of paper, and there should be no difficulties.
Decorative jug made from trash
Wandering around different sites is a real pleasure.
I came across another handicraft blog by a craftswoman from Argentina named #d24511;” href=”https://translate.googleusercontent.com/translate_c?hl=ru&rurl=translate.google.com&sl=auto&tl=ru&u=https://www.mylivesignature.com/&usg=ALkJrhjHTQmxzsPRIKUI…” target=”_blank”> and saw this! How do you like the jug? Wonderful, isn't it? Just some kind of Provence and enameled tenderness. Do you want to make one for yourself?
Yes, in general, it’s easy, all that remains is to find suitable banks. True, in Argentina ice cream is sold in such containers, but here we will have to activate our brains in search of a substitute. Nevertheless, I think if you pay attention, you can find everything
Hamster habits are inherent in all needlewomen, without exception. Therefore, we arm ourselves with hidden wealth and try to create beauty out of all this garbage.
And step-by-step photos will show the whole process...
We cut off the bottom of the jars and glue them together to achieve the shape of a jug.
Using a sharp cutter, we make a spout and beak for the jug.
Using the papier-mâché technique, we paste the resulting shape with several layers of paper. The glue is of course PVA, it will add strength to the structure
We sand the spout of the jug well inside and out and also cover it with paper.
Now we cut out a strip from thick cardboard and form the future handle for our jug. Glue it in place with adhesive tape
And now - attention! Using cord or woolen threads we imitate the characteristic details of a brass jug
And be sure to cover these parts with paper, just like the entire jug.
This is what happened...
Apply several layers of putty. Dry each layer well. This way we level the surface. Well, let’s not forget to sand!
And coat it twice with white acrylic paint.
Glue fragments of napkins with lavender. We're in Provence, haven't you forgotten?
Adding colors. Draw stripes with acrylic paint
And we cover it with glossy acrylic varnish in several layers, achieving the complete illusion of enameled shine.
And enjoy!
By the way, Susana made this jug to store brushes in it.
When I make mine, I will keep beautiful dreams in it...
Source
s30893898787.mirtesen.ru
Origami
A fluffy and beautiful origami-style water lily can be made from just one sheet of paper. To work, you need to prepare one pink and one green leaf, as well as glue.
The paper for making crafts should be double-sided; besides, it is best to choose less dense sheets - they are much more convenient to fold.
The first step is to mark the diagonals by folding a square sheet of paper in half twice. Next, each of the four corners needs to be bent towards the center to create a smaller square.
The paper square must be bent again, just like the previous time. Similar actions need to be repeated a third time.
After this, the protruding corners are bent again, but not towards the center, but just a little. At this point it becomes clear why you need to choose thinner paper.
The paper blank is again turned over to face itself and the petals of the water lily begin to open. First the first row is folded back, then the second, third row - the final one - the smallest. Additionally, the water line can be decorated using a green leaf cut in the shape of a real one. The two parts are simply glued together. Now you won’t have any questions about how to make a water lily out of paper using the origami technique.
From paper you can make a large number of a wide variety of flowers, which, unlike living ones, will not wither and will delight the eyes of others for a long time. Today, such products are actively used in decorating halls, banquet tables and festive arches. Water lilies look original and can be made by both adults and children. And if you don’t know how to make a water lily out of paper, then arm yourself with patience and the necessary materials, and the recommendations presented in this article will help you cope with the task.
Today we will tell you how to make a paper water lily with your own hands. Schemes for this will be presented below. These flowers can be used to decorate a festive feast or home interior. If we get a paper water lily made with our own hands, it will fill the house with a cheerful atmosphere. In addition, such activities allow you to train patience, attention, and also develop hand motor skills.
Quick diagram of a modular origami water lily
Cut the A4 sheet into 4 identical rectangles. You need 16 pink and 8 green such blanks.
Stages of work:
- Fold the rectangle in half. Expand.
- Fold the corners towards the center line.
- Fold to the center line of the side.
- Fold the workpiece in the opposite direction, with the folds facing outward.
- Make 16 of these elements.
- Green modules are made in the same way, only in the last step the fold is made inward.
- Make 8 elements.
- Take a green blank and place two pink ones on top of it.
- Make 8 such sets, fold them evenly together.
- Tie with wire in the middle.
- Straighten the pieces to make a circle.
- Fold the petals of the first layer up.
- Fold the petals of the second layer.
- Spread out the green leaves.
- The water lily is ready.
Video instruction:
Instructions
Next, a detailed master class will be given, when repeated, you will get a paper water lily with your own hands. First, take a piece of paper. Draw a circle on it. This can be done by hand or using a compass. The diameter of the figure we need is 16 cm. In total, we make a couple of such circles on two sheets. We move on to the next stage of solving the issue of doing it ourselves. Make a circle of smaller diameter. The diameter of this figure is 8 cm. The circle is divided by two perpendicular lines. We connect their ends with dashes. The result should be a diamond. We divide it into a dozen parts. In the center we draw another circle of even smaller diameter. Now we draw the leaves. We create the lines slightly arched.
Petals
Our final goal is a paper water lily. With our own hands we repeat the manipulations described above for all circles, providing them with petals. Next we need scissors. Cut out circles and petals. Let's move on to the next stage. We bend the petals up. Take yellow paper. From it we cut out a strip 1 cm wide and 20 cm long. Using a ruler, we mark lines on the strip every five millimeters. Using the resulting strokes, we cut the fringe, which will decorate our water lily in the center. Using a pen, roll the strip into a spiral shape. To prevent this “structure” from unraveling, we fasten the ends of the fringe with glue. Carefully remove the strip that was previously rolled into a spiral from the handle. Take green paper. We cut out a leaf for our water lily. Place the spiral in the center. We add fringe. The scheme described in this material is not the only one; there are many of them, but this approach can be called convenient.
Final manipulations
You can make a paper water lily even easier with your own hands. Take a sheet of paper in the shape of a square. We bend it diagonally. Then we unfold it. Bend the corners of the square towards the center. The sides must match. Then we rotate the square so that the corners are perpendicular. As a result, the square will turn into a rhombus. We bend the corners again towards the center. We turn the craft towards us with the wrong side. We bend the ends again towards the center from this position. Next, move the triangle a little to the side. We look for the next similar geometric figure from the back side. We bring this triangle to the top. We smoothly bend it towards the front of our workpiece. We press on the base. We wrap using circular movements at the corner of the square. It is important not to damage the paper. You can bring the petal to the front side.
Paper is one of the most difficult and capricious materials to work with. This is why masters love to work with it so much - the result is always worth the effort. Two sources of inspiration - material and nature - can be combined in one creation. An artificial water lily made from paper will delight any craftsman because he was able to repeat with his own hands an unsurpassed example of nature’s work in paper.
"Water lily". Children's crafts using the origami technique
Galina Solomatina
“Water Lily”. Children's crafts using the origami technique
Collective work of junior group No. 11 “Semitsvetik”
MBDOU Kindergarten No. 316
Educator: Solomatina Galina Aleksandrovna
Today we read an interesting children's fairy tale "Thumbelina"
We looked at a lot of illustrations for this fairy tale. The children really liked this kind and interesting fairy tale. Especially the moment when Thumbelina managed to escape from the toad and her son. The children were very worried about little Thumbelina. ( Water Lily ) attracted a lot of attention
. The children have never seen this flower in real life. We all decided together to make such a flower, to make our own little swamp like in a fairy tale.
This is what we got!
To make a water lily we need !
— Two sheets of paper of different sizes and colors. (for water lily )
— Green cardboard. (for water lily )
the water lily in this order:
We bend all the corners of the square towards the middle.
Once again, all corners to the middle.
We turn it over and again bend all the corners towards the middle.
Now we bend the petals, leaving a small tongue inside.
Four petals will not be enough, we bend back more petals from the bottom of our water lily .
I made the water lilies myself , and cut out a water lily leaf from cardboard .
These are the parts the children used to assemble a water lily !
Glue our water lily to the leaf !
“A gift for mom on March 8th” Collective work of pupils and the teacher of the group “Semitsvetik” MBDOU No. 316. Kindergarten “Joy” Educator: Solomatina Galina.
Collective work “Callies” Collective work of the nursery group “Semitsvetik” MBDOU No. 316 Educator: Solomatina. G. A. Pupils: Rita Uvarova, Kostya Ibragimov.
We study techniques for folding paper water lilies with our own hands
Using different techniques, you can layer water lilies that are as beautiful as real ones.
The most common option, however, is not the simplest, making a flower using the origami technique.
To fold a water lily, as in the photo, you will need:
- 4 sheets of A4 paper (red or pink);
- 2 sheets of A4 paper (green);
- a piece of wire.
A sheet of paper of the main color (red or pink) is divided into 4 even parts, arranged along the width. To do this, you need to use a ruler and a simple pencil. The drawn lines are cut using scissors.
Now the strips of paper are folded in half in the longitudinal direction, that is, along the length. Then the corners and long sides of the strip are folded.
Now the resulting workpiece needs to be carefully folded in the middle in the other direction, outward, as if folded in half.
All 16 pieces of colored sheets, both red and green, must be prepared in this way for further work. Only one, the very last green piece, should not be turned outward, but rather inward.
Now the work with module failure begins.
To do this, two red ones are superimposed on the green blank.
You need to make exactly 8 such sets, using all the parts prepared earlier.
All modules fit tightly to each other.
The middle is fastened with wire, carefully wrapping the center several times, and securing the ends of the wire and carefully cutting them off. The blanks are straightened. To straighten it out evenly, you can use the wire as a support, pressing on it when bending the leaves and forming a circle.
Now you need to straighten the centers of the future petals. To do this, the inner layer of the sheet is bent inward. The depth and height of the bend can be adjusted at your discretion. The main thing is to do it carefully, so that if something needs to be corrected, you can do it without leaving creases on the paper.
The second layer of petals is folded in the same way. They should fit more or less tightly to the previous one. The bottom of the workpiece, where the green leaves will be, is straightened in exactly the same way.
If the leaves are not straightened evenly, making the bends larger or smaller, then the water lily will look even more like a real one.
To make a snowflake using the classic technique, you need to bend a sheet of paper strictly along the lines shown in the diagram. The diagram is detailed and clearly shows the directions of the folds with arrows. However, it will be more convenient for novice masters to familiarize themselves with the description of addition.
- At the beginning of the work, an initial shape is made from a sheet of paper, which is called “Pancake”.
A square sheet of paper (this is important, the sides must be equal to each other, otherwise the flower will not be folded) is folded diagonally. The intersection lines of the diagonals are smoothed out well using a ruler or the back of the nail. Each corner of the vertex is folded in the direction of the center, with the vertex facing the other corners.
- After this, all corners of the workpiece are folded towards the central point.
- The same corners are bent again, and again to the middle.
- All lines must be marked. To do this, the sides of the triangle are bent in the opposite direction, towards the middle.
- All corners of the flower blank are bent like a mountain. Before this, folds are made along the lines so that the corners are turned out.
- The petals are also folded back into a “mountain”, thus marking folds. The workpiece turns over and the pockets of the petals seem to be flattened. To do this, you need to press them down well.
- The workpiece is turned over again. The inner corners are folded into a “valley”. To do this, they are turned outward.
- Similarly, it is necessary to open all the corners of the inner “pancake”.
- The workpiece is turned over again. If desired, you can pull out additional petal corners. This will give the water lily a more natural and open look.
The resulting flower can be used as table decor, to decorate a room with it, or as a craft for a child.
More ideas can be found in video lessons dedicated to the topic of the article.
Modular lotus
To make a flower you will need 16 sheets of 10x10 paper: 8 pink and 8 green. It is advisable to use rough material so that the modules are fixed without glue.
Step-by-step instructions:
- To fold the petal module, bend the square in half from bottom to top.
- Repeat with the resulting rectangle.
- Open the last fold.
- Fold the bottom corners towards the center line. Fold the upper corners of the top layer towards the middle line.
- Lower the free edge down, folding the product in half.
- Turn the workpiece over.
- Fold the top corners to a horizontal line.
- Close the shape from top to bottom.
- The result was a product that resembled a boat.
- Open the module, straighten the edges.
- Bend the bottom edge towards the middle.
- Press and smooth the part. Make 7 more of the same.
- To make the leaves, fold the green square in a zigzag pattern to mark the lines.
- Open the sheet.
- Fold the right edge to the left line, unfold.
- Fold the left side to the vertical line formed.
- Move the right edge of the top layer back to the left.
- Repeat on the other side.
- Open the top flaps from the center.
- Rotate the product 90 degrees.
- Raise the bottom edge towards the top.
- Fold the upper corners of the first layer towards the middle axis, the same with the lower ones.
- Repeat steps 5-12. Make the rest of the leaves.
- Assemble the modules. Insert the left corner of the petal into the pocket of the other. Turn the lotus over and do the same.
- Move around the circle until it closes.
- Collect the petals in the same way, but so that the finished rosette is larger than the flower.
Editorial Voice
Irakli
Lord of Paper Sheets
Ask a Question
A modular lotus made of thick and durable paper can be used to store jewelry or sweets. In this case, it is better to glue the modules in advance so that the craft does not fall apart.
Video instruction:
Step-by-step master class on how to make a paper lily
We need: white paper, green colored paper, yellow paper, glue, scissors.
To make one lily, cut out 2 circles from white paper, one with a diameter of cm, the other cm.
We need to make equal cuts in them at the same distance. To do this, let's divide the circle. First, fold it in half.
Then in half again.
Fold again, aligning the round edges.
We expand it and see that the circle is divided into 8 identical sectors.
Now we cut along the fold lines, but not all the way.
To make a water lily petal, mark the middle of the segment. Lubricate half the edge with glue.
We connect and overlap the corners to form a sharp petal, and glue it together. There will be more overlap - the petal will be narrower and thinner. Lightly connect the edges - the petal will be wide.
We also glue the other petals together. When you turn it over, it will look like this:
We do the same with the second circle, which is smaller. Place the circles of petals on top of each other and glue them in the center. We cut out a leaf for the lily from green paper, glue a flower onto it, and make a center out of yellow paper.
The core can be made simply in the form of a circle or you can glue a piece of foam rubber there and a needle bed will come out. And if you change the color of the petals to yellow, you will get not a lily, but a water lily (water lily). In the same way, you can make other flower crafts, for example, a three-dimensional flower applique.
Master class on making flowers
It is better for novice craftsmen to take on the simplest jobs. It must be borne in mind that, for example, manipulating crumpled paper requires some skill, while modular origami also requires precision, perseverance and takes a lot of time. You should thoroughly prepare for working on the chosen version of the water lily (water lily, lotus). Before starting, it is recommended to read the instructions, watch the corresponding video lesson, and print out the necessary diagrams and templates.
Paper water lily
Without much effort, you can make a rather impressive paper water lily with your own hands. Master class on its creation:
- Two circles of different diameters are cut out of a white sheet, for example, 10 and 7 cm.
- Each of them needs to be divided into 8 sectors. It is more convenient to do this if you first fold the circle in half, then bend it twice more through the center of the original circle. After this, the workpiece must be unfolded. You can also draw a circle by drawing 4 lines intersecting in its center.
- According to the folds or pencil markings, each of the circles is cut from the edge, slightly short of the middle.
- Opposite corners of one sector need to be brought together. Along the line of contact between the edges, the paper is fixed with glue. The result is a pointed petal. The rest of the petals are glued together in this way.
- Both pieces processed in this way are turned over, the smaller one is placed on top of the larger one and glued together in the center.
- A leaf is cut out from green cardboard according to the template. A water lily is glued onto it.
- From yellow paper you need to cut out a small circle 1-2 cm in diameter. It is smeared with glue and glued into the middle of the flower. The craft is ready.
The core of a water lily can be decorated in different ways. For example, cut a yellow napkin into 2x2 cm squares and roll them into balls. Next, 10-15 such pellets are glued close to each other. They can be replaced with a small magnet. Now it’s convenient to store paper clips or other small metal items here. If you glue a round piece of foam rubber inside the flower, you will get an original pincushion.
Volumetric applique flowers using the same technique
Everything is similar to the master class about lilies, but we take paper of different colors. We glue them together in the same way and get magically beautiful bouquets :)
You can make a paper water lily that looks like a real flower yourself. Water lily is a beautiful flower that grows in ponds. It is called a mermaid flower.
How to make a water lily from paper? Let's look at a master class on the process of creating a paper water lily step by step.
A large jug, oddly enough, is easier and more interesting to make than small ones - small flowers can be sculpted from plasticine or foamiran, but large volumetric flowers are fun to assemble from paper using the quilling or origami technique. A stencil for cutting out petals can be found and downloaded on the Internet, or you can make it yourself. Instructions that will help you understand step by step how to make a large water lily, as well as a useful video - and our article.
Volumetric paper crafts in elementary school
Master class on paper making. Volumetric paper toy “Water lily – pin holder”
Author: Tsarenko Galina Evgenievna, primary school teacher, MKOU "Oktyabrskaya secondary school No. 1", Oktyabrsky village, Volgograd region
Master class for primary school teachers and for further use in the classroom
Goal : Direct mastery by students of working techniques for performing technological operations, the formation of skills and abilities to work with tools.
Material : colored paper, pencil, ruler, compass, scissors, piece of foam rubber
Introduction
To create a paper water lily, you need to prepare some materials . To get started you will need:
- yellow corrugated paper;
- pink corrugated paper;
- a small piece of cardboard;
- ordinary stationery scissors;
- PVA glue.
Using scissors, you need to cut seven strips; they should be 1.5 centimeters wide. Then six strips 1.2 cm wide and five more - 1 cm. We begin to make petals from the strips. In order for the strips to take the shape of petals, you need to stretch them with your fingers, creating a boat shape. It is necessary to cut a circle with a diameter of 4 cm from corrugated paper. Seven strips must be glued on top of the cut out paper circle. You should start gluing in a checkerboard pattern.
Master class “Do-it-yourself paper origami”
To make an origami paper water lily you only need two multi-colored sheets of paper . The paper must be colored. First you will need 1 pink sheet of paper and 1 green sheet of paper. You will also need glue to secure the pieces of paper. The paper should be two-layer and not very thick.
First, the diagonals . To do this, you need to fold a sheet of paper in half twice. Then each corner of the paper sheet needs to be folded towards the center - you get a small square. The corners of the resulting square must be folded again. The third time you need to repeat the same steps. Then the resulting square is turned face down, and again the corners of the paper square are folded.
After this, the corners of the square are bent a little again, but this time not towards the center. Thinner paper makes it easier to fold the paper than thick paper. The paper craft must be turned over to the front side again. Then you need to start opening the petals of the water lily. Everything must be done in a checkerboard pattern: first the first row is folded, then the second and finally the third row.
Felt water lily, DIY master class
A water lily can be a wonderful gift for a loving soulmate. Anyone can make a water lily with their own hands, you just need to be patient. Let's look at the master class step by step, the entire scheme for creating a water lily from felt.
To make a felt water lily you will need the following components:
- multi-colored felt;
- small needle;
- threads;
- small scissors;
- PVA glue.
First, rectangular pieces of felt are cut. Then you need to make them look like petals. To do this, pieces of felt are cut with scissors. The resulting felt pieces are slightly bent and their ends are glued together with glue. You can sew the petals together if you don’t have glue on hand. The middle of the flower should be made of orange felt. To do this, you need to cut out a circle with scissors. The resulting circle is attached to the back of the petals. The result is a beautiful water lily. This water lily will come in handy instead of a brooch or hairpin.
Paper flower made from origami modules
Many origami lovers have a question: how to make origami from modules? Let's look at a master class on the process of creating a water lily with step-by-step operations for making crafts from origami modules with your own hands.
To work you will need:
- PVA glue;
- color modules of different colors.
You need to make a water lily from modules according to the following scheme . You can choose the colors you like.
We put it in a row:
- the first - from one green, one white and one green module;
- the second - one white, two red and one green module;
- third - one green, three white and one green module;
- the fourth is green, four white and one green;
- fifth - one green, five white and one green;
- sixth - one green, four white and one green module;
- seventh - one green, three white and one green;
- eighth - one green, two white and one green;
- ninth - one green, one white and one green;
- the tenth is from two green ones;
- the eleventh is from one green module.
Each row of modules is glued together with glue. You should get six petals. The next step is to connect the petals. Take 1 white module and connect two petals. Three modules are connected. We begin to create a flower according to the following scheme: it is created in the same way. We begin to lay out the rows. The first one consists of two yellow modules. The second one is made of 3 yellow modules. The third one is made of 4 modules of the same color. The fourth is made up of 5 yellow modules.
At the next stage, you need to decrease modulo until 1 remains. Create six blanks. We connect each piece together using glue.
At first glance, it’s a fairly simple master class, but still, such a craft requires effort on the part of little children’s fingers, but it develops fine motor skills extremely effectively, and, as you know, you can’t do without it. When a child gets the hang of gluing petals, he will really like this process and will not want to stop, therefore, dear educators, teachers and parents, prepare a lot of colored paper and glue, and a good mood will come with this craft. Moreover, using this technique you can make not only a water lily, but also a pincushion lily for your mother on March 8, and entire bouquets of flowers.
Modular technology
You can also make a water lily from modules. They are prepared in advance from double-sided colored paper. Green ones will go to the leaves, and, for example, pink and white ones will go to the calyx of the flower. The modules are simply inserted into one another, but if desired, the structure can be secured with glue.
Work begins with assembling the foliage. Paper parts are laid out in rows. The first consists of two modules, the second - of three, and so on until there are 7 elements in the row. Further assembly proceeds in descending order: in each subsequent row there will be one less module than in the previous one. The latter consists of one single module. The sheet is ready. In total you need to build five such leaves. Next, they are all combined into a single platform on which the flower will rest. The sheets are fastened together with additional green modules.
Step-by-step master class on how to make a paper lily
We need: white paper, green colored paper, yellow paper, glue, scissors.
To make one lily, cut out 2 circles from white paper, one with a diameter a couple of cm larger than the other.
We need to make equal cuts in them at the same distance. To do this, let's divide the circle. First, fold it in half.
Then in half again.
Fold again, aligning the round edges.
We expand it and see that the circle is divided into 8 identical sectors.
Now we cut along the fold lines, but not all the way.
To make a water lily petal, mark the middle of the segment. Lubricate half the edge with glue.
We connect and overlap the corners to form a sharp petal, and glue it together. There will be more overlap - the petal will be narrower and thinner. Lightly connect the edges - the petal will be wide.
We also glue the other petals together. When you turn it over, it will look like this:
We do the same with the second circle, which is smaller. Place the circles of petals on top of each other and glue them in the center. We cut out a leaf for the lily from green paper, glue a flower onto it, and make a center out of yellow paper.
The core can be made simply in the form of a circle or you can glue a piece of foam rubber there and a needle bed will come out. And if you change the color of the petals to yellow, you will get not a lily, but a water lily (water lily). In the same way, you can make other flower crafts, for example, a three-dimensional flower applique.
Oriental jug...or variations on a theme...
Good evening, SM!!! I don’t know if anyone will need it or not. I would like to imagine my thoughts moving towards jugs. I’ve been wanting a jug for a very long time. But I couldn’t find what I like. I had to make it myself. This is a blank, I can decorate it each to their own taste. I haven’t been able to finish mine for half a year now, but I decided to share with you how to make it.
I made the bottom from large bowls. We covered them with newspaper. The first layer was water, the other three were wallpaper glue (I had a moment)
We glue one part with a bottom, the second without a bottom. If it’s not straight, you can cut it off. We glue the two parts together (I glued them with paper tape). There aren’t enough photos. My eldest daughter tried, she decided that I didn’t need them. And she erased them.
Then coat the resulting workpiece with putty. Any putty. Dry until completely dry.
Well, here the question arises about the neck. We take thicker wire. It is desirable that it bends well and holds its shape. We make holes in the workpiece at an equal distance and fasten the wire. We simply bend the loops, do not twist them.
To give the throat a narrower look, we take ceiling tiles and cut out circles of the diameter you need. I have 3 cm at the bottom and 2 cm at the top. We bend the wire to fit the shape of the jug. We put on the foam rounds. The shape is ready. The only thing is, the closer to the edge you insert round pieces, the less they will stick out from the finishing material in the future. I put it away and paid. I had to disassemble, cut off and re-finish everything.
All the fun begins. No photos. Foil is applied to the frame, then a plaster bandage. The form is drawn out. Well, that’s roughly how it turned out for me.
Then everything is covered with putty. Sanding, then putty again... Until the required surface is acquired. Well, longer is your fantasy... I feel mine will not be completed soon. Therefore, I did not wait, and left it to you for judgment.
stranamasterov.ru