When you want to please a child and show that you can not only decorate a birthday cake with large roses made of mastic, but also understand matters that are higher for him.
Since the Minecraft game has captured a large number of children and youth, carefully look to see if your child is playing this game. If this is the case, then make him game characters out of fondant, and decorating the cake with a playing field is not at all that difficult.
Dear visitors of the video site Lepka.rf!
The source of all text, photo and video content about modeling from plasticine, dough, clay and so on, including that played on the pages of the Lepka.rf resource, is a third-party video resource, namely the public video hosting YouTube.com, which provides open access to its video content (using youtube.com's open and publicly available video API3 technology)!
The video resource Lepka.rf is a search engine based on the name and description of video content. Files are never uploaded to the hosting and website Lepka.rf and no photo/text/video content protected by copyright is stored on our server at all. Detailed information for copyright holders. If you own the copyright to this text, photo and video, which was uploaded without your consent to YouTube.com and is displayed from it with us, go to the main page of this video on YouTube.com, click on the link under the player
More - > “Complain” -> “Violation of my rights” and in the drop-down menu, select what exactly is being violated and click the “Submit” button
.
To report a prohibited, illegal or inappropriate video, photo or text, go to the YouTube website, click on the link under the player More -> “Report” and select in “Report Violation” what exactly you are not happy with in this video
. Read more about the terms of use of the video site about modeling Lepka.rf in these rules.
modeling.rf
paper decoration
The first step is to print out the garland diagram. For those who are good at drawing, you can try to draw the layout yourself. This master class will use various patterns.
Then the parts are carefully cut out from the paper. If you plan to use the banner in the center of the room, then it is better to make a garland from double-sided paper.
Holes are made in the corners of the base using a hole punch. A colored thread or satin ribbon is threaded through them.
The festive garland can be decorated with decorative items if desired. For example, you can cut out various geometric shapes from pieces of felt, and also use pebbles, colored sand, shells, beads and seed beads. It is recommended to use hot glue to secure the parts to the paper blank.
You can combine paper decoration with any small items at hand. The main thing is that the birthday person likes the decor.
Making mastic
The recipe for the sweet mass looks like this:
- milk powder - 150 grams;
— budra sugar — 150 grams;
— condensed milk — 200 grams;
— lemon juice — 2 tablespoons;
- cognac - 1 teaspoon.
Mix powdered sugar and milk powder. Pour condensed milk into the prepared mixture. Add lemon juice and cognac, knead the dough.
Sweet bunny
In this part of MK we will show you how to sculpt figures from mastic step by step using the example of a bunny.
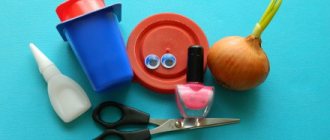
Necessary materials:
- mastic of three colors;
- food coloring;
- spoon;
- knife.
First, you need to make a clearing out of green mastic. Use a spoon to cut out the edges.
Note! If you want to make a clearing on a regular plate, you should cover it with cling film.
Then start creating the bunny. Take two pieces of white mastic and make two small ovals: a large one and a slightly smaller one. The larger oval will be the carcass, and the smaller one will be the head. Glue these ovals together.
Make ears from mastic of the same shade. First roll out sausages of the same size. Press them through with scissors and make ears.
Use the edge of a knife to make a muzzle in the same way as the ears. You need to moisten the knife with water so that it does not stick to the material.
Press out the eyes on the resulting muzzle with the back of the knife. Use food “beads” for the pupils, and a mastic heart for the nose. It's time for paws and tail. Roll into four ovals and make slits in the legs. For the tail, make a small circle.
The hare figurine is ready, now you can decorate the cake with it! It should be remembered that the figures are stored for a maximum of 2-3 months in a cool and closed place.
Creamy temptation
Cream can be used to decorate any cake without any restrictions. At home, you can use protein-based, whipped milk-based, and oil-based. In addition, the cake is decorated with vegetable cream from a balloon.
You can make the following original decoration from the cream:
- Flowers are the most common option. To create them you will need a piping bag with a star tip. Squeeze the flower directly onto the cake or onto a special plastic nail, put the flowers in the cold to harden, and then transfer them to the product.
- Inscriptions. To create them, use a nozzle with a narrow straight cut. To finish the lettering beautifully, sharply move the nose of the bag upwards along the letter.
- Sides according to the diameter of the cake. They can be made smooth and voluminous, low and high. The best cream for creating them is oil cream. Using the sides you can attach a waffle picture, hide the ends of the mastic braid and simply hide unevenness along the edges of the product.
- Sides. Protein or oil cream is used to help level the sides of the cake and visually increase its size. The sides can also be decorated with either small flowers or stars. The braided pattern, which is created using small vertical and horizontal stripes of cream, looks neat.
Little man and rose
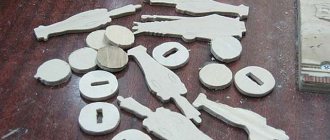
This microscope will help you figure out how to make human figures.
To make a little man, you first need to mix the mastic dough with the addition of flesh-colored dye. Make an oval the size of a small chicken egg. Make a hole with a toothpick at the bottom for the navel. Roll a ball for the head and attach it to the body with a toothpick.
Then draw the face. Make holes for the eyes and draw a mouth. Instead of a spout, attach a small rolled ball. Make ears from two flattened balls.
It's time to start working on the handles. Roll out the sausages, bend the parts that will be your palms and draw fingers. Attach the handles to the body. The little one is ready!
You can make a toy, a duck or a ball for your little one. You can also easily create a girl by adding braids and a bow. The workshop on making figurines from mastic is finished!
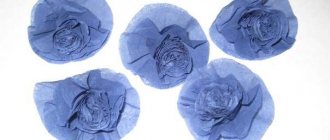
To get a beautiful rose, you need to do the following:
- Roll out small balls from red or pink mastic and place on a board;
- Flatten them into flat cakes and shape them into petals. The top edge should be thin and wavy.
- For the core of the flower, make a small drop. Attach petals from the smallest to the largest to the drop, for a more realistic look. Having molded the required number of flowers, let them dry at least a day.
knittochka.ru
Cake mastic figurines: manufacturing basics
Every mother wants to please her child with a beautiful and delicious cake. One way to decorate it is with mastic figures.
The process of their manufacture includes the following steps:
- Preparing sugar mass for modeling.
- Direct sculpting of figures.
- Drying the finished decor and installing it on the cake.
What tools and materials are needed to create sweet sculptures will be discussed in more detail below.
If you have doubts about whether you will be able to make mastic decor yourself, you can always practice on plasticine first, and when you achieve the desired result, start sculpting from mastic.
What tools are needed for sculpting?
In confectionery stores, your eyes are simply wide open from the wide range of various devices for working with mastic, so in order not to buy too much, it is better to familiarize yourself in advance with what these or those tools are needed for.
Confectioners use mastic for the following purposes:
- covering the finished cake to give the surface smoothness or a certain texture (wood, leather, etc.);
- for creating flower arrangements (sugar floristry);
- creation of miniature sculptures (people, animals, fairy-tale and cartoon characters).
Each type of mastic decor uses its own tools.
So, to cover the finished cake with sugar mass you need to have:
- rolling pin for mastic (regular or textured);
- silicone mat for rolling out;
- knife;
- and an iron to smooth out the coating to avoid wrinkles.
In sugar floristry the following are used:
- cuttings or plungers of flowers or their petals;
- silicone weiners to give the workpieces a more natural look;
- soft mat for thinning the edges of leaves and petals;
- devices (tables) for drying workpieces,
- food wire and artificial stamens;
- brushes with artificial bristles.
To sculpt figures from mastic, you need to purchase a set of special stack tools:
- Dresden stick for depicting facial expressions;
- stack-cone (rounded, smooth), which will allow you to make blind cone-shaped recesses;
- “shell” tool for sculpting animal paws, shells, human arms and legs;
- Stack boning will help create ruffles on clothes or wavy edges
- a tool with balls at the ends is used to form eye sockets or other round recesses;
- stack-arc for creating smiles on the faces of figurines of mastic people.
In addition to these tools, you will need food coloring for coloring the mastic, brushes (necessarily with artificial bristles) and food glue for gluing the parts of the figure.
Preparing mastic for modeling with your own hands
Before making figures for the cake, you need to prepare the sugar mass for modeling.
Mastic for creating flowers and figures should be pliable so that you can easily work with it, and dry quickly so as not to waste a lot of time drying the figures.
Mastic made from:
- 1 ½ teaspoons instant gelatin;
- 40 ml water;
- 3 teaspoons of liquid honey or syrup (invert, glucose or any other);
- 2 teaspoons butter or any other solid fat (margarine, coconut oil);
- 1 teaspoon of liqueur (can be replaced with other alcohol);
- 500 g powdered sugar;
- 25 g corn or potato starch.
Cooking technology:
- Soak the gelatin for the time specified in the instructions for its use.
- Combine syrup, butter and liqueur in a saucepan and heat until smooth. Then add the swollen gelatin and heat until it is completely dissolved.
- Sift the powder and starch into a mound and make a funnel in the center. Pour the liquid component into the well and knead the mass like regular yeast dough.
- Place the finished mass in a tight bag, greased from the inside with butter, expel as much air as possible and leave the mastic to rest for a day at room temperature. After this you can start sculpting.
The game that captivated millions
To make it easier for you to understand all the intricacies and create a cake decoration in accordance with your favorite game, you should learn some of its features.
The first thing that catches your eye is the playing field itself and the characters, since it has a cubic appearance. The entire game world consists of 3D cubes, the animals also look a little strange. Yes, however, everything looks very original.
There are a lot of game situations and developments.
For example, 5 game modes that allow you to either build your own objects or observe those around you. There are a lot of animals and monsters, many different items and other possibilities.
Not a single child will refuse if you ask him to tell you about the game and what character he is, as well as ask for permission to observe the progress of the gameplay. If you succeed, then look carefully at the baby’s character himself and what animals he interacts with, what monsters he fights.
When creating a cake based on the game for a child’s birthday, a similar lesson will be very useful. It will be possible to make figurines of characters with whom your child is friends, and it will not be difficult to repeat the figurine of the player himself.
The simplest mastic figures for beginners
Simple figurines of animals that do not pretend to be sculpturally similar are sculpted using the same technology:
- For the body, roll into a ball and give it a teardrop shape.
- The head is just a slightly smaller ball that is connected to the body with a toothpick.
- The front and hind legs are sculpted from mastic flagella, which are glued with food glue or raw protein.
- Next, ears are sculpted: for a bunny - from two wide flagella-stripes, for a cat or tiger (lion) - pointed triangles, for a bear or monkey - two circles with a depression in the center.
- A tail is also formed from a flagellum, but thinner. If necessary, they sculpt a hairstyle, for example, a mischievous forelock for a monkey or a mane for a lion.
- The sculpting of the animal figurine is completed by designing the face - nose, mouth, eyes.
It’s easy to make various cars out of mastic that would be appropriate on a boy’s cake.
The simplest option is from a single piece of mastic:
- Give a solid rectangular piece of mastic of the appropriate color the shape of a car body.
- Make wheel-washers from four balls and glue them in place.
- Cut out glass (front, back and side) from thinly rolled white or pale blue mastic and also attach them where needed.
- Make headlights from small balls of yellow mastic.
- Make the necessary additions, for example, inscriptions or eyes, and the machine is ready.
Master class on how to sculpt children's mastic figures
Children's figures made from mastic are usually heroes of their favorite cartoons. Among the huge number of fairies, little animals, robots and cars, the heroes of the cartoon “Smeshariki” will be ideal for a beginning sculptor. Their modeling is carried out according to a principle similar to that already described.
First, the mastic is painted in the desired color (or colors), then a ball-body is rolled out of it, and then proceed as follows:
- Bunny Krosh. For the arms and legs, roll two ropes, cut each of them in half and use a stack or a regular toothpick to separate the fingers. Form ears from two wide strips. Next, all that remains is to decorate the face by gluing the eyes from white mastic, and eyebrows from blue mastic, draw pupils and a smile.
- Barash. Roll up thin flagella, form curls out of them and glue them with edible glue or egg white. Sculpt the arms and legs in the same way as Krosh’s paws, but making hooves at the ends. Make horns from flagella of darker mastic. Shape the face.
- Hedgehog. Roll small balls of blue mastic, give them the shape of needle cones and glue them onto the spherical body. Sculpt the arms and legs like for a bunny. Add glasses, eyebrows, nose, ears, smile and the Hedgehog is ready.
- Nyusha. First you need to draw hearts-cheeks and sculpt paws with hooves, as for Barash. Form a snout out of a small ball, making two indentations in it with a toothpick. Weave and glue a braided hairstyle and shape the face.
Making a Birthday Cake
Most pastry chefs do not understand this game at all, so ordering a cake from a pastry shop will not only be expensive, but also quite difficult. If you really want to please your baby, then try to decorate the cake yourself.
To do this you will need dyes for mastic and the ability to create tones.
By the way, the main cost of the cake will depend most on the quantity and cost of paint.
How to create a playing field, or rather the main layer of mastic for covering the cakes?
Look at the image of the game on your baby's screen - gray, green and brown tones predominate there.
Choose a basic background, then use dyes to create several different color shades.
Roll out the flagella and go over them with a rolling pin, and then you will need to make even stripes.
Roll out the mastic sheet to the required size, and then lay out the blanks crosswise.
You should end up with even squares. You can use a ruler or a centimeter to create it correctly.
When the entire field looks like an incomprehensible color of madness, but the squares on it are even, you need to once again roll out the resulting tight material and cover the cake with it. What happens next will depend on your skill, since the figures are also like cubes, it won’t be very difficult to fashion them from scraps of dough in butter cream. Even the trees look like cubes, so you just need to take a good look at the characters of the birthday boy.
How to dry mastic figures
Fashioning mastic figures is only half the battle. They still need to be dried properly. When the figures dry unevenly, they can crack, and if the drying temperature is too high, they melt, and the result of long labor cannot be saved. All the intricacies of this process and ways to speed it up will be discussed below.
The simplest and most correct, but also the longest drying method is self-drying at room temperature. Drying the figures, depending on their size, can take up to several days.
Large figures consisting of several parts are usually dried disassembled, and then all the elements are glued together using confectionery glue, raw egg white or vodka. During drying, the figures or their parts should be covered with napkins to prevent dust from falling on them. The napkins will also absorb some of the moisture.
If time allows, then dry the figures only at room temperature.
And if you urgently need to make a decoration from mastic, you can speed up drying in one of the following ways:
- Hairdryer Dry the mastic decor much faster by blowing it at a considerable distance with a hairdryer operating in the “Cold Air” mode. In this way, you can dry the figures in just a few hours.
- Oven. Using the oven, you can quickly dry flat mastic decorations (for example, letters), but the drying temperature should not exceed 80 - 85 degrees, and its duration should not exceed 5 minutes.
- Microwave. The drying principle is the same as in the oven. Figures heated in a microwave oven harden after cooling. But due to the different power of the devices, the drying time will have to be selected experimentally on a small piece of mastic mass.
Chocolate figures and patterns
Chocolate, like porridge, cannot be spoiled with butter. This incredibly tasty delicacy is used successfully to decorate any type of cake - dry “Napoleon”, and juicy “Prague”, and “Medovik” with bitterness. You can take any type of chocolate - black without sugar with a maximum cocoa content, white, milk, porous, most importantly - without filling or nuts, if you are going to melt it and make patterns.
Ideas for making your own chocolate decorations:
- The quickest way to freshen up a homemade cake is to sprinkle it with chocolate shavings or melt it and pour icing over the entire surface.
- Does the previous option seem too boring? Try making patterns with chocolate: melt it in a water bath, pour it into a cornet and draw a birthday greeting or lace directly on the cake. The pattern can also be made on parchment: the pattern applied along the contours must be left for about 20 minutes to harden, then carefully remove the parchment and lay out or install the pattern on the product.
- Chocolate bows look unusual. To create them on cornet parchment, pour long strips before the chocolate hardens, fold them in half and pinch the edges with a regular clothespin. When the mass has cooled and hardened, you can remove the parchment. Lay the resulting parts of the bow in layers, reducing the number of pieces: for example, the bottom layer - 4 tabs, the second - 3, and the top - 1.
- Chocolate border is a particularly exquisite decoration. On a sheet of parchment that matches the size of the side of the cake or is slightly higher than it, pour out a beautiful design, immediately wrap the sheet around the cake and seal the ends with tape. After hardening, remove the paper by prying it off with a sharp knife. The border is attached to cream or glaze, that is, any sticky surface.
- Large and small chocolate chips are a great way to freshen up your baked goods decor. To create fine shavings, simply grate half the tile. To make large curls, use a special device or a regular vegetable peeler, removing large plates from the tile.