Receive one of the most read articles by email once a day. Join us on Facebook and VKontakte.
Who would have thought that old Soviet blankets could be used to make a delightful collection of fashionable outerwear! Estonian designer Marit Ilison, whose childhood coincided with the existence of the Soviet Union, indulged in nostalgia and decided to perpetuate her “memories of childhood rainbow dreams.”
The imagination and skillful hands of the Baltic designer turned thin wool blankets into wonderful coats. According to Marit Ilison, her unusual and shocking collection should not be taken ironically. Most items are decorated with real Swarovski crystals, so the cost of some items reaches up to two thousand euros.
Outerwear made from Soviet blankets is, of course, a completely unexpected design find, but the coats really turned out to be very stylish, original, warm and cozy. In the cold season, such things will help create a bright and very interesting image. And for those who are cold always and everywhere, and who are still too lazy to leave a warm shelter to perform any actions, a blanket with sleeves and heating has been created.
Did you like the article? Then support us, click
:
Fashion trends of the last few years dictate very interesting rules. During the cold season, every fashion-conscious girl wants to choose an interesting option for warm outerwear. One of such bright elements that are very popular now are down jackets and blankets.
How to make a blanket from old sweaters?
The process is simple and does not take much effort. Let's get to work!
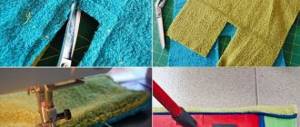
Decide what size you want to make the finished blanket, for example, it will be 2.1 x 1.5 meters. We carefully cut the selected material on the sides and divide it into equal fragments of 30 x 30 centimeters - you should get 35 squares.
We cut strips 12 cm wide from old sweaters, sew pieces of three strips into rectangles, be sure to sew all seams - with an overlocker or by hand
We grind them off carefully. We sew the finished product with an overlock stitch to prevent the knitting from unraveling. The bedspread is ready.
We take scissors and cut the stitched parts into strips - now crosswise, we make our plaid from the strips we received, and carefully sew them together
Do-it-yourself ready-made country blanket from old knitted sweaters
How to do something yourself, with your own hands - home craftsman website
AN EXCELLENT TOOL FOR CRAFTERS AND HANDCRAFTS AND EVERYTHING FOR THE GARDEN, HOME AND Cottage LITERALLY FOR FREE - SEE FOR YOURSELF. THERE ARE REVIEWS.
AN OLD WOOL COAT, PIECES OF DRAPEN AND TAPESTRY LINEN BECAME AN EXCELLENT BASIS FOR A WARM BLANKET USED IN THE PATCHWORK TECHNIQUE.
1. I ripped the clothes apart at the seams. Steamed the blanks.
2. I drew sketches of the blocks on a sheet of paper measuring 25x25 cm. I numbered each element of the drawing with numbers (photo 1).
3. I transferred the drawing diagram onto non-woven fabric. I cut it along the lines of the sketch details (photo 2).
TOOLS FOR HOME AND GARDEN, HANDCRAFTS, ETC. PRICES VERY LOW
4. Having selected a color combination of contrasting fabrics for each block, I fixed the blanks from the torn interlining on the front side of the fabric using an iron (photo 3).
5. I cut out the necessary details from the coat and skirt. I collected them into blocks with and without a pattern, and then laid out the entire composition on a thin non-woven fabric for stitching according to the sketch (I got two large canvases). Fixed it with an iron.
6. Removed the torn interlining.
The torn interlining does not leave traces of glue on the fabric and this pattern can be used 5-6 more times. The glue does not lose its properties.
7. I cut out strips for bias tape. By adjusting the binding to the joints between the elements of the pattern, I sewed the blocks into a single fabric (photo 4).
I sewed the bias tape on, starting with the shortest line that intersected with another, longer one. Each subsequent piece of trim covers the cut of the previous one.
8. I cut out the bottom part of the blanket from fleece. I basted the assembled top piece with the patterns to it, and then quilted both pieces together, stitching along the sewing lines of the bias tape.
9. I trimmed the product around the perimeter with bias tape.
In several blocks I used only the base square without additional inserts from another fabric.
I laid out the design on them with bias tape and stitched its edges in the same way as the prefabricated fragments.
Winter, frost. We spend a lot of time at home. To make the evenings useful, let’s do what we simply don’t have enough time and energy for in the summer, spring and fall. But you will need a positive attitude. We are waiting for spring, a time of renewal and new hopes . Therefore, we not only tune in internally to change, but also externally: first of all, let’s put things in order at home. And let's start with this: let's check our closets, chests of drawers and bedside tables. It is behind their doors that all our shortcomings, omissions and long-forgotten unnecessary things are often hidden. Today we will work on the chest of drawers and the closet in which clothes are stored.
I would like to draw the attention of those site visitors who generally do not accept any alteration of old things, for whom it is easier to throw away everything old. Then this article is not for you. To avoid getting irritated and spoiling your mood, do not read further!
I will share my little experience with everyone else. Today, for the first time, I decided to repurpose old sweaters and blouses into something useful. Circumstances prompted me to this idea:
- too many of these same knitted items (which are not used at any time of the year) have accumulated in the closet
- the new bed is covered with an old tapestry bedspread
- I have some free time that I want to spend productively
- I wanted to learn patchwork sewing
I have already tried to master the patchwork technique and sewed a rug for the kitchen. And I really like him! Such a cozy, handmade wool rug. It fits perfectly into the interior of my kitchen.
Let's start work! We open the closet and look for those knitted items that we haven’t worn for a long time. One important condition: we select knitwear according to tones. So, pink, red, gray will look harmonious together.
Note: white will suit any color and will refresh any product well.
Take to work everything that you don’t wear: skirts, pullovers, jumpers, sweaters and warm old woolen scarves! I decided to use red, pink, gray and white knits for my bedspread.
Plaid from old sweaters in patchwork style
Lately, patchwork has been gaining more and more popularity. We propose to create an unusual and beautiful blanket from old sweaters using this technique.
- interlining;
- padding polyester;
- old sweaters;
- threads, needles, scissors.
We cut the sweaters into parts and glue the resulting parts with non-woven fabric.
We cut the material prepared for work into equal parts (20 x 20), glue them with non-woven material. We take a square and fold it diagonally into a triangle, sew one edge, fill it with padding polyester (if it is tape, then first lay it with padding polyester and then form a triangle), sew it up. We do the same with other parts, we sew two triangles along the larger side (hypotenuse), and we do the same with other squares.
We make patchwork parts from several squares, sew the plaid first into stripes, then as a whole, iron
When all the blanks are prepared, we form them into a blanket, moving towards the edges from the center. The cozy do-it-yourself quilt made from old things is ready.
We lay out the layers: lining face down, padding polyester, on top - a blanket of squares with the front side facing us, quilt our blanket on a sewing machine, starting from the central seams
Plaid from old sweaters in patchwork style
Plaid made from old sweaters with decorative seams
There are many interesting ways to make a beautiful and warm bedspread, we offer one more.
You will need:
- sweaters;
- colored thread for knitting;
- needles and scissors.
We cut out the selected items, forming them into squares of the same size. We sew the parts together with an overlap of 1-1.5 centimeters.
We overlap identical squares with an allowance of 1 cm, sew a knitted seam at a distance of 0.5 cm from the edge
First you need to form the strips, and then assemble them into a single canvas of the required size. At the final stage, sew yarn on each side of the square with a decorative stitch.
Blanket made from old sweaters with individual parts knitted
To sew a blanket with binding you will need:
- old sweaters;
- Knitting thread;
- hook and scissors.
We rip the sweater and give its fragments (sleeves, back, front) a rectangular shape
We cut the prepared material into squares or rectangles. We lay out the resulting blanks, forming them into a blanket (it’s better to do this on the floor).
We crochet the resulting shred in a circle, the first row with a single crochet
The second and subsequent rows are double crochet, we knit an arbitrary number of rows for our fragment of a blanket
We take one flap and tie it in a circle, crocheting on all sides, adjust the number of rows of tying at your discretion.
We connect the resulting fragments together with a single crochet stitch.
We do this with each element of the blanket. We tie together the parts of the blanket with a single crochet.
Having made the required number of “sweater patches”, we connect them all together with a single crochet
The finished fabric for our blanket, if desired, you can make it double-sided or with a lining
A cozy warm blanket looks great on the sofa
DIY blanket using felting
This technique is only suitable for sweaters made of natural wool (see wool 100 – 80% label). We'll throw it in the washing machine. Here are some simple tips to achieve the desired result:
- It is better to immediately cut the sweaters into squares or strips of the required size, removing parts unnecessary for work;
- to avoid clogging the filter with fluff from natural items, it is better to put them in a pillowcase;
- For better matting, add a tablespoon of grated laundry soap, a teaspoon of soda and tennis balls (if available) to the pillowcase.
Experts advise putting an unnecessary towel or denim along with woolen items. The washing water should be very hot. After completing the cycle, see if the knitted seams are visible, if so, then run the wash again. If the machine has a drying function, use it, this will increase the chance of getting the desired result.
There is an alternative to felting in the washing machine - simply boil woolen sweaters. When the material stops fluffing, you have achieved the desired result. Rinse in cold water.
Our blanks are felted and dried, let's start assembling the blanket. We assemble the parts and sew them together. At the end we sew on the lining fabric. Cover the edges of the bedspread with bias tape.
Autumn
—Search by diary
—Subscription by e-mail
— Regular readers
—Communities
—Broadcasts
-Statistics
Monday, November 19, 2012 14:39 + to quote book
A blanket made from old sweaters. Master Class.
For a blanket measuring 150 by 180 cm, Michelle, author of the Yellow Suitcase blog, took 10 sweaters. She bought most of them at the Flea Market. By the way, now even second-hand stores have sales and sell, for example, any item for 30-50 rubles.
First step. Decide on a color scheme (Michelle's is creamy-gray, warm, earthy tones).
Second step. Open all sweaters and cut off all labels, zippers, buttons, etc.
The third step is felting. We'll throw it in the washing machine. Please note that only natural wool has the ability to feel. If you have “raw materials” with artificial additives, it will either not mat at all, or not as much as products made entirely from natural wool.
For felting, put your workpieces in a bag for gentle washing or simply in an old pillowcase (if this is not done, wool can clog the entire drain of the washing machine), add bed linen or a pair of jeans, and put the washing machine on a long cycle, switching from cold to hot water and with the obligatory rotation of the drum and spinning.
This is what Michelle writes as a size 54 sweater looked like after washing with the drum spinning. He sat down and fell down. For some it might be a nuisance, but for us it’s just right!
The next stage is cutting out the parts. Michelle prepared two templates: for a large square - 26.5 cm side, and for a small square (we will sew four such squares into one large one) - 14 cm side.
We arrange our parts by color and size, as in the picture.
Now you need to find a free, flat place, most likely on the floor, and lay out the parts on it so that you get the image of the future blanket.
Pay attention... no, not to the cats, but to the fact that Michelle left a couple of pockets and placed them along the edges of the blanket. What a good idea - you can put there, for example, a TV remote control, or even a handkerchief.
Let's go further - we sew the parts of the blanket on the machine. Michelle writes that she sewed with a straight stitch, the widest stitch. It’s not entirely clear why, because on her car, as you can see in the photo, there is also a knitted stitch. We sew the smallest parts first, then the large ones together in rows. Pins are needed only when sewing large parts and rows.
Ideas for warm little things from an old sweater
In addition to making blankets, you can use old sweaters to decorate your home with your own hands and prepare for the coming cold weather. We offer you some interesting ideas.
- a piece of clothing, from an unfashionable sweater you can sew a skirt, a warm hat, a snood, a stylish dress and even a coat;
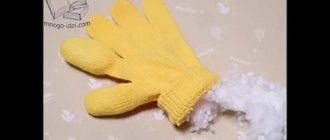
- you can make cozy mittens or fashionable mittens;
Striped mittens from your favorite sweater
DIY leg warmers from a sweater
Making pillows from old sweaters, which, thanks to the softness of the material, are very cute and cozy
Cup warmer made from an old sweater
These are some simple ways that will help breathe a second life into your favorite clothes. And it doesn’t matter whether it’s a blanket or a cover for a mug, the main thing is that the thing makes you happy and gives you positive emotions. Don't be upset if you don't succeed the first time, don't give up. As popular wisdom says: “The eyes are afraid, but the hands are doing.” Good luck and creative inspiration!
Do it yourself
To create a warm blanket from old sweaters, you will need the following materials and equipment:
- pins;
- sharp scissors;
- contrasting or plain threads;
- a sewing machine or thread and needle for those who decide to sew by hand;
- 10-12 soft wool or cashmere sweaters;
- flannel fabric for the reverse side.
You may not have that many old clothes at home. In this case, you can buy sweaters at a consignment store or any other store. If there are various elements on the clothing, such as pockets, buttons or decorative details, they do not need to be removed. They will become a bright accent on the finished product and give it originality.
You can also buy ready-made scraps of fabric to create a similar blanket. But they are usually made from cotton rather than wool or cashmere. Therefore, the finished product will not be as warm.
Tip: do not forget to wash the sweaters in the washing machine on a delicate cycle before starting the manufacturing process. They may have stains or an unpleasant odor.
Video: BEDVERT FROM SWEATERS
Recently I was visiting one of my school friends. She is currently on maternity leave and has two mischievous twins growing up. It cannot be said that she has a lot of free time, but what Olga did simply amazed me. What a find! Probably every housewife still has old sheets and pillowcases that have already gone out of use, but it’s a pity to throw them away. They are often used as rags, but there are more sophisticated ways to reuse such fabric.
Second life for old things
Nowadays, reusing old things has become fashionable to reduce the amount of waste and significantly reduce the cost of purchasing new items. Who would have thought…
Patchwork Quilt
To make a quilt, you need to sew multi-colored pieces of fabric and put pieces of cotton wool between them. If you choose bright patches, then overall you can get a very stylish bedspread that will decorate any room.
It is believed that the patchwork style is quite monotonous. But by playing with colors, patterns and textures, you can create a wide variety of decorative and interior elements: soft and delicate, autumn-warm or, conversely, bright and funny.
Decor for small pillows Any pillow, especially a sofa pillow, can be easily decorated using pieces of fabric from old sheets. Fringes, different patterns, flower petals are all great ideas for decorating a gray or black sofa cushion.
What the design of your new pillow will be is up to you. Just trust your imagination and start creating!
Children's tent And here is the craft that I saw while visiting a friend. Simply amazing, isn't it?
Cozy DIY knitted blankets and bedspreads
A knitted blanket looks very cool and truly cozy in the interior. It generally brings a touch of rustic or bohemian style, although in a solid color and a tight knit it can look quite modern. When creating a knitted blanket with your own hands, you don’t have to stick to one pattern. You can make your own adjustments, play with the color of the threads and turn your plans into reality without limiting yourself in anything. Several such ideas for creativity with knitting needles and crochet are presented to you in the following photos. Notice how impressive and stylish a blanket made with large knitting with your own hands looks.
Blankets with chunky knitting: Unusual floral crocheted blanket:
How to decorate a bedspread with tassels: Crochet tones: