Maria Slepova
Body massagers from capsules from Kinder Surprise
Crafts from Kinder Surprise capsules - body massagers
The massager is intended to be used by children as a spinal massager , since children always like to repeat what adults do. Moreover, it is useful both as a baby massage and as a children’s physical exercise. Convenient for massaging the neck , head, upper shoulder girdle, back, legs.
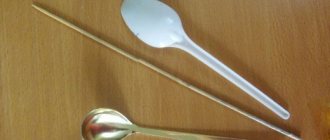
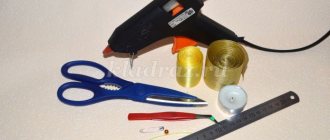
To make this manual, you need capsules from Kinders , twine, beads and your hands. To make one massager, 5-6 Kinder capsules and the same number of beads are enough. They all connect to each other. And to make it comfortable to hold in your hands, the handles of the massager are made of twine . Now the body massager is ready .
Children really like it.
The use of exercise equipment increases muscle tone, improves blood circulation, and activates redox processes in muscles, joints, and tissues.
Massagers can be used in the process of performing general developmental exercises, during gymnastics after sleep, exercise machines - during physical education events and free activities of children, both in a group and on a walk.
A lot can be made from Kinder Surprise capsules , useful material that can help not only preschool children.
Quest game in the middle group “Looking for a surprise” in the afternoon” for children from 4 to 5 years old Quest - game in the middle group “Looking for a surprise” “Organization of joint play activities of a game with rules in the afternoon.”
Photo report on making a surprise for the closest men “The best gift for daddy” Very soon there will be a holiday - Defender of the Country Day, We want to congratulate you on it, Be faithful to your homeland, We wish you good luck, Without it.
Competition with parents “The best New Year's toy from Kinder surprise capsules” A cheerful New Year in kindergarten is an interesting scenario for a New Year's party, unusual children's costumes, gifts from Grandfather Frost.
Lesson summary “Parts of the body” for the senior group Lesson summary for the senior group on the topic “Parts of the body” Objectives: •educational: consolidate knowledge on this lexical topic; clarification.
Master class for teachers “Spring flowers made of paper and capsules from Kinder Surprise” “Spring flowers” Purpose: - Training teachers to make paper crafts and capsules from Kinder Surprise together with children. - Continue.
Master class on modeling from plasticine using a container from the Kinder surprise “Baby Elephant”. There is nothing unnecessary in the world, you just need to think a little, turn on your imagination, add a grain of creativity and here... On our land, forever.
Master class on making crafts from plasticine and eggs from the kinder surprise “Smeshariki” At work, they announced a “fun plasticine” competition. For a long time I thought about how to create something original and at the same time simple. I present it to your attention.
How to make a bee from a Kinder Surprise box?
Another way. Also simple and made entirely from scrap materials (no need to buy fluffy wire).
To create a bee, you will need a toy box from a new kinder surprise, a plastic bottle, black electrical tape, a thread from which we will hang the bee in the future, scissors with sharp tips. In my work presented in the photo, I additionally used red electrical tape and a corrector (stroke).
We take an empty container (an egg from under a toy), open it and tear it along the line to the end (to the round piece);
We cut out long rectangles from a plastic bottle, fold them in half and cut out the bee’s wings from the fold line (the wings are connected to each other);
In the same way we cut out the antennae of the bee;
Cut the thread to the required length and tie its ends together;
We make a hole in the “butt” of the future bee with the sharp edge of scissors. We cut out a triangular-shaped “sting” from the bottle and insert the sting “in place” with the sharp end from the inside. The sting is firmly stuck in the hole.
We insert antennae, wings, and a rope under the part that has come off the container. Close the container;
Cut a piece of black electrical tape the length of the circumference of the container egg. We cut the piece into three long strips and glue the strips onto the future bee.
Now we cut out the eyes, nose, and mouth from electrical tape. Glue it. On the black circles of the eyes we apply a dot-pupil with a white stroke.
Eyes can be made from tablet cells (small glycine cells in the first photo), put black paper circles-pupils inside the cell and glue the eyes with Titan glue. Then the eyes will “run” and the bees will look in all directions.
All! My first prototypes are ready.
It's easy to make a bee from a Kinder Surprise capsule. This does not require any special knowledge or skills. So:
We take a capsule from Kinder Surprise and pierce it on both sides with an awl. After this, pierce through the holes with a toothpick. You need to make sure that a small part of the toothpick sticks out on one side, and a large part on the other. Then, from black, self-adhesive film, we cut out several narrow strips. After that, in a circle around the capsule, glue them. We cut out wings from a sheet of white paper and glue them to the capsule. From the remaining strip of film, cut out the bee's mouth and carefully glue it. Using acrylic, white and black paint, we complete the eyes and teeth of the bee. All! The bee is ready! You can make a whole hive this way! Happy crafting!
Minions
Not a single child will refuse to make their favorite minions. After all, then you can play with them!
- plastic containers,
- thin wire,
- transparent blister for tablets,
- black beads,
- plasticine,
- paints,
- glue, brush.
- We make holes at the top of the container and insert a thin wire into them - the hair of the future minion.
- We cut out the eyes from a transparent tablet blister, place a bead in them and glue them to the container. There is no blister - we make glasses and eyes from plasticine.
- Using felt-tip pens or paints, draw a mouth.
- We sculpt clothes from plasticine or paint them with paint.
- We attach plasticine arms and legs.
If you have an unnecessary piece of denim lying around at home, you can sew a cute overall for your minion.
How to make a funny bee with your own hands from a kinder surprise: master class
From such a simple material as kinder packaging you can make funny and unusual bees that can be used as decoration. So, prepare all the necessary materials to create bees:
- Empty container from a kinder surprise;
- Black insulating tape;
- Wooden toothpick with a sharp tip;
- Sheets of white paper;
- Reliable glue;
- Sharp scissors;
- Thin sharp knitting needle or awl;
- Thick thread or twine.
After preparing all the necessary tools and materials, start making bees. Take a thin knitting needle or an awl and use it to make two small holes in the egg container. They need to be made in the end sides of the kinder, and another hole should be made in the place where all the parts are fixed.
Thread a thick thread into the hole on the side, forming a small knot at the end. This thread will allow you to hang your bee in the air in the future. Insert a wooden toothpick into the holes located at the ends of the container so that the sharp end sticks out. This design will be your bee's sting.
Now take black insulating tape into strips two to three millimeters wide. For the body of the bee you will need three or four blanks. If you couldn't find tape, you can use white construction tape. Stick it on and paint it black. You need to cover the surface of the entire body of the bee with such black blanks, maintaining the same distance between them.
From white paper you need to cut out paired wings for your funny bee. They can be double or single - as your creative imagination tells you. Using glue, carefully and securely fix them on the back of the insect.
Now you need to start making the face of your bee. Cut out two circles with a diameter of four or five millimeters from white paper. Glue them to the end part of the structure on top of the sting. You need to cut out small circles from black insulating tape and stick them on white blanks. If you wish, you can simply draw the pupils of your bee using a black marker. If you wish, you can also make your bee's eyes from polymer clay or even mastic.
You need to cut out a triangular mouth from the same insulating tape and glue it underneath under the toothpick sting. Add a couple of white teeth and your DIY or crocheted bee is complete.
Flute of Rain
For this tool you will need a long cardboard tube (for example, from food foil, but it is a bit short; it is better to look for a similar tube about 70 cm long in a hardware store). Inside this tube you need to insert a spiral made of foil. The spiral must match the length of the tube - this is important. Having tightly sealed one end of the tube, you need to pour a handful of beads, cereal or sand inside the structure. Next, you need to securely seal the second end of the tube. That's it, the rain flute is ready. Now, when you turn it over, you can hear the filler slowly descending through the tube, making the sound of rain.
With a little imagination, you can make guitars, whistles, bells, shakers, water xylophones, tambourines, cymbals and other musical instruments at home with your children. Such items will be especially loved by children, because they are made with their own hands. But the main benefit is that the child becomes several steps closer to the world of music.
Making an unusual and fluffy bee from pompoms
We offer you another option for making an original bee from balls in the form of pompoms with your own hands. For work you should prepare threads of two colors: black and yellow. Also, to make a bee, you should stock up on thick wire for weaving with beads, brown adhesive tape, PVA glue, thick cardboard, also scissors and two pieces of fabric measuring ten by five centimeters.
Make your insect's belly first. Form two rings from sheets of cardboard and wrap threads around them. When creating the bee's abdomen, use thread in both yellow and black shades. shape into an oval pompom. After finishing winding the threads, cut them with scissors and tie them with thread.
You need to form the head of your bee from black threads. On the head you can make antennae and eyes from felt or paper.
A bee has six legs. Cut two pieces of eleven centimeters, two pieces of ten centimeters and two pieces of twelve centimeters from thick copper wire. Wrap each piece of wire with black fluffy thread on one side only. Now stick all the legs in pairs into the chest of your bee.
Wings should be formed on the surface of your bee's chest. To do this, you can use pieces of fabric or make them using the kanzashi technique.
Also, use pieces of thick wire to make antennae and a stinger for your insect. Fix these structures on the surface of the head using PVA glue. That's it, now your unusual and funny bee is ready!
Castanets
This musical instrument is an excellent assistant in learning rhythm. Making castanets with your own hands is very simple: take two metal lids, for example, from a tin of tea. Attach a piece of fabric to the back of each lid so that the child can put the castanets on his fingers. The result of the work might look like this:
DIY crafts from Kinder surprise eggs
As children, many of us wore a Kinder Surprise egg around our necks, where caring mothers and grandmothers put killer doses of garlic so that the child would not get sick. However, you can make much nicer accessories and toys from plastic eggs with your own hands. We offer you a large selection of master classes with which you and your children can make a lot of interesting things.
Most of the lessons will be very simple, so preschoolers and children of primary school age can handle crafts from Kinder Surprises. Some tutorials will be more complex and you will have to do most of the work yourself. You probably already have all the craft materials on hand, so pick something you particularly like and get started.
Crafts with plasticine
If your child is not too old, then you will like this simple master class. To make a funny chicken from a kinder surprise with your own hands, you will only need plasticine and blank plastic eyes.
If your child already knows how to work with plasticine, just show him this picture and ask him to repeat it - he should be able to do it himself. Please note that the Kinder egg has two eyes; they are attached to a small piece of plasticine. If you don’t have anything suitable, you can cut them out of paper, or you can simply draw them with a permanent marker or make them entirely out of plasticine.
Developmental rattle
You can make this craft from Kinder Surprises yourself, and your child will already play with it. This toy is good for developing ingenuity and logic. Making a rattle from an egg is quite simple.
Make a small hole in the bottom and insert either a pencil or pen, or a lollipop stick into it. You can secure it in the inside with superglue or simply push it all the way so that it goes through the entire egg.
For the educational game you will need several types of cereals of different formats: millet, rice, peas, etc. You need to pour cereal into the egg and shake it - the child will guess what is inside. It is very useful.
A Kinder egg can be painted to make the toy even more interesting. And if you don’t want to make a rattle, and you just need a regular rattle, tie a kinder with thread - it will turn out very beautiful.
Knitted animals
This master class is no longer for children: you will make knitted toys from Kinder surprises yourself. Although, of course, your child will play with these funny dolls.
Additionally, you will need thin threads or felt, as well as artificial eyes made of plastic or beads, plus any decor.
The Kinder egg needs to be crocheted from top to bottom using regular circular knitting. Try to change colors to make the toy look more colorful. However, the choice of thread depends on who you are going to make.
Take a look at the proposed ideas - they are quite easy to repeat. Try making your child's favorite fairy-tale characters or any animals.
If you don't like to knit, you can cover the Kinder Surprise egg with felt or woolen fabric. Add some decor to it and you will have a great toy.
Minions
If you have a lot of empty Kinder eggs, you can make an entire army of minions from them with your own hands - heroes of the popular children's cartoon. If your child likes these funny creatures, he will definitely appreciate their miniature versions.
To make a minion, we need to take blue and black materials, as well as an artificial eye.
You can paint the material with whatever you have on hand. This could be acrylic paints, permanent markers or even nail polish. If there is nothing like that, take pieces of fabric and glue them onto kinder surprises. If this option is also not suitable, you can stick regular plasticine on plastic eggs.
You need to shape the overalls, hairstyle, arms and legs. By the way, if you want, you can poke two holes in the bottom of the egg, insert lollipop sticks, and then mold shoes from plasticine - you’ll get a long-legged minion.
The eye can be made from pill backing and a tiny piece of black fabric and then glued on with superglue.
If you have a lot of kinders, make the whole “army” at once - it will be easier. If your imagination runs wild, you can make the leader Gru for this company.
Bees
From Kinder eggs you can make a large toy beehive with your own hands, which will be interesting for your child to play with. Additionally, you will need a sleeve or cardboard, paints, threads and a few more accessories.
Bees can be different. How to make them from Kinder eggs depends on what you have on hand. Stripes on the bee’s body can be made from “fluffy” decorative wire, black thread or thin colored tape, or simply drawn with acrylic paints or a marker.
Glue the eyes onto the Kinder egg using plasticine or glue, or you can simply draw them. The basis here can be plastic blanks, beads, fabric or paper. We make wings from paper, plastic folder or wire.
To make the honeycomb to which we will then attach our Kinder Surprise bees, we need to divide the sleeve into rings of equal width. Place 5 pieces in the center, then a row of 4 pieces on top and bottom, and then a row of three - glued with PVA or stapled, and then painted with yellow paint.
You can also make artificial paper flowers for bees to explain to your child how these creatures turn pollen into honey and organize an interesting game for him.
Kinder Zoo
Perhaps the most favorite children's toys made from Kinder eggs are various animals from which you can assemble a whole zoo. Take a look at this photo - you can easily make any of these heroes with your own hands!
To make a cat out of a Kinder egg, you can paint the body with acrylic paints or markers, and then make plasticine ears, paws and a tail for it.
All other animals are completely sculpted from plasticine, and the basis of their eyes are black beads. We advise you to choose plasticine for such crafts, which does not stain your hands and surfaces - now there are a lot of such options in craft stores.
Of course, these toys will not be durable (if you sculpt them on a plastic egg and do not paint the body), but it is easy to clean off the plasticine and cover the Kinder Surprise with a new layer to get a new “zoo” resident.
Keychain
You can make some very funny, beautiful keychains with your own hands from Kinder Surprise eggs. In this video master class you will find simple instructions with which you can easily repeat the craft.
By the way, if you are one of those who likes to ward off colds from your child with garlic, you can repeat this lesson, but make a pendant out of a Kinder egg - just insert a longer chain or thread. In addition, you can add any interesting design to the craft and make a character that your children like the most.
Choose any of the proposed master classes and stock up on Kinders! Of course, your child will really enjoy such lessons, because he will receive a delicious dessert and two toys at once: one ready-made, and the second home-made. Imagine, experiment and change any lesson to suit you.
Bilbock
Playing bielboke develops dexterity, eye and coordination. And if the toy is made with your own hands, then this is doubly useful, because creative thinking also develops.
- plastic containers,
- plastic bottle,
- felt of different colors,
- paints, brush,
- glue,
- thick threads, scissors.
- Cut off the neck of a plastic bottle.
- We cut out a thin strip of felt and paste it over the cut edges of the bottle.
- From felt we cut out flowers of various sizes and colors and small yellow circles - the centers.
- Glue the flowers to the bottle, the yellow centers to the flowers.
- We make a hole in the bottle cap and insert a thick long thread or twine into it.
- We thread the free end of the thread threaded into the bottle into the hole in the container and secure it there.
- Paint the container black, leaving one end untouched. Let the paint dry.
- Glue strips of yellow felt in a circle, leaving a small distance - you get a bee.
- On the unpainted side we draw eyes for our bee.
- We cut out wings from felt and glue them to the body.
You can decorate the bottle in any other way, for example, by painting it with paints. Absolutely anything can be in the place of a bee. Depends on your imagination.