In 2020, step-by-step instructions for assembling a 3D printer with your own hands - Vulcanus V1 - were published on the Internet. Also at this time the CoreXY project was being worked on, and when we saw Vulcanus V1, we immediately decided to make it.
Show 3 more images
Thanks to experience, we have expanded the Prusa i3 (Mega Prusa i3), and redesigned parts of the Vulcanus V1 to be able to make models in sizes 32x32x32, 42x42x42 and 52x52x52 (this last version is still untested).
The Vulcanus Max 30 has dimensions of 32x32x32, an E3D V6 lite extruder, auto bed leveling and an MK8 direct drive system. The Max 40 has dimensions of 42x42x42, an E3D V6 lite extruder, auto bed leveling and an MK8 direct drive system. Thus, the Vulcanus Max is a larger version of the V1 with structural upgrades, metal direct drives, auto bed leveling, LM10UU and LMK12L Z bearings, and it is equipped with acrylic panels that create a visual effect of lava.
Watch a video of the V MAX in action at The Maker Faire Lisbon 2015:
X axis
For the X axis you need:
Install two M4x45 mm bolts into the “X-End” part.
Connect the motor as shown in the pictures.
Tension the belt and install the limit switch.
Install the extruder using two M3x25 bolts and tighten with nuts.
Electronics
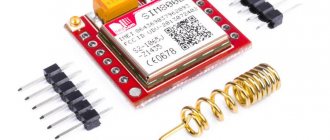
-1 Arduino Mega 2560 + Ramps 1.4 + 4 A4988 stepper motor drivers.
-4 stepper motors 28byj-48.
-3 optical limit switches.
-1 Nema 17 stepper motor (we also order from Ali or Ebay. Such drives cost about $10).
-1 extruder E3D-V5 Aliexpress
or more expensive, but with cooling
-1 extruder E3D-V6 Aliexpress.
Components
Arduino boards are constructed from:
- microcontroller - it is a microcircuit designed for a microprocessor and peripheral devices;
- electrical pins - they are distributed on the board and are classified into analog (characterized by the presence of a range between 1 and 0) and digital (have only two values 1 and 0).
Such a device makes the boards the universal core of the system in which they are included. An IDE is a programming language designed specifically for Arduino.
Arduino UNO board
The Arduino UNO board works in conjunction with the ATmega328 microcontroller, characterized by the presence of:
- 14 digital and 6 analog ports;
- USB port;
- reset functions;
- In-circuit programming and power connectors.
The expansion board provides power to the above components, for example via USB. The location of the microcontroller makes it easy to replace and repair.
Arduino UNO has several differences from other modifications of expansion boards from this company:
- Firstly, you don’t need a USB-UART FTDI bridge to connect it to a PC.
- Secondly, it receives electricity through a USB port and from external devices. Several pins are predefined for this (Vin, IOREF, 5 V, GND).
- Thirdly, the microcontroller of the Arduino UNO board has three types of memory: FLASH, EEPROM and SRAM.
- Fourth, there is consistency in SPI. This applies to exits (entrance) 10 to 13.
- Fifthly, there is an automatic reset function.
- Sixthly, there is protection from the effects of heating the wires.
The Arduino Uno 3D printer is considered the most popular in its price category.
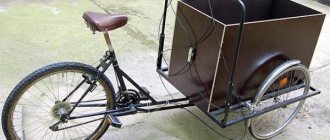
Printing table
We drill four holes with a diameter of 3 mm in a wooden slab 20x13 cm.
After this, tighten 4 M3x25 bolts.
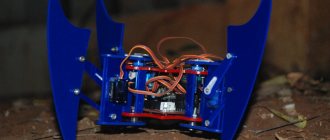
Modification of stepper motor 28BYJ-48
In order to convert the 28BYJ-48 stepper motor from unipolar to bipolar, you need to open the plastic cover.
After this, remove the red cable and open the contact path from it as shown in the figure.
Now on the other end is the output that you will connect to the Ramps, arrange the pins as follows:
After such a small modification, you can connect these motors directly to the contacts that are provided on the shield for Arduino Ramps 1.4
Arduino CNC Shield v3.02 board
The CNC Shield v3.02 expansion board is designed for Arduino UNO 3D printers and similar equipment. This input/output base allows devices to operate in automatic mode or by connecting to a USB port.
Arduino CNC Shield v3.02 has 4 axes, two types of interface (UART, I2C). The required voltage for the power and logic parts is 36 V and 5 V, respectively. The firmware type of this board is called Arduino GRBL. The base is characterized by four slots (according to the number of axes) and jumpers for duplicating them. Arduino CNC Shield v3.02 drivers are connected in different ways.