Quote from Rukodelkino
Read in full In your quotation book or community!
Cross stitch is not a very difficult task, but it requires special care and attention. How accurately you fulfill the requirements of the chosen scheme depends on how your work will look. Cross stitches are quite varied: these are a classic cross, a straight cross, an asterisk cross and others. All of these seams are often used in fabric work and are well suited for making geometric patterns and for edging embroidery.
Embroidery materials
The result of any embroidery primarily depends on the correct choice of threads: thick ones for embroidering on harsh fabrics, thin ones for more delicate work. As a base canvas it is better to take:
- fabrics with a surface on which squares are clearly visible (fiber weave or small check print;
- machine- or hand-made linen;
- fabrics with rare weave of fibers;
- cotton canvas (for table linen and paintings);
- thin transparent fabric.
What is cross stitch
Cross stitch is a type of needlework that is an image of a design on a special fabric called “canvas” using a needle and threads. The needle can be either ordinary or specialized, the threads can be a certain type of floss, ordinary threads, and a variety of woolen threads can also be used - it all depends on the size of the divisions on the canvas. Embroidery has its roots in the distant past. The history of many cultures has captured references to embroidered patterns on clothes, on household items, on posthumous bedspreads, etc. Embroidery was also used as a talisman.
The standard set will include:
- Embroidery instructions;
- Canvas;
- Embroidery pattern;
- Threads;
- Selected by specialists in shades of different Colors that harmonize with each other;
- Some kits also come with a special embroidery needle already included.
In addition, nowadays, pictures and embroidery patterns for them that interest a person can be found on the Internet, completely free of charge, but here you need to have a good understanding of the patterns and be able to organically select embroidery threads to match the chosen image.
Special floss, depending on the manufacturing company, has its own specific numbers or names, which indicate one or another shade of a color.
For example, such a designation may look like 06337 or words such as navy. Also, floss is divided according to the manufacturing companies themselves, for example, dome, Gamma, etc. In addition, you need to know that the embroidery itself can occur both in color and in rows. If a person embroiders by color, it means that he takes a thread of one color and embroiders on the canvas according to the pattern all the places indicated by that color. To a greater extent, experienced embroiderers use this method. Passing embroidery in rows is a desirable method for beginners. With this method of work, the entire selected row is embroidered completely, using threads of all colors that are used in this row, even if some color is used only for one cross.
Pay attention to the cross stitch kit from Riolis: .
Beginning of work
Before starting work, you should not make a knot at the end of the working thread (it can easily slip to the front side). Most often, the end of a working thread a few millimeters long is left on the wrong side, sewing to the fabric in the process. The transition paths between the details of the patterns should be as short as possible (especially when making needlework from several colors). If it is impossible to make a short transition, it is better to cut the floss and sew the end under the stitches from the wrong side. The next group begins with a new thread.
Each element consists of two firmware (top and bottom). Horizontal rows are performed in two steps: first, the lower path in the direction from left to right, then the upper path from right to left into the holes of the first row. Vertical stitches are formed on the wrong side. When performing vertical and diagonal chains, each figure is made completely, sequentially moving from one to another. Do the same with elements located at a distance, with gaps.
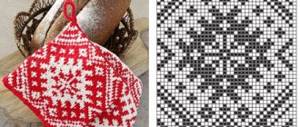
Cross stitch pictures: patterns for beginners
Anyone who wants to master a craft like cross stitch will need to start somewhere. There are special schemes for beginners. Few people will risk starting from the first steps a large painting with a huge number of colors used and their shades. The first time you can get lost and confused in the scheme, you can confuse the colors and then you will have to unravel everything and get to work from the very beginning. And someone may realize during the embroidery process that cross stitch is not an activity for him. That is why it is best to start learning with picture diagrams for beginners.
Basically, these are small drawings with diagrams:
- Such schemes are simple and small in size;
- Pictures usually combine from 4 to 6 colors;
- All patterns are divided into squares with a side equal to 10 crosses.
You will find even more popular diagrams and drawings for beginners in our material:.
Beginning creators are also recommended to cut the canvas onto which the painting itself will be transferred. At the same time, in stores specializing in creativity, including embroidery, you can find a special canvas with a picture diagram printed on it. In this case, the embroidery will take place directly according to this pattern. This canvas with a color scheme is a kind of stencil.
If the pattern comes separately, then it is best to choose for mastering the art of embroidery patterns constructed in the form of colored squares, where each color of the square corresponds to the color of certain threads, that is, if a red square is shown in the layout of symbols, then among the set of threads there will be a red skein/ bunch and so on accordingly.
In addition, we recommend watching videos in which you can watch experienced embroiderers share their experience and knowledge with novice embroiderers. Such lessons will be a good help in mastering the art of cross stitch.
Embroidery patterns for beginners to some extent overlap with patterns for children's creativity.
Small pictures for cross stitch
Pictures and patterns for embroidery can be found not only large and complex, which can be used as a picture that can be hung on the wall and admired, they can also be small-sized drawings, which can also find their use both in interior decoration and for decoration household items.
Small pictures for embroidery are well suited for those who are just starting their journey in the art of embroidery and for those who have decided to decorate their home or clothing, making it more exclusive. After all, clothes with hand embroidery will not only be unique, but will also attract the attention of others.
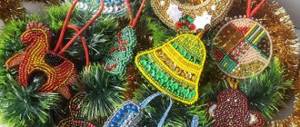
Original cross stitch: children's pictures
Due to the fact that more and more children, looking at their beloved mothers, grandmothers, sisters, become passionate about embroidery, and in particular cross-stitch, demanding that they also be taught how to embroider. Of course, it is difficult to persuade a child to sit and embroider some large picture, various ancient ruins, or embroider icons. No, when dealing with children, you need a completely different approach and a set of children’s pictures. That is, it is worth choosing those drawings that the child likes.
Among the pictures and patterns for embroidery intended for children's creativity, popular motifs are:
- Wild or domestic animals stylized as fairy-tale characters, be it Winnie the Pooh, Tigger, Puss in Boots, etc.
- Some funny simple pictures that will cheer up a child.
- Cartoon characters: Disney princesses, Smeshariki, Fixies, fairies, Machinarium, etc.
- For older and more experienced children, you can offer small fragments of some landscapes, animals, no longer stylized; beautiful fairies can gradually become more complex: increase in size and consist of more shades of colors. In addition, children can already try to create small embroideries on scarves, decorating their clothes.
- In adolescence, you can already offer embroidery depicting human emotions: a joyful person and a smile, a sad image and a tear, etc.
Mini embroideries on children's clothes look stylish, especially when the child himself makes such decoration on his T-shirt or blouse, he will immediately notice that the old boring elements of the wardrobe have immediately become interesting. They are fun for a child.
You will find embroidery ideas for children, patterns and variations in our selection: .
Materials and tools for work
The standard set of embroidery tools includes a needle, thread, hoop, canvas and thimble.
Embroidery materials and tools
Needles
Cross stitch does not require a special needle. Pictures cross-stitched with floss threads will be realistic if you follow the following tips:
- the shape of the needle and the size of the eye should be such that the thread easily passes through the canvas and does not become deformed;
- for large weave canvas, a blunt needle of medium thickness is recommended;
- The denser the canvas, the thinner the needle should be selected.
Needles
Canvas
Canva is a fabric for embroidery with numerous squares. There is linen, cotton, combined. The dimension of the base is indicated on the canvas:
- number 14 (55 cells x 10 cm) – characterized by a large cell, recommended for beginning craftswomen;
- number 16 – (60 cells x 10cm) – the size of the crosses is small compared to the previous version;
- number 18 - (72 cells x 10cm) - canvas with numerous small cells, in demand by women with experience, it allows you to create real masterpieces.
Canvas
Important! When working with cotton canvas, shrinkage is possible after washing (along the grain line). In order for the picture to remain symmetrical, the correct cutting of the material is important.
You might be interested in this How to learn how to embroider with beads correctly: instructions for beginners
Hoop
The main purpose of the hoop is to stretch the canvas. The device is available for sale in plastic wooden, chair and frame versions. The first option is embroidery on a hoop for beginners and children, the second is professional, for working with fabric of different thicknesses, the third is for making serious paintings that require long-term stress on the hands, the last among them is a universal option.
Hoop
Note! The size of the hoop depends on the scale of the picture. The larger they are, the smaller the amount of thread fastening and the more convenient it is for the needlewoman, and the lower the risk of damage to the canvas.
Thimble
A device that protects fingers from accidental puncture. The practical experience of craftswomen shows that old grandmother's thimbles made of a metal base are the most effective.
Let's start cross stitching
The initial stage of cross stitching is processing the edges of the canvas. The work begins by coating the edges with special glue or hand stitching. To make the work easier, the canvas needs to be marked. To do this, the canvas is folded in half and ironed, and markings are made into 10 × 10 cm squares with a pencil.
The canvas attaches to the hoop evenly and easily. Strong screed and distortions will lead to subsequent deformation. The canvas will be damaged.
Let's start embroidery
Important! When marking the canvas, you need to leave 5 cm of material for allowances. If the picture involves a large amount of empty background, it is worth considering the parameters of the indent from the motif to the frame.
You may be interested in this: Patterns for embroidering three angels to get pregnant