Squirrel mask “glasses”
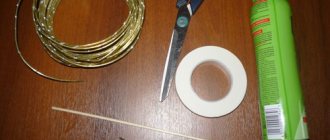
In order to make your own squirrel mask that children will put on their faces, you will need:
- Colored cardboard or paper.
- Pencil.
- Scissors.
- Rubber.
- PVA glue.
The squirrel mask can be made of cardboard or paper. Everyone can decide which material to choose individually based on how long such an attribute should last. Once the material has been selected, you can begin to work. Manufacturing takes place in several stages:
- On the wrong side of the paper or cardboard, you need to mark the lines of the future mask. It will consist of several parts of white and orange colors. Below is a sample template for each color.
On white paper you need to draw the following figures:
And on the orange one there is only one, it will serve as the basis:
The sizes depend on how old the child is, so everyone will choose them for themselves. The main thing to remember is that the mask should not be lower than your nose.
- Now you need to cut out eye holes on the main part of the orange color, and also make small holes on the edges. Both ends of the elastic are threaded through them and tied with a knot to secure them. The size of the elastic can be measured by placing it on the child’s head from earlobe to earlobe through the back of the head and adding 5 cm.
- Next, white part No. 1 needs to be glued to the orange base so as to cover the holes into which the elastic is threaded. In this case, the ends of the latter should be extended by 2-3 cm. As a result, the mask will acquire fluffy cheeks.
- After this, you need to glue decorative triangles onto the ears and draw a nose with a black felt-tip pen or gouache.
The child will like the resulting squirrel mask much more than the purchased one, since he made it himself. Parents can additionally decorate the ears of the craft using fluffy tassels or in another way.
But children start going to kindergarten at the age of 2, and parents don’t always have the opportunity to sit down with their child and help make an outfit. Then a faster and easier way to assemble a mask with your own hands will do.
How to make a beak out of paper
The manufacturing process consists of several stages and takes a lot of time, so it is better to start it at least two days before the finished product is needed.
First stage
It is necessary to fashion a base from plasticine. The type of finished product depends on how it is made. You shouldn’t add small details, since they won’t be noticeable under several layers of paper, but you shouldn’t oversimplify either. It is advisable to apply cream to the base to make it easier to separate the paper product from it.
We continue to work
Making papier-mâché is not as simple as making a crow's beak from paper rolled into a cone, but even a schoolchild can do it. Pre-prepared sheets must be torn into small pieces and pasted over the base. Make a paste from flour, salt and water and brush each layer with it. There should be about 10 of them in total to make the product dense and durable. After applying the last layer, you need to leave the work for a day to dry.
The final stage
After drying, carefully cut the paper beak and remove it from the base. Glue the cut. For greater strength, it is recommended to cover the workpiece with PVA glue, apply putty and sand it. Cover with soil.
Since you need to make a beak out of paper not only realistically, but also beautifully, you can experiment with color: paint it black with a metallic tint. After drying, you need to make slits in the finished beak and insert an elastic band with which it will be held on the head.
Squirrel mask “rim”
For the youngest children, a method is suitable that does not require anything complicated other than curly cutting, and its complexity depends on the efforts of the parents (later it will become clear why). The mask is a headband, and the squirrel that is attached to it is a printed picture. For this method you need:
- White paper.
- Orange cardboard.
- Scissors.
- PVA glue.
- Paper clips.
It will take no more than five minutes to make such a mask:
- The role of the elastic band in this case will be played by a cardboard rim.
- To make it, you need to cut two strips 4 cm wide along the sheet.
- After this, they need to be wrapped around the child’s head and secure the circle with paper clips.
- The workpiece can be removed and the protruding end can be trimmed so that there is 3-4 cm left before the paper clips.
- Now the ends of the rim need to be glued together and the paper clips removed.
- After the bezel is assembled, you can start searching for pictures via the Internet. Here, as they say, “it depends on the taste and color...”. There are many options. You can find both whole squirrels and their faces separately. If the mask is made together with a child, then it is better to take a closer look at options that will be easier to cut out. For example, something like this:
- Now the found picture needs to be printed and then glued to the rim.
The result is a pretty good and simple squirrel mask. But masks made in this way are considered disposable.
Beaks and paws | Country of Masters
I continue the theme of my favorite wooly birds. Today we will talk about beaks and paws. This MK is auxiliary. I prepared it together with MK on non-standard birds (Parrots, woodpeckers... https://stranamasterov.ru/node/1052843) But since a lot of material had accumulated, I decided to take it out separately.
PART 1. Beaks
Birds' beaks are very diverse in shape and color. I want to offer a way to make almost any beak, the size and color you want and almost any shape.
First of all, the beaks require seeds. Sunflower seeds are suitable in shape and color, but I prefer watermelon seeds, they make such cute “faces” with them!
For small birds, the size of chickens, apple seeds are suitable. If you want a beak close to the real one, then I prefer the one on the right:
Or here’s another bullfinch:
In general, the theme of beaks appeared when I made a woodpecker and a kingfisher. The question arose: what to make their beaks from? After all, the seeds are not suitable for this; the beaks of these birds are longer than usual. I had nothing at hand (I was visiting in the village), and I cut out a beak from a twig. I thought about painting it later, but using only a knife it didn’t turn out very smooth.
Returning home, I began to look through different options. I thought and thought and finally, through trial and error, came up with this option:
So, let's start making beaks.
Option 1
So, to make beaks we will need: • fabric or plastic of the desired color, for example, black or brown, • glue (preferably TITAN). I used a paper folder cover as plastic. Plastic immediately gives the desired thickness, and the fabric is thin and soft, so you need to take two pieces of fabric, glue them together and dry them on a flat surface, the glue will add rigidity. To make the details easier to see in the photos, I used red fabric.
It will come in handy someday, because there are birds with a red beak, for example, the water cutter. The photo is mine.
We cut out blanks for beaks from our material: strips 4 cm long and 5-6 mm wide. Of course, the length and width of the beak depends on the size and “breed” of the bird.
The indicated sizes are “regular”; for more elegant beaks of small birds, you can make smaller blanks, 3.5 cm long and 4 mm wide. If you need a long beak, for example, for a woodpecker, then you need to take a longer one, 4.5 or 5 cm. In general, it is better to make several beaks of different widths and shapes and see which one suits your bird best.
We cut the blanks from both ends, forming a beak. Make sure that the tips of the beaks, especially plastic ones, are not too sharp. In general, for small children it is preferable to make beaks from fabric.
We bend it in half and trim off the corners a little at the bend for ease of gluing.
The result is this:
View from different sides.
The beaks are almost ready. The last step remains. The plastic is hard and when glued in, it tries to straighten out and come out. You can hold it until the glue sets, but I don’t have enough patience for this, so I stitch the workpiece with threads at the bend, a little, just to grab it - and you can glue it. The red color of the threads is only to make it easier to see in the photo, but then it will stick in anyway and will not be visible.
I picked up more different beaks, and for scale, the already mentioned watermelon seed.
There is no need to sew fabric beaks. If desired, you can paste them with a thread in the same color as in this photo.
Beaks. Option 2
A long, large beak for a woodpecker or kingfisher can be made in a different way (but from the same materials).
To do this, you need to cut out from the same plastic or glued fabric (just glue more layers of fabric, 3 or 4) a beak approximately the same as the one below in the picture. Above for comparison is a beak made using the first method.
Same thing, different angle.
Two beaks for comparison:
It remains to show the beaks for parrots, they are very unique, crocheted.
Such a beak can be cut from a piece of plastic or glued fabric measuring 1 x 2 cm.
Beaks for birds are a must, but legs are not. Toy birds can be hung somewhere, for example, New Year's bullfinches and titmice on a Christmas tree, or in general - anywhere!
The birds in the Window of Joy don't need paws either.
Birds look great in a nest or basket:
You can’t tell which chickens in the nest have legs and which don’t.
But, of course, they look great with paws too!
PART 2 Feet for birds
So, you decided to make the bird's paws. Let's get started. There is a well-known way to make paws: bend the wire and wrap it with thread, I want to offer a new one. For those who have seen my MK about chickens, a lot will be familiar, but, of course, there are differences. The paws are based on threads. The photo shows the threads I used. I used red threads for the chickens; for others they are too thin. For the rest of the birds - black and beige, they are the most optimal - not too thin, not too thick, and besides, they are cotton or almost cotton. I don’t recommend wool (pictured above), it’s thick and doesn’t stick well, obviously too fluffy.
For one foot you will need a thread 18-19 cm long and a piece of waxed cord of a suitable color 5 cm. (For smaller birds, you can make smaller feet, take a thread 16.5-17 cm, and a waxed cord 4.5 cm). The thread must be cut into 3 equal parts (6-6.3 cm each). The photo shows a blank for two black feet and two beige ones.
We cut the waxed cord into three unequal parts, first in half, and one of the halves in half again, you get three “bones” for the paws, one 2.5 cm and two 1.2-1.3 cm each. The result is at the bottom of the photo.
We take blanks for one foot.
Now we fold each thread in half and glue it together, putting a bone inside, until about halfway. The short bones fit completely inside the loop, and the long ones remain half free of glue; the free tip forms the fourth finger of the bird, looking back. I lifted the free part of the thread of this middle finger up so as not to glue too much. Plus it's easier to see.
The fingers dry for some time on the plastic backing.
When the toes are dry, we begin assembling the paws: take three toes (the long one in the middle), grease the free parts of the threads with glue, twist them with a rope and bend them perpendicular to the foot. We lubricate the foot itself with glue from below, a little, and glue it to the plastic, carefully straightening the “fingers” so that the foot stands straight.
After complete drying, separate the legs from the backing and trim off the excess cured glue. Cut off the top of the legs, leaving the desired length and glue the legs into place.
In this photo you can compare the sizes of different paws.
Here is a company confidently standing on its own feet, sorry, on its paws.
stranamasterov.ru
Types of masks
There are also more complicated versions of the headband mask. For example, for greater strength, the image of a squirrel before gluing to the rim can be further strengthened with a layer of cardboard. A glue stick will help to glue them together, which will provide reliable adhesion and will not damage the printed image.
In addition to the design, you can improve the design of the rim. It can be made slightly shorter than the circumference of the child’s head, and a wide elastic band can be sewn into the resulting gap. This will allow you to adjust the size of the headband, which means that this New Year’s mask can be used more than once.
How to dress a child in an original way? Buy a costume and make a mask yourself. An addition to the carnival costume is a paper head mask.
Here is a selection of photos and step-by-step master classes. All you have to do is print the templates and cut along the contour. To ensure that the mask fits tightly to the child's head, glue the template onto a wide piece of paper tape. In some cases, an elastic band or satin ribbon will do.
Mask made from hands
You will need: colored cardboard, a simple pencil, scissors.
Master Class
- Choose your hand position.
- Trace their hands on cardboard.
- Cut out the mask.
- Place the mask on your face, mark the holes for the eyes, then cut them out.
- Cut out the nails and ring from cardboard, then glue them onto the mask.
- Fold the cardboard in half and cut a “double” thick stick.
- Glue a stick to the side of the mask as a holder.
The handmade mask is ready! I recommend watching this video!
DIY New Year's masquerade mask made of papier-mâché: master class
We suggest making your own papier-mâché mask. The operating technology is simple. You will have a mask prepared just for your face. Cover the base with paints and create any character. Products made using the decoupage technique look original.
What materials will you need:
- petrolatum;
- cling film;
- magazine or newspaper sheets;
- rubber;
- scissors;
- stapler;
- white and colored acrylic paint.
- Lubricate your face with a thin layer of Vaseline.
- Glue pieces of cling film tightly to the skin. Leave the eye and nostril slits without film.
- Soak pieces of newspaper sheets in PVA glue. Glue onto film. Cover the entire layer of film with paper pieces.
- Wait 30 minutes.
- Carefully remove the workpiece from your face. Pull the film.
- Leave the workpiece overnight to dry.
- Trim excess film and paper with scissors.
- Cover the base with another layer of newspaper scraps. Soak each one in glue. Dry again.
- Use a stapler to attach the elastic to the sides of the base. Cover the inner parts of the elastic with pieces of paper.
- Paint the workpiece with white acrylic paint. Let it dry.
- When the white layer is dry, apply colored paint.
Paint when the white layer of paint is completely dry. Want to use decoupage? Prepare colorful paper napkins. Tear them into pieces. Glue it to the white base of the mask with PVA glue. Let dry.
How to make a paper mask for the New Year's school competition: video
Costume parties are popular with both children and teenagers. Do you want to make your child stand out from the crowd of his peers? Make a paper mask with your own hands. When choosing colors, focus on the schoolchild's costume.
What materials will be needed:
- pencil;
- sheet of single-sided colored paper A4;
- scissors;
- white cupcake baking capsule;
- hole puncher;
- colored rubber band.
- Place your palms alternately on a sheet of white paper. The thumb and index fingers should be bent. The holes between them are slits for the eyes.
- Draw an image of the product.
- Cut out the workpiece.
- Cut out arcs from a paper capsule.
- Glue it in the form of eyelashes.
- Use a hole punch to make holes on the sides of the base.
- Tie a thin colored elastic band.
Best regards, Natalya Krasnova.
The dog is the symbol of 2020. At matinees in kindergartens and schools, children wear costumes and dog masks on their heads. Masks are a universal accessory, suitable for girls and boys. You can make them yourself from scrap materials. The process will take 30-40 minutes.
To make a paper mask you will need:
- Paper or cardboard. The thicker the paper, the stronger the product.
- Felt for rag products.
- Threads.
- Scissors.
- Glue.
- Elastic band for fastening.
- An awl or sharp knife.
- Pencil.
- Colored and velvet paper.
- Decorative beads.
Paper
Making from ready-made pictures is a simple method; schoolchildren can do it without the help of their parents. First you need to download and print a dog head mask template .
The sequence of work is as follows:
- Print out the sample and carefully cut it out with scissors.
- Lay out all the elements on paper, trace the outlines with a pencil and cut out.
- Glue the parts together.
- Make holes for the eyes using a sharp knife.
- Make eyes, nose, tongue, eyelashes from colored paper.
- Carefully glue the listed parts or secure them with a stapler.
- Use an awl or sharp knife to make holes on the sides for the elastic.
- Insert an elastic band or rope and secure it.
To make the paper puppy's ears hang cutely, they need to be bent at the base and then glued.
There are color and black and white pictures of dog masks on the Internet..
Monochrome images are attractive because children can paint them in any colors, even the most unusual ones.
Paper crow: simple crafts from cones
A paper crow based on a cone looks interesting and funny. Be sure to do it with your children, the craft is very easy. The only difficult task for children may be the design of the cone. But with proper preparation of the paper, this should not be a problem.
Materials for paper crow:
- Black cardboard;
- Yellow paper. If you don’t have ready-made eyes, you’ll also need white paper;
- Moving eyes;
- Scissors, compass, pencil, glue stick.
With such a minimum you get a nice craft.
How to make a crow out of paper?
The first step is to make a cone out of black cardboard. To do this, use a compass to draw a circle on paper. Its value depends on the size of the crow you need. In any case, from a circle covering the entire width of A4 cardboard, a cone approximately 10 cm high is obtained.
Draw a circle, divide it crosswise into 4 even parts. Depending on how many parts will be involved in the work, the width of the cone is determined. That is, if you cut off one part, the cone will be wide. The cone for the crow needs to be quite narrow, so you need to cut 2.5 parts from the circle. And make a cone from the remaining 1.5. In the photo, the sector of the circle that we need for the craft is indicated in red.
Cut it from the circle.
Roll into a ball and glue the sides together. The base of the crow is ready, now let's move on to the small details.
Draw on black cardboard, or first on white paper, a round head with forelock, tail and wings, cut out. The wing can be drawn on one side only, then fold the paper in half and cut out two identical parts at once.
Cut out a diamond-shaped beak and legs from yellow paper. Make the paws longer, taking into account the fact that later they will need to be folded into an accordion.
The components of the paper crow are ready, it’s time to move on to assembling the bird.
To do this, glue the eyes and beak to the head. Note that the sides of the beak should be at the edge of the head. The beak itself is slightly folded and pressed in the middle and glued only on the sides and in the upper part. Glue the crow's head and tail.
Attach the wings to the back of the cone.
Fold the paws into an accordion.
Glue them inside the bottom of the cone.
That's it, the paper crow is ready. Isn't she funny?
tratatuk.ru
Felt
Felt is a soft and durable material, products made from it are strong and last longer than paper accessories. Work on a mask begins with a pattern.
- The printed template must be attached to brown or black felt, outlined with chalk, outlining areas for the eyes, and cut out.
- Separately, you need to prepare blanks for the ears, a fragment for the mustache and the nose. To do this you will need pieces of black and light material.
- When the blanks are made, the main blank needs to be finished with two decorative stitches along the entire edge and around the eye sockets.
- Now on the stitched base you need to glue the ear parts, an element for the mustache.
- The black nose is glued to light felt in the center and decorated on the sides with black beads. In the sample under consideration there are three of them on each side.
- When the mask is assembled, it needs to be placed under pressure for 2-3 hours so that all the parts are securely set.
- The final stage is to sew elastic bands or fastening ropes on the sides.
Simple and stylish raven costume
For teenagers, the outfit may consist of a black classic suit, shoes and a top hat. There is no need to sew anything extra, just add a black turtleneck.
If there is no ready-made cylinder, you can make it yourself from paper.
To do this, prepare:
- White thick cardboard
- Glue, compass, ruler
- Scissors, paints
- Centimeter tape
Cut out 3 elements from thick cardboard:
- Circle
- Rectangle
- Circle with the middle cut out
Immediately measure your head circumference with a measuring tape. If the base is for a child’s head, then we calculate that 50 centimeters is equal to the radius 50 / (2 * 3.14) = 50 / 6.28 = 8 cm.
After calculating the radius, set it on a compass and draw a circle, which we cut out. One larger for the cylinder fields, one smaller for the base. The crown is equal to a rectangle of suitable length. We glue everything together and paint it, after complete drying the cylinder is ready for use.
Plastic plates
Original accessories for carnivals and New Year's parties are made from unexpected objects. You can make an exclusive dog mask with your own hands from disposable plastic dishes.
To make it you will need:
- Disposable plate.
- Cardboard.
- Colored marker or felt-tip pen.
- Watercolor paints.
- Wooden stick or rubber band.
First, the white plate needs to be tinted gray or brown. Watercolor paints are used for this.
While they dry, you need to cut out the ears, forelock, nose, eyebrows from cardboard and paint them in the appropriate colors. Experiments are welcome - a dog with an orange or green forelock will look bold and unusual.
Then holes for the eyes are cut into the base and the cut and painted elements are glued.
All that remains is to fix the wooden stick at the bottom so that it is convenient to hold the mask. The stick can be replaced with an elastic band.