Images
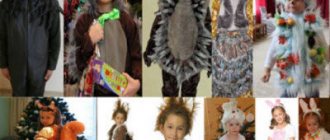
Wood color fringe. Fairytale Leshy costume for a boy
Shoulder bag
Leaf patches
Hood depicting Leshy's hat
Loose shirt with patches. Leshy outfit for an adult for the New Year
Raw hem burlap trousers
Original shoes
"Forest" makeup
Original green mask. Costume for the funniest dad
Costume made from threads and pieces of fabric
One-piece jumpsuit made of tow
Tow mask for the face
A few ideas for creating an image
Basically, the Leshy carnival costume is more suitable for a child. If any adult wants to create such a fabulous and unusual image for himself, then he can use the same ideas. However, sometimes on Halloween a Leshy may appear in a real camouflage suit with a camouflage net.
For a child, you can sew with your own hands both a simple and uncomplicated outfit, and a very thoughtful, original goblin costume.
- The most primitive option would be to combine a regular shirt (you can even use a shirt) and pants (breeches) in khaki or gray-green tones. Try decorating your pants with patches and decorating everything with fringe made of soft, voluminous fabric.
- Cut many wide and narrow strips of fabric and sew them in different parts of the jacket: in the middle, along the edges and at the top (preferably at an angle). Sew small pieces in bunches onto the edges of the cuffs on the sleeves and shoulders. The pants are decorated with fringe along the bottom.
- You can also use mesh to decorate individual parts of clothing.
- Don’t forget about the rain or sparkles to make your Leshy look festive.
- The pattern itself is very simple. You will need to make four rectangles of different sizes: a back, two sleeves and a front. It is better to cut the back part a little longer than the front.
- The goblin is not a character from high society, and this gives some advantages in sewing with your own hands: you don’t have to work on the bottom of the product and the neckline; it will be beautiful even if you wave them too much.
- It’s also good to make fringe directly along the fabric of the robe, that is, cut it along the bottom of the sleeves and the product itself.
- If you have long, nice twine, you can sew around the neckline (make large stitches over the edge).
- Pieces of fur sewn in different places of the robe - on the back, shoulders, chest - will look colorful.
- Leaves, tree branches and other forest paraphernalia can be made from felt fabric or you can buy and sew ready-made appliqués.
- Sew a belt from faux fur or velvet to tie up a shirt or hoodie.
You can also sew a carnival outfit with a robe. We make pants using the same principle. But the robe will have to be cut out.
The process of making a suit from net and tow for an adult and a child
The unusual Goblin costume, woven from a net and decorated with bast brooms, will delight your child. The New Year holiday will bring even more joy if dad joins the baby.
Tools
You will need:
Knife
Scissors
Awl or needle
A piece of thick wire 15 cm
Materials
Consumption of materials:
| Material | Quantity | Price |
| Fishing net (with meshes 1 x 1 cm) | 1 PC. | from 300 rubles |
| Plumbing linen (tow - sold at any plumbing store) | 3 pcs. | from 100 rubles |
| Bask panicles (sold at hardware stores) | 5 pieces. | from 20 rubles |
| Leg-split | 1 PC. | from 40 rubles |
| Total: 740 rubles |
Action plan
Includes:
- Straightening the network.
- Finding the middle and marking places for the hands.
- Fastening the tow fiber over the entire area of the network.
- Distribution of bast panicles.
Complexity
Creating clothes for a forest owner is not difficult; you will need patience, work, imagination and a couple of free hours. Even a beginner can make the costume.
Who is she, swamp kikimora?
In order to understand exactly what a kikimora costume should be like, you need to get to know this fairy-tale character better and highlight its features and distinctive features.
- First of all, this is hair - it should be long and green. However, this does not mean that you need to dye your own curls. But more on that a little later.
- The kikimora costume must contain appropriate attire. This could be a long dress or skirt with a T-shirt and some kind of mesh cape from which thread scraps hang (like seaweed).
- Particular attention should be paid to shoes - for a kikimora these are necessarily bast shoes.
- To complete the look, consider swamp-themed accessories. Bracelets and necklaces with pendants made of beads of different sizes are just what you need!
All these elements should be contained in both an adult kikimora costume and a children's one. But what they will be like depends on your imagination.
Step-by-step instruction
Working with the network:
- Find the middle. To do this, straighten the net and put it on your head. Mark the part that is right on the top of the head - tie it in a tight bun. This mark will guide you on how to put on the suit.
- Mark the location of the arm holes—the holes should be wide enough to comfortably raise and lower your arms—then cut the net at these locations.
Working with tow:
- Spread the net on a convenient surface or hang it to make the costume creation process convenient.
- Divide the tow into fibers one centimeter thick.
- Distribute the pieces of tow over the grid. With such small “tails” you need to decorate the entire area of the network. Since the fibers may be too long, do not forget to fasten them additionally along the length. If you wish, then for an even more impressive effect you can cut the tow between the fastenings: then you will get a shaggy and voluminous outfit.
- Secure the tow with twine. It must be cut into many small pieces and each piece of tow tied separately. This is important for the strength of the suit, otherwise the sanitary flax fibers will disintegrate.
Working with bast panicles:
- After working with tow, you need to distribute the bast panicles over the suit. Since the fibers are fastened at the base, they must first be fluffed into several parts.
- Weave the bast into the product. To make it more convenient to thread parts of the panicles into an almost finished product, you can take thick wire: it will help the fibers pass faster and the process will speed up. After all the material has been distributed, the costume is ready - all that remains is to try it on and, possibly, add accessories from a real Leshy.
Other costumes:
Alien costume
New Year's costume of a space alien. Easy to sew in a few evenings
Instructions
More details
Snowman costume
How to quickly and cheaply sew an original outfit for a boy or girl at home
Instructions
More details
Fox costume
Children's costume for matinee and New Year's holidays. We sew on our own
Instructions
More details
Bunny costume
Children's New Year's costume for any size and age in one evening
Instructions
More details
Mischievous squirrel costume
How to sew a dress, tail and ears. Step-by-step instruction
Instructions
More details
Baba Yaga costume
How to sew a suit in one evening. Step-by-step action plan
Instructions
More details
Manufacturing of additional elements
Leshy's feet are always decorated with bast shoes. Now you can buy them at a carnival costume store or even weave them yourself. However, homemade shoes are not always comfortable to wear, so you can make burlap covers for existing comfortable shoes.
To make shoe covers you will need a piece of burlap measuring 1 x 1 meter and twine for ties . Actions:
- Divide the square into 2 parts.
- Sew the pieces together by folding them in half. You can sew them on a sewing machine, or you can sew them by hand. The thicker the thread and the more deliberately sloppy the seam, the better.
- Attach twine to each cover, put the covers on your shoes and tie the twine tightly at the ankles so that the covers last the entire New Year's Eve.
Sackcloth
Durable fabric made from plant fibers for technical purposes
Characteristics
More details
Sewing machine rating
The best sewing machines from budget to computerized
Rating
More details
Overlock rating
The best overlockers for home and production according to customer reviews
Rating
More details
LiveInternetLiveInternet
KUSYA'S HOUSEBORN. Description: Svetlana Rumyantseva. 1.
Happiness to the home! Brownie Kuzya and his friend Kitty. Legend: Ch - air loop KA - amigurumi ring Pr - increase Decrease - decrease Sc - single crochet Sc2n - double crochet (1 sc, inc) * 6 = 18 sc - single crochet, increase, repeat 6 times. HEAD 1)6 sbn in KA 2) 6pr=12 sbn 3)(1 sbn, inc)*6=18 4)(2 sbn, inc)*6=24 5)(3 sbn, inc)*6=30 6 )(4 sbn, inc)*6=36 7)(5 sbn, inc)*6=42 8)(6 sbn, inc)*6=48 9)(7 sbn, inc)*6=54 10-17 )=54 sbn 18)(7 sbn, dec)*6=48 19)(6 sbn, dec)*6=42 20)(5 sbn, dec)*6=36 21)(4 sbn, dec)*6 =30 22)(3 sc, dec)*6=24 23)(2 sc, dec)*6=18 24)(1 sc, dec)*6=12 25)6 dec=6 Sew on the head last! BODY red color 1) 6 sbn in KA 2) 6 inc = 12 sbn 3) (1 sbn, inc)*6 = 18 4) = 18 sbn 5) (2 sbn, inc) * 6 = 24 6) for the back half loop =24 sbn 7)(3 sbn, inc)*6=30 8)=30 sbn 9)(4 sbn, inc)*6=36 10)(5 sbn, inc)*6=42 11)(6 sbn, pr)*6=48 12-15)=48 sbn 16) for the back half-loop=48 sbn 17)(6 sbn, dec)*6=42 18)(5 sbn, dec)*6=36 19)(4 sbn ,ub)*6=30 20)(3 sc,ub)*6=24 21)(2 sc,dec)*6=18 22)(1 sc,dec)*6=12 23)6 dec=6 Pull To the 6th row - sc with a white thread for the front half-loop (collar) To the 16th row - join the front half-loop, sc in a spiral with a red thread, knit the hem of the shirt to the desired length LEGS with the color of the bast shoes Knit 7 ch 1) from the second loop: 5 sc, 3 sc in last loop, turn, 4 sbn, inc = 14 sbn 2) inc, 4 sbn, 3 inc, 4 sbn, 2 inc = 20 sbn 3) inc, 5 sbn, inc, 1 sbn, inc, 1 sbn, inc, 5 sbn, inc, 1 sbn, inc 1 sbn = 26 4) 1 sbn, inc, 5 sbn, (1 sbn, inc, 1 sbn) * 3.4 sbn (1 sbn, inc, 1 sbn) * 2 = 32 5) for the back half-loop = 32 sbn 6,7,8) = 32 sbn then we make decreases in the middle of the front, the loops can not be counted. 9)…dec, 1 sc, dec…=30 10)…3 dec…=27 11)…4 dec…=23 12) behind the back half-loop, another color…5 dec…=18 13-18)=18 sc 19 )(1 sc, dec) * 6 = 12 20) 3 dec sew on Tie a ribbon for bast shoes 37 ch, tie around the leg. HANDS flesh color 1)6 sc in KA 2)6 cr=12 sc 3)(1 sc, cr)*6=18 4)=18 sc 5)3 dc2n with a common top in one loop (finger), 17 sc= 18 sbn 6) = 18 sbn 7) 2 dec on the sides = 16 8) = 16 9) 2 dec on the sides = 14 10) 4 sbn, go to the red thread, 10 sbn = 14 sbn 11) = 14 sbn 12) for back half-loop = 14 sc 13,14,15) = 14 sc 16) 2 dec on sides = 12 17-22) = 12 sc 23) 6 dec = 6 sc To the 12th row: behind the front half-loop in red we knit cuffs: 2 sc , inc = 18 sbn 2 more rows - 18 sbn in red and 1 row in white Return to the head SPOUT 1) 6 in KA 2) 6 ind = 12 sbn 3,4,5) = 12 sbn USHKO 1) 6 in KA 2) 6 inc = 12 sc 3 (1 sc, inc) * 4 = 12 sc - not a complete row Sew on the ears and nose, embroider the mouth, make hairs. CAT Legs, head, body - one piece. Legs 1)6 in KA 2)6 pr=12 sc 3,4)=12 sc 5)2 dec,8 sc=10 6,7)=10 sc Do not cut the thread on the second leg Connect the legs (BODY) 1)By to the second leg 4 sc, connect to the first leg with two chain loops, 10 sc, 2 chain stitches, 10 sc. 2) 2 inc (front in the middle), 10 sbn, 2 inc (back in the middle), 10 sbn. 3) 15 sbn, 2 inc (back), 11 sbn = 30 sbn 4-8) = 30 sbn 9) (3 sbn, dec) * 6 = 24 10) = 24 sbn 11 ( 2 sbn, dec) * 6 =18 12)(1 sbn, inc)*6=12 Head 13)(1 sbn, inc)*6=18 14)(2 sbn, inc)*6=24 15)(3 sbn, inc)*6= 30 16)(4 sbn, inc)*6=36 17-20)=36 sbn 21)(4 sbn, dec)*6=30 22)(3 sbn, dec)*6=24 23)(2 sbn, dec)*6=18 24)(1 sbn, dec)*6=12 25)6 dec=6 sbn, pull Handles 1)6 sbn in KA 2)6 pr=12 sbn 3)=12 sbn 4)=11 sbn 5)=10 sbn 6-12)=10 sbn 13) decreases Tail 1)6 sbn in KA 2)=6 sbn 3)6 inc=12 sbn 4-10)=12 sbn 11)=11 sbn 12)= 10 sb 13) decreases Spout 1) 6 sb in KA 2) 6 inc = 12 sb 3,4) = 12 sb Ears 1) 6 in KA 2) = 6 sb 3) 6 sb = 1 2 sb 4,5, 6) = 12 sc Knit a bag according to the size of the cat
How to sew a dress
A kikimora costume may consist of a dress and a mesh cape. To cut out the dress, you will need a child’s T-shirt, which is traced along the contour, and the side seams are drawn out from the armpits in the shape of a trapezoid with such a base that the baby can easily walk in it. They also outline the sleeves and cut out the details.
The dress can be with a detachable skirt - pleated or multi-tiered. To make it, you will need rectangular pieces of fabric, which are assembled with a basting stitch and sewn to the yoke.
For the top of the dress, it is best to use knitted fabric. It is easier to work with, it does not require special adjustment and fits perfectly to the figure. But for a skirt you can choose a more interesting fabric, for example, with sequins or embossed flowers. To make the skirt fluffy and keep its shape well, you will need a tulle petticoat. The strip is sewn along smaller sections and gathered at the top with an elastic band, and several tiers of frills are added along the bottom, which will provide the required volume. It should be remembered that the main skirt should be slightly wider so that it fits beautifully on the petticoat.
What to make hair from
The easiest way is to buy a wig, but in fact, those accessories that are on sale are not quite suitable for creating the look we need, since the strands in them are too silky and shiny. And if we are preparing a kikimora costume for a girl, then we should take into account that it will not be very comfortable for the child to dance under the Christmas tree in a wig, especially if his own hair is long and thick. An excellent solution in this situation is false strands with clips, which are quite possible to make yourself. For this purpose, you will need plumbing flax, the fiber structure of which is perfect for the role of kikimora hair. You can purchase it at any hardware store. This material can be painted with absolutely any paint or even brilliant green. Before painting, the strands should be separated and boiled separately for 2-3 minutes in a solution with paint. Next, the fibers are rinsed and dried.
Description of the camouflage suit
Camouflage and Leshego come in several types, depending on the area in which the hunt will take place.
- Forest
. Brown and green colors predominate in these clothes. Such attire will help to camouflage in the forest. - Desert
. Here the main colors are gray-green and beige. Thanks to this suit, you can ideally hide in a desert area. - Wormwood
. Gray and light green colors predominate here. You can’t do without such a suit in the steppe, on a rocky surface. - Snow
. The main colors in the attire are light gray and white. Such camouflage coats for hunting are capable of camouflaging a hunter in or on snowy terrain.
When creating camouflage, you need to take into account that the vision of many animals is not monochrome, so a camouflage coat made with your own hands should be multi-colored. In addition, you cannot wash the created clothing with bleach, as the animals will see a luminous spot, and naturally, the hunt will be unsuccessful.
Thus, it is advisable to create a camouflage suit that is as realistic as possible in color and pattern, which guarantees an excellent hunting experience. If you can’t make it yourself, you can buy ready-made clothes. Fortunately, domestic manufacturers have created several models with various realistic images. For example, you can see the drawings “Bittern”, “Polar Owl”, “Woodcock”.
If you need to learn how to make a camouflage coat with your own hands, you need to study a lot of literature to achieve an amazing result. Leshy and Kikimora costumes are becoming more popular, although they are quite bulky. But they work even better than spotted suits.
