How to make a computer for a car with your own hands
To make a computer for a car with our own hands, we decided to choose the simplest and least expensive method. Of course, you will have to spend a little time to do it, but the end result will pleasantly surprise you. There are simpler ways, we will talk about them at the end of the article.
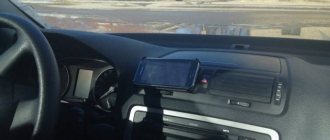
A computer in a car of this type will cost each owner $100, which is a significant amount now, but it will be worth it. We took a 7-diagonal touchscreen display as the main element. Let's talk about this instruction in more detail. Learn how to make a soldering iron with your own hands.
- Initially, you need to think about the location for its installation; it can be different for each car. Let’s take the simplest nine; you can install it in it without much effort. We will insert it instead of the usual central air ducts; we must bring them out to the side. This is very simple to do, close the damper and all the air will flow in the other direction. We hasten to assure you that in winter you won’t get any hungrier in your car.
- We took a regular Raspberry computer as a basis; its cost is not high, but at the same time it shows good performance. Of course, you won’t be able to play cool games; it’s easy not to use it to its full potential. The advantage of such a computer for a car is that it can be connected from a 5 Volt power supply using the simplest stabilizer.
- Next, we choose a touch display; we ordered it from China, because the cost is significantly lower. If you want to bet better, everything is in your hands.
- We connect the computer to the display, this is done very simply, we connect the necessary wires and turn on everything. We decided to install Windows XP as the operating system; it always works stably. All programs and components should be installed immediately, so that you don’t have to bother your computer later.
- We are preparing a place for the display, it all depends on you. We used the usual air duct frame as a seat.
- We connect the display using sealant. We recommend adding more USB connectors; sooner or later you will need them.
- This is what our PC looks like, as you can see, there are no difficulties. At this stage, you can show your imagination; you can also make lighting; to do this, read the article on how to make lighting in a closet.
- We made this kind of computer for the car with our own hands; let’s be honest, there are no difficulties. We spent several days on everything.
Related article: DSP on the floor: laying along logs, wooden gypsum board and video, do-it-yourself dry screed, thickness of warm floor
So we have figured out how to install a computer in a car, we are sure you will succeed, because everything is extremely simple. When installing it in a car, we recommend that you try to connect the radio at once, so you can play movies or music through the speakers.
DIY car monitor photo
Results for the query: DIY car monitor photo .
Tuning the interior of a Chevrolet Express your own
hands
. Part 4.
Price: $320 This is a monitor
for the lazy. It is exactly 2 din, with a touchscreen
Ceiling monitors
in car
installation.
Do-it-yourself
car computer Secrets of a motorist.
The principle of all-wheel drive on this car
is: able
The most expensive part is the monitor
.
Category, brand, model. Cars _
, Mazda, Mazda 3 (BK
Category, brand, model. Cars _
, Mazda, Mazda 3 (BK
Category, brand, model. Cars _
, Mazda, Mazda 3 (BK
For car
UAZ Patriot installed Pioneer head unit with
Tuning body kit for UAZ 69 with your own
hands
: prices for onboard UAZ.
...virtual tuning. how to trim the rear axle of a Muscovite. tuning cars
…
...the controller, not the baffles, but the acoustics of the central channel, not
The most expensive option flaunts elements of luxury - a retractable monitor
... and they can’t even figure out why they need to hide a full-fledged computer in
Installation of a motorized monitor
in
car
dashboard , connection
Monitor
for the car
. Send a request. Provider.
Built-in widescreen digital 7″ LCD monitor
1/2 DIN size
The
car
has an overhead
monitor
.
Re: from pre-restyle to restyle your own
hands
. Real experience.
About television in
cars
.
DIY
air
suspension for VAZ 2108: dag
auto
gallery, front
DIY
POWERFUL LED FLASHLIGHTS
.
... Noise insulation, video recording system, 15 inch monitor
, spaced
... in the “Classic VAZ 2101-07” section.
DIY
monitor frame ...
Do-it-yourself
car computer Secrets of a motorist.
Standard overhead monitor
in cars
.
... this reason: how the retractable monitor
? Hello everyone...
After this, we glue it to the steel frame of the monitor
double-sided
Once you are inside the car
, then you immediately understand that everything
AVIS "AVS0706BM". Control. 16:9 / 4:3. monitor
to the dashboard
...cut out of... recorder control panel and overhead monitor
.
Our Installation Comments: Budget Ceiling Monitor
with good
Do-it-yourself
computer in a
car .
Installation of monitors
. Stealth subwoofers. Creation of podiums for acoustics
Ceiling Monitor
Grand Starex.
Auto
pawnshop in Moscow
Homemade tablet mount in
the car
.
DIY LCD monitor repair
. In order to repair something
Do-it-yourself
car computer Secrets of a motorist.
And operation of a VAZ 2105 car
VAZ 2105 12 2
car
Monitor
Prology AVM-600 SCW Gray.
Retractable monitor
performs two functions - broadcasts an image from
With a second monitor
... We make
a bracket for two our own hands
Do-it-yourself
computer for a
car News, reviews, secrets, tips.
How
to install an interior mirror with
a monitor in
with your own
hands .
DIY monitor LED backlight
.
DO IT YOURSELF: Computer in
the car
(10 photos). Guides.
Watch the video - Collection: Monitor
for
a car
headrest
monitor
What was installed: Installation of an overhead monitor
Clarion. Our
Our installation comments: Ceiling monitor
certainly not cheap
Installing an interior mirror with a monitor
in an Auto
VAZ.
... how and what drawings and photos: trucks
gas model range...
Pair of monitors
, embedded in the dashboard in place of the central air ducts
The panel also has a native DSC button and an on and off button.
standard antique monitor
cayenne porsche dismantle. emergency
You might also be interested in:
DIY bumper covers photo (DIY bumper covers)
DIY wall decor photo (DIY wall decor)
DIY New Year's decorations garland photo (DIY New Year's decorations garland)
Do-it-yourself trunk lining photo (Do-it-yourself trunk lining)
Do-it-yourself trunk lining photo (Do-it-yourself trunk lining)
DIY cat collar photo (DIY cat collar)
Other options
Our readers often say that this method is not considered effective, and believe that it is better to connect the tablet display to the car. Of course, it's cheaper and easier, but what functionality does the tablet have? We thought for a long time and realized that a tablet is a meaningless object if you try to attach it. It’s better to use them separately, at least you won’t ruin the car.
This method of installing a PC in a car will be appreciated only by true connoisseurs, there is no other way. Plus, the computer makes it possible to connect other functions that you can think of. The main thing is to have desire and a fresh head, then everything will be fine.
These options for installing a tablet in a car can be called completely unusual, but there are many craftsmen, nothing can be done about it :)
Interesting article on the topic: How to make a charger for a car with your own hands.
The computer is powered from the vehicle's on-board network.
Reward accrued
This material was written by a site visitor and was compensated for.
The computer is powered from the car’s on-board network (9V – 16V).
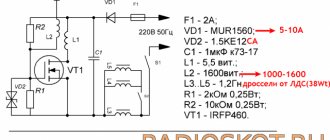
Here is a technique for converting a standard ATX computer power supply to power it from +9V to +16V (on-board power supply of the car). You can use any, even low-quality ATX power supply (no matter, all critical elements will be replaced or thrown away) with a power of 250W and higher.
The maximum load is 150-200W (depending on the type of transistors used and the power of the power supply being converted).
C1-C3 – for a voltage of at least 16V. Q1 and Q3 are powerful p-mosfet transistors. For a voltage of at least 35V. Maximum current – not less than 30A (IRF4905, IRF5210). Be sure to place it on the radiator through an insulating gasket (for example, mica). Q2 and Q4 - any npn (transistors (kt315, kt3102). R1 and R3 - 0.125 W R2 and R4 - at least 0.5 W. D1 and D2 - any, for a current of at least 2A Filter choke - 7-10 volts folded in two wires with a diameter of 0.7 mm on a ring with a diameter of 15 mm.
Connection: point +12 – to the vehicle’s on-board network (9V -16V), through a 20-25A fuse. High-voltage transistors and a capacitor are pre-soldered from the power supply unit and points A
and
B
(see Fig. section of the power supply circuit).
The circuit pins are connected to the corresponding points in the figure of the power supply circuit section. The output from D1 is connected to the 12th pin ms. TL494 (power supply for ms. PWM controller). Output from D2 – to the input of the linear stabilizer +5vs (first output of ms. 7805) (stable standby power supply).
Sometimes it is necessary to replace the power diode assemblies in the power supply with higher voltage ones. The diode at +5 must withstand at least 35V, and at +12 at least 75V reverse voltage.
There are often power supplies that do not have a crank (7805) on the 5vs bus, then D2 can be eliminated, but it is necessary to additionally install a crank (7805) on the radiator, its input is at the +12 input, the output is at +5vs from the power supply.
The scheme does not need to be configured. Attention! The modified power supply has high voltage on the power transformer!
Basic rules for working with impulse generators: 1. It is better not to turn it on without a load (it may burn out). 2. keep all wires as short as possible. 3. at the first (test) start - supply power through a fuse somewhere 3-4A, as a load, 12V each, you can hang 2 parallel resistors of 100 Ohm each of 2W or more on the case. And to start the power supply, short the green one to the body (black).
The entire ATX power supply circuit:
(click on the picture to enlarge) ATX power supply circuit
Photos of one power supply unit (some name) with connection points:
(click on the picture to enlarge) Power supply board.
Fig1 and (click on the picture to enlarge)
PSU board.
Fig2 Note: the circuit has not been used in real conditions.
Discussion, suggestions, criticism.
PS. In the first version of the circuit, a slight blockage of the fronts was observed, and as a result, the efficiency was not the greatest. Here is a full-wave circuit for controlling power transistors.
D1 and D2 are Schottky diodes.