Bouquets of sweets have long enjoyed well-deserved popularity - a universal gift - beautiful, practical, tasty. Ordering such a composition from specialists is not a cheap pleasure, but it is quite possible to try to make a bouquet of lollipops with your own hands. Why exactly these candies? This option is even suitable for children’s creativity, because the design of the lollipop gives us at once a stem, a base, and a center for the flower. To make a gift, you can use any available means - acrylic paints, corrugated paper, fabric, ribbons, lace. If the candy wrapper is not very impressive, you can tint it golden or another color that matches the tone. Or slightly tint the petals too. The main thing is to start, and inspiration and ideas will definitely come.
Bouquet of lollipops and colored paper/crepe
Creating a full-fledged composition will require quite a lot of sweets (15-20 pieces). They will play the role of the cores of the flowers, and the petals can be easily made from soft colored paper; you can use corrugated paper for flowers or plain kitchen napkins without patterns. In addition, when making a bouquet you will need:
- scotch;
- ruler;
- compass;
- pencil;
- thick colored paper (you can take student paper);
- glue/glue gun;
- scissors;
- plain cocktail tubes.
Sequins, dried berries on branches, and bright feathers are suitable as additional decoration.
The master class begins with preparing the workplace: the process involves the use of glue, so all things unnecessary for creating a bouquet should be removed and the table covered with newspaper or polyethylene. Next you need to follow the step-by-step instructions:
- Cut rectangles (5x10 cm) from thick colored paper; there should be as many of them as candy canes.
- Cut one side of the workpiece into a fringe up to 3 cm long and about 3-4 mm wide.
- Wrap the resulting ribbons around the lollipops at the base and secure with a drop of glue or a strip of colorless tape. In this way, the future “flowers” have stamens.
- Next you will need soft colored paper (crepe) in bright colors. From it you need to cut many circles with a diameter of 10, 11, 12 and 13 cm. And in their centers make small holes suitable for a lollipop stick to pass through.
- Different sizes of blanks are needed to create a feeling of splendor of the flower. Therefore, on lollipops with “stamens” you need to string circles of different diameters, starting with the smallest, each of them should be secured to a stick with a piece of tape. It is recommended to slightly twist the paper at the base of the candy to create the appearance of a voluminous bud.
- Place cocktail straws on lollipops.
- Mark with a pencil to what extent they cover the sticks.
- Cover the blanks with glue up to the mark, then return the tubes. Thanks to this technique, elongated stems will be obtained. They can be dyed one color if desired, or wrapped with wool threads, creating a beautiful textured surface.
- Additionally, secure the “flower” to the stem-tube with tape so that it does not bend or fall out.
- To complete the bouquet, you can apply glitter, add dried branches, berries, etc. and assemble it into one composition, which should be tied with a colored ribbon or decorated with thick wrapping paper.
Bouquet of lollipops: an original replacement for traditional flowers
A bouquet of flowers is a classic gift for absolutely any occasion. Year after year, people traditionally exchange short-lived inflorescences, turning this type of gift into a banal cliché. If you are lucky and your significant other is a fan of creativity, surprise her by presenting a bouquet of lollipops made by yourself.
Materials
To make a craft using the sweet design technique, you will need various fabrics, lace and a variety of paper for decoration. As a rule, such compositions are decorated with beads, artificial inflorescences and ribbons.
For decoration you will also need a florist network. With its help, all the candies are formed into a single composition, fixing the grid with tapes, tape or a stapler. The product is wrapped over the mesh with wrapping paper, which can be purchased at craft stores.
Each candy must be wrapped in crepe or corrugated paper, a piece of thick fabric, or a candy wrapper that imitates a flower stem. If it is not possible to use the materials listed above, use ordinary colored cardboard.
Flower extravaganza
You can decorate the craft with whatever your heart desires. Artificial inflorescences and decorative branches will be a wonderful addition to such a sweet gift.
You will need:
- corrugated paper;
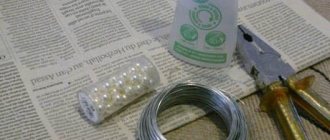
- a coil of thick wire;
- scissors;
- green fabric;
- wrapping film;
- ribbon;
- glue.
For each candy you need to make a paper flower. Use corrugated or crepe paper: this material easily stretches and takes on different shapes; it can be used to make the buds more realistic.
Cut out 5 petals for each flower and glue them to the base of the candy so that they wrap around the candy ball. Crush the petals with your fingers, slightly pulling their outer edges, and then lightly curl them by twirling them around a toothpick. The wire should be inserted directly into the candy stick, and the “stem” should be wrapped with green cloth on top.
Once all the details are ready, you need to assemble the entire composition, securing it with wrapping film or floral mesh. Tie the item with a wide satin ribbon and decorate it with a lush bow.
For a wedding
Creative brides don’t have to worry that the traditional floral accessory looks too faded against the background of their original designer dresses, since you can even make a bouquet of the famous caramels for a wedding!
You will need:
- white corrugated paper;
- wire;
- scotch;
- white satin ribbon;
- bow.
The sheets should be cut into small rectangles and wrapped around each candy. You need to place the base of the candy on the wire and additionally secure it with tape. The composition is wrapped in paper and tied with a wide satin ribbon.
A luxurious bow will add a festive touch to the product; it can be additionally decorated with beads or sparkles. And the greatest advantage of such an accessory is that the “flowers” will not wither in the heat, and the newlyweds will be able to admire their wedding gift for a long time.
Sweet plantation
A large flower pot strewn with colorful candies will come in handy in a home where people with a sweet tooth live. How nice it will be to wake up in the morning and water the flowers, allowing yourself one delicious lollipop as a reward. And you can collect a sweet harvest from your own windowsill every day!
You will need:
- floral sponge;
- pot;
- decorative decorations.
Place a floral sponge of the required size at the bottom of the pot. If you only have a small copy of it, fill all the empty space with decorative stones.
You need to stick the lollipops one by one into the sponge, after tying each one with a thin ribbon. You can decorate the product with special decorations such as ladybugs, dragonflies, small bees or birds.
Pot for little sweet tooths
An appetizing pot filled with various sweets is perfect as a birthday gift for a child. This bouquet of sweets is placed in a low vase filled with chocolate dragees and lollipops.
You will need:
- M&M's jelly beans;
- wire;
- various lollipops;
- colored cardboard and paper;
- glue;
- candies.
Cut out several pairs of bright butterflies from colored cardboard. Wrap a piece of wire with colored paper - this is your future stem. Apply glue to the butterflies and glue them together on the inside out so that the wire stem is in the middle of the figures.
In a low container you need to pour the required amount of M&M's dragees mixed with chocolate candies and chocolate-covered peanuts. The resulting “flowers” must be placed in a vase along with various lollipops. The pot can be tied with a wide ribbon and additionally decorated with multi-colored stickers.
A bright and sweet bouquet of famous caramels on a stick will be an excellent analogue to traditional holiday flower arrangements. Your other half will definitely note the originality and creative approach and will enjoy the delicious gift for a long time.
pro-prazdniki.com
Flower pot made from lollipops
This option is even simpler and faster to implement.
For it you will need:
- a pot or a bright round cardboard box;
- lollipops;
- soft colored paper (it’s beautiful when it matches the color of the details on the pot/box);
- scissors;
- glue/glue gun;
- foam ball (its diameter should be slightly smaller than that of the selected pot/box);
- narrow ribbon for decoration;
- ruler;
- decor for the pot/box as desired.
The creation of this gift composition occurs in the following order:
- Cut out squares from colored paper (the length of one side is 10 cm), there should be as many of them as lollipops.
- Make a small hole in the center of each for a lollipop stick.
- Thread the lollipops through them, fold the two corners of the squares with their vertices, you get almost a triangle.
- Then bend the corners of the base of the newly formed figure clockwise around the candy so that they meet and partially lie on top of each other. Repeat with the rest of the preparations.
- Secure the resulting buds with a thin strip of tape, which is hidden under a decorative tape.
- Place the foam ball in a pot/box. If it moves there, then fix it by filling the empty corners with cotton wool or other filler.
- Place the “flowers” by lowering them into the foam half the length of the stick. It is better to start from the top of the hemisphere and move further in a checkerboard pattern.
- Release some of the ribbons out and curl them with scissors.
- If desired, decorate the pot/box with stickers, glitter, and decoupage.
Original crafts from lollipops for girls
It's all in the hat
But girls will appreciate this souvenir. Just take a piece of candy with a face on it and put a hair tie on it. It turns out to be a cartoon character in a hat. In fact, these are two gifts in one: a delicious candy and a hair decoration.
You can make your own elastic band from ribbons using the kanzashi technique.
Pleated dress
To make such a dress, you need to take a sheet of white paper and fold it like an accordion. The width of the strip should not exceed 1 cm. Then a 4 cm long cut is made from the top in the center, and the two parts are bent to the sides.
Glue the candy onto the stick in the middle and decorate the dress with paper flowers. It is better to use a candy that already has a face drawn on it.
Doll
To make a doll dress, take a three-layer paper napkin with a beautiful pattern.
Place the candy in the center of the napkin and fold it into a triangle.
Form arms and skirt.
There is another way to make a fluffy dress for the doll.
When your daughter has had enough of playing with such an unusual toy, she will then be able to simply eat it.
Candy flower
Cut out 4 flowers from a yellow cleaning napkin and make a hole in the center.
String the blanks onto a stick and secure them with a piece of fabric.
It turns out to be a flower with a candy-like center.
Lollipop flower
Bride
The lollipop dress can be made in another way. Take white cardboard and draw several circles of different diameters on it.
Cut out circles and fold them several times to create waves.
Place the blanks on the stick in this way: small circles on top, largest circles on the bottom.
It turns out a bride in a fluffy white dress.
Topiary bouquet of lollipops
The composition in the form of a mini-tree with candy flowers is more complicated than the previous ones, not so much in its execution as in the materials that will need to be collected:
- a small opaque flowerpot or a thick cardboard cup;
- plaster for home use;
- lollipops;
- 2 wooden sushi chopsticks;
- wide plain satin ribbons;
- colored paper;
- floral sponge about 10-15 cm long (can be purchased at most flower shops);
- scissors;
- wire cutters;
- glue gun;
- decor for a glass/pots as desired.
Once the necessary items have been collected, you can begin to work:
- Using scissors, cut out a sphere from a floral sponge (also called foam or oasis).
- Cut the lollipop sticks to half their length using pliers.
- Dilute the plaster according to the instructions.
- Insert the sushi sticks into the middle of the pot/cup without separating them and fill the empty space with plaster, but so that there is 1-1.5 cm left to the rim.
- After it hardens, cut out a circle from colored paper with a radius similar to the selected container, and make a hole in the center for the sticks. Place a paper circle through it to cover the cast.
- Wrap the barrel with satin ribbons and secure with hot glue.
- Insert lollipops into the sponge. Thanks to the properties of floral foam, additional fastening of the candy canes with glue is not required, but it will not be difficult to stick them out.
- On one side of the oasis you need to leave a space unoccupied by candies, necessary for placement on the “trunk”.
- Once the top of the topiary is in place, you can tie a bow of satin ribbons underneath it. This will hide possible problems with fastening and make the bouquet decorative.
- The flowerpot/cup can be additionally decorated or covered with paper in the color of the trunk, lollipop or bow.
Knowing how to make a bouquet of lollipops with your own hands, having studied step-by-step instructions for beginners and photo materials, it’s easy to create an interesting and tasty gift for family and friends. It will be especially appropriate when an informal gift is required or you need to show sincere attention to a person.
Author: Vladimir
Bouquet of Chupa candies - DIY chups
Master class with step-by-step photos. Making a bouquet of sweets. Gift for a sweet tooth
Topic: “Gift for a sweet tooth.”
Sweet - design. Author: additional education teacher Novichkova Tamara Aleksandrovna MBOU DOD Lesnovsky House of Children's Creativity. Description of work. The master class is designed for children of preschool and primary school age, teachers, creative parents and those who like to make gifts with their own hands. Flowers are made from office paper and Chupa candies - Chups. The process of making flowers is not complicated, but you just need to be patient and do the work carefully, because this will be our hand-made gift for a loved one. Making a sweet bouquet will give everyone great pleasure and delight with its originality.
Purpose. You can give a sweet bouquet as a gift for a holiday, a birthday, or simply as a token of gratitude. Goal: learning how to consistently make flowers, using candies, and creating unusual flower arrangements. Objectives: - learn to make flowers using the sweet design technique; — improve the ability to work with paper; - develop creative abilities, aesthetic taste; - cultivate interest in work, the ability to bring the work started to its logical conclusion, a sense of composition; - cultivate a desire to do something nice for family and friends. Sweet design is the creation of beautiful sweet bouquets using sweets and creating flowers from paper, fabric, and ribbons. Floral arrangements are decorated with decorative ribbons, beads, and floral mesh. Currently, such a direction as suite design is very popular. After all, receiving a bouquet of sweets is always nice, especially if it is beautifully decorated. Children also love sweets, and on holidays you can give your child gifts in the form of candy bouquets, a cake with a surprise made of sweets. The kids will be happy with such a gift and will remember it for a long time. A sweet bouquet will decorate a children's birthday table.
Materials and tools for making flowers:
- office paper of different colors; - corrugated green paper; - glue stick, Titan glue; - pencil, scissors, ruler; - Chupa Chups candy.
For decoration we will need:
- basket; - corrugated red and green paper; - red ribbon; - thick cardboard, foam plastic; - wooden skewer, pencil, scissors.
Step-by-step execution of a bouquet using the sweet design technique.
Let's start by decorating the basket. Take green corrugated paper, cut it into strips 20cm long and 5cm wide. Fold each strip in half and randomly cut out leaves.
Glue the prepared foam plastic to the bottom of the basket. Now we will insert the leaves along the edge of the basket, gluing them with glue.
Cut the green corrugated paper into narrow strips and glue it onto the foam. You can glue a green circle. You can decorate the basket to your taste, using any available material.
Let's move on to making sweet flowers. Let's take a sheet of office paper. We measure 21cm on the long side of the sheet, draw a line and cut it off. The result is a square.
Fold the square in half, in half again and cut along the fold line. We ended up with four small squares that we will turn into flowers. We take a square, fold it in half, in half again, and now we make a triangle.
Draw a cut line on the triangle to create flower petals.
Cut it out. At the end of the triangle you need to cut off the paper a little to make a hole for the chups. We lay out our workpiece. The result was an eight-petalled flower.
Cut out one petal.
Using scissors, curl the petals.
Lubricate one petal with glue and connect it to the other petal. Forming a flower.
We use the same principle to make the rest of the flowers for our bouquet. We make them multi-colored to make the bouquet bright and elegant. The flowers are ready. They really look bright.
Take the chups, insert it into the hole and glue it to the flower. This is such a cute, big-eyed flower.
Let's make the rest of the flowers. There are already three of them. And here is the whole bouquet!
Let's start making sepals. Cut green corrugated paper into squares with a side of 5cm.
Fold the square in half, in half again, make a triangle, round it and cut out the teeth. Let's make a hole by cutting off the tip of the triangle. We lay out our workpiece. It turns out like this.
Let's make them according to the number of colors. We will have nine of them.
Glue the sepals to the flowers.
Cut a narrow green strip from the corrugated paper and wrap it around a chups stick.
To make the flower stem longer, you can insert a wooden skewer into the tube and also wrap it with green paper.
The flowers are ready.
We decorate the basket with flowers. Along the edge we insert short-stemmed flowers into the foam.
We place flowers with a long stem in the center. Here's what's happened so far.
To complete the bouquet and its significance, we will make a red heart. After all, we give a gift to someone dear to us and with great love. To do this we will need red corrugated paper, red ribbon, thick cardboard, scissors, a pencil and a heart template.
We trace the heart template, cut it out and wrap it in red corrugated paper.
Take a wooden skewer and glue it to the heart.
We tie a bow.
We insert our “loving heart” into a basket of flowers. You can go congratulate.
Here is another version of a sweet bouquet.
Materials required for its manufacture:
— remains of office paper (strips); - ruler, pencil, scissors, glue stick; - mini chups;
Take a strip of colored paper, measure up 8cm and again 8cm. We draw a line. The strip makes two squares.
Cut squares according to the number of candies.
Using a process already known to us, we make a flower blank from a square.
We cut out not one, but two petals from the flower.
Glue the outer petals together and curl the edges. We got a small five-pointed flower. It is very similar to a lily flower.
Insert a small chups.
Cut out the sepals and glue them.
Let's make flowers on a long stem so that we can put them in a vase. Insert a wooden skewer.
We cut out the leaves as you wish. Let the children show their creativity. We begin to wrap the stem with a narrow green strip and attach the leaves. This is such a sweet lily we got.
Let's make the rest of the flowers. In my opinion, they are very cute and cute.
We put the bouquet in a vase and admire it. Another gift for your sweet tooth is ready.
A bouquet is a sight for sore eyes, a bouquet is admiration, a bouquet is pleasure and replenishment. A bouquet of sweets is a man-made miracle, original, elegant, cool! Anna Creative.
Thank you for your attention.
We recommend watching:
DIY gift for your beloved mother. Master class with step-by-step photos Beautiful DIY fruit decorations DIY candy cake. Master class Bouquet of daisies made from sweets with your own hands. Sweet - design.
Similar articles:
Candy cake. Suite design master class with step-by-step photos
DIY candy bouquet. Master Class
