Hello, friends and readers of the boxing blog. If you want to practice boxing at home, you must know how to hang a boxing bag correctly. Follow the criteria below to ensure an excellent and safe training environment.
You can practice strikes and combinations at home, in the country or in the yard. To do this, purchase or create a special bag yourself. But it also needs to be hung correctly. In this matter, the key aspects are the choice of location, the strength of the coverings (ceiling or walls) and the fastenings used.
Types of fasteners
The reliability of the bag placement and safety depend on the selection of fasteners. Follow the main rule: the more massive the projectile, the stronger the fastener. Also, the principles of operation differ for concrete and wooden surfaces. Take into account the additional loads generated during the exercises.
The options for fasteners for projectiles are as follows:
First: An anchor bolt equipped with a hook. Suitable for products weighing a maximum of 40 kg. The foundations for it are reinforced concrete
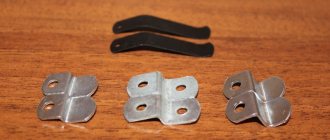
The second is special ceiling fasteners. Designed for bags weighing over 40 kg. Externally, the fastener consists of plates with holes in all corners and a ring in the center.
Third: swing hooks. Necessary for mounting projectiles on a wooden surface with strong beams. We use products with a minimum thickness of 8 mm. They guarantee the reliability of the design.
Conclusion
It is impossible to master striking technique without having the appropriate equipment, so do not delay purchasing and attaching a punching bag and practice at home or in the garage for your own pleasure. You just need to choose the mounting option that is best suited for your premises, then purchase everything you need and carry out the work in accordance with the recommendations outlined above.
The video in this article will help you understand some of the nuances of attaching punching bags even better, and if you have questions on this topic, write them in the comments under this review.
Work with anchor products
Here you should first organize the following arsenal:
- Automatically latching carabiner.
- A piece of chain. Its length is determined by the height of the ceiling and the positions of the components. The chain links should fit onto the hook so that you can easily adjust the height of the bag.
- The bolt itself. Its diameter is 1.2 cm, and the length of the functional zone is 8-10 cm.
- A hammer drill equipped with a drill bit with a diameter of 1.2 cm.
How to hang a boxing bag in an apartment from the ceiling using such fasteners? The following algorithm is performed:
- Determining the location for the projectile, taking into account the area of the room and the situation. One way or another, an empty space of 2 m should form around it on all sides.
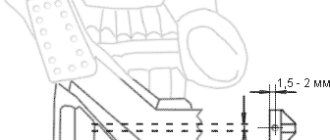
- Drilling. Keep the hammer drill strictly vertical, otherwise the anchor will be crooked. To correctly determine the depth, a piece of electrical tape is glued to the drill as a guide. When drilling, it is very important to get into the concrete, more precisely into the lintel, and not into the void. Otherwise the anchor will not lock.
- Anchor installation. It fits into the hole as far as it will go. The spacer part is tightened. If there is a nut in it, then this is done with a wrench. If it is not there, turn the anchor until it is firmly fixed in the concrete. Any backlash is not acceptable here. They only weaken the fasteners. Schematically, a competent work technology looks like this:
- Place the bag at the required height.
What to stuff a pear with?
Sand is often used for internal filling.
or
sawdust
. With sawdust inside, the product is softer and lighter in weight. With sand it is heavy and hard.
To make the device heavier, small stones, such as pebbles
.
The best filler for a home-made projectile is rubber crumbs
, but some people think it's
rice.
Installation on special fasteners
This method is chosen for hanging heavy equipment and more intense training. Here the components are fixed at four points. This creates a more durable and reliable structure. The anchor bolts used have a diameter of 1-1.2 cm and a length of 8-10 cm.
How to properly hang a punching bag from the ceiling using this method is reflected in the following instructions:
- Determining the optimal position for fastening.
- Designation of fastening points. The bracket is leaned against the ceiling, marks are made with a pencil on the areas where the holes are located.
- Drilling. The hammer drill is also held vertically. The process proceeds carefully and strictly according to the mark. The slightest shift will seriously complicate the installation of anchors.
- Fastener location. The bracket is applied to the surface. Anchors are placed in it one by one and tightened. Do not allow the plate to become skewed. To do this, first tighten the two anchors diagonally, and then the remaining fasteners. The structure is fixed as firmly as possible.
- Placement of the pear. The result is the following picture:
If a person purchases a very massive and voluminous projectile, weighing within 100 kg, then a dilemma arises - how to hang such a boxing bag at home?
How it's done
What are the advantages of a homemade apparatus and how to properly stuff a punching bag?
Firstly, the main advantage is its extremely low cost compared to a ready-made product purchased at a sports store.
Secondly, it is possible to create the required degree of rigidity and density of the product (it all depends on the filler). Often such bags are excellently used as a replacement for makiwara for stuffing the hands.
Thirdly, the ability to select the required dimensions (height and width).
Therefore, this begs the question of how to stuff a punching bag at home. When choosing a filler and getting right to work, you should remember that this simulator will be used for a long time and, as a result, will be subject to excessive loads. There are quite a lot of options for fillers.
Classic padding options for punching bags and punching bags.
- Rubber crumbs, shavings. It differs in that it gives the projectile greater mass and rigidity. There is also a risk that over time the rubber shavings will bunch downwards. Such bags are recommended for use by professional athletes with well-developed striking technique.
- If you want to save money, the best bag filler is sand. It is considered the most inexpensive material. When using sand, it is extremely important that the bag is sewn well. Over time, the sand compacts and the projectile becomes stiffer.
- Rags. First of all, these are scraps of natural and synthetic fabric. It is better to have two of these types of fabric present at once. Synthetics make the product heavier, while fabric made from natural ingredients retains volume and shape.
- Expanded clay balls are much more effective than sand, but they still differ significantly in their structure. They noticeably make the pear heavier.
- Among the many types of filling for a punching bag, you should not neglect tyrasa and sawdust. It is only important that the material is completely dry and thoroughly sealed from possible moisture. A pear filled with sawdust produces the least noise and is quite light in weight. Due to its weight, the projectile can be perfect for training for children and teenagers.
- Composite, prefabricated material. Perhaps the best solution would be to mix different materials together. For example, sand with sawdust and rags.
Many athletes positively assessed the rag for its ability to hold volume. As you know, those bags in which all the filling has bunched up at the bottom simply tear over time.
Working with swing hooks
This method is usually used for hanging a projectile in the country. Because such buildings are usually wooden and have a beam system on the ceiling. The work algorithm is as follows:
- Calculating the position for the bag. It is extremely important that the fasteners fit into the beams. If they are open, then difficulties are excluded; if they are isolated, it is necessary to identify a suitable place for drilling. After all, in case of a mistake, the work is carried out again. Example with open options:
- Drilling. The process uses a drill, which is 2-3 mm smaller in diameter than the hook. The work proceeds neatly, the drill is held exactly vertical.
- Screwing in the hook. The element must be included in the tree for the required level. If the material is strong and free of defects, the result is a very reliable fastener.
- Hanging the bag.
If the ceiling in your country house is not very durable, make the following mount:
Designations:
1 – three nuts: 2 – on top, 1 – on bottom.
2 – plate for bolts,
3 – M12 stud, treated with zinc; it guarantees the reliability of the structure; its length is affected by the thickness of the ceiling,
4 – wide washer to ensure the eye stops,
5 – ring with M12 thread for screwing in a bolt
6 - carabiner
Stages of work:
- Determining the location for the projectile. First it is selected indoors, then in the attic. An assistant from the room taps the desired area with a stick, and you, being in the attic, focus on the sound.
- Detection of the closest beam to the selected sector. Insulation is being pulled back in the attic. The drilling area is selected. An extension cord is pulled into the attic to turn on the drill.
- Drilling. The work uses a drill with a length of at least 25-30 cm. Act carefully so as not to break it. Every 1-2 minutes, clean it of debris and cool it.
- Place the pin in the created hole. It should come out from the ceiling by 4-5 cm.
- Screwing the bottom eye. First, a wide washer is arranged, then the ring is strung. A nut is screwed onto it to strengthen it.
- The plate is located on top.
- Screwing and powerfully tightening the nut onto the stud.
- Screwing the second nut (control) onto the first.
- Hanging the projectile.
Details for clarification
Before filling the boxing bag, rings and carabiners for hanging are selected in advance under the lining. You can also cut a circle out of plywood; its thickness should be no more than 12 mm. The diameter of the circle must accurately fit the base of the projectile. Next, a hole is drilled in the center and a rope is secured in it.
After reading the topic on how to fill a punching bag yourself, there are unlikely to be any difficulties. It is much more important to choose the right filler and find reliable, undamaged skin.
In fact, the types of stuffing for punching bags are not limited to the above options. The materials used are old mattresses, thermal insulation, foam rubber, cereals (rice, buckwheat), leather scraps, and small stones for greater rigidity. You can also wrap the bag with a layer of tape. This will add additional elasticity and prevent the sand from sticking to the bottom.
If you have a great desire, you can make a full-length bag. This is especially true for those who like to practice low kicks. However, in this case, pay attention to the fastening. It must be reliable because... the weight of the projectile will be decent. For hanging from the ceiling, it is better to use a chain. It guarantees durability and does not allow the pear to rotate around its axis, as is often the case with a regular rope.
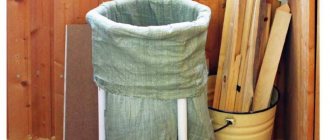
As practice shows, homemade pears made even from an ordinary construction bag can last a very long time. An important condition is to avoid moisture, make several layers of sheathing and avoid direct kicks.
I recently came across this problem: my punching bag, which I use to actively combat stress, as well as to develop a knockout blow, and as a type of aerobic training, suddenly became completely unusable over time and “decided to live a long time”!
I keep my punching bag on the balcony. There I have a special ceiling suspension, with the help of which I securely fasten it and “beat” it. Moreover, I practice this in warm and cold weather, and even in winter. Apparently in winter the pear freezes slightly, and then these powerful blows... In general, it began to crumble a lot.
Placement on the horizontal bar
Often, due to a lack of space and space, the bag is hung not from the ceiling, but from a horizontal bar. This also has its own nuances and methods of action. Much depends on the location of the horizontal bar and the parameters and mass of the projectile. If it weighs less than 40kg, you can hang it on a nylon eyelet strap with two steel rings.
Fixation occurs very quickly. And at any time the bag can be removed without any problems. This method is especially good outdoors. The apparatus can be easily placed on a horizontal bar or crossbar, and taken with you after class. The only inconvenience is the constant carrying of the sports product. But having a car or a special cart solves this problem.
An alternative solution for attaching to a horizontal bar is a carabiner, but it is optimal for children’s equipment weighing up to 20 kg. Often used to organize children's activities in the yard. Naturally, adults help. But carrying and mounting the projectile does not cause any difficulties. It is important to choose the right parameters for the carbine.
The role of plating
When wondering what is the best way to fill a punching bag, it is worth knowing about other equally important aspects.
There are several types of cladding. If your choice is a simple fabric whose structure is porous, the best solution would be to create several layers (at least three). Quite often, two-layer sheathing stretches over time and all the contents come out. Fabric covering can injure your hand. If you do not use bandages with gloves, it is very easy to tear off the top layer of skin, especially with side impacts.
Wall variations
When there are no conditions in the apartment for placing the bag on the ceiling, it can be placed on the wall. The accommodation options are as follows:
- Special metal structure with holes for four anchors. It is a combination of triangles located perpendicular to each other and a crossbar with a hole for an anchor on which the bag is suspended.
- Wall horizontal bar. In this case, the wall must be created from monolithic concrete or brick. Only under this condition will it withstand the weight of both the horizontal bar and the bag.
- Swedish wall. A T-shaped variation is suitable for securing the projectile. True, it is quite difficult to arrange it in standard apartments. But sophisticated craftsmen succeed. Unfortunately, in such conditions the bag is located against the wall, and the student is limited in movements and practicing techniques.
The third point has more subtleties. And you can hang the projectile on the wall bars according to the principle of working with a horizontal bar. In fact, it is present in this design. Or you can use such a wall to regulate the position of the projectile. To do this, an anchor with a hook must be installed in the ceiling. A special device is attached to it - a hoist. It allows you to lift heavy projectiles. The chains pass through the wall or its horizontal bar. The wall here is an auxiliary element for placing the structure. Details are presented in this video:
Making a punching bag
At the first stage, you need to prepare raw materials and supplies. For a piece of log, you can use any wood, but preferably one that is not sharp. Birch is perfect for our conditions.
After sawing off a piece of log, we spread old rugs on a flat surface, face up. We try to place them one above the other.
We begin to roll the rugs into a “cigar”.
We immediately insert our wooden part from one end.
It needs to be recessed a little inside the future training bag. We nail both rugs to the forming plug.
Trying to avoid voids and pockets, as tightly as possible, we roll the mats and the embedded part into a single cylinder. After each turn, we attach the mats to a nail.
Additionally, we fix the wrapping of rugs to the side of our wooden cork using several nails. We hammer in at least 6 nails, evenly distributing them along the circumference of the bag. Remove excess threads. We received a cylindrical container sealed at one end. Now you can stuff it with old clothes.
We stuff clothes into the bag. We use a tamper (baseball bat, shovel handle) to fill the bag tightly.
Stuffing must be done carefully and gradually. If you use too much force, the impact of the rammer may cause the wooden plug to fly out.
We sew up the open end of the bag with a cable (we make holes in the rugs with an awl and pull the cable through). We tighten the end into knots.
Wrap the bag with packing tape. We wrap the ends of the bag with pieces of tape, and wrap the main surface with an overlap. We cut access to the wooden plug.
We screw 3 hook screws into the wooden plug using glue at an angle of 120 degrees, at a distance of 2-3 cm from the edge of the plug.
We finish wrapping the punching bag with strong black tape 50 mm wide.
We cover the ends with pieces of tape, and cover the main generatrix by rotating the bag (in a horizontal position) and laying the tape overlapping. We cut holes to access the hooks.
We divide the chain into three parts of 60 cm each. Using carabiners, we attach the ends of the chains to the hooks.
We connect the upper parts of the chains to a common carbine. A large carabiner fastener is attached to it, with the help of which our boxing bag is suspended on any crossbar or hook.
A homemade punching bag is ready to take a beating.
Preparation
The best version for the shell is thick genuine leather. If you sew a bag from PVC, leatherette, tarpaulin or dermantin, fold the material in half or even three times. This is not very convenient, although the density of the option is close to the skin. In this example, it is she who appears.
Work is impossible without the following components:
- Durable nylon thread.
- Steel wire.
- Chains.
- Sawdust and sand.
- A thick garbage bag.
- Reinforced tape.
Also, you cannot make the intended bag with your own hands without three tools:
- Sewing hook or large needle.
- Pliers.
- Scissors.
Eventually
Let us now summarize the benefits you will get by installing a wall mounted punching bag at home.
- You can keep yourself in great shape at any convenient time.
- Relieve stress and throw out negative emotions on a wall projectile.
- A beautiful decorative element for your abode.
- Deliver a knockout blow.
- Doesn't take up much space.
- Low price, high quality.
- Practice a variety of strikes and practice defense.
- Friends who come to visit will understand that you lead a healthy lifestyle.
- Feel confident in any conflict situation.
As you can see, there are a huge number of advantages from this simple and at the same time useful projectile. Friends, train, strengthen your body, I wish you success and victories in everything.