Scope of application
- Monitoring the population of wild and rare animals;
- As a means for hunting and fighting poachers;
- A means of protecting private territory, a country house.
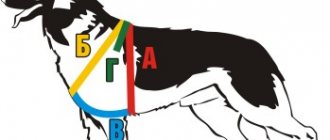
Operating principle
- Typically, the activation of a camera trap occurs due to the activation of a motion sensor. But there are also models that are triggered by heat;
- After the device is triggered, the image either remains in the memory card or is transmitted via MMS to the configured email;
- Usually the devices are activated from 20-30 meters, but also in some models it is possible to configure the time interval at which the device will take photographs;
Most models use very high-quality cameras, so it is easy to determine not only what exactly was photographed, but also the identity, in the case of a person.
Tracking equipment is often moved around the protected area, which is why it makes no sense to simply remember the location of the cameras.
Installation
To get the effect of using the device, you need to act with your head. Otherwise, you will encounter the following problems: lack of image, highlights, blurry images, random pictures.
Key points important during installation:
- The camera trap should only be mounted on a hard surface, like medium-sized trees;
- Lack of heat sources near the equipment;
- A static space in front of the lens, there should be no grass or other objects that can move from a light wind;
- Correct setting of the PIR sensor. These requirements may differ for your model, but usually the minimum sensitivity is set for low temperatures and the maximum for high temperatures. Therefore, depending on the time of year and climate, sensitivity must be adjusted;
- Correct determination of the optimal distance and viewing angle during installation. These parameters depend on the specific model.
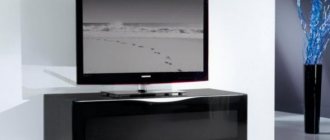
Photo from a properly installed camera trap:
DIY video surveillance
Create your own unique video surveillance system!
Every person who sooner or later realizes the importance of life safety and the safety of their material assets is faced with the choice of some kind of security equipment. This article will directly discuss video surveillance as a guarantor of the safety of your property.
There are ready-made video surveillance kits with their own characteristics, pros and cons. And purchasing such a kit is the simplest and, in its own way, the right decision. However, there is an alternative option to protect yourself and your loved ones - a do-it-yourself video surveillance system. This option is an opportunity to create an effective security system, but with lower financial costs.
What is needed to create video surveillance?
To create the simplest basic system you will need:
· DVR (available with 4, 8, 16 channels or more)
· Cameras (today there are a huge number of them and each of them is used under certain conditions)
· Monitor (the most common are monitors with a BNC or D-SUB interface)
· Hard disk (the best choice would be a disk with a memory of 1000 Gb or more)
· Power supply for cameras (these are either standard power supplies or uninterruptible power supplies, which is preferable)
· Cables and connectors (this is a coaxial cable, a combined cable and a PVS cable)
Listed above are the devices that were necessary to organize video surveillance with your own hands a couple of years ago. However, with the development of technological progress, the organization of a tracking system has become even simpler, so the use of wireless cameras will eliminate the laying of cables, and the use of cameras that transmit information in real time to your mobile device eliminates the need for a hard drive and monitor. Moreover, in our modern world (and in our store, including) there are cameras that allow you to shoot wirelessly, on the street, in real time and even with recording.
You can purchase everything you need to create your own video surveillance system in our online store with free delivery in Minsk or another region of Belarus. All products sold by us are easy to use and will not require third-party assistance in installation, and our specialists will provide you with professional advice on selecting the necessary devices, thereby you will create a truly effective security system without any problems.
Place your order and be safe!
What is the effectiveness of self-made surveillance systems?
Self-assembly of a video surveillance system involves the following operations:
- Installation of external web cameras.
- Installation of local network.
- Connecting cameras to a local network.
- Installation and connection to the network of a control unit - a regular personal computer.
That is, all “independent” production consists of “screwing” a “purchased” camera to the supporting surface of the bracket, laying a “store-bought” network cable from the camera to the hub and, as a final touch, installing professional software on your computer.
In this case, the stage of setting up a local network can be abandoned. To do this, you need to purchase cameras with a built-in Wi-Fi module and a router with a wireless communication module, which will replace an ordinary network hub.
Miniature cylindrical IP video camera with IR illumination and built-in Wi-Fi module DS-2CD2022F-IW
How to make video surveillance at your dacha
The car video recorder has one very good feature - the video recorder immediately switches on to recording mode when an external power supply is applied and turns off normally while saving the current video recording when the power supply from the external source is stopped.
The lighting control motion sensor is powered by a 220 Volt network and has a relay-controlled contact. The sensor is equipped with two regulators. Regulator for the duration of light switching on and a regulator for the threshold for starting work when the lighting decreases. During daylight hours, the motion sensor will never turn on. For round-the-clock operation, the motion sensor needs to be modified. Carefully disassemble. Find the light sensor and cover it with one to three layers of black electrical tape. Now the device will work around the clock.
DVRs are powered in the car via an adapter with an output voltage of +5 Volts. This design uses a power adapter from a 220 Volt network. The block connection diagram is shown in the photograph. The system was built for temporary use and the housings were not disassembled. To do this, a cable with an installed socket is removed from the sensor to turn on the adapter. But in principle, you can assemble a compact device directly in the spotlight and, if necessary, remove information via a USB cable led out of the spotlight body. The motion sensor is installed in the area requiring control, and the video recorder is mounted on a suitable bracket in a secluded place protected from precipitation. The infrared illumination of the recorder should clearly illuminate the control zone. The homemade design is powered by high voltage. Be careful, if you are not confident in your abilities or do not understand what you are doing, ask for help or advice from a specialist.
Rules and methods for installing CCTV cameras
Many people think that installing a CCTV camera is not difficult. You just need to attach it to something and point it in the right direction. Alas, this is not true. When installing video cameras, you need to take into account many parameters. Among them are such as the type of camera, the conditions in which it will work, mounting methods, access to the camera, its secrecy, the ability to route cables and much more.
Before installing cameras, you need to think carefully about where they will be located, and also determine where to lay the cable. Dome cameras are better suited for installation in the house, while case cameras are better suited for security and surveillance on the street.
When installing video surveillance, you must take into account:
- When choosing a mounting location for the camera, try to protect it and the connection boxes as much as possible from possible exposure to sunlight, snow, rain, and ice.
- Cameras need to be installed as high as possible to prevent intruders from removing or breaking the equipment.
- However, you yourself must have access to them. This is necessary so that you can troubleshoot the camera, remove dust, moisture, etc.
- If you are installing surveillance cameras outdoors and using power supplies, you should place them in a sealed box. Also pay attention to the tightness of the holes when entering wires into this box.
- Before installing the camera brackets and wiring, you should check that the camera is working properly. To do this, you should look at the image it shows.
- Determine the capture area that it should show and check the day and night vision mode.
- Check that the lighting in the camera's viewing area is evenly distributed. If you place the camera in the shade and it shoots in areas that are illuminated by the sun, the picture quality will be poor.
- Cameras pointing towards bright light or the sun can cause them to malfunction, so consider the sun's movement across the sky throughout the day when mounting your camera.
- Before finally fixing the video cameras, you should first look at the viewing radius, height and tilt.
- It is best to install outdoor video cameras on a bracket so that the edge of the roof is not directly above the video camera, since in winter icicles can damage the surveillance camera.
Many fans of two-wheeled horses have recently installed video recorders on their helmets - either action cameras or motorcycle recorders. They all have common features - autonomous power supply (most bikes do not have a “cigarette lighter”, and it’s not convenient to ride with a wire stretching to the motorcycle) and a long bracket so that the helmet does not block the view of the camera. So I came up with the idea of putting a recorder on my helmet. But I wanted to get some special properties: 1. Fixing the picture both in front and behind; 2. The cameras should not stick out far when turned off (to make it more convenient to store and wear the helmet); 3. All new elements must be placed on the outside of the helmet to maintain the “safety capsule”; 4. Cameras should capture the view of the horizon, not the sky/legs when I shake my head. In addition, I wanted to implement additional functions: 5. Display the image from the rear view camera; 6. Display service information about the state of the motorcycle - battery voltage, speed, and so on. I decided to use servos (left over from a radio-controlled airplane) to control the cameras, an accelerometer to search the horizon, and an Arduino to control the whole thing. I ordered an Arduino Pro Mini (the smallest of the Arduinos) in China, a pair of TrustFire batteries (sort of oversized AA batteries), a charger for them, and a pulse DC-DC voltage converter. I bought an IconBit recorder in Moscow - it has 2 cameras and, in addition, they are remote - this allows you to make a block of 2 cameras light, so that it is easier for servos to move them. In order to see the picture from the monitors while driving, we had to increase the optical path to the eyes - move the screen outside the helmet and add a mirror.
In the picture, the gray box to the right of the helmet is exactly the monitor block. Since the monitors covered the front ventilation slots, we had to add a fan and its power control circuitry. Unfortunately, field tests showed the failure of the idea with screens and a mirror - during the day, two glasses (of the helmet and the camera unit) glare strongly, and the bulky external block makes the helmet not very graceful.
The first version of the control device was assembled by surface mounting on a breadboard. The wire hedgehog was assembled quickly, but had almost zero maintainability.
In the photo the cameras still sag pitifully, but design elements are visible. Since there are a lot of external elements - a battery pack, a recorder, a camera drive, a voltage converter - I had to think about the design. The camera block extending from the helmet resembled the Predator's laser gun from the film of the same name. I also wanted to make a visor so that the sun wouldn’t shine in my eyes, and you can hide a lot of things under the “hair”:
For a whole year (sorry, season) I rode with this recorder. By the end, the following disadvantages were clear: 1. The batteries lasted for 1.5 – 2 hours; 2. The fan did not really provide anything, but took up a lot of space; 3. We need flexible peripheral management logic; 4. Maintainability is still important; 5. Epoxy fabric is not the best material for external elements.
Winter was ahead and with it came new technologies: 1. LUT for the manufacture of printed circuit boards; 2. SMD as an element base; 3. Do-it-yourself Arduino (rejecting the finished board and using only a microcontroller); 4. Molding of polymer liquid plastic (it turns out that now there is such a thing!).
The approach to controlling the mechanics was radically changed - instead of constantly powering the servos and holding the cameras in place by creating torque, a mechanism for folding the landing gear for model aircraft was used for the power suspension. The peculiarity is that in extreme positions no force is required - such a drive itself blocks unwanted movements, and energy consumption is zero. It also turned out that using the ULN2003 chip to control peripherals is not the best approach. The voltage loss on the Darlington transistor is too high and when powered by 5V + ULN2003 the screen controller does not start. I had to master field-effect transistors. The easiest to control is n-channel, just like ULN2003, which disconnects the ground from the controlled device. But there’s an ambush - the cameras and the screen have another connection along the “ground” - in the signal cable. I had to switch to p-channel field devices. Thanks to technology, there are now field-effect transistors controlled by a logical level and switching several Amperes. For control from a microcontroller, 2 resistors are enough (well, it would be nice to install a reverse diode, because you never know). The field effect transistor has a very low resistance (miliohms), which minimizes power consumption. In addition, the servos are now turned on only when the camera position needs to be changed. Likewise, the accelerometer is not constantly powered, but only once per second and only for one measurement, adjusting the position of the cameras, and turns off again. In addition, using the microcontroller sleep mode and interrupt management allows you to remove the power relay to power the microcontroller. Now everything is controlled without mechanical elements.
The only element that I decided to place in the helmet was the central control board. All wires to it are laid along the inner shell:
External elements are covered with plastic fairings:
Well, the finishing touch is that the Predator had teeth. Made them from lightweight plastic. Here's what we ended up with:
Addition. Here's how folding and horizontal stabilization of cameras works:
Further problems need to be solved: 1. Displaying a picture to the pilot (okay, driver) of the motorcycle; 2. Display of text information (voltage and so on); 3. (A complete dream) – processing images from cameras to search for dangerous movements and notify the driver about them, as well as display navigation information.