Metal products made using forging have long become very popular due to their beauty and sophistication. Such decorative elements are quite expensive and it is not always possible to order all the desired decorations for your interior or country house. But, in addition to the hot type of forging, which is needed in order to create metal decorative structures, there is a cold variety. The last option can be implemented independently; for this you will need to build a cold forging machine with your own hands, after which you can begin to implement all your plans and ideas.
DIY hodol forging machine
Types of machines
Basically, all devices that are intended for the manufacture of metal parts using cold forging are characterized by a manual drive. Few of them operate on the electric drive principle, although such a structure can be built with each of the devices. The only question regarding the drive is its feasibility, because the cost of the energy resource that powers the unit and the complexity of the installation process of the mechanism may not be justified if they are correlated with the amount of work performed and its regularity.
The table shows all the devices that operate using a manual drive and are related to the cold forging process.
| Device | Short description |
| Twister | With the help of such a device, the metal is twisted, spirals and curls with a narrow core are formed. |
| Torsion bar machines | With the help of such a machine, screw-type rods are twisted, and it is also possible to produce large spirals and filaments (baskets, lanterns and bulbs). |
| Inertial stamping machines | They are intended for making connecting parts with decorative components, making patterned tips and various small patterns and reliefs. |
| Bending machines | There are several types of such machines: push, broach and combined types. The first variety is needed in order to obtain wavy bends or to bend a rod in a zigzag manner. The extended variety is in demand when it is necessary to make a ring, curl or spiral with a wide core. Using the combined variety, you can build any of the listed elements. |
Help: very often in some sources you can find the name of machines designed for torsion as well as for machines that do winding - twisters. However, this is not entirely true; machines that twist metal are torsion bar machines.
Video on how to make a cold forging machine with your own hands.
Square twisting machine (for twisting torsion bars)
A torsion bar is a metal rod that works to twist. If you need to make a small amount of rolled square, a manual square rolling machine is perfect for the job. Since the costs of its manufacture differ significantly from the costs of a similar electric machine.
Read how to make a manual square twisting machine here.
For a larger volume of work, a manual machine will not do; here you will need an electric drive. Its design is more complicated and more expensive, unlike a manual one, but it’s worth it.
Read how to make a machine for twisting a square with an electric drive here.
Differences of cold forging
There is such a thing as “stamping”, which is sometimes confused with the cold type of forging. Cold forging itself has 2 principles according to which this process can occur. The table shows the differences between the processes.
| Process | Description |
| Stamping | The stamping process can be described as the extrusion of certain shapes using a punch that operates at a high level of pressure. An example of the stamping process is an aluminum can. Heating of the metal is not used in this case. The ability to apply such technology at home is hardly possible, since it is impossible to create the necessary conditions for this. |
| Cold forging type (riveting) | This type of cold forging, in essence, is cold hardening, namely, a certain number of blows of very high force are carried out in the process, which allows the structure of the metal to change and become the required parameters in size and shape. This manipulation is carried out using a hammer, which you can also build with your own hands. |
| Cold forging type (bending) | Another type is bending. With this technology, the metal structure remains the same without changing its characteristics. This type of forging can be used at home; all you need to do is create a cold forging machine with your own hands. |
Cold forging, which is carried out on the principle of bending, is quite simple to do, especially if you have special stationary equipment that significantly facilitates the process. The advantage of this variety is that you can assemble almost any cold forging machine with your own hands without much expense.
Video review of a manual machine for forging metal
Construction of cold forging machines
Each device for cold forging has its own characteristics and parameters. In order to easily make a cold forging machine with your own hands, you need to understand what each of them is.
| Machine | Device | |
| Bending machines | The design of this device is such that by changing the rollers and wedges, the size of the waves and bends changes. They can bend rods up to 16 mm. The only caveat of this device is that it cannot be made independently, because it requires processing and turning many parts of the exact size. The cost of such a device is low. | |
| Twister | The unit works by equipping it with a special template, onto which the piece of metal being processed is pressed. The pressure must be very high, so those who work on the twister must have sufficient strength to do this. In addition, the safety of the template itself is ensured by the presence of a persistent horn (end). As for the middle horn, which is otherwise called the encircling horn, it should be made in such a way that it can change its position and be fixed in it. The efficiency of work depends on this, especially for those who are starting the process for the first time. | |
| Base with spacers | This unit will allow you to make patterns of absolutely any variation. The design itself is very simple and consists of a plate made of durable and reliable material into which spacers are screwed at a certain distance. For such purposes, you can use bolts with sizes from m8 to m24. The thickness of the metal depends only on the skill of the person working on the machine. Basically, this device is well suited for metal with a thickness of 6 mm. | |
| Snails Twister machine | With collar | This installation consists of a base plate on which a special coil is located. This coil is used as a template for the future product. The peculiarity of the machine is that the “snail” template is divided into several parts, which are secured to each other using special connecting elements, which allows the template to vary in shape during operation, which creates various kinds of waves and bends. There are also disadvantages to this design, since in order to make such a machine for cold forging with your own hands, you need to select a very durable material that will not bend over time. Also think over the connecting loops, which are quite vulnerable, given the amount of force with which the entire process of bending the metal occurs. |
| Lever type | In this type of snail machine, the template is attached very firmly to the base. Due to this fact, its productivity is lower, however, its reliability is greater. Using a special lever, the metal plate is pressed against the template; at the same time, the movable roller must be moved during the process. To make such a machine for cold forging with your own hands, you can use steel material, which is distinguished by its strength, and the roller can be made from a regular roller bearing. In general, the design is similar to a pipe bender. | |
| Torsion bar machine | Such a device will be good for screw twisting rods. Such a machine is made from a cylindrical metal base and two fastening and simultaneously twisting elements. It is advisable to equip such a structure with a special pair of paws that will not allow the metal being processed to bend in ways that are not necessary. The principle of operation of the machine is such that the rod is placed in the elements holding it, clamped at one end, and at the other end, using a rotating spindle, it is twisted to the desired size of the helical wave. | |
Equipping a torsion bar cold forging machine with an electric drive
In order to increase not only the efficiency of work on a cold forging unit, twisting rods into a helical wave, but also to increase the speed, as well as ensure stability and not be subject to overfatigue, you can install an electric type drive.
Working by hand, it is quite difficult to make all the decorative elements made of metal rods the same, since the uniformity of the rotational moment in such a situation will vary greatly. In order to avoid errors in the manufacture of products, you can use:
- axle shaft from the car, which is installed on the drive axle;
- you will also need a differential gear pair;
- For protection it is worth using a casing.
Building a curl for the machine with your own hands
Before you start creating a cold forging machine with your own hands, you need to be able to calculate the parameters of a template spiral, because there are practically no special programs for such purposes. Such a template should not only be technically competent, but also have an attractive appearance.
The calculations for this pattern are based on a logarithmic spiral. Some nuances during construction can be highlighted in the following list:
- the beginning of the construction is taken at point R0;
- the turning radius will be equal to a fixed angle;
- the length of such an angle must be multiplied by the divergence of the coil;
- the discrepancy in the standard version is generally taken to be 1.2;
- for simplicity of calculations, as well as maintaining accuracy, the bending angle is best taken at an angle of 45 degrees;
- if there is a need to build a template that will have a denser spiral, then the 8th part (s) of the unit distance from the spiral should be added to the radius;
- As for r0, it must be equal in cross-sectional size to the diameter size of the workpiece for the spiral.
Important: r0 can take any value, it all depends on what characteristics the metal is used for the workpiece, namely its density.
Taking into account all the nuances, you can start making a “snail” template; for this, it is best to be able to solve equations that have a cubic degree and higher. There is no exact formula for calculating such a device, but there is one that allows you to achieve the optimal result. The sequence when constructing a spiral template can be like this:
- the initial point r0 is determined first;
- the turns that the template will have are taken arbitrarily, their number can be any;
- using tabular data, you should calculate the diameter (b), while ensuring that it is smaller in width in the opening for the template;
- using the formula, the radius R is calculated;
- the last step is to transfer all the obtained points in accordance with the scale, after which you can proceed directly to construction. In the process, let’s adjust the radius R in the final version using a similar formula.
Help: if it becomes necessary to calculate intermediate values, then this is done in accordance with the geometric proportion.
Construction of a cold forging machine
When drawing up a drawing to further create a template for the machine, it is best to make sure that it has the maximum number of different variations regarding bends and waves. Having such blanks, you can create a cold forging machine with many interchangeable attachments, which will make it possible to produce various patterns and monograms.
Sequence of actions when creating a device:
- Initially, you will need a metal sheet, the size of which will depend on the number of patterns placed on it. The templates themselves should be placed in such a way that there is room for the manufacture of products, because during the process the material from the nozzles may shift due to lack of space. Also, if the templates are not sufficiently spaced from each other, complications may arise in the work.
- As for the variations of the templates themselves, they can be either simple or contain more than one turn of the monogram. You can make a similar ploughshare-type snail and think through the design of the bends in the disassembled and assembled state. At the same time, you should be careful when selecting the material for fixing the sliding parts - it should be as durable as possible.
- The change of nozzles can be ensured by making a rectangular slot; replaceable templates for forging can be inserted into it. They should all be attached to metal plates shaped like a rectangle. Fastening of such nozzles will be ensured using bolts.
Video instruction
How to make a forged curl with your own hands, production video, drawings, calculations, dimensions, bending
Future blacksmiths who want to try their hand at metal processing through forging are recommended to begin honing their skills by making forged curls .
Detailed instructions for creating curls of different shapes are provided below.
Necessary equipment, tools and devices for hot (art) and cold forging: snail, wave, anvil and others
Depending on the chosen technology for working with metal, the performer will need a different set of equipment and tools .
Hot forging involves the use of a hammer (or hammer) and an anvil.
Creating a curl on a snail-type machine.
Cold forging is performed on special equipment: the “wave” machine allows you to produce parts with wave-like bends and change their direction, the “snail” (conductor) is designed to create spiral curls. It is also possible to use templates for making curls.
Some performers also perform hot and cold forging using special templates and patterns.
See also: the section about curling machines, where you can buy them and about homemade machines.
Required materials: profile/corrugated pipe, rods, strip
Forged curls can be made from metal blanks of different shapes :
- profile pipes:
- rods with round and square cross-section;
- stripes.
Important questions: how to calculate the length of the workpiece, how to draw, and so on
When performing bending and forging, performers face a large number of technical questions.
Drawing the curl in full size, which is done with chalk or pencil , simplifies the manufacture of the element.
Calculating the size of a metal workpiece must be done by adding the values of straight and curved sections. To do this, performers often use ordinary rope or wire, which is applied to the bends. The resulting value is measured using a tape measure. The curvimeter tool is also used.
Other important nuances are discussed in the video reviews presented below.
Assembling the device
This version of the machine is used as an example because of its simplicity. Knowing the basic principles and sequence of equipment design, you can upgrade it at will. To assemble all parts of the equipment into a single whole, you will need to use:
- drill with carbide type drills;
- welding machine;
- a saw cutting metal or a hacksaw;
- metal sheet of the selected size;
- round metal pipe;
- metal rod;
- bearings of different sizes;
- bolts size M8.
To assemble a cold forging machine with your own hands, you need to use a proven sequence of actions:
- Initially, you need to assemble a stand that will serve as a support. To do this, all its components (pipe sections of the same size and the joints between them at the top and bottom edges) must be connected into a single whole. The design may resemble a stool in appearance. The connection is made using a welding machine, and the sections are cut with a saw.
- The next step is cutting the metal sheets. You should get circles of equal diameters and four triangles with equal sides. Triangular-shaped elements must be welded to the bottom of the connected pipe structure in such a way that something similar to a pyramid is formed. The base, which has a wider area, must be welded at the central point of the cut circle.
- Four strips that are located horizontally must be attached to a circle with an already welded element. This should be done using bolts; for this you will need a drill to make the holes.
- The next step is the construction of the handle. To do this you need to use two rods of different lengths. Their sizes can be determined by correlating them with the diameter of the circle. One rod should be commensurate with the diameter, the other should slightly exceed its size. When bending the first rod, you should maintain an angle of 30 degrees. Then weld both rods to each other, and then weld another rod into the lower part. There should also be a jumper between the first two sections, to which a lever is attached by welding, which should maintain the direction towards the structure made of rods.
A bearing for future directional variability in the device must be attached to the end of the attached lever, as well as to the segment located at the bottom of the structure. The upper section serves as a mount for a metal coil, which must be installed horizontally - it makes it possible to bend the metal. On the lower side of the segment, where there is a free end, a hole should be made equal in diameter to the size of the pipe section.
- The last step in the algorithm of actions when constructing a machine for cold forging with your own hands will be the connection of the designed handle with a part of the device similar to a “pyramid”. These elements are fixed after putting on the handle with a wide-diameter nut, to which it is first necessary to weld a metal circle, which will allow the template itself to be attached to the machine. Next, the “snail” template is attached by welding.
- Twisted fences.
- Decorations for residential buildings.
- Patterned gate.
- Railings for balconies and stairs.
- Metal garden benches.
- Decorations for gazebos and lanterns.
- A large number of grating options.
Anyone who decides to take up forging seriously and make a cold forging machine with their own hands should be very scrupulous at the stage of creating drawings and calculations. Otherwise, the creation process is quite simple, and once you understand the principle of equipment design, you can come up with various variations of it that will help improve the product.
Admiring the beauty of an openwork metal fence or admiring the incredible twisted pattern on the railing of an iron staircase, few people think that they were made using the cold forging method. You can learn to embody beauty in metal without much effort. To do this, it is enough to have minimal skills in working with metal and have special machines for cold forging. What is cold forging? What machines are needed for it? What can be made on these machines? You will find answers to these questions in our article.
It would be more correct to call cold forging - mechanical bending of a metal rod on specialized machines to give it the shape intended by the manufacturer. Bending rods in the machine can be done either manually using levers or using electric motors. In addition to metal rods, cold forging can be used to bend small-diameter pipes, narrow iron strips and fittings. Using the cold forging method the following are produced:
see also
Comments 25
It turned out well, but this is for those who have the hands and the desire. I didn’t have one, although I found a bunch of drawings. We bought ready-made machines: spbstanki.ru/ruchnoy-instrument-holodnoy-kovki
Hello. Answer please. Does the curvature and angularity of the cochlea not matter? Will the rod still come out neat?
no, you need to do it as evenly as possible, I had a slight bend on the snail, but the part turns out even more closed
Cold forging for those who understand this is G (to put it mildly), so it doesn’t cost anything and you can’t make money on these semi-finished products, but the manufacturers of these cold forging machines make very good money by selling machines + dies for them for 5000-10000 euros. If you make beautiful things, then only a hammer and a forge, and cold forging is moldings.
I completely agree with you
Is 8 mm thick enough and the rod doesn’t come off? If you twist approximately 8-10 mm square?
I twisted the tenth square, it’s enough, but I would like it higher
And if you weld this bent square onto the snail, will it still be 18mm?
try it, I didn't bother
where did you get such thick metal for the snail and what did you use to cut it with?
Metal 8mm. Left over from my grandfather, cut out by a Bulgarian 125
How lucky I am with it, I bought it for free
Yes, more luck. When I was planning to take up artistic forging, I bought a tool, made mining... All my friends knew and offered everything that was “out of the box”, everything that was relevant. In 4 years we have gained a lot!
Are you still doing forging?
No. I prepared everything: a workplace, tools, fuel... but never got around to it. The season was spent on construction sites, the season was treated, and this one I decided to devote to UAZ. Therefore, due to the change of interests, everything is worth it.
There is no sales market, the material is expensive. Everyone who opened (officially) in the village closed. They asked me to sell everything - it’s a pity.
Maybe I'll do it again. There are machines for “cold” forging from eisenkraft - eisenkraft.ru/ I bought it used. I read certain resources on forging, collecting ideas (I can share). I can take measurements from factory equipment.
Okay, let's start with "you". Yes, our market is not so hot either, and there are plenty of metal workers, I have other work on business trips, it’s true, but all my life on business trips, life even the prospect is not ice at all. So in my free time I do what warms my soul, I hope that everything will be useful, we have a lot of greenhouses, maybe I’ll take care of greenhouses.
My main job is on the computer. And hardware is a hobby. I came in to warm up, I’m doing a “press” with an 8t jack. I just completed the cutting machine, from a 235 mm grinder.
I also want a drilling machine from the “steering rack 2108”. I found the rack, now I need a drill or a motor.
I also thought about making drilling chisels from the river). When you do it, be sure to post it! And with my next paycheck I decided to buy a factory cut-off one, I don’t have any extra grinders yet, it’s too early to buy everything, even if the factory-made ones are more expensive, we used this at work - it’s beautiful))) Why a press? and even at 8 tons?
It’s just that my father had a working jack lying around for about 30 years! And I needed to replace the wheel bearing, and there was beauty with the help of a press. I got into a conversation with a friend, he gives a 120 mm channel “in return”, 6 meters. Of course he knows that I have a glandular disease.
So, as far as expenses go, 3 meters of channel for 160 mm is missing. That's all.
Admiring the beauty of an openwork metal fence or admiring the incredible twisted pattern on the railing of an iron staircase, few people think that they were made using the cold forging method. You can learn to embody beauty in metal without much effort. To do this, it is enough to have minimal skills in working with metal and have special machines for cold forging. What is cold forging? What machines are needed for it? What can be made on these machines? You will find answers to these questions in our article. It would be more correct to call cold forging - mechanical bending of a metal rod on specialized machines to give it the shape intended by the manufacturer. Bending rods in the machine can be done either manually using levers or using electric motors. In addition to metal rods, cold forging can be used to bend small-diameter pipes, narrow iron strips and fittings. Using the cold forging method the following are produced:
Cold forging machines
Below we will give you instructions on how to assemble cold forging machines yourself.
Machine "snail"
Making a snail machine is one example of independent design, and it makes no sense to give advice with an exact indication of the dimensions of all parts. You need to be guided by your idea of the operation of the machine, how and what will bend, how many turns of the spiral will be enough for high-quality work, what size the lever with the tabletop will be. If you understand the essence of the machine manufacturing process, then the assembly itself will not cause any particular difficulties.
Machine “snail”
Manufacturing of main machine components
The process of bending an iron rod exposes the machine to heavy loads, so when making the frame for the “snail”, only a metal corner, channel or thick-walled pipe is used. Do not make a frame from wooden beams; such a table cannot withstand prolonged loads and collapses.
The tabletop for the “snail” is made of a metal plate cut in the shape of a circle, at least 4 mm thick. From the same slab, a second tabletop is cut out, repeating the shape of the first. The snail segments will be placed on the second tabletop and the products will be bent. During the cold forging process, the tabletop takes on the bulk of the load, so there is no need to save money and make it from a thinner sheet of iron.
Main shaft and lever.
The main shaft is placed centrally between the tabletops and is attached to the base using four right triangles. The shaft can be made from a thick-walled pipe of the required diameter. The lever is attached to the shaft using a ring and rotates around it; in addition, a roller is installed on the lever for bending the rods on the upper tabletop.
Machine diagram
Marking and installation of attachments
Depending on whether you want to produce only the same type of samples or you need more artistic products, there are three options for the snail device. Option #1. This is the simplest of the three options; its essence is that the outline of a spiral is drawn on the tabletop.
Drawing of the snail segments
At its core, this is a drawing of future products that you will produce on the machine. After applying the diagram, it is enough to cut out several segments from thick strips of iron of different widths that follow the line of the drawing and weld them to the tabletop according to the markings. With such a static “snail” you can make simple bends. Option #2. The second option is the most popular among homemade machines; it involves making a collapsible snail from removable parts. Holes are drilled along the contours of the markings into which threads are cut. Next, templates for the stop segments are made from cardboard or plywood and metal overlays are made from them. Finally, holes are drilled in the pads, which should coincide with the mounting sockets on the tabletop. To secure the segments, bolts are mainly used, but you can also make cylindrical stops. This “snail” design will allow the production of spiral-shaped workpieces with different radii on one machine.
“Snail” made of metal strips
Option #3. In the third option, instead of collapsible stop segments, several removable modules are made with different volute options, which change as needed. The module is made of a piece of iron onto which segments repeating parts of the spiral are welded.
Snail modules
- Install the frame in a place where you will have easy access to the machine from all sides.
- Concrete the legs of the frame in the floor or secure the frame in another accessible way.
- Weld the main table top to the frame.
- Install the main shaft by welding it to the tabletop and strengthening it with triangles.
- Place the rotating lever onto the shaft.
- Install the top tabletop by welding it to the main shaft.
- Place the snail segments on the tabletop.
After assembly, test bend the rod. To learn more about assembling a snail cold forging machine, watch the video:
Torsion bar machine
This machine is designed for uniaxial longitudinal twisting of a workpiece from a transverse or square rod.
Torsion bar machine
A channel or I-beam is used for the base of the torsion bar machine. A thick iron strip is attached to it by welding, onto which a vice is installed to clamp the stationary part of the rod. The vice is secured with four bolts with a diameter of M16 or more. To increase the clamping strength of the bar, corrugated sheet steel plates are welded onto the vice. On the opposite side of the base, guide rollers are installed, to which a clamping unit for the movable part of the workpiece is attached. It is made of a steel bushing, in which it is necessary to provide holes for clamping bolts located at an angle of 120 degrees. The bolts must have a flat end and be made of high quality steel. Both clamping devices must be positioned coaxially; to do this, they must be checked using a level, a plumber's square and a caliper.
Types of machines
Next, you need to make a handle for turning the moving part of the clamp. Its lever should hit as long as possible to reduce the applied force. It is better to make the handle itself with a rubber bushing to prevent the hand from slipping during operation. After the machine is fully assembled, it is checked for the reliability of the moving elements and the accuracy of the deformation of the bar. After checking, the machine is attached to the support frame.
A simple model of a torsion bar machine
How to make a torsion bar machine with your own hands, watch the video:
Machine "gnitik"
To qualitatively form a corner in a product produced by cold forging, you will need a machine called a “bend”. It consists of a steel plate with a movable stop on which there are two support shafts and a lever.
Machine “gnutik”
The workpiece is placed between the wedge and the support shafts. After this, with the help of a lever, the wedge is shifted towards the shafts, which leads to bending of the workpiece.
Computer model of the machine
Making such a machine is quite simple, the main thing is to follow the given drawing and use tool steel, since during operation a large load is placed on part of the device. You can also watch how to make a “gnitik” machine in the video:
Wave machine
It would be more correct to call this machine a controlled wave. The equipment of the machine consists of a pair of steel disks with a diameter of 140 mm, which are bolted to the worktop. The axis of rotation of the universal wrench is fixed to the drive disk.
Machine “wave”
Wave control occurs as a result of changing the distance between the disks. When the bar is rolled around the drive disk with a knob, a pattern is formed, after which the bar is removed from the conductor and a pattern is formed on the other side. You can watch the machine in action in the video:
Machine - press
A press is needed to form the ends of the rods. This machine works on the principle of a flywheel; first, by rotating the bar with weights, the screw striker is pulled back until it stops. After this, a replacement stamp is inserted into the slot and the workpiece is placed. Next, quickly spin the bar in the opposite direction and leave it to rotate freely. Finally, the striker hits the stamp shank strongly, due to this, a force sufficient for stamping is developed.
Rolling press
As for the manual rolling mill, you can make it yourself, but you still have to order special steel rolls, bearing bushings and shafts, and buy gears in the store. Only “crow’s foot” and “leaf” tips can be produced on such a machine.
Connecting and painting parts
Elements produced by cold forging are connected in two ways:
- Welding - parts are welded to each other, and the scale is ground off with a grinder or other grinding machine.
- Clamps - this type of connection looks much more beautiful. For clamps, stamped strips of metal with a thickness of 1.5 mm or more are used.
Preparing the type snail
Tools and materials:
- Bulgarian.
- Welding machine.
- Paper and pencil.
- Marker.
- Ruler.
- Sheet steel.
- Steel strip.
- Bar.
- Pipe.
At the very beginning, you need to make a tool that will carry out the entire work process - a snail. The simplified version is most often used, but working with it requires a lot of physical strength, while in the complicated version everything works much better.
In order to make this tool, you will need to do a number of steps:
General view of a snail for cold forging. The tool is indispensable when creating spiral-shaped decorative elements.
- A 15*15 cm plate is cut from sheet steel. This plate will form the basis, so the material must be of very high quality and resistant to bending and breaking.
- A drawing of an Archimedean spiral is made on paper with a pitch between turns of 17 mm. If you take a smaller step, the spirals will turn out to be scanty, as if the metal was spared on them, and too large will not provide the necessary reliability of the metal structure. In addition, work usually involves workpieces 10 mm or smaller.
- A steel strip (2-3 mm) is cut and bent in the form of a spiral. As a result, you should get 3-4 turns, but no more, because otherwise there will be an overconsumption of material when twisting (turn number 5 in length will be equal to the sum of 4 and 2 turns, which is an obvious overconsumption). In order to bend the spiral, you will need pliers, a glove and patience. Without a thick glove, you don’t even have to start work, because... this will certainly lead to cuts on your hands.
- A steel rod (5-7 mm in diameter) is cut to 2.5 cm in length so that it can be installed near the center of the cochlea. The rod will help fix the workpiece at the initial stage to make bending more convenient, but it should not be higher than the strip.
- 7 cm is cut from a thick-walled pipe, and the pipe in this case should preferably be round.
- The snail is placed at the site of its future dislocation and outlined inside and out with a permanent marker. As a result, a drawing of the future part will remain on the plate, which will be erased only during use.
- The snail is cut into 3-4 parts (more is possible, but not less) depending on the number of turns. It is very important in this case to ensure the ability to work from beginning to end, i.e. don't leave any extra.
- The central part of the snail is welded into place, and the rod is welded here. Legs made of a rod 0.8-1.2 cm long are welded to the remaining elements of the steel strip from below. The step between the legs is 3.5 cm, because this will create maximum reliability of the joint without weakening the supporting part.
- The cuts are put back in place, the legs are outlined with a marker, and then drilled so that the part is installed end-to-end and does not have free movement during operation.
- A pipe is welded at the bottom center.
This completes the classic version of the inlaid snail, but all that remains is to add the mechanical component.
Also read: Features of working with the foundation.
Products produced by cold forging
We invite you to familiarize yourself with the options for products that you can make using the cold forging method:
- The fence element is completely made using the cold forging method. Clamps are used to connect the parts. The following machines were used for manufacturing: “snail”, torsion bar, “bend” and “flashlight”.
- Soda bench - made by cold forging and covered with wood. Welding and clamps are used to connect the elements. Machines used in production were “snail”, torsion bar, and press.
- Balcony railings - production method - cold forging. The railing elements are connected using welding and clamps. The machines used in production are “wave”, “snail”, press.
- Stair railings are produced using the cold artistic forging method. The parts are connected by welding. The machines used in production are torsion bar, flashlight, and snail.
- Visor - the frame of the visor is made using cold forging. The parts are connected by welding. In the manufacturing process, machines were used - “snail”, “wave”, press.
- The grill is a simple design made using the cold forging method. Clamps and welding are used to connect the parts. The barbecue elements were produced on machines - torsion bar, "snail".
- Double bed - cold forging method is used for the backrests. Connections are made by welding and clamps. In the manufacturing process, machines were used - “snail”, “wave” and press.
As can be seen from all of the above, the cold forging method does not require large financial costs and is quite easy to learn, so if you decide to start learning blacksmithing with this method, then you did the right thing.
One way to decorate areas is to use forged items. Fences, benches, gazebos, stair railings and other similar structures look very decorative. Moreover, in most cases, these products are not forging in its traditional sense. Most often, this is done not in a forge or with a hammer and anvil, but with the help of some devices that allow you to create a wide variety of patterns and products from metal strips and square rods. To make such products you will need cold forging machines. Some of them you can make with your own hands, others are easier to buy.
How to forge the ending of curls, commas, volutes and other elements
Manufacturers offer customers curls with rolled and unrolled ends. The first group of elements has a more elegant and vibrant design. Most often, the parts have a houndstooth finish. You will see below how to make a curl with a similar ending with your own hands.
- A curl with a crow's foot ending is made using a hardened steel stamp, the surface of which has shallow grooves.
- The workpiece is heated and placed on the stamp, the end is tapped with a hammer. Thus, the performer will not need a special machine.
What kind of devices are used?
Cold forging is characterized by various curls, bends, twisted rods, etc. Almost every type is made on a separate device - a specific machine. They can be driven manually or electrically. For small volumes “for yourself”, manual cold forging machines are used. Although they are not particularly productive, they are much easier to manufacture. If it is necessary to put production on stream, similar devices are made, but with electric motors. In this case, there is almost no need to physically work, but the complexity of making the device increases significantly. In our material we will talk about manual machines for cold forging.
What devices are used:
- Torsion bars. With their help, tetrahedral rods or strips of metal are twisted in the longitudinal direction. The result is twisted columns, which are also called torsion bars.
This is what a torsion bar and the machine of the same name look like
This is how they make a flashlight
Device for cold forging snail - for forming curls
For bending anywhere and at any angle - bending machines (bending machines)
Machine "Volna" - for the formation of the appropriate relief
Machines for shaping the ends of rods. In this case - crow's foot
For a beginning craftsman, the most relevant machine for cold forging is a snail. Only with its help you can make many interesting things - from a fence and gate to a bench and other similar products. In second place in terms of necessity is a torsion bar machine. It adds variety to the details. All the rest can be purchased or made as you improve and gain skill.
Homemade “Snails”
In essence, this is a modernized bending machine (pipe bender), but these improvements make it possible to easily make curls from fairly thick rods (up to 10-12 mm cross-section) and repeat them with a high degree of accuracy.
One of the homemade cold forging machines
These cold forging machines have several designs, but the easiest to implement is the one with a round table with a central leg. A lever with rollers on bearings at the end is movably attached to the leg. They make the bending process easier.
The table surface can be made of steel sheet with a thickness of 10 mm or more. For the leg, you can use any thick-walled round pipe. It is important to make the structure stable, since lateral forces will be applied, so side posts, spacers, and a stable base are needed.
Drawing of a cold forging machine “Snail”
It is easier to make a lever from a square pipe with a thick wall - at least 2-3 mm. The cross-section of the pipe is 25*40 mm or so. Attaching the lever to the leg can be done on a bearing, or you can simply take a small piece of thick-walled pipe of a larger diameter, put it on the leg, and weld a stop strip on the bottom so that the lever does not fall down. The option with a bearing gives easier movement, but if there is lubrication, the second option also works.
Lever mounting option
The shape of the lever is also important. The lever is double, the upper part is working, the lower part is supporting. Wherever there are connections, it is advisable to add reinforcement, since the efforts are significant.
The lever must be reliable, with reinforcement
A mandrel or jig is fixed on the table - the shape along which the curls are bent. They are made in different diameters so that you can make curls of different diameters. Such mandrels can be prefabricated to form a larger number of bends. Each such sample must have rods that are installed in holes in the table. This is how this template is fixed. Also, its shape must be designed in such a way that the end of the rod is well fixed in it.
Variant of conductors for the snail
Often, mandrels are machined from a metal circle of a suitable diameter using a grinder, but there are options made of metal with steel plates welded onto it, curved accordingly.
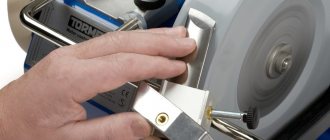
How to make a similar machine for cold forging is in the next video. There is also a good description of how to bring the ends of the workpiece to a decent state - ordinary raw edges look very rough. There is special equipment for processing them, but, as it turns out, you can do it without it.
Device for baskets
Maxim Vishnyakov from Ivanovo, an active participant and editor of our group on VKontakte, shared his experience in making a device for bending baskets and photos. Maxim's page in the blacksmiths catalog is here. Below are photos and comments from the blacksmith; if anything is unclear, ask questions in the comments.
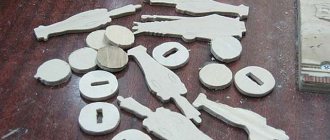
Twist - 1 turn. Square 6mm, length 180mm. Rod diameter 20mm. It's easy to spin. You can anoint the rod with oil. I welded the bushings from pieces of the same square. After twisting the 4 parts, you tie them around the edges with rubber bands for banknotes, straighten them and make tacks at the ends.
2 bushings are made from pieces of 6x6 square. One bushing is fixed on the table, handles are welded to the second. Rod 30mm thick. The thickness of the rod affects the diameter of the basket. Thickness 30mm - basket 60-65mm.
The grooves in the bushings for the workpiece are not through. They are plugged so that the workpiece fits into the groove to a depth of approximately 20mm.
The photo shows that the grooves in the bushings are not through, but are plugged. the rod enters the sleeve 20mm.
The process of making 1 basket takes me no more than 5 minutes.
You can also twist a round rod.
It is better to sand the central rod (30mm) or, if you are not too lazy, lubricate it with oil to reduce friction of the workpiece against it. The less friction, the more uniform and easier the twist will be.
Torsion bar machine
As already mentioned, these cold forging machines allow you to make longitudinal bends on the rod. This is a relatively simple design. The main task is to fix one end of the rod motionless, attach a lever to the second, with which you can twist the workpiece.
A piece of profiled pipe with a thick wall (at least 3 mm) is suitable as a base. The retainer can be welded from the same rods, leaving a square gap of the required diameter. You can use a properly sized cable clamp (available at a rigging store). Any of these stops is welded to the base.
Cable holder - great for holding rods
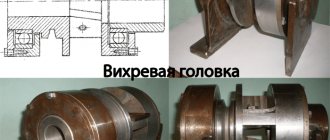
Next, you need to somehow ensure grip and torsion of the second part of the workpiece. This can be done using two bearing units. A pipe of a suitable diameter is inserted inside, and a handle is welded to it on one side - the design resembles the letter “T”. On the other hand, a clamp is made in the pipe: four holes are drilled, nuts for 12 or 14 bolts are welded into them. The result is a good clamp - the bolts are tightened after the rod has been inserted.
Next - a matter of technique - use a lever to screw in the required number of turns. This is not to say that this work is for weaklings, but with a lot of leverage, everything is not so difficult.
An even simpler machine for making torsion bars using cold forging is in the next video.