Conventional headphones are made of a wire, a plug and a pair of speakers. Additionally, the headset can be equipped with other elements that expand its scope of application. Each of these elements may fail during operation. Before you begin the repair, you should understand how to disassemble the headphones or vacuum earphone, so as not to completely damage the headset. Let's look at the features of disassembling the main categories of headphones. Having studied this information, you can easily cope with any headphones, because the features of all are similar.
DIY headphone repair
If the headphones fail to work, the sound disappears or changes, then do not rush to the service center. Do-it-yourself repairs are quite possible. First you need to determine why the headphones are not working. Breakage most often occurs due to the fact that the wires are bent and their conductive strands are damaged. This is possible with Nokia headphones. Then the wire must be cut, stripped and soldered. You can buy a soldering iron and tin in a store.
Prepare pliers and wire cutters for processing the headphone wire. If you want to check for damage, you will need a multimeter. You'll need to buy a plug or connector if you suspect a replacement will be needed, or if your headphones break. Glue and scissors will also come in handy. It is advisable to choose an adhesive that is elastic for the plug and quick-drying. If rustling noises appear in one of the headphones or in both, and then the sound disappears completely, this means an internal break in the wire wires.
There are other reasons why headphones don't work. For droplets of a closed acoustic type, the channel may become clogged. In such devices, the membrane and the channel are separated by a metal mesh, which can become dirty. A sign of such damage will be the absence of sound when the wire is intact. Disassemble the earphone and clean it with alcohol. If rattling occurs, this indicates damage to the membrane. Open the device and inspect it. If the membrane is damaged or dented, try straightening it. If there is dirt on it, wash it with alcohol.
How to fix headphones without a soldering iron? Without it, it will not be possible to create a reliable contact. By twisting the wires, you will make the headphones work, but without soldering, such a repair will be unreliable, and soon your favorite accessory will stop working again, which will force you to spend money on buying a new one.
Koss Porta Pro headphones are considered difficult to repair on your own, but it is possible if you follow clear instructions. How to fix an Apple earphone? It will be easier to fix problems here. Their headphones are attached with glue. Remove the gray rubber band from the headphone head or pick off the glue seam. Having found damage, cut it off, strip the damaged wire, and solder it in place.
How to disassemble headphones
To repair large headphones, you will need to use a screwdriver to remove the screws. The mid-sized headphones have well-hidden latches. “Drop” headphones, as a rule, are simply glued together. You can actually disassemble them by using a blade or lightly squeezing the headphones in a vice, in which case the entire load will fall on the gluing line.
How to fix a plug
A broken plug at the end of a headphone cable is a common problem. This results in noise, wheezing and crackling sounds appearing in the accessory, signaling that the conductive wire has broken. If your headphone plug needs repair, there are a few things to keep in mind. It can be covered with a solid plastic shell or be a rigid mold covered with a rubber cap, which is pulled together during repairs or carefully cut off.
To break the casting, you will have to use wire cutters, then you will gain access to the connector contacts. Inspect the wires, find the break point and carefully solder. Since plastic parts have to be removed, there may be empty spaces that are best filled with quick-curing epoxy glue. Wrap the structure itself with synthetic threads for greater strength. Please note that problems with the plug often occur with AKG headsets.
Connector repair
Have you already figured out how to fix the earphone, but are there problems with the connector? Returning the latter to working condition will require the presence of some parts on which it is better not to skimp. Although there are worldwide standards, how they are mounted on the board can vary significantly. A common input is 3.5 mm. It is found in most modern music players, mobile phones, laptops, and computers. If the connector breaks down, there is a chance to purchase it at specialized radio stores and replace it yourself.
Wire repair
Need a wire repair? Then find the place where the break occurred. Sometimes you can't notice it right away. In this case, you need to turn on the sound and bend the wire in different places to understand where the problem occurs. Then you need to cut off the damaged part down to the plug. After stripping the ends on the wire that will be connected to the damaged one, place a “cambrik” on the end of one of them. Having twisted and tinned, you should solder them. If the sound is restored, then move the cambric and melt it on both sides, protecting the joint. The same procedure if the wire breaks.
The cable may also be damaged near the headphones themselves. In this case, one of them will stop working or change the volume. There is a chance that both speakers will stop working at once. If this happens, then cut the wire near the case itself, open it, remember the distribution of the wires, strip it, tin it, solder it. Before closing the earphone, you should check the sound; even a slight loose connection or weak soldering can lead to noise and crackling.
With microphone for phone
All headphones are designed the same, with the only difference being that some add a microphone or volume control. The problems they may encounter are the same as with conventional devices. The wire may become damaged by bending, then you need to determine where this happened. Sometimes the wire stretches, then you need to inspect it for a decrease in thickness.
Then the wire should be cut and cleaned where it was damaged. Use a sharp blade to carefully cut around the wire. The conductive cores themselves should be removed from the varnish coating by holding them over a flame. It is recommended to place a small piece of “cambric” on the wire to subsequently create additional protection. Then you need to carefully tin and solder the conductors.
To prevent them from touching, use a little electrical tape. After this, slide the cambric and swim. If the quality of the recording produced by the microphone has deteriorated, noise or interference has appeared, this may mean that the microphone head is clogged or dust may have gotten on it. Moisten cotton wool with alcohol and carefully wipe the microphone, removing dirt. Make sure that there are no fabric fibers left on it.
Wireless
If contact is broken directly on the plug or speaker, you won’t even need to strip the wires again. After disassembling the case to gain access to the speaker, or opening the plug shell, you should solder the damaged area. If the malfunction is caused by physical damage to the speaker, which is reflected in the damage to the membrane, you will have to look for a new one and put it in the place of the failed one. Find out how much it costs and order the speaker at service centers, or search on the Internet.
Vacuum
Repairs are made by replacing housings. After carefully disassembling the device so as not to damage the membranes, prepare a new shell. Tighten the wires into knots, strip and process. Heat them with a soldering iron to remove the old varnish. If you decide to use speakers from different pairs of headphones, it is recommended to measure their impedance to avoid unpleasant differences in sound and volume. Having soldered the wires, we close the cases, then get ready to enjoy the music.
Major headphone failures:
Repairing a broken headphone wire
A broken wire is the most common cause of headphone failure.
To repair the wire we will need:
- solder;
- scalpel or wire cutters;
- heat-shrink tubing;
- hot glue;
- thread.
First, it is necessary to determine the place where the break occurred, since the outer rubber braid may not have externally visible deformations. You can find the location of the wire break by connecting the headphones to the sound source and bending the wire from the connector to the speakers, we find the place where bending causes sound to appear in the headphones. Having determined the location of the break, we cut out a section of the wire, taking a few centimeters before and after the break point. Next, we strip the wire from the outer insulation and tin the wires. How to tin a headphone wire is a fairly pressing question. Now I’ll tell you how to do this efficiently and quickly. For this we need: a board, flux (for example organic flux F-99), solder and a soldering iron.
We apply flux to the wire, place the wire on the board and press it for a few seconds with a soldering iron, making movements with it as if you were removing varnish from the wire.
Having tinned all the wires, we put a thin heat-shrinkable tube on each wire, solder the wires, observing the color scheme, and using a lighter or soldering iron, shrink the heat-shrinkable tube.
The heat-shrinkable tube acts as an insulator and prevents the wires from shorting together. Now we need to ensure the strength of our connection. To do this, we fold the wires in a Z shape and use a thread to make a bandage for our connection.
The last stage of repairing the headset wire is of practical and aesthetic importance. Using a soldering iron, we carefully apply hot-melt adhesive to our bandage; on the one hand, the hot-melt adhesive will prevent the thread from unwinding; on the other hand, it will give a normal appearance to the connection of the wires. If you can’t get black hot glue, you can put a heat-shrinkable tube of the appropriate diameter over the bandage.
A few more words about artistic modeling from hot-melt adhesive: if you heat up the hot-melt adhesive and wet your fingers, you can use your fingers to give it any shape before it completely hardens. Irregularities can be made glossy using.
Damage to the headphone plug (connector)
Before repairing the plug, we need to carefully disassemble it; to do this, carefully use a scalpel to cut the housing lengthwise. Breakage of a headphone plug (connector) can be divided into breakdowns associated with mechanical deformation:
- the last link is broken, as a rule, this link remains in the mating part of the device and can only be removed with the help of an awl and tweezers for SMD installation. Such a breakdown can only be eliminated by replacing the plug.
- rotation of the first link (general) around its axis is characterized by a change in sound to “metallic under water” and a decrease in volume. In this case, the repair consists of soldering the contact between the link and the contact blade.
And not related to mechanical deformation of the plug - this is a wire break at the base. It is treated by shortening the wire a couple of centimeters above the break point and soldering it in place, observing the color scheme.
If you break a wire and don’t know which one was soldered where, don’t despair! Using a multimeter you can easily determine this. We put the multimeter in the resistance measurement mode and alternately find 2 pairs of wires between which you will see an equal value (depends on the resistance of the winding of your speakers and usually lies in the range of 16-100 Ohms. We take one wire from each pair, weave them together, this will be a common We solder the wire to the first (most massive) link. We solder the remaining wires to links 2 and 3. You will probably have a question about how to determine where the right channel is soldered and where the left one. You can check the correct connection by connecting the headphones to and starting the sound adjustment, alternately clicking on the left and the right column. There is a second option: we launch an audio player, for example Winamp, and adjust the balance by comparing it with what we hear and conclude that the channels are connected correctly.
Microphone failure
The headsets are equipped with capsule electret microphones. There is an amplifier inside the microphone, which makes it necessary to maintain polarity when connecting the microphone. Microphones are sensitive to diaphragm deformation, so do not try to clean the hole in the microphone. Microphones are also very sensitive to high temperatures, so you need to resolder the microphone quickly and carefully. Before you start soldering, it is advisable to apply organic flux to the microphone contacts, this will improve heat transfer and the contact time with the soldering iron necessary for reliable soldering. You can check the functionality of the microphone only by replacing it with another one, or connecting it to another device that is known to work. And yet, you can check whether the microphone is working or not, if you have an oscilloscope (or an active speaker system) and an operational amplifier chip (any), you can assemble a simple circuit (for example, an inverting amplifier with one polar power supply.
Do not forget that the microphone must be powered through a resistor, and the signal must be collected through a 0.1 µF coupling capacitor. This will allow you to clearly see whether the microphone is working or not; the amplified signal from the microphone will change the picture on the screen in time with your voice. If you don’t have an oscilloscope, you can connect the output of the circuit to an active speaker system; if the microphone is live, you’ll get a megaphone.
Headset speaker repair.
If the supplied power is exceeded, the speaker may fail; the winding wire in it burns out. Check the integrity of the speaker winding using a multimeter.
For a working speaker, the winding resistance will be equal to the winding resistance of the second speaker +\- 10%. Typically, this value is 16-100 Ohms. If there is sound in the speaker, but it is wheezing, this means that the winding is intact, but it has either peeled off from the membrane or is clinging to the magnet. This may be a consequence of an impact (displacement of the magnet), or a consequence of excess power (boiling of the varnish in the winding and “hooking” it on the magnet, as well as peeling off part of the coil from the membrane). This one requires carefulness. The coil can be glued to the membrane using superglue; it can be applied using a toothpick or a sharpened match. To avoid jamming of the diffuser, do not connect the speaker housing and the membrane until the glue has completely dried. You can speed up drying by placing the speaker under a table lamp.
Headphone volume control repair.
One of the weakest points of the headphones is the volume control, provided that it is used frequently. The volume control is a dual variable resistor consisting of 2 strips of resistive coating and 2 sliders moving along the surface of the resistive layer when the control wheel is turned.
During operation, dust gets onto the surface of the resistive layer, which causes poor contact between the slider and the resistive layer. This failure manifests itself in the form of a crackling sound when adjusting the volume level, or loss of signal in the headphones. Repairing the volume control involves applying a resistive layer of graphite grease or technical petroleum jelly to the surface. In this case, reliable contact is restored and the crackling sound disappears when the regulator is rotated.
Repair of headphone arms (the suspension on which the speakers are mounted).
Broken headphone arms are one of the most common problems. Some manufacturers who rely on the quality of their products have already reduced the possibility of such a breakdown of their headsets to 0. Instead of classic plastic arms, they use flexible metal spring suspensions coated with a layer of PVC or rubber. But we are talking about a classic plastic suspension and a method for repairing it.
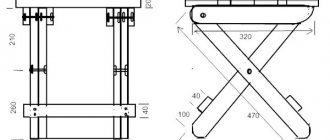
In the photo we see that the arch is broken in half. To repair it, we will need several thin metal plates, M2 or M3 screws, 2-component epoxy glue and. To begin with, we apply our plates to the bow and, using a marker or pencil, make notes: where we have to drill the holes. holes in the arms and plates and tighten the structure with screws. Please note that the metal plates are quite long and do not end immediately after the screw hole, this adds to the reliability of the design under loads. Also pay attention to the 3rd plate, which is located on the back of the headphones. It is installed before pouring epoxy glue, and is also designed to increase the strength of the headphones and resistance to future tests.
Microphone mount repair.
The microphone mount (boom, “antenna”) is usually made elastic and quite resistant to mechanical damage, but it can still be broken. In the photo we see how the plastic base of the microphone mount was damaged as a result of the headset falling. Its function was to adjust the position of the microphone in the vertical plane. Naturally, it will not be possible to restore full functionality, but it is quite possible to securely fix the microphone in one position. For this we will need: a drill, a wire with a diameter of 0.6-0.8 (mm) and hot melt glue. Having determined the optimal position for mounting the microphone, we outline the places from which we will drill holes. Next, using a wire, we tightly tighten (sew together) the base of the mount and the body of the headphones at 3-4 points. We twist the wire from the inside of the earphone using pliers. Next, we apply hot melt glue on top, giving it the shape we need using fingers moistened with water. Next, you can take nail polish or spray paint and cover the repair area.
Send us yours, or register and publish them yourself.
Autumn has come, dear readers, Apple is releasing new products. This means that iFixit
It's time to blow off the dust from your tools that has settled on them since the day of the natural Retina display from the MacBook Pro.
The most interesting is yet to come, but, let’s say, EarPods
are on sale immediately after the presentation and are ready to be the first to go under the knife.
EarPods model number is MD827:
The new remote, with three buttons and a microphone (left), looks different from the previous generation headphone remote. The wires at the top and bottom are much better protected from kinks.
Looking at the following photo, you will say that Apple removed the microphone hole in the remote control housing - and you will be wrong! The fact is that there was no
. The round grid was purely informative - so that you knew where to speak. It is now replaced by a microphone icon. Are we saving on matches, Joni?
To open the remote control, it is best to use a mediator. A surprisingly useful thing when dismantling equipment.
The remote control consists of five components: two plastic covers on the top and bottom, an elastic band with buttons, a flexible board, and an oblong metal plate. Here we see the top cover being held in the right hand, while everything else, still assembled, is held in the left:
Remote control, rear view. Just in the plate (it is needed to give rigidity) there is
.
In addition to the microphone, another microcircuit was found on the flexible board. Pretentious Chipworks believe that this is either an analog-to-digital converter or some kind of volume control device.
Remote control board (top - dime, 10 cent coin): Red - microphone 2F17 045; Orange - TI25ASGVI 079.
Compared to the new remote control, the old one is just a toy. By the way, it is much less protected from moisture.
Now that you're done with the remote control, it's time to pick up a scalpel and move directly to the headphones. EarPods glued together
, there are no latches. If you open the house (read below for why it’s better not to do this), then you will need fresh glue for reassembly.
...Modestly. Like most in-ear ("eardrop") headphones, a single EarPod contains a membrane, a voice coil, and a magnet.
The membrane, which is very important, is for the first time made of paper, not plastic. iFixit write that this will have a positive effect on low and mid frequencies. Frame? From the inside, it no longer seems somehow super unusual...
So, once again: magnet (left), membrane and voice coil (right). And then they are the same, but upside down. On the outside of the acoustic design (around the magnet), a fine mesh is laid directly over the symmetrical holes.
This is an important component, since in order to maintain the required sound quality, the acoustic design must be rigid and, moreover, open, so as not to impede the passage of air behind the vibrating membrane.
There was no mesh in the old headphones. From top to bottom: previous generation headphones, headphones from the first iPod and EarPods.
iFixit puts durability at the forefront, and the EarPods are very good in this regard. But before us is an acoustic device that, being disassembled and reassembled even with great diligence, will never sound the same again. Therefore, there will be no rating for “ease of repair.” Bye
it won’t, because iFixit is still just warming up. Very soon the iPhone 5 will land on their desk, then there will be an iPod touch and nano, and then, lo and behold, an iPad mini.
Clickable. [
Has it often happened to you that one ear of an earphone stops working? Repairing headphones requires minimal skill, but at the same time allows you to greatly extend the life of your favorite headphones. In the laboratory, we have compiled a detailed repair manual for you.
My headphones don't last longer than a month, so I buy cheap ones. — They work for you for no more than a month because you buy cheap headphones.
Headphones fail in 90% of cases due to broken conductors in the wire. Depending on the quality of the wire and its design, the service life before this misfortune varies. If the Chinese simply used two insulated copper wires as conductors, then this will happen in less than a month. If the conductors are wound on a synthetic cord, the wire can last for years. Breakage occurs due to metal fatigue at small bending radii. If you take a paper clip and bend it in one place several times, it breaks, and the same happens with the copper wire strands. To combat this, they try to increase the bending radius of the wire - the plastic spring at the connectors is made just for this.
Here is an example of a broken conductor in a wire, the conductors are removed from the insulation:
Or this. Greens - sebum penetrated through the insulation and oxidized copper:
Repair begins with finding the location of the problem. If one of the headphones does not work, then there is a break in the wire of the left or right channel. If there is a break in the common core, then only music can be heard in the headphones, and vocals are practically inaudible; the difference signal between the left and right channels begins to play in the headphones.
To diagnose broken conductors in a wire, use this technique - fix the connector and make circular movements with the wire during operation. If you hear rustling noises, crackling noises or interruptions in operation, this means that the fault is located in this place. From experience, it most often occurs at the headphone jack, but with headphones with a 50/50 rim there is a break at the jack or at the earpiece.
The break point is shown with a red arrow. Once the location of the break has been identified, we begin repairs. You can, of course, replace the connector and install a collapsible plug, but unfortunately the collapsible plugs are quite large and their quality is often poor (in Yekaterinburg we could not buy plugs of acceptable quality. Even the all-metal ones with a gold-plated body suffered from misalignment of the contact cylinders, weak contact of the cylinders with the lamellas) Therefore, disassembly non-separable connector and the use of its components seems appropriate.
Fortunately for us, in the vast majority of cases, the plug for headphones consists of two parts, a plastic filler for the connector and a rubber cap. Removing the cap:
We bite through the plastic filling of the contact part:
We clean the wire. It is advisable to use a heated object so as not to leave scratches on the wires, which will cause a break. Don't forget to leave the cap on the wire:
This is where the subtlety lies. The cores are covered with polyimide insulation, which does not melt from the soldering iron tip. Cleaning with a sharp object is a filigree job, and there is a high risk of missing the end of the conductors. In this case, there are two ways to proceed. You can burn the insulation with a lighter, then clean up the fumes and tin. The disadvantage of this method is that the veins oxidize due to combustion and it becomes difficult to tin them. The second method is more elegant - the insulation is burned chemically.
We take an aspirin tablet (acetylsalicylic acid) and with a heated soldering iron tip (350+ degrees Celsius) press the insulated conductor to the tablet, pulling it out. The acid destroys the insulation and acts as a flux. DO NOT INHALE VAPOR! WORK UNDER A HOOD!
Result:
We clean off the remaining aspirin from the wires (it is advisable to thoroughly wash and dry, aspirin is an active flux and will continue to destroy the material if it is not removed), bite off the excess and solder it back to the connector:
We plug it into the player and check that everything works. After this, the plug must be fixed in the cap. To do this, we use fast-hardening epoxy glue:
We recommend poxipol because of its consistency. Epoxy glue “moment” also hardens in 10 minutes, and is also suitable, but it is more difficult to work with because it is more fluid. Mix the glue and fill the cavity of the cap with it, placing the plug there. Thus, we imitate the plastic filling that we bit into at the beginning. It fixes the conductors, protecting the delicate soldering area.
When the glue has set, but has not yet hardened to the state of stone, cut off all excess with a knife:
The renovation is complete! You can use it.
Sometimes it happens that there is a break in the wire directly next to the earphone, or the repair according to the instructions above did not help. In this case, read on.
The headphones are not considered to be dismountable, as if they were assembled with glue. Fortunately, many plastic glued cases can be disassembled by taking advantage of the fact that the adhesive seam is poorly deformed.
Let's clamp the headphones into a clamp or vice; the screw allows you to strictly dose the force, gradually increasing it:
At a certain moment, the part will come unstuck and open like a shell:
We open the earphone and get access to its contents. Using a multimeter, we test the headphone winding to prevent a break:
Winding breakage and membrane damage are some of the few things that cannot be repaired. If the winding is intact, then cut the cord and thread it into the earphone again. Most often, the wire is fixed in a knot; strip and tin the conductors in the same way as for soldering the plug.
You can glue the earphone back together with any glue, after degreasing the surfaces. Apply the glue carefully so that excess glue or its vapor does not damage the membrane.
Based on experience, after such a repair, the headphones work until the next breakdown for about the same amount of time as they worked after purchase. Considering the cost of high-quality headphones, repairs of this kind are advisable.
Modern people cannot do without technological devices that make life more interesting and productive. Music is present in our lives thanks to mp3 players and smartphones. While going for a run or getting to work, many people listen to music. Such a pleasant time is ensured by headphones that transmit high-quality sound and at the same time allow you not to disturb others. You can find out how to repair headphones in this article.
Many people find that their headphones break after a period of use. Most often, one of the headphones stops working, which gives hope that it can still be repaired. The question is especially relevant for those who use expensive headphones.
“What’s the first thing you should do when your earphone breaks?” – The first thing you need to do is find out the cause of the breakdown.
Often the cause of headphone malfunction is a broken wire. The second most common problem is a speaker malfunction. If you listen carefully to the “symptoms”, you can determine the cause of the breakdown by ear.
How to determine the cause of the failure:
- The absence of sound or its frequent interruption or disappearance indicates that the problem is a broken wire.
- Wheezing and muffled sound indicates that the breakdown has occurred in the speaker.
- Constant changes in sound may indicate that the plug is broken and coming off.
- If the wires in the cord are broken, the earphone begins to make rustling sounds.
- Usually the cords break at the plug location or inside the earphone.
- The channel may simply become clogged. To clean it, you need to disassemble the earphone and clean the membrane with alcohol or hydrogen peroxide.
Breakage and bending of the cord usually occurs under constant loads. An increase in the bending radius of the wires can also lead to breakdown. Repairing the headphones yourself is only possible if the wire in them is broken. But a breakdown of the speakers will most likely lead to the purchase of new headphones. If the headphones are of high quality and have a warranty, then if the coil breaks, they can be taken to a service center.
Video: how to repair headphones
These stories will tell you how to fix your favorite accessory and how to disassemble Beats headphones if they are broken and cannot be repaired, but you want to find out what’s inside. You can amuse yourself and find out whether you bought the original Monster Beats or a fake, and also adapt small speakers as mini-speakers. After all, it’s a pity to throw it away if you can adapt the thing for something else.
How to fix headphones
How to take Beats headphones apart
To avoid disturbing others, many people use headphones when listening to music and watching videos. Unfortunately, over time they break, and if you don’t mind throwing away the cheap ones, you don’t really want to part with your favorite rare and expensive model. Therefore, many are interested in how to fix Samsung, Sony, etc. In principle, the repair sequence is the same for all models, and if you have a soldering iron at home, do not get upset prematurely - restoring the operation of the accessory is not so difficult.
We disassemble the headphones
There are several types of headphones:
- Disposable, Chinese (usually included with cheap players and phones) - they are practically impossible to repair, since their cases are sealed, and even after disassembling them, it will be difficult for you to glue them back together.
- Earbuds are in-ear or in-ear headphones that are quite easy to disassemble. Examine them carefully. After this, along the seam running down the middle of the earphone, carefully separate the halves with a thin watch screwdriver. Now all the internal parts of the headphone will be visible to you, and you can quickly fix the problem.
- You can learn more about how to disassemble Beats headphones by following the link: “Dissecting Monster Beats By Dr. headphones. Dre Studio «
- The easiest headphones to disassemble are large external ones. To disassemble them, just unscrew the bolts on their body, and then separate the part with the speaker and the protective casing. You can learn more about how to disassemble Philips headphones by clicking on the link: “
In this article I will tell you how to repair headphones or a headset for a computer or mobile phone yourself. We will look at the main breakdowns and how to fix them.
Finding the reason
Before doing this, you must first identify the location of the malfunction. Most often, sound loss is associated with:
Broken wire between the plug and the speakers;
Broken wire at the very head of the plug;
Broken speakers;
Broken volume control;
Rubbing the wires on the headphone arm.
It is unlikely that it will be possible to visually determine what caused the problems with the headphones and where the problem area is located. But still, the preliminary inspection should not be neglected. If this does not work, you need to connect the headphones to your laptop or player and turn on the music at full volume. Then, starting from the plug, gradually bend the wire along its entire length until a sound or crackling sound appears. If you manage to find the fracture site, you can safely assume that the hardest part is behind you. Otherwise, you will have to disassemble the case and check the speakers.
We reinforce
For reinforcement, I used pieces of paper clips, which I slightly bent at the edges and fused into the plastic using a soldering iron. If you do not bend the edges, there is a possibility of disconnection.
We do the same on the opposite side:
It didn’t turn out perfectly neat, but now it’s quite reliable, although not absolutely. Yes, and this sloppiness will not be noticeable during operation.