Some of us love to give gifts, some of us love to receive, but both of us agree that beautiful wrapping is essential in the process of creating a surprise. Today we will look at options for New Year's boot patterns, in which you can place a gift and give it to your loved ones and family. The traditional shoes of Santa Claus have become as important an element of the New Year holidays as a Christmas tree, a wreath on the door or a bottle of sparkling wine. We'll tell you how to create and design
DIY New Year's boot from scrap materials.
Traditionally in the West, Christmas gifts are placed in socks.
The history of the tradition with the boot
It is no secret that it is in Western countries that St. Nicholas and Santa Claus put sweets and gifts in stockings, which is where this tradition came to us. According to legend, they brought gifts to children unnoticed. One day, Nikolai learned that three sisters lived on the outskirts of the village. They lost their parents early and lived quite poorly, barely making ends meet. Nikolai decided to help the orphans, climbed onto the roof and threw three gold coins into the house through a chimney.
You can easily make a New Year's boot together with your child. The gold got into the stockings, which were hanging to dry over the fireplace.
The next morning, the sisters were very surprised and delighted at the gifts and shared the good news with their neighbors, and they also decided to hang the stockings over the fireplace so that they too would receive something. This tradition originated in the 16th century, since then its popularity has only increased and is conquering more and more countries every year. In modern houses, of course, you can’t find a fireplace, but people have also found a way out and hang their boots on the bed frame or put them under the Christmas tree.
Paper boot with teddy bear
A New Year's boot can be easily made with children.
Let's start with the simplest design option for a New Year's boot made of paper. It is possible to involve children in this work; they will cope with it perfectly. Let's present one of the best ideas for designing a paper boot, for which you will need the following materials:
- thick colored paper or cardboard;
- scissors;
- PVA glue;
- pencil and eraser;
- ribbon.
Let's get started:
- Fold a sheet of paper of the desired color in half and draw the outline of a New Year's boot on it. The back of the shoe should coincide lengthwise with the fold of the sheet on which we are drawing. Cut out the silhouette along the contour, you will end up with a pair of felt boots connected to each other.
- Next, fold a sheet of white paper in half and draw fur from a felt boot. It looks like a rectangle with torn sides and one of the sides should fall on the fold. Cut out the piece with scissors.
- Transfer the boot with fur onto the fabric and cut it out without any allowance.
- Glue the details of the pattern of the New Year's boot made of fabric to the paper elements on the back side. Glue along the outline, leaving space for gifts.
- When starting to decorate, forget about conventions and completely trust your design talent, and you undoubtedly have it, since you have already taken on this work. Drawings with felt-tip pens, paints, pencils, stickers made of paper, felt, felt, gluing rhinestones and various sparkles will be used - here the imagination is limitless. If desired, it is even possible to carefully embroider the design.
- At the last stage, we fold the ribbon in half and sew it to the edge of the boot so that we can hang it later.
It’s possible to make a large number of felt boots of different sizes and colors, so that you can decorate the New Year tree with them.
To make a boot we will need:
- - bright red felt;
- - green felt;
- - white felt;
- - blue felt;
- - silver sequins;
- - beads of white, red and black colors;
- - scissors;
- - a regular sewing needle;
- - thin needle for beads;
- - threads of red, green, white and blue colors.
The procedure for making a boot
1. To start working on the New Year's boot, you need to make a paper pattern. To do this, we will redraw the boot pattern and applique details onto paper and cut it out.
2. Draw the contours of the paper boot onto bright red felt and cut out two identical parts.
3. Now you need to cut out the applique parts from felt. We will cut out one part of the Christmas tree from green felt. From white felt we will cut out a bunny and snow under the Christmas tree. From blue felt we will cut out a snowdrift on which the bunny will stand.
4. Additionally, you need to make a lapel for the boot from white felt. To do this, cut out a strip about 11 cm long and about 2.5 cm wide. Smoothly trim one edge of the strip with scissors to create a wavy edge.
5. Take one bright red part of the boot and sew a green Christmas tree to it. It is better to sew on the Christmas tree using regular basting stitches, using green threads for sewing.
6. Now take the white snow piece and sew it under the Christmas tree with white threads. Nearby, to the left of this part, we will sew a snowdrift cut out of blue felt with blue threads.
7. Take the bunny part and sew it so that it stands on a snowdrift.
8. Sew on the bunny’s nose from red beads and eyes from black beads. To sew them on, it is more convenient to use a special thin needle for beads.
9. Put the parts of the boot together and sew them together with an overcast stitch. To sew a boot, you need to take red threads and try to make small, equal-sized stitches.
On top, using white threads, we sew a white lapel to the boot. This piece can be sewn on with a simple basting stitch.
10. Decorate the lapel of the boot. To do this, take silver sequins and white beads and sew them along the upper edge of the lapel with white threads using a beading needle.
11. The boot itself can also be additionally decorated with white beads. We will sew white beads scattered all over the boot, as if it were falling snow.
12. If you plan to hang the boot on the Christmas tree or near the fireplace, then you need to sew a loop to it. A green satin ribbon of small width is well suited for making a loop. It is enough to take a piece 18 cm long. It needs to be folded in half and sewn to the inner surface of the boot, trying to sew the tape so that the stitches are not visible from the outside.
13. This is what a boot looks like with a loop sewn on the back side.
The bright boot is ready. All that remains is to put a few delicious candies in it and hide the boot under the child’s pillow. The boot turned out to be small, but that’s even good, because eating a lot of sweets is harmful for children. If you wish, you can enlarge the pattern and make a larger boot - then the toy will fit.
You can sew several New Year's boots and hang them on the Christmas tree or give them as gifts to children who will come to visit you during the winter holidays. Applications on boots can be different - with snowmen, snowflakes or deer.
Good day everyone, we continue to show beautiful templates for the New Year, we have already shown New Year’s templates with Santa Claus, and posted fresh and clear pictures with snowmen. Today we will have a GENERAL selection of New Year's templates that can work as stencils for various crafts for the New Year. Based on these pictures, you can make applications with children in kindergarten and school classes. You can use our templates to make pictures to decorate a window for Christmas. You can use our templates to make felt toys for the New Year tree. Here, in addition to template pictures, I will also show cool crafts that can be made using our pictures.
To ENLARGE or REDUCE A PATTERN
You need to copy the picture into a Word document. And by pulling the corners of the image to make it smaller or larger.
If you do not want to print the picture with a printer, but just want to trace it with a pencil from the monitor screen, placing a sheet of paper on the screen, then you can CHANGE the SIZE of the picture on the screen,
If you press the Ctrl key on your computer with one hand, and with the other hand, turn the mouse wheel - toward you to decrease, away from you to increase.
Template package No. 1
New Year's toys.
Beautiful Christmas tree decorations can be made from felt, colored cardboard or a new craft material - formiam. I saw that some people make New Year's crafts from thick washcloths.
We choose a small New Year's template and place it on the round base. Below we see several ready-made templates for such crafts.
New Year's crafts
based on template
in the shape of a star.
New Year's templates can be placed within the boundaries of the star silhouette and you will get a new interesting craft design.
You can paste any colored silhouettes onto the star template - a smaller star, an angel, a Christmas tree, a New Year's ball, a deer, a snowman, Santa Claus.
New Year templates
for crafts BOOT.
Below in a series of photographs we see beautiful New Year's crafts with boots. You can hang them on a Christmas tree, decorate a door frame with them, fasten them along the shelves on a rack, or decorate cabinet doors. Here is a great boot made of thick cardboard with a snowman. A simple craft that children can handle.
You can print our New Year templates and use them as New Year coloring pages. You can sew a real foot based on the template and decorate it using any other stencil picture from this article.
For those who want, here is a clean boot template without any pattern or decoration. You can come up with a drawing for it yourself. Use it as a template in drawing lessons with children, in appliqué classes.
New Year templates
WITH A CHRISTMAS TREE.
A beautiful Christmas tree has long been a symbol of the New Year. Here we publish neat silhouettes of Christmas trees for your crafts. We will also offer you ideas for Christmas tree crafts made of felt, fleece, cardboard, and formiam.
Dense hard felt, sharp scissors, a template from this site - and now the result is in your hand. Cute delicate Christmas tree with eyes and a funny red nose. A beautiful craft that you quickly made yourself with your own hands. The parts are attached perfectly using glue from a hot gun. The Christmas tree can be a table decoration or it can be hung from a loop.
Christmas tree crafts don't have to be green - you can use any shade from purple to gold.
Below is half of the template for the weaving technique. When a sheet of paper is folded in half, the template drawing is transferred to one half and cutting out the sheet folded in half, we end up with a double-sided symmetrical Christmas tree. We stick it on the window as a New Year's decoration.
You can sew other Christmas tree crafts from bright, thick felt, including ones decorated with felt appliqués.
If you want to decorate your Christmas tree silhouette with a Christmas flower, then here is a template for implementing this idea.
NEW YEAR'S FLOWER templates.
For holiday decoration.
Since we're talking about the New Year's flower, let's dwell on this topic a little longer. And we’ll give you beautiful, detailed templates with suggestions for crafts. Here is a classic craft with this flower.
Here is a visual diagram that shows the process of assembling such a flower. As you can see, there is nothing complicated. Flat silhouettes of a flower stacked on top of each other. To add volume, each petal of the silhouette is folded along its axis, forming a folding edge.
If you buy office sheets of paper in red and green. Then you can make large decorations on the wall in the form of a scarlet flower - a symbol of Christmas and New Year.
Here is a template below where the petals are the size of a standard sheet of office paper - A4 format. The petals are placed on glue around a cardboard pentagon.
The petals of a New Year's flower may have one side notch, or several teeth, as in the photo below.
Such flowers can become decorations for any New Year's crafts. For example, such a wreath with Santa Claus made of cardboard.
Or it’s no longer a children’s craft, but a New Year’s decor ready for sale. Also based on our templates with flowers. As you can see, there is a lot of room for creativity.
This same color can be made very interesting FROM FELT, which bends. Here we can add volume to the petals using tucks.
Here is the template for this craft. You can print it out, or trace it directly from the screen by placing a sheet of paper on the glowing monitor.
The Christmas flower motif is also used as a fabric applique when decorating pillows, curtains, and napkin holders when setting the New Year's table.
By the way, a similar template - with jagged edges - is used for another New Year's craft - holly twigs. Such a green branch with red balloon berries would be beautiful to hang on the wall for the New Year holidays.
New Year template WITH DEER.
Here in the photo below we see a Christmas tree pendant in the shape of a deer. It is made from felt based on a simple template with a deer silhouette. Below we offer several options for such a small template for a New Year's deer.
You can use deer templates to create a large applique on the wall in a children's room, or to decorate a group room in a kindergarten. This applique can be used to decorate office corridors and staircases.
A beautiful silhouette deer with long legs, a curved back and branched antlers can decorate adult hand-made crafts. Handmade work with a deer can be designed in the form of a box, decorative lantern, pendant, postcard, gift wrapping, smartphone case and other useful things in life.
Here are options for templates with deer of such an elegant silhouette - for your New Year's crafts and gifts for loved ones.
Christmas motives
in crafts with templates.
Christmas, a baby in a cradle and loving faces bending over him. You can make beautiful delicate crafts and gifts with your own hands. Cut out of felt, sprinkle with nail glitter and spray with hairspray to secure the glitter.
Christmas angels are also beautiful silhouettes that set a magical atmosphere on New Year's days. Let them blow their golden trumpets, proclaiming the good news of the Nativity of the Savior. Let the stars light up in the sky, let them sing cheerful songs and bring joy to this world. Here are beautiful angel templates for your Christmas crafts.
Templates with snowmen
for New Year's crafts.
Snowmen are funny snowmen who know how to set the New Year's mood. Who never lose heart. Who are friends with everyone and don’t get upset over trifles. They never hang their noses and always believe in the best. Because it's necessary. This is exactly how you should live. They already know that.
Here are snowman templates that will help you make your New Year's crafts bright and festive.
Templates with New Year characters
(penguins, hares, little men).
You can make a lot of different crafts for the New Year theme. You can sew or glue any animal and hang it on the Christmas tree. Below we will show several characters and give templates for Christmas tree decorations with them. A felt sandman with a cheerful smile is a great craft idea for the New Year.
Here is a New Year's template with a penguin - it can be sewn from felt and filled with cotton wool, a ball of thread. You can glue it from colored paper, paint it with sparkles, or make it into a New Year’s hat or scarf.
Animals, snowmen and bells with Christmas trees can decorate a large frame for a photo collage of your family. You can stretch threads on the frame, and attach several family photos to the threads with clothespins.
You can use templates to make packaging for small NEW YEAR PRESENTS for friends, neighbors, and co-workers at work. And not expensive in terms of money, and at the same time stylishly beautiful and a sign of attention and warmth emanating from skillful hands.
Carved openwork crafts
TEMPLATES FOR THE WINDOW.
Also, as part of this same article, I want to give you some beautiful and simple window templates. You can decorate the window not only with snowflakes, but also with interesting carvings with New Year’s symbols inside a star.
SILHOUETTE PATTERNS
for the New Year.
Here I also give simple silhouettes for Christmas tree crafts. They can be decorated with any patterns, applications of snowmen and other New Year's characters. Here are templates whose size you can reduce or increase by transferring them from a website page to a regular Word document.
Here are templates for Christmas tree decorations that you can cut out of felt - make holes in them, even insert metal eyelets into them. And hang toys on the New Year tree. Bright, warm, rough to the touch - so cozy and loved. Appliqués on silhouettes are also made from felt and using regular thermal glue.
Wow, I finally finished this long article. There are other articles with New Year's templates on our website.
And now you need to choose pictures and template silhouettes that interest you and make beautiful New Year’s crafts in a good creative mood. I wish you an easy and exciting job.
Let everything work out and stick together. Olga Klishevskaya, especially for the site “” If you like our site,
you can support the enthusiasm of those who work for you. Happy New Year to the author of this article, Olga Klishevskaya.
And Christmas is the most long-awaited, kindest and, despite the cold, favorite winter holidays. One of the glorious traditions at this time is hanging special boots or socks on the mantelpiece or window - Santa Claus puts gifts in them for children and adults throughout the Christmas holidays. That is why such a boot is considered a symbol of the New Year.
Of course, these accessories can be bought in the store. However, they are unlikely to have as much warmth as if they were sewn with their own hands. Even for those who don’t know how to do needlework, it won’t be too difficult to make New Year’s boots for gifts on their own. This simple, but at the same time cute and most New Year's accessory will be a pleasant addition in the form of holiday decor or a cute addition to a gift for both a child and an adult.
Felt boots made from a cup and foam plastic
An unusual combination of scrap materials attracts with its originality and accessibility, so we suggest making a New Year's felt boot from just such a combination. The result will be a voluminous craft that is well suited not only for decorating a Christmas tree, but will also take pride of place on the table as an extraordinary decoration. Let's prepare materials and tools:
- a piece of foam plastic with a thickness of 5 cm;
- popcorn glass;
- cardboard;
- fleece fabric;
- artificial fur;
- cotton wool;
- thread, needle;
- knife;
- glue;
- scissors;
- decorative cord;
- decorations.
Would you be interested in making such a craft with your child?
Not really
Let’s make ourselves comfortable and begin the exciting work:
- On cardboard we draw a blank for the sole of a felt boot. We cut it out and transfer it to a piece of foam plastic. We cut out the foam in the shape of the sole and cut off a place from it in the heel area where the cup is planned to be located.
- Use a knife to round the nose of the felt boot and begin assembling the craft. Glue a sock onto a cardboard sole and place a cup in the form of a boot. If you are going to glue with a gun, then do not set the temperature to high, as this may cause the foam to melt.
- We mask unevenness and transitions with cotton wool.
- We try on the fabric by stretching it over the felt boots. It can be temporarily secured using clothespins. We cut off the excess and begin gluing the fleece onto the workpiece. At the top of the boot, leave an allowance of 1.5-2 cm for the hem.
- Sew the back seam with thread. We drape the fabric beautifully at the front and also sew it together. Don't forget about the allowance at the bottom to wrap it over the sole.
- On top of the boot we glue a strip of faux fur with a fold inward no more than 2 cm.
- We mask the seams, joints and gluing areas with decorative cord. Glue or sew on the prepared decorations.
We fill the felt boots with candies and other sweets. It is also possible to place a long candle in it and get a completely independent decorative element. However, do not forget about fire safety.
Boot made of New Year's vanity fabric
It is possible to make a new New Year's boot with your own hands with festive motifs from fabric. We find a scrap of the desired size, color and begin to create. But first, let’s prepare the basic tools and materials:
- pompom braid;
- thread;
- thin tape;
- needle;
- scissors;
- fabric stickers;
- paper and pencil.
The manufacturing instructions are approximately as follows:
- On paper, draw a pattern for a boot of the desired size and shape. We lay out the fabric with the wrong side up and apply the silhouettes of the product on it in two places in a mirror image of each other. Cut out both pieces, leaving an allowance of about 1 centimeter.
- Place them together with right sides facing in and sew along the outline, except for the top side.
- Turn inside out and sew the pom-pom braid to the boot, masking the fold. Sew several pompoms along the length of the sock.
- On the side of the craft, place thematic stickers symbolizing the New Year's fuss, for example, a Christmas tree, gifts, Santa Claus. Glue them with an iron. You can actually find a wide variety of stickers in fabric stores.
- Sew a loop of ribbon, fill the gift with souvenirs and hang it in a visible place.
I would like to note that you can actually make pom-poms for a New Year’s boot yourself if you don’t find anything suitable in the store.
DIY New Year's (Christmas) boot (templates, photos)
New Year is the time for gifts. Children and adults enjoy sweet surprises. Prepare your own container for treats and delicacies - a New Year's boot.
To create a boot you will need:
- - sewing machine;
- - brightly patterned fabric for the boot itself;
- - contrasting material to decorate the boot's lapel in the form of a crown;
- - plain material with a letter with the initial of the owner of the boot and loops for hanging on a hook;
- - threads for connecting parts;
- - to perform a zigzag stitch of thread to match the letter with the initial;
- - mini pom-poms that will be sewn to the tops of the crown-shaped lapels;
- - a small amount of soft filler to stuff the toe of the boot;
- - transparent ruler;
- - pencil;
- — iron and ironing board;
- - needle for hand sewing;
- - pins;
- - scissors;
- - adhesive tape;
- - hot glue.
So let's get started.
1. Transfer the templates for the top and bottom of the boot onto the fabric (the boot can be enlarged using a photocopier). To do this, fold the prepared fabric lengthwise, with the outer side inward. Add seam allowances.
2. Do the same with the lapel template. Just keep in mind that the template is ? required length.
3. Using the stencil, cut out the desired letter with your initial. It is recommended to glue the letter with hot glue to the lapel or using adhesive web.
Now let's move on to working with a sewing machine and iron.
1. Sew your initial to one part of the boot lapel. Finish the lapels by connecting two quarters at a time with side seams. The stitched edges must be ironed. Turn the lapel with the initial inside out, and leave the lapel without it face up. Now insert the colorful patterned lapel piece inside the letter lapel, lining up the triangular edges so they meet. Sew the edges of the crown along the lapel circle and turn the resulting product inside out.
2. Connect the edges of the boot parts, folded right sides inward. Turn out the resulting product. Fill the toe of the boot with soft filling.
3. Fold the prepared fabric for the loop along the width and stitch along. Sew a loop folded in half lengthwise on the left side to the inner edge of the boot.
4. Attach the lapel to the boot so that the initial is in the center and facing you, and the toe of the boot is on the right. Iron the edge.
5. Sew pom poms to the tops of the lapel triangles.
If you plan to place fairly heavy gifts in the boot, then it is recommended to strengthen the seams in the product by making an additional sewing line.
The New Year's boot is ready to contain sweet surprises. Happy holiday!
Thanks for the master class Alicia Tommas, website www.sew4home.com
New Year's boot made of felt with a sleeping mouse
An arsenal of felt sheets is present in any needlewoman’s collection, so let’s consider the option of making a New Year’s boot from felt. The material is great for small-sized crafts. We will need:
- sheets of white, red, green, brown or blue felt;
- a small amount of white material;
- cardboard or paper;
- pencil;
- threads and scissors;
- Moment glue or glue gun;
- thin satin ribbon.
A felt boot can be decorated with any designs and patterns that only you have enough imagination for.
Manufacturing instructions:
- Draw or print a template for the top and main part of our New Year's felt boot. If an additional application is planned, then this should also be depicted on paper, in our case it is a mouse.
- Cut out the pattern, attach it to the wrong side of the fabric, trace the outline itself and an allowance of 1 centimeter. Cut out the parts and sew them by hand, or better yet by machine. Turn the workpiece inside out. Repeat with the boot and white felt.
- Sew the bootleg to the main part of the felt boot, turning the edges outward. Glue a figurine of a sleeping mouse covered with a blanket onto a New Year's felt boot.
- Sew a ribbon loop to the edge to hang the craft in the place you like.
The boot can be decorated not only with a mouse, but also with any other New Year's and winter motifs, for example, bullfinches, snowmen, Christmas trees, red berries.
Necessary materials
To sew a New Year's boot with your own hands, you will need a minimum of materials that can be found in almost any home:
- Material for the main part. For the boot itself, you can take almost any fabric, but it will be easiest to work with felt, flannel, cord, velvet, footer, flannel. In addition, these materials will hold their shape better.
- Material for finishing the boot. White fur, fleecy or smooth fabric - anything can be used. This part is optional, but gives the product a finished look.
- Lining. Sewn on at will, makes the boot more durable and neat.
- Ribbon loop for hanging.
- Threads to match the color of the fabric.
- Scissors.
- Pencil.
- Pattern paper.
- Set of needles.
This classic New Year's boot is made by hand from red fabric with a white stripe on top. However, your imagination should not be limited by any boundaries: let the sock be blue, yellow, purple, and even striped - the main thing is that it creates a festive mood and you like it!
New Year's boot made of candy
Not only can you put sweets in the boot, but it itself can become a gourmet treat. It will serve as a wonderful decoration for the New Year's apartment, and then you can simply take it apart and eat it - double the benefit! For work you will need the following materials:
A candy tree will be an excellent addition to the sweet New Year's attributes.
- foam sheet 5-7 cm thick;
- round cylinder made of foam 10-20 mm in diameter;
- candies;
- glue gun;
- decor as desired.
The step-by-step instructions are something like this:
- Draw the outline of the sole of the boot of the desired size on a sheet of foam plastic. Cut out the workpiece.
- Next we make the bootleg. If there is no cylinder, then a rectangle made of sheet metal with rounded edges will come to the rescue. Using a glue gun we connect both parts. Don’t forget that the foam melts at high temperatures, so we set the average values on the gun.
- We begin to glue the candies onto the finished piece, trying not to leave any gaps or large spaces. The boot must be completely covered in candy chain mail.
- If desired, among the candies we attach pieces of tinsel, ribbon bows, Christmas tree branches, large beads and other decor.
This will make a wonderful candy gift that will delight not only children, but also adults. And rest assured that after the holiday there will be no trace left of it.
Other manufacturing options
You can not only sew a New Year's boot from fabric with your own hands. Knitted with yarn knitting needles or crocheted, they will look very cozy. The latter option, by the way, will look more airy and elegant.
Thick paper can also be used to create boots. If the required color is not available, you can paint it before starting work, and then paint it with gouache, markers, or make appliqués from leftovers.
When the New Year's boot is finally ready, you can immediately fill it with sweets, lollipops, nuts, gingerbread cookies, and cookies. Or you can wait until it gets dark and, under the cover of night, place little pleasant surprises in hanging socks: toys, fruits for children, cosmetics, money, pleasant and useful little things for adults.
Boot with Santa made from ribbons
By making such a craft, you will find good use for fabric scraps.
The needlewoman always has a large number of cuts and just new rolls of assorted ribbons, and finally the time has come to put them to work. In addition to tapes, we will need the following materials:
- bias tape with lurex;
- adhesive web with a paper base;
- cardboard and scissors;
- canvas;
- red satin cord;
- red and green floss threads;
- pins;
- iron.
Let's stock up on imagination and get to work:
- Lay out any soft fabric on the table, and a cobweb on top, paper side down.
- Lay out tracks from different ribbons, butt to joint diagonally, and then thread other ribbons through to make a weave, secure with pins. Do the second part of the boot in the same way.
- Iron the base so that the ribbons are fixed on the web and unnecessary folds are removed.
- Print and cut out two identical parts of the boot from cardboard. One by one, attach them to the front side of the blanks, remove the paper part of the web and place the tape blanks on the canvas. Iron everything again, finish the edges of the fabric in any way and sew the parts.
- Sew bias tape with lurex on the edges, and canvas with winter embroidery on the tops. It is possible to attach a thermal sticker with Santa Claus to the side of the boot.
Instead of embroidered canvas, it is possible to sew strips of faux fur onto the bootleg.
Felt boot
The best solution would be to make an individual gift boot for each family member.
Let's try to break the tradition of depicting not a felt boot, but an elegant lady's boot, which the Snow Maiden herself probably liked. Made from felt, it will turn out to be rigid and can be used as a stand for a New Year's composition. To make a craft, prepare the following materials:
- brown or gray felt;
- white cardboard or paper;
- scissors;
- dense red and white threads;
- large needle;
- round beige buttons;
- bells;
- white lace;
- red stones or beads for decoration.
Let's start the master class on making a New Year's boot:
- First, make a pattern of the part from cardboard or paper and cut it out. Place on sheets of felt and cut out two equal pieces.
- At the next stage, the halves should be decorated, because it will be inconvenient to do this later. Sew the prepared buttons, beads and rhinestones to the bootleg.
- We sew an openwork ribbon to the inside of the boot and let it out. Attach bells to the edges.
- We sew the two parts together by hand using coarse stitches and white thread. Attach a bell to the curved toe.
Place a gift, candy or a composition of fir branches inside. The boot will be an excellent gift for your loved ones.
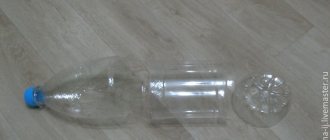
Original boot made from a plastic bottle
Agree, after reading the title, you were extremely surprised, because a plastic bottle is a rare material from which it is possible to make a New Year's boot. But our editorial team is always one step ahead and aware of trends in many aspects, including innovative approaches to decor. We suggest preparing the following materials:
- two-liter plastic bottle;
- cardboard;
- red and white fluffy fabrics;
- pencil;
- braid;
- glue;
- scissors.
Stages of making a boot from a plastic bottle.
Having prepared the tools and materials, let's get to work:
- Cut the bottle into 3 parts. We leave about 5-7 mm in height at the bottom, and the main part of the bottle will serve as the boot, so choose its size based on your desire. We don't need the neck of the bottle.
- Place the 2 pieces on the cardboard so that they touch each other and trace with a pencil. We cut out the sole of the New Year's boot, then it should be cut out.
- Place the sole on the red fabric and trace it directly and taking into account the allowance. The second part is made according to the dimensions of the cardboard blank without allowance.
- Glue the sole to the fabric, turning the edges. On top, on the folded edges, glue the second part of the pattern, which will cover the wrong side and the sole is ready.
- Let's start with the boot. We take the middle part of the bottle and cut out a rectangle from the fabric, where the height is equal to the size of the boot, and the length is the circumference of the bottle. Don’t forget to leave an allowance so that there are no obvious joints and there is enough material for the hem.
- Cover the entire plastic cylinder with a cloth using glue. When you fold the bottom edge and glue it to the bottle, leave the edges unglued, about 5 centimeters from each edge.
- Now we apply glue inside the bottle along the edge and glue a piece of white fabric, approximately 35-40 cm wide. We bend the fabric outward and it is already possible to estimate the appearance of the future product.
- We make the nose of the boot from the bottom of a bottle. We cover it with red fabric and sew it on, tightening it in the form of a bag.
- Apply glue around the base of the sock and shaft and glue the parts to the finished sole. The blank is ready, all that remains is to decorate it.
- We seal the joints with openwork braid. We also glue it along the perimeter of the edge of the white fabric. It is possible to attach a bell and a couple of spruce branches or glue a holly with ribbons and bells. Decorate as your imagination dictates.
The color of the boot does not have to be red, make it blue, like for the Snow Maiden, or green, like for the elf. If the size allows, you can put a bottle of champagne in the boot, which will create a beautiful and original stand.
New Year's boot decor ideas
But you shouldn’t dwell on the options described above; there are a large number of ways and techniques for making New Year’s boots with your own hands, and here, for example, are a few more:
- A crocheted felt boot looks original and evokes warm thoughts about the coming New Year, the smell of a Christmas tree and tangerines and, of course, delicious Olivier.
- On a knitted item, embroider the names or initials of the people to whom you are going to give the gift. Believe me, even the most notorious skeptic will like this exclusive work.
- It is also possible to sew a patch with New Year's embroidery and warm congratulations on the New Year on a knitted New Year's boot for gifts.
- Make a garland from ready-made products, sewing them at an equidistant distance from each other. Place sweets, candy or cards inside.
- Make green elf boots with curled toes and scalloped tops from red fabric.
- Mini boots can really be used for serving cutlery. Guests will be very surprised to see spoons and forks peeking out of beautiful mini shoes.
- And what gorgeous products are made using embroidery! Cross stitch on a New Year's boot looks amazing, because the work and kindness of the needlewoman is put into every millimeter. The patterns are sold in many embroidery stores and are also easy to find online.
- A particularly original solution is a shoe made from pasta. It is made according to the same principle as snowmen, kitchen utensils and other things, only the balloon must be cylindrical in shape. The boot and toe are made separately, and then glued together and tinted with spray paint. The craft is so original that it does not need additional decoration, but if anything, it will not hurt.
The bright and beautiful symbol of Western Christmas has migrated into our culture and seems to be firmly entrenched in it. And it’s not surprising, because the very idea of hiding a New Year’s gift in an unusually beautiful boot is quite cute and interesting.
DIY New Year's boots for gifts
We can already feel the approach of the fabulous New Year, which we have been waiting for all 12 months. When preparing for the celebration, don’t forget to make your own New Year’s boot templates. As you know, this tradition migrated to us from the West. However, Russians are happy to support this fad and happily hang these products in their homes.
The fact is that, according to the traditions of Western people, Santa Claus must leave presents in this particular product, although if the gift is very large, then the Wizard can leave the gift nearby. But be that as it may, having entered the house, Santa Claus will look for the boot and if he does not find it, then the owners of the house may be left without a New Year's gift. And in order to prevent such a situation, it is imperative to prepare for the arrival of the Good Wizard.
You can draw a New Year's boot template yourself, or you can take it from the Internet. When you have selected the necessary model, you now need to prepare the necessary tool for the job.
For this you will need:
- the material from which the product will be made;
- threads;
- a piece of fine soap or chalk;
- threads matched to the color of the material;
- scissors;
- accessories for decoration;
- thin rope for hanging the product.
New Year's boots are easy to make from felt. Multi-colored sheets of this material can be easily purchased in stores that sell goods for needlewomen. The size of one sheet will fit half a boot. After everything is prepared, you can start working.
Therefore, using the selected template, you need to make a pattern. Applying the stencil to the material, use chalk or soap to trace it, transferring the outline to the base. This will create the silhouette of a boot. If the material is folded in half and not moved from its place, it will be possible to cut out two parts at once. After which these parts need to be ground.
It turned out what we wanted. For beauty, the edges of the boots can be carefully trimmed with curly scissors. Surely many have seen when products have a beautiful outline, for example, in the form of small triangles. If this is not possible, then you can use a bright thread and a needle to overcast the edges, but so that the colors are contrastingly different. This is done for originality. Then fasten a loop from the rope and you can hang the finished product wherever you want.
On New Year's Day, of course, almost every mother is very busy with chores and, well, there is no time for needlework. Therefore, you can use the simplest option for making such a craft, that is, make it from paper. Moreover, to do this, you definitely need to call the children and transfer such an easy task to them.
But first you need to prepare the necessary material and show how to do it. So, for work, prepare paper of different colors. After that, make a template. To do this, draw your boot on a cardboard sheet with a simple pencil. You can depict it with the end rounded up. This is how anyone wants it.
After this, cut out a thick stencil using scissors and transfer it to colored paper, for example, red. The top and bells can be made from white paper. To do this, cut a wide strip of white and glue it on top of the red boot.
Then make 3 small circles from the same white paper. 2 of which are glued to the side of the product in the form of cherries on the tail, and one is glued to the rounded toe of the product. The result is such a cute boot, which can additionally be decorated with sparkles to create a snowy effect.
To do this, draw thin lines of glue where you plan to apply the shiny base. For example, along the contours of the top and at the tip of the boot. Then use a brush to apply glitter until the glue dries. Thus, they will not crumble, and the products will look beautiful, shimmering with their “snowflakes” from the light.
Mini boots are made using fabric. Typically, such products can be given as a gift or to decorate your home and office. To do this, a stencil of the product is drawn with the size of a matchbox. Then it is transferred to the fabric. The edges of both halves are stitched. After which the product is turned inside out and framed.
For decoration you can use applique or embroidery. After all, the boot is small, so this is all done quite quickly. Also, using yarn, make several pom-poms that will decorate the product. You can attach a lace to which you can apply glitter.
Using an ordinary paper clip, make skate boots that will look original on this product. You can sew beads or buttons in a chaotic manner. It’s just as easy to glue other pieces of fabric in small squares. It’s not uncommon for many craftsmen to glue beautiful snowflakes on the side of such New Year’s decorations. The edges can be decorated with rhinestones, which will shimmer beautifully in the light.
Together with your children, you can cut out stencils of such decorations from paper and glue them onto the glass, and decorate them around with snowflakes, which seem to be performing a dance in anticipation of the appearance of the Good Wizard. In any case, no matter how you design these boots, they will still be there, by the way, for the upcoming holiday. The main thing is to try and devote at least a little time to it.
New Year is a magical holiday, so decorating your home is a lot of fun.
Especially when everything around sparkles, shines and pleases the eye, and handmade crafts lift your spirits. Happy New Year! Also study the templates and diagrams of cardboard New Year's houses.