Autumn leaves from foamiran - maple, oak and elm
Foamiran flowers decorate homes, hairstyles, wedding attributes - all this brings beauty and joy to our lives. But from foamiran you can make not only flowers, but also leaves, especially since autumn has come and you want something new and extraordinary.
Materials and tools:
- - foamiran of three colors (pale orange, orange, yellow);
- - leaflet templates;
- - a set of pastels;
- — acrylic paint (red, brown, yellow, green);
- - brush;
- - acrylic lacquer;
- - molds;
- - handkerchief or cotton fabric;
- - red gel pen;
- - foam sponge;
- - floral wire;
- - instant glue;
- - tape;
- - toothpick;
- - scissors;
- - iron.
We will make three leaves - maple, oak and elm.
We draw the templates by hand on paper.
We cut out and the leaf templates are ready.
If you don't know how to draw, we offer leaf templates that you can print or trace from your screen.
Place the template on the foamiran and trace it with a toothpick.
Cut it out. It is better to do this with manicure scissors.
Let's start with maple. We cut it out of yellow fom. We tint the central part of the blank with green pastel using a sponge. We begin to make all strokes from the base to the tips of the blanks.
We all know that when yellow and red paint are mixed, the color orange is obtained. And since we need to create this very shade, we tint the blank with red pastels. We lighten our initially yellow leaf a little lighter - we make rays emanating from the center.
We tint it green one more time, but apply paint to the ends.
We paint the wrong side of the workpiece less intensively.
We take an oak leaf that we cut out from orange Iranian foamiran. We tint it green. First we draw the rays and shade them with a sponge.
Mute the greens with yellow.
We tint individual areas with red and terracotta.
We paint the inside less lightly than the face.
Let's start tinting the elm leaf. Shade the green pastel. Unlike an oak leaf, we do not need clear, pronounced lines. We need to achieve a smooth transition of color from the base of the workpiece to the tips.
Add red and terracotta colors (shade with a sponge).
We lighten the places where we want with yellow.
We slightly green the edges of the cloves in individual areas.
We make the wrong side lighter.
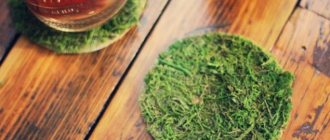
We select leaf molds whose vein patterns match the living leaves.
Place the foamiran sheet face down on the mold.
Wrap it tightly in a cotton rag. Heat it on an iron and use your fingers to press the foamiran into the mold through a scarf so that all the veins are imprinted.
When you print a sheet on a mold, make sure that the central vein is located in the middle and not shifted to the side.
We print all the blanks in a similar way.
We create waves at the tips, thereby giving the leaves a natural look.
Once again we go through and shade the leaves. We add red to the oak leaf, terracotta to the maple leaf, and brown to the elm leaf.
If desired, you can add red to the maple leaf.
We draw veins along the lines extruded by the mold. For an oak leaf we use brown pastel, for a maple leaf we use a red gel pen, for an elm leaf we use a green pastel.
We measure the required length of floral wire for each leaf. We wrap it with tape with a thickening at one end.
Glue the leg to the wrong side of the sheet until it thickens. We fasten the very end of the base of the sheet with tape. If necessary, make the stem of the leaf thicker.
We glue the ends of the tape for reliability.
Take acrylic paint and paint over the tape. It is advisable to choose the paint color that prevails in the sheet. We wait until the first layer dries.
Paint with the same color or add some shade. Let's dry it. A layer of paint can be applied without sparing.
We cover the entire sheet, excluding the reverse side, with acrylic varnish.
Replaceable window decoration (wood)
The master class was prepared by Irina Mironova.
To make a reusable window decoration you will need:
- Fom - brown, two shades of orange, yellow;
- Double-sided tape;
- scissors;
- stationery knife;
- non-writing pen;
- templates of leaf, tree trunk. (photo 1)
1. Trace the leaf and tree trunk templates onto the shape using a pen. 1 trunk, 20 leaves. (photo 2)
2. Cut leaves and tree trunks with scissors. (photo 3)
3. Using a utility knife, cut lines on the trunk that resemble branches. (photo 4)
4. Cut out the veins on the leaves with a stationery knife. (photo 5)
5. Place double-sided tape on the leaves and trunk of the tree. (photo 6)
6. Glue it to the window.
Templates can be printed from the Internet or drawn yourself.
If the window frame has a crossbar, then the tree trunk is not continuous. Double-sided tape peels off well from glass and sometimes from glass, which makes the decoration replaceable. For example, when winter comes, you can remove the leaves and add snowflakes in this place, in the spring the tree can “bloom” - make flowers on the branches, and in the summer - green leaves. It is convenient to store the decoration in a folder, until next time. Foam does not wear out as quickly as paper, which makes the product reusable. In order not to forget the page address and share with friends, add it to your social network:
More interesting:
See also:
New works by teachers of kindergarten No. 267 in Izhevsk
Meet new photos sent by Olga Zakharova. See last year's work here: Decorated...
New snow figures of Izhevsk kindergarten No. 267
Dear readers, you, of course, remember photographs of snow figures made by the hands of kindergarten teachers...
Buildings made of snow MBDOU No. 267 (continued...)
New photographs of snow sculptures, as well as slides and sports facilities made of snow, were sent to us by Ol...
Snow sculptures - more than 100 photos
DIY snow figures Dear readers, we are pleased to present you new works by the creative coll…
Scenario for an environmental holiday for the middle group
Work for the “My Best Script” competition. Author: Bessonova Victoria Anatolyevna. Ecological scenario...
Game-activity “Lukomorye” for preschoolers
“Lukomorye” Methodological development Author-compiler: Lyubov Sergeevna Tueva, teacher-organizer…
Summer recreational paths for children
Olga Zakharova sent new works of teachers from MBDOU 267 in Izhevsk. Previous summer wellness…
New snow buildings for kindergarten
Snow buildings in kindergarten And again snow sculptures of teachers of kindergarten No. 267 in Izhe...
Tags: Kindergarten
White flower decorations
We make additional decoration. To do this, we take thin wire, beads and pieces of white foamiran. We cut out the shape of flowers from pieces of foamiran.
Wire, bead and white foamiran
We string a bead onto the wire to the middle. Bend the wire in half and twist it tightly.
Twisting the wire with the bead
We put a flower made of foamiran on a wire under a bead. Glue it to the bead using a glue gun.
Glue the flower to the bead
Let's make some flowers.
Making some flowers
Take the floral tape and carefully wrap the wire around the stem.
Wrap the leg with wire
We wrap each flower.
We wrap all the flowers
Creating an autumn bouquet
Many people have the mistaken impression that an autumn bouquet should consist only of colorful leaves. In fact, this composition includes a huge variety of colors. It can be:
- physalis;
- roses;
- dahlias;
- gerberas;
- chrysanthemums;
- spikelets and straw;
- bunches of rowan;
- grass and much more.
You can also complement the bouquets with any artificial fruits that are sold in craft supply stores, or make them yourself.
An autumn bouquet can be of any shape and structure; the main rule for preparing materials for such compositions is that the stems and cuttings of all elements must be of sufficient length, otherwise you will not be able to put the entire composition together.
As for the design, it completely depends on the shape of the bouquet. For example, a low bouquet will look great in a small decorative box, a wicker basket, or even in an ordinary beautiful cardboard box. A classic bouquet is wrapped in craft paper, tied with beautiful ribbons, multi-colored woolen thread, or even tied with twine. Another option for a successful and original design of an autumn bouquet is topiary design.
To create an autumn wreath from foamiran you need to prepare:
- 1. Foam of different colors - green, burgundy, yellow.
- 2. Floral wire.
- 3. Acrylic paint to match the foamiran.
- 4. Foam balls about 4 cm in size.
- 5. Hot glue (gun).
- 6. Tape.
- 7. Foam sponge.
- 8. Iron.
- 9. Satin ribbon to decorate the composition.
- 10. Scissors (two types - regular and curly).
How to assemble a wreath
- First you need to prepare rose petals: cut multi-colored squares of the same size from foamiran, then carefully process two sides of the square and the corner between them using curly scissors. After this, using a sponge and acrylic paint, give the petal the desired shade. The workpiece is heated with an iron, given the desired shape, carefully pulling off the edges. The finished petals are carefully glued onto a foam ball, previously fixed on a wire. Complete the design of the bud with two green petals. The stem of the rose is wrapped with olive-colored tape.
- Take a piece of wire about 50 cm long, make small loops at its edges and wrap them with tape. The loops along the edges of the wire will be needed for a satin ribbon, with which the wreath can be firmly secured to the head.
- Now the elements of the future composition - buds and leaves - are alternately attached to the wire. Leaf cuttings should be the same length as the leaf blade. The leaves are applied by cuttings to a wire base and secured with tape. Rose buds are attached in the same way. As a rule, one wreath takes about 25 leaves and 5-7 roses.
- The finished product can be additionally decorated with grape vine branches, ears of corn, artificial fruits and vegetables, and so on. The more varied small details there are, the more original and beautiful the wreath will be.
A few more autumn wreaths made from foamiran.
What else can be made from foamiran
You can create not only wreaths and flower arrangements with autumn foliage from foamiran. An unusual garland of leaves will decorate any interior and bring a touch of good mood on gray autumn days. Making such a garland is very simple - the leaves are fixed on ordinary twine with glue. A garland can be a separate decorative element, but you can also connect several garlands into one composition using ribbon, twigs or twine.
Beautiful autumn flowers and leaves made from foamiran can be used as home decorations, clothing and hair accessories. To create a colorful autumn bouquet, a decorative wreath or a beautiful hairpin, you will need a little imagination, and rest assured, a colorful and unique masterpiece awaits you!
The leaves turned out wonderful: bright, light and very similar to real ones.
You will learn how to make such wonderful pins in my detailed master class! So, right from the start, let's go! Part #1:
To make leaves we will need foamiran in autumn shades. I took olive, burgundy, coffee, yellow and orange.
Cut out sketches of autumn leaves from paper. To do this, I collected different leaves from the Internet, adjusted them to size (so that they looked beautiful on children and were not huge), printed them and cut them out.
We distribute the sketches: which ones we will make from which foamiran.
Slowly and methodically trace all the leaves with a regular toothpick.
We cut out the blanks with scissors.
We additionally process some leaves with curly scissors.
We cut out complex leaves in layers, i.e. each component separately.
To imitate wind-worn, holey leaves, we will make several holes on our blanks. The holes should not be even, so an awl will not work. I came up with the idea of making them with a broken toothpick (and the more crookedly it breaks, the better).
You can paint foamiran with anything. I like to do this with oil paint from Winzor&Newton, Winton and Artisan series (fine pigment, evenly applied, Artisan is a water-soluble oil, i.e. can be washed off your hands with plain water).
We will apply the oil with a regular sponge. A construction sponge for windows is very convenient (buy once and use for a lifetime).
We take leaves of a yellow base color. We emphasize the edges with Indian red, in some places we tint them with green (we make sure to go over the holes to further emphasize them). Don't forget about the back side (it also needs to be painted).
Option with burgundy, orange and brown.
Here are orange, brown and white.
Brown and burgundy.
And in this leaflet we combine warm shades with green.
Orange and burgundy.
Painted yellow blanks.
To make the edge more frayed, use a lighter to burn some parts of the leaves. Be careful, foamiran can catch fire, but the flame can be easily extinguished by simply blowing it out.
Similarly, we tint all the cut blanks. It's easy to select colors by looking at photographs of living leaves on the Internet;)
Prepare the spray solution. We dilute the acrylic paint a little with water. I used acrylic in two colors - dark purple and green.
Using a toothbrush and your finger, spray the leaves. Dry and repeat the same on the reverse side.
To make the leaves look like real ones, they need veins. To imitate them, we will need special molds.
Set the iron to maximum and turn off the steam. We take the mold in one hand, and the future sheet in the second. Place the sheet on the hot surface of the iron and...
...and immediately, without wasting a second, we apply hot foamiran to the mold, trying to align the central vein with the center of the sheet. Press with your fingers. The mold in the photo is the most popular and most often used when working with foamiran. If you don't have one, be sure to buy it! I recommend! This mold is called universal, because... with its help you can make not a specific leaf of a specific plant, but a lot of leaves. There are a lot of leaves with such a network of veins and you will definitely need it.
Almost finished birch leaf.
For leaves of this type, we apply each half-petal separately to the iron and print it separately on the mold. This is the only way to create a radial network of veins.
To make leaf cuttings we will need #22 floral wire. For complex leaves, the components of which we cut out separately, we will use thinner wire No. 28.
For each leaf, we separately try on the wire and use wire cutters to cut off the required length. In order for the pin to have a stiffening core, the wire will need to be glued from the very top of the leaf (if we were making leaves in a bouquet or wreath, the wire would not even reach the middle).
Using cyanoacrylate second glue, glue the pieces of wire to the leaves. To do this, lubricate the wire with a toothpick and press it in the center along the sheet. If you carefully coat the wire with glue, you can press it with your hands. But often glue appears out of nowhere and instantly glues your fingers together. Therefore, it is still more convenient to press the wire to the sheet with a clean toothpick.
Today we will learn how to make autumn leaves from foamiran. The leaves turned out wonderful: bright, light and very similar to real ones. You will learn how to make such wonderful pins in my detailed master class.
To make leaves we will need foamiran in autumn shades. I took olive, burgundy, coffee, yellow and orange.
Cut out sketches of autumn leaves from paper. To do this, I collected different leaves from the Internet, adjusted them to size (so that they looked beautiful on children and were not huge), printed them and cut them out.
We distribute the sketches: which ones we will make from which foamiran.
Slowly and methodically trace all the leaves with a regular toothpick.
We cut out the blanks with scissors.
We additionally process some leaves with curly scissors.
We cut out complex leaves in layers, i.e. each component separately.
To imitate wind-worn, holey leaves, we will make several holes on our blanks.
The holes should not be even, so an awl will not work. I came up with the idea of making them with a broken toothpick (and the more crookedly it breaks, the better).
You can paint foamiran with anything. I like to do this with oil paint from Winzor&Newton, Winton and Artisan series (fine pigment, evenly applied, Artisan is a water-soluble oil, i.e. can be washed off your hands with plain water).
We will apply the oil with a regular sponge. A construction sponge for windows is very convenient (buy once and use for a lifetime).
We take leaves of a yellow base color.
We emphasize the edges with Indian red, in some places we tint them with green (we make sure to go over the holes to further emphasize them).
Don't forget about the back side (it also needs to be painted).
Option with burgundy, orange and brown.
Here are orange, brown and white.
Brown and burgundy.
And in this leaflet we combine warm shades with green.
Orange and burgundy.
Painted yellow blanks.
To make the edge more frayed. Let's set some parts of the leaves on fire with a lighter.
Be careful, the fom may catch fire, but the flame can be easily extinguished by simply blowing it out.
Similarly, we tint all the cut blanks. It's easy to select colors by looking at photographs of live leaves on the Internet.
We dilute the acrylic paint a little with water. Prepare the spray solution. I used acrylic in two colors - dark purple and green.
Using a toothbrush and your finger, spray the leaves.
Dry and repeat the same on the reverse side.
To make the leaves look like real ones, they need veins. To imitate them, we will need special molds.
Set the iron to maximum and turn off the steam. We take the mold in one hand, and the future sheet in the second. We apply the sheet to the hot surface of the iron aaaand...
...and immediately, without wasting a second, we apply hot foamiran to the mold, trying to align the central vein with the center of the sheet. Press with your fingers. The mold in the photo is the most popular and most often used when working with foamiran. If you don't have one, be sure to buy it! I recommend! This mold is called universal, because... with its help you can make not a specific leaf of a specific plant, but a lot of leaves. There are a lot of leaves with such a network of veins and you will definitely need it.
Almost finished birch leaf.
For leaves of this type, we apply each half-petal separately to the iron and print it separately on the mold. This is the only way to create a radial network of veins.
To make leaf cuttings we will need #22 floral wire. For complex leaves, the components of which we cut out separately, we will use thinner wire No. 28.
For each leaf, we separately try on the wire and use wire cutters to cut off the required length. In order for the pin to have a stiffening core, the wire will need to be glued from the very top of the leaf (if we were making leaves in a bouquet or wreath, the wire would not even reach the middle.
Using cyanoacrylate second glue, glue the pieces of wire to the leaves.
To do this, lubricate the wire with a toothpick and press it in the center along the sheet.
If you carefully coat the wire with glue, you can press it with your hands. But often glue appears out of nowhere and instantly glues your fingers together.
Therefore, it is still more convenient to press the wire to the sheet with a clean toothpick.
We bend the tail of the wire into a loop; it will help us imitate a thickening at the tip of the petiole.
Using permanent markers (you can just do this with acrylic) we mask the white paper braid, which stands out very brightly against the background of the colored sheet.
It is convenient to use markers with a brush, rather than regular ones with a rod.
To decorate the wire tails and turn them into almost real cuttings, we will use tape. We cut off a piece of tape, it is too wide for our purpose. To cut a long ribbon lengthwise and in half, roll it in several layers.
Using scissors, cut lengthwise.
To activate the adhesive layer, the tape must be constantly stretched as you work. To make the tip sticky, simply tear off the edge of the tape.
We fix the end of the tape at the base of the sheet.
We carefully wrap the entire wire at an angle, making a thickening on the loop.
We tear off the tape and smooth the tail.
The neat cutting is ready.
To assemble a complex sheet, we glue a thin wire to each one, assemble them together and secure them with tape.
After this, all that remains is to straighten the composite leaves and bend the stalk a little.
In order for the sheet to turn into a pin, we glue such a fastener to each one.
Using a toothpick, coat the back side of the fastener with instant glue and press it against the back side of the sheet, along the wire.
We choose a place in the approximate center of gravity of the jewelry, so that when worn, the brooch does not protrude or sag on any side.
For different leaves we use pins of our appropriate size and preferably color (I did not have the opportunity to choose a color).
We admire the result! Leaves can be worn on autumn hats and hats (products made from foamiran are not afraid of rain), leaves look wonderful on a coat and on a bag... and from such leaves (without fastenings) you can make a wonderful wreath or eternal bouquet...
We create an autumn mood from foamiran with our own hands
Many needlewomen prefer to work with foamiran, because it produces incredibly beautiful products. Thanks to foamiran, masters of artificial floristry can now create an autumn mood in their work, because foam is not afraid of moisture, holds its shape well and takes on almost any terrain. A wide range of colors and shades of foamiran allows you to get the most natural, effective product. How to make autumn leaves from foamiran and how to assemble an original and attractive craft from them - read the article!
What you need to make a panel of foamiran flowers with your own hands
From this material you can make small flowers, items for scrapbooking, jewelry, decorations and much more. Most often it is flowers that are made.
A foamiran peony consists of many petals of different sizes. The composition, complex at first glance, is quite simple to perform. Even a novice master can cope with the task.
To make a beautiful flower from foamiran, prepare the necessary materials in advance:
- Foamiran. The thickness of one sheet of foamiran is no more than 1 mm. This will make the craft more realistic. You will need canvases in dark green, dark pink, light pink shades.
- Tape for fixation.
- Acrylic water paints of dark pink, yellow, marsh color.
- Wire. To form a stem, a thick, well-bending option is suitable. A small thin cut is enough for the leaves.
- Artistic brushes.
- Scissors, glue.
- For the core of the bud, a bead, stone, or shiny foil are selected.
- Pattern of petals, leaves.
Cut out the blanks from the pattern:
- A-petal – 10 light pink;
- B-petal – 10 light pink, 5 dark pink;
- C-part – 10 stem-pink petals;
- D – 5 parts dark pink;
- Z-leaf – 3 pieces of dark green color;
- M – 6 sheets of dark green shade;
- K, L – sepal stickers – 6 pieces in dark green;
- F – blank for decorating the core with stamens.
We tint parts of the flower with acrylic paint.
Final peony collection. To create a foil base, roll a ball with a diameter of 1.5 cm. We form a hole in it, pour glue into it, and install wire.
We paint the petals of the stamens with yellow acrylic paint. We attach 10 parts A to the base with glue.
After attaching the sepals, we begin to design the leaves according to the diagrams.
The finished peony can be used as part of a bouquet, for decorating jewelry, brooches.
Most often, when making foamiran panels, all kinds of artificial flowers are used. The floral diversity here is comparable to nature itself.
All the beauty of foamiran lies in this nature, so flowers from foamiran often serve as the basis of a panel. You can use at least burlap as a background, choose an elegant frame, and you’ll get a classic panel. The technique for making this beauty is quite simple, not requiring significant material costs, great subtlety and time.
READ MORE: Cosmos flower Growing from seeds When to plant Planting and care in open ground Photos of varieties
In order for foamiran flowers to turn out beautiful and symmetrical, templates for petals and sepals made of cardboard or similar material are used when making them.
You can always find the necessary components for needlework at hand:
- Acrylic paint;
- Decorative wire;
- Sponge;
- Green tape;
- Artificial stamens, which can be made from fishing line or similar material;
- Pencil or pen;
- Cardboard blank for the base of the future panel;
- Glue;
- Scissors;
- Sewing needle;
- Sewing threads;
- Awl;
- Foamiran, desired colors;
- Iron.
The flowers can be tinted a little with lipstick.