Children's beautiful example
Let's take a step-by-step look at how to draw a dragon from How to Train Your Dragon. Let's start with the main and unusual thing, which delights with its kindness and courage.
The work is not difficult even for beginners, as children can easily cope with it. This method will help your child get a portrait of his favorite character on a sheet of paper. Prepare an album, a felt-tip pen and let’s begin the creative process:
- We start from the top of the character.
To do this, slightly above the middle of the sheet, strictly in the center, draw two vertical arcs. We direct them in different directions. Let's add one more segment to them, but with a larger indentation. - We complement everything with highlights and pupils. Immediately shade the pupils, leaving highlights. We draw the silhouette of the nose, and underneath it a big smile.
We direct the smile upward, complementing it on the sides with two pairs of small ears in the form of ovals. - From the very top areas we continue to draw the outline of the face and show the large ears. We finish drawing out the upper components. We complement the result with small horns.
- Let's add the neck right away. From the edges of the neck we will sketch out the tummy.
Now you need to draw the front paws. We use horizontal segments for this. Decorate your skin. - A little above the middle we draw the main lines, first create the main elements of the wings. We draw the remaining parts and add lines to the wings so that they become webbed. Let's mark the position of the hind limbs and draw the fingers below.
Toothless's drawing is ready. Not only a novice artist, but also a child can depict such an image. Follow our instructions and then you will definitely succeed. Our picture can be colored, but we did not do this, since we provided general material so that you could understand the general principles of drawing this cartoon character.
Fantastic animal costumes (fursuits)
What is a fursuit ? This is a general term for animal costumes within the furry .
Furry is a subculture that is more popular in the West than here (but we also have several communities). In the most general terms, these are fans of anthropomorphic animals (animals endowed with human traits - speech, intelligence, often walking on two legs). Does everyone remember The Lion King? The TLK (The Lion King) fandom is a very significant part of the furry subculture. Here the animals only talk and behave like humans, but still walk on four legs. But in the same Disney cartoon “Robin Hood” the animals are even more anthropomorphic, because they not only behave like people, but also dress like people and walk like people.
But it is a mistake to assume that furry culture is based only on cartoons, and, moreover, that it is exclusively a children's hobby. This subculture draws its nourishment from a variety of sources. Any book or film, any picture can resonate among furries if the animal in it is endowed with human traits. Remember the Egyptian gods - half-beasts. Anubis, Sekhmet - now they would be called “furries”. Werewolves, alien beast-like races in science fiction, all of this one way or another becomes inspiration for furry authors.
Moving a little away from the main topic of this post (costumes), I will show some examples of furry art. As you know, examples make things clearer.
The first picture shows famous cartoon characters. Some furry artists draw fanart for cartoons. But let me remind you that this is only a small part of the subculture.
(The author signs as Tartii)
And here, at first glance, there is complete realism... except for the “cartoon” eyes. The author (under the pseudonym Blotch the Screwbald Spotcat) knows how to combine realism and animation very skillfully. By the way, he is a very popular author in the furry community. But be careful with your Google search - in addition to such cute pictures, the author also draws very explicit 18+ erotica.
And here, it would seem, it’s just a wolf. Only with fantasy elements. But this also relates to the furry theme. The picture shows Okami, a she-wolf from a Japanese computer game (the entire game is played from her perspective). This is one of the cult images; many authors have fan art on this topic. Yes, furry art may not even bear obvious anthropomorphic features. How then to distinguish just an animal from furry art? Good question... Sometimes it's something elusive. A special attitude that is conveyed even in completely bestial images.
The author of the drawing is Amber Hill.
And this is classic furry art, from one of the most famous artists in the furry community. Few people familiar with the topic have not heard the name Darknatasha . Most often, furry characters have exactly this, semi-human anatomy. They walk on two legs, wear jewelry and clothing, and use objects like humans. Often such art intersects with the theme of werewolves or tribal, totemic spirits.
Before we talk about the costumes themselves, I want to emphasize an important thing: despite the fact that furries are a single subculture, it is still not a single genre. In the furry style you can draw both kind animation and cruel horror. Or good horror and cruel animation. You can draw a graphic novel with the plot of “Crime and Punishment”, you can write fantasy, or you can write science fiction or steampunk. There is furry art for 10-12 year olds, and there is erotica for 18+. Absolutely any story you can imagine about people can be transferred to furries. Furry artists paint hunting scenes, ballroom dancing, office workers... you name it!
And I really like this subculture :)
And now about the costumes themselves. Furry costumes can be divided into two types: fursuits proper (a “two-legged” animal costume) and quadsuites (a “four-legged” animal costume). Costumes can be both realistic and “cartoonish”. One of my favorite authors, Qarrezel from the USA, makes amazing costumes of anthropomorphic and fantastic animals - fursuits. Amateur enthusiasts have even made a fantasy movie with these costumes! (but, unfortunately, it has not been translated into Russian).
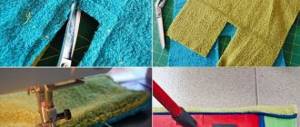
The costumes are made from high quality faux fur. As far as I know, no animal materials are used at all. We look and are surprised - they look like they are alive!
And, by the way, the jaws of these masks are quite movable. When a person in such a mask talks, the lower jaw of the beast repeats all movements.
***
And now a little about other authors and other styles. Some masks and fursuit from Eddie-Ka :
Beautiful and realistic costumes from Thundolis .
More cartoonish costumes from Beetlecat
Kind and positive saber-toothed tiger costume from thecritterfactory .
But residents of London saw such amazing creatures on the streets in 2011.
You can talk and show for a very long time, but all the diversity of furry culture still won’t fit into one post. Therefore, that’s enough for the first time, and finally, a few photographs from different authors about the process of creating such costumes.
And just for dessert - a few videos.
Toothless's quadsuit from the cartoon How to Train Your Dragon. You can see the internal structure of the suit, the process of putting it on a person and, finally, a real dragon! True, the video is in English, but still interesting :)
The man received a mask and cheetah paws from the Clockwork studio in the package, showing off his new clothes) Very indicative of the capabilities of such a costume.
Several dragons in Clockwork studio costumes
And this, if I understand correctly, is the author himself (Qarrezel) in a suit :) A very short video.
If there is interest in the topic, someday I will make a selection of the most interesting artists of this genre)
Toothless from the third part of the cartoon
Let's continue the training with another easy option. The work is also not difficult, but if you are new to this type of creativity, we recommend that you follow the instructions. By the way, this option can also be used for the Light Fury, because they are similar in appearance and can only be distinguished by color.
Before starting the lesson, prepare markers and an album; you can use other favorite materials for coloring. If you are ready, then let's start the lesson on how to draw How to Train Your Dragon 3:
- Approximately in the middle we depict several small semi-ovals.
We connect them with a segment. Draw the bottom and draw out the ear. We repeat similar actions on the left side of the silhouette. - In the middle of the resulting sketch, we will first create the right eye, and then the second. We complement everything with a nose and a smile. We draw the pupil and immediately shade it, leaving only the highlights. We create additional elements on the muzzle and start drawing the body.
- Almost from the lower left edge of the head we will draw the front part of the body and forelimbs. We decorate the bottom of the paws. Showing the belly and hind limbs. We draw a small segment on the right.
- At the end of this segment we begin to apply the large wing. Let's clarify the wing. Let's move on to the tail.
- We figured out how to portray the cartoon “How to Train Your Dragon 3”. Now let's color it. Color the area around the whites with light green. We paint the entire drawing with gray. To make shadows appear in the picture, use gray color.
The picture is ready. You see, if you follow our instructions, you will do great. Offer a similar lesson to your child; if he loves this cartoon, he will probably like it.
You can also draw a pony from the cartoon Friendship is Magic
Easy sample
Let's consolidate the acquired knowledge using the following instructions. You can depict a cat in a similar way, and if you were able to do this, then you can easily cope with the upcoming instructions.
Prepare a simple pencil and an album. Now we’ll tell you how to draw Toothless with a pencil step by step:
- At the top left we draw a slightly inclined segment downwards.
We turn it to the left and apply a semi-oval. From the semi-oval we draw a short line to the left and several zigzags. - We continue to draw the outline of the head and select another section. We depict the lower body and forelimb. From the edge of the front limb we draw a line for the hind paw and begin drawing the webbed tail. They are somewhat similar to the fins of the fish that we made together with the megamaster.info website.
- From the end of the tail border we show the wing. We finish it near the head. We clarify the boundaries. Let's make a second ear and erase the extra strokes. We detail the wings and tail.
- Now we need to make everything more natural. We draw a second line along the contour. We complement the face with a smile and a nose. To complete the borders of the image, draw a dark colored pen or felt-tip pen.
Ready. You can color it if necessary. You probably already know what colors are needed for this. The finished picture can be supplemented with the Night Fury. Below we will tell you how you can get a portrait of them together using simple steps.
Velor dragon
Toothless looks most natural when sewn from velor or suede - then his sides will evenly shimmer in the sun.
The leather can be used to make the tip of the toy's tail, the teeth on the spine and claws. In general, the toy looks equally good in any design made from any materials - wet suede, leather, yarn.
Making a dragon with your own hands is very simple - it is important to decide on the materials and techniques for making it. List of required materials:
- Velor or black suede
- Volumetric eyes
- Black threads
- Sintepon for stuffing
- Black and burgundy leather stripes
- Scissors
- Needle
First of all, based on the patterns, you should make fabric blanks.
You should start by assembling the head parts into a pile. In order to get the head, you need to cut out and combine parts A-G. First of all, you should sew parts A on side 1. You need to remember that Toothless has beautiful horns. They can be obtained by connecting parts E6 and C6. Similar work should be done with parts D5 and C5. Then you need to align both parts C. All 4 “ears” must be connected near the beginning of the horns with the back part G.
The seam should be located inside. The remaining horns are sewn from parts F7 and B7. The head will be ready if you combine parts C3 and B3, and then BC with A. You also need to stitch along sides B2 and A2. The next step is to create Toothless's torso. To do this, you should cut out parts J and K from the fabric and connect them together. Next, you need to attach part V to the stitched parts. As a result, a line of spikes should appear located in the middle of the back.
Next you need to cut out parts G and L and sew them together in the places marked on the pattern as “ears”. It is very important that there is a hole between the two Q parts (it will be convenient if it is located below the protrusion of the chest). This hole will be needed so that the toy can be turned inside out. Parts R, S and T, which are the scallops and wings, need to be assembled together. You need to embroider them based on the dotted lines on the front side. P should be attached to combination parts QL.
To obtain the torso, you need to combine the parts QPL with JK. The upper part of the wings should be located 5 cm from the apex, on the shoulder of JK. Thus, the triangular scallop S should begin where the wing ends. Similar actions are performed with parts U, S, T, W. You need to make sure that when turning the craft right side out, the scallops will be on the outside.
Toothless in cells
When you have dealt with the previous pictures and they are not enough for you, we suggest you learn how to draw Toothless step by step on a checkered sheet of paper. This method of drawing is the simplest, because it is by starting from the cells that you can more easily understand the instructions. Prepare your pen and pencils and let’s begin the creative process:
- Almost at the very top we draw an oval with uneven sides.
On the right side of this outline we show the eye and detail it. We draw the second one below and also clarify it. We add the nose and draw lines from it pointing to the eyebrows. We add ears in the form of oval shapes with a zigzag detail to the sides. - Below we draw the elements that highlight the structure of the skin. Starting from the edge of the ears, draw a line for the body and front legs.
They will have claws. Next, we move on to the hind limbs. - On the right we need to draw an inclined segment. Make a slope to the right, rounding it at the top. From the end of this element we draw a long arcuate line downwards and, starting from the body, finish drawing the border of the wing.
- Let's create the second wing in a similar way. We figured out how to draw Toothless with a simple pencil using step-by-step instructions. But the drawing cannot be considered finished yet, because it needs to be painted.
- If you are a beginner or doubted your abilities and used a pencil, outline the entire image with a dark-colored pen. Shade the picture completely. On top of this layer we shade with a dark blue tint. Then, again highlight the dark areas with black.
At this stage the work is completed. You see, it’s not difficult to portray this cartoon character, the main thing is to stick to the steps. If you were able to recreate this character on a checkered sheet of paper, then you will probably be able to do it in a regular landscape format.
Simple Furies
If you have figured out the previous works, we suggest you learn how to draw Toothless and the Day Fury using step-by-step instructions using a pencil. The work, regardless of the fact that there will be two cartoon characters in the picture, is not too different from the previous ones. But if you are a beginner, we recommend following our instructions.
Let's start the creative process:
- In the middle we create one oval with a pointed bottom. Next to it we draw another such figure, but of a smaller size. Draw the outline of the muzzle and ears.
- At the top we will recreate two elements that look like ears. Between them we will create small horns. We complement the figure with eyebrows and detail the head. Add a smile and age-related growths below.
- On the left we create a large oval. In the middle we will draw lines of closed eyes. Add ears and a mouth. On the right picture we will draw the contours of the neck and begin drawing the wings. We will detail everything.
- In the image on the left side we draw the silhouette of the neck. We draw the body and part of the wing.
At this stage, drawing in a simple way is completed. We were convinced that this picture is not much more difficult than the previous ones, but you can easily cope with it.
Girlfriend for Toothless
In order for the little dragon not to get bored alone, you can sew him a girlfriend. It should be made according to the same pattern as Toothless himself, but with minor differences. So, it is advisable to make it from brighter materials - pink or yellow fabric is quite suitable.
An important feature is that the girlfriend must have a solid tail, so there is no need to add any extensions to it.
There are many more techniques in which the toy can be made. A developed imagination and skillful hands will help you create a unique craft.
Toothless and the Day Fury
Let's continue to learn how to convey this unusual pair on a sheet of paper. Now we suggest you learn how to portray the main characters from How to Train Your Dragon. All the previous options could be called easy, so let’s complicate the task. Ready? Begin:
- Starting approximately from the center, create a large oval.
Add ears. On the sides of the figure you need to create two more ear-like elements. In the middle of the sketch we draw oval eyes with sharp lower areas. - Draw the nose. Under the nose we will add a wide mouth, then eyelashes and eyebrows. Under the bottom of the head we draw the neck and torso. Now you need to add the wings and refine the details in them in the form of lines.
- Now from the right sheet we create another oval at approximately the same height, but with a pointed left side. On the sides of this image we add several additional shoots below. At the top we depict large ears and miniature horns.
- In the middle of the figure we will create the eyes, below we will create the nose and smile. Below we sketch the boundaries of the neck. Starting from the neck, we draw the perimeter of the body. We detail the resulting sketch and show the front paw with sharp claws on the chest.
- Add an oval wing with a sharp upper and lower perimeter. Let's clarify the details in the middle. We outline everything with a black felt-tip pen and start coloring.
- We highlight the eyes in green. We shade the hero on the left side in some places with a blue pencil. We make the pupils dark, and the remaining areas blue.
The picture is ready. Of course, this drawing is a little more complicated than the previous one, but if you follow the instructions, you can easily cope with it. As a result, you should definitely get a beautiful picture with this cute couple.